Page is loading ...

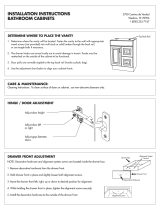
VANITY INSTALLATION
1. Fasten the vanity cabinet to the wall with 2 screws (not provided) into wall studs through
the back top rail, or use toggle bolts if necessary.
2. Knobs/Pulls: Knobs/Pulls are attached to the inside of the vanity. Reattach so the
pulls/knobs are visible from the outside of the doors.
HINGE ADJUSTMENT
The door alignment was set in the factory, but it could have
shifted during transit. If adjustment is needed, follow the
instructions provided in the adjacent chart.
CARE & MAINTENANCE:
Cleaning Instructions: To clean surface of doors or cabinet,
use non-abrasive cleansers only.
HINGE / DOOR ADJUSTMENT
CABINET FRONT VIEW CABINET SIDE VIEW
B
C
CABINET FRONT VIEW
A
Used to adjust
door height
A
Used to adjust
gaps between doors
B
Used to adjust between
door and cabinet
C
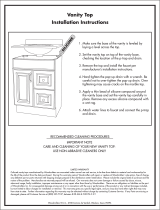
VANITY TOP INSTALLATION
1. Set the vanity top on top of the vanity base, checking the location of the p-trap and drain.
2. Remove the top and install the faucet per manufacturer’s installation instructions.
3. Hand tighten the pop-up drain with a wrench. Be careful not to over-tighten the pop-up drain. Over
tightening may cause cracks on the marble top.
4. Apply a thin bead of silicone compound around the vanity base and set the vanity top carefully in
place. Remove any excess silicone compound with a wet rag.
5. Attach water lines to faucet and connect the p-trap and drain.
Backsplash and sidesplash available at www.homedepot.com for a limited time!
LIMITED LIFETIME WARRANTY
The product has been manufactured by WoodCrafters Home Products, LLC and is warranted under normal use and service, to be free from defects in material and workmanship for the life of the
product from the date purchased. During this warranty period, WoodCrafters Home Products, LLC will repair or replace at WoodCrafters Home Products, LLC sole option, free of charge, any
defective part or parts returned with shipping charges prepaid to the distribution center listed below. Please include the original receipt with date of purchase and the nature of the problem.
Merchandise not returned prepaid will be refused. Our warranty does not cover damage or failure caused by abuse, misuse, abnormal usage, faulty installation, improper maintenance or any repair
other than those by WoodCrafters Home Products, LLC There are no obligations or liabilities on the part of WoodCrafters Home Products, LLC for consequential damage arising out of or in
connection with the use or performance of the product or any indirect damages included, but not limited to labor charges for installation or removal. This warranty gives you specific legal rights,
and you may also have other rights that may vary from state to state. Further information regarding this warranty may be obtained without charge by contacting WoodCrafters Home Products, LLC
Customer Service. If any Parts are missing or damaged, please call WoodCrafters Home Products, LLC Customer Service at (800) 235-7747, between 8 a.m. and 5 p.m. C.S.T.
WoodCrafters Home Products, LLC
2700 Camino de Verdad, Weslaco, TX 78596-1266
570677
Revised April 2010
DRAWER FRONT ADJUSTMENT
1. Remove decorative hardware from the drawer front.
2. Hold drawer front in place and slightly loosen both alignment screws.
3. Move the drawer front left, right, up or down to desired position for alignment.
4. While holding the drawer front in place, tighten the alignment screws securely.
5. Install the decorative hardware to the outside of the drawer front.
Drawer Box
Decorative Hardware
Drawer Front
Alignment
Screws
Alignment Screws
INSTALLATION INSTRUCTIONS
BATHROOM CABINETS
Top Back Rail
/


