Page is loading ...

VANITY INSTALLATION
1. Fasten the vanity cabinet to the wall with 2 screws (not provided) into wall studs through the back top rail,
or use toggle bolts if necessary.
2. Knobs are attached to the inside of the vanity. Reattach so the knobs are visible from the outside of the doors.
HINGE / DOOR ADJUSTMENT
DRAWER FRONT ADJUSTMENT
1. Remove decorative hardware from the drawer front.
2. Hold drawer front in place and slightly loosen both alignment screws.
3. Move the drawer front left, right, up or down to desired position for alignment.
4. While holding the drawer front in place, tighten the alignment screws securely.
5. Install the decorative hardware to the outside of the drawer front.
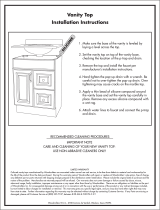
VANITY TOP INSTALLATION
1. Set the vanity top on top of the vanity base, checking the location of the p-trap
and drain.
2. Remove the top and install the faucet per manufacturer’s installation
instructions.
3. Hand tighten the pop-up drain with a wrench. Be careful not to over-tighten
the pop-up drain. Over tightening may cause cracks on the marble top.
4. Apply a thin bead of silicone compound around the vanity base and set the
vanity top carefully in place. Remove any excess silicone compound with a
wet rag.
5. Attach water lines to faucet and connect the p-trap and drain.
VANITY TOP CARE & MAINTENANCE
Your vanity top will remain in its original state if you maintain and clean it properly. Clean the surface with
a glass cleaner or other household cleansers that do not contain chlorine. Avoid using abrasive cleaners
as they will damage the surface.
Alignment Screws
drawer box
decorative hardware
drawer front
alignment screws
A
Used to adjust
door height
A
B
Used to adjust
gaps between doors
B
Used to adjust between
door and cabinet
C
C
CABINET FRONT VIEW CABINET FRONT VIEW CABINET SIDE VIEW
back
top rail
VANITY CARE & MAINTENANCE
To clean surface of doors or cabinet, use non-abrasive cleaners and or cleaning agents that do not contain solvents.
The door alignment was set in the factory, but it could have shifted during
transit. If adjustment is needed, follow the instructions provided in the
adjacent chart.
Rev. 1
July 2011
551547
WoodCrafters Home Products, LLC
2700 Camino de Verdad, Weslaco, TX 78596-1266
LIMITED LIFETIME WARRANTY APPLICABLE TO USA
The product has been manufactured by WoodCrafters Home Products, LLC and is warranted under normal use and service, to be free from defects in material and workmanship for the life of the product from
the date purchased. During this warranty period, WoodCrafters Home Products, LLC will repair or replace at WoodCrafters Home Products, LLC sole option, free of charge, any defective part or parts
returned with shipping charges prepaid to the distribution center listed below. Please include the original receipt with date of purchase and the nature of the problem. Merchandise not returned prepaid will
be refused. Our warranty does not cover damage or failure caused by abuse, misuse, abnormal usage, faulty installation, improper maintenance or any repair other than those by WoodCrafters Home
Products, LLC. There are no obligations or liabilities on the part of WoodCrafters Home Products, LLC for consequential damage arising out of or in connection with the use or performance of the product or
any indirect damages included, but not limited to labor charges for installation or removal. This warranty gives you specific legal rights, and you may also have other rights that may vary from state to state.
Further information regarding this warranty may be obtained without charge by contacting WoodCrafters Home Products, LLC Customer Service. If any Parts are missing or damaged, please call
WoodCrafters Home Products, LLC Customer Service at (800) 235-7747,
between 8:00 AM and 5:00 PM C.S.
Customer Service
1(800) 235-7747
INSTALLATION INSTRUCTIONS
FOR VANITY ENSEMBLE
SILICONE
ADJUSTABLE HEIGHT LEVELERS
Make sure the base of the vanity is leveled by
laying a level (not included) across the top. If
adjustment is needed use base levelers located
under each leg.
*To lower the cabinet turn levelers clock wise
or to rise the cabinet turn levelers counter
clock wise.
*Adjust until level across the top is leveled.
Backsplash and sidesplash may be available at www.homedepot.com for USA
or homedepot.ca for Canada

SOIN ET ENTRETIEN
Utiliser uniquement un produit non abrasif pour nettoyer la surface des portes et des armoires.
rail
arrière superieur
SILICONE
Assurez-vous que le bas du meuble-lavabo est de
niveau en posant un niveau (non incluses) sur le
dessus du meuble. Si un réglage est nécessaire,
utilisez les niveleurs situés en dessous de chaque
pied.
*Pour abaisser l’armoire tournez les niveleurs
dans le sens horaire pour monter l’armoire
tournez les niveleurs dan le sens antihoraire.
*Réglez jusqu’à ce que le niveau posé sur le
dessus soit de niveau.
vis d’alignement
tiroir boîte
quincaillerie décorative
tiroir avant
vis d’alignement
Service à la clientèle
1(800) 235-7747
NIVELEURS DE HAUTEUR RÉGLABLES
INSTRUCTIONS D’INSTALLATION POUR
LES ENSEMBLES MEUBLES-LAVABO
INSTALLATION DU MEUBLE-LAVABO
1. Fixer le meuble-lavabo au mur à l’aide de deux vis (non incluses) dans les montants du mur à travers le rail
arrière supérieur, ou utiliser des boulons à ailettes si nécessaire.
2. Les poignées sont fixées à l’intérieur du meuble. Fixer les poignées de manière à ce qu’elles soient visibles
du côté extérieur des portes.
AJUSTEMENT DES CHARNIÈRES
L’ alignement des portes à été effectué en usine, mais il est possible
qu’il se soit modifié durant le transport. Si un rajustement est
nécessaire, suivre les instructions qui se trouvent dans le
tableau ci-contre.
A
Permet de régler la
hauteur de la porte
A
B
Utilisé pour régler les
lacunes entre les portes
B
Utilisé pour régler entre
la porte et le meuble
C
C
Vue de face du meuble Vue de face du meuble Vue de côté du meuble
AJUSTEMENT DU TIROIR AVANT
1. Retirer toute quincaillerie décorative sur le tiroir avant.
2. Maintenir le tiroir avant en place et desserrer légèrement les vis d’alignement.
3. Bouger le tiroir avant (gauche, droite, haut, bas) jusqu’ à la position désirée.
4. Tout en maintenant le tiroir en place, resserrer les vis d’alignement solidement.
5. Installer la quincaillerie décorative sur la face extérieure du tiroir avant.
INSTALLATION DU REVÊTEMENT DE MEUBLE-LAVABO
1. Placer le revêtement sur le meuble-lavabo. Vérifier la position du siphone en
P intégral et du drain.
2. Retirer le revêtement et installer le robinet selon les instructions d’installation
du manufacturier.
3. Serrer le drain à tirette à la main à l’aide d’unce clé. S’assurer de ne pas
trop serrer le drain à tirette, car cela pourrait causer des fissures sur
le marbre.
4. Appliquer une mince goutte d'isolant à base de silicone autour de la base du meuble-lavabo et placer
soigneusement le revêtement. Retirer l'excès d'isolant avec un chiffon sec.
5. Attacher les conduits d’eau au robinet et connecter le siphon en P intégral et le drain.
SOIN ET ENTRETIEN DU REVÊTEMENT DE MEUBLE-LAVABO
Votre revêtement conservera son état original si vous l’entretenez et le nettoyez de manière adéquate. Nettoyez la
surface avec un nettoyant pour vitres ou un autre produit nettoyant ménager qui ne contient pas de chlore. Évitez
d’utiliser des produits abrasifs, puisqu’ils pourraient endommager la surface.
Des dosserets et des panneaux latéraux anti-éclaboussures peuvent être disponibles sur le sit
www.homedepot.com pour les États-Unis ou le site homedepot.ca pour le Canada
GARANTIE LIMITÉE | CANADA
Le produit a été fabriqué par WoodCrafters Home Products, LLC 2700 Camino de Verdad, Weslaco, TX 78596 et est garanti, à condition d’être utilisé et entretenu normalement, contre les défauts de
matériaux et de fabrication tant que l’acheteur initial en demeure propriétaire. Pendant cette période de garantie, WoodCrafters Home Products, LLC réparera ou remplacera, à son choix, sans frais, la ou les
pièces défectueuses retournées port payé au centre de distribution indiqué ci-après. Veuillez inclure la facture originale portant la date de l’achat et une description du problème. La marchandise qui n’est pas
retournée port payé sera refusée. Notre garantie ne couvre pas les dommages ou les pannes causés par l’abus, une mauvaise utilisation, un usage anormal, une installation défectueuse, un entretien incorrect
ou toute réparation qui n’aurait pas été effectuée par WoodCrafters Home Products, LLC. WoodCrafters Home Products, LLC n’aura aucune obligation ni responsabilité à l’égard des dommages indirects ou de
la perte de profit découlant de l’utilisation ou du rendement du produit ou liés à cette utilisation ou ce rendement ni à l’égard de tous dommages indirects, notamment des frais de main-d’œuvre pour
l’installation ou l’enlèvement. La présente garantie vous donne des droits légaux spécifiques, et vous pourriez également avoir d’autres droits, qui peuvent varier d’un territoire à l’autre. Vous pouvez obtenir
sans frais d’autres renseignements au sujet de cette garantie en communiquant avec le service à la clientèle de WoodCrafters Home Products, LLC. Si des pièces manquent ou sont endommagées, veuillez
communiquer avec le service à la clientèle de WoodCrafters Home Products, LLC au 800-235-7747 entre 8 h et 17 h (heure normale du Centre).
LIMITED WARRANTY | CANADA
The product has been manufactured by WoodCrafters Home Products, LLC 2700 Camino de Verdad, Weslaco, TX 78596 and is warranted under normal use and service, to be free from defects in material
and workmanship for as long as the original purchaser remains the owner. During this warranty period, WoodCrafters Home Products, LLc will repair or replace at WoodCrafters Home Produts, LLC sole
option, free of charge, any defective part or parts returned with shipping charges prepaid to the distribution centr listed below. Please include the original receipt with date of purchase and the nature of the
problem. Merchandise not returned prepaid will be refused. Our warranty does not cover damage or failure caused by abuse, misuse, abnormal usage, faulty installation, improper maintenance or any repair
other than those by WoodCrafters Home Products, LLC. There are no obligations or liabilities on the part of WoodCrafters Home Products, LLC for consequential damage or lost profits arising out of or in
conccection with the use or performance of the product or any indirect damages included, but not limited to labour charges for installation or removal. This warranty gives you specific legal rights, and you
may also have other rights that may vary from jurisdiction to jurisdiciton. Further information regarding this warranty may be obtained without charge by contacting WoodCrafters Home Products, LLC
Customer Service. If any Parts are missing or damaged, please call WoodCrafters Home Products, LLC Customer Service at (800) 235 - 7747, between 8 a.m. and 5 p.m. C.S.T.
/