Page is loading ...

DETERMINE WHERE TO PLACE THE VANITY
CARE & MAINTENANCE:
Cleaning Instructions: To clean surface of doors or cabinet, use non-abrasive cleansers only.
HINGE / DOOR ADJUSTMENT
Drawer Box
Decorative Hardware
Alignment Screws
Drawer Front
Alignment System
Screws
INSTALLATION INSTRUCTIONS
BATHROOM CABINETS
Top Back Rail
DRAWER FRONT ADJUSTMENT
1. Determine where the vanity will be located. Fasten the vanity to the wall with appropriate
wood screws (not provided) into wall studs or solid lumber through the back rail,
or use toogle bolts if necessary.
2. The drawer knobs are turned inside out to avoid damage in transit. Knobs must be
reattached on the outside of the cabinet to be functional.
3. Door pulls are normally stapled to the top back rail (inside a plastic bag).
4. Use the adjustment chart below to align your cabinet fronts.
NOTE: Decorative hardware and alignment system screws are located inside the drawer box.
1. Remove decorative hardware from the drawer front.
2. Hold drawer front in place and slightly loosen both alignment screws.
3. Move the drawer front left, right, up or down to desired position for alignment.
4. While holding the drawer front in place, tighten the alignment screws securely.
5. Install the decorative hardware to the outside of the drawer front.
Adjust gaps between
doors
Adjust door left
or right
Adjust door height
2700 Camino de Verdad
Weslaco, TX 78596
1 (800) 235-7747

CARE & MAINTENANCE:
SILICONE
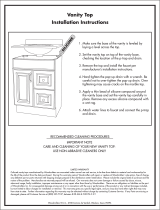
HOW TO INSTALL VANITY TOP TO VANITY
1. Make sure the base of the vanity is leveled.
2. Set the vanity top on top of the vanity base, checking the location of the
p-trap and drain.
3 Remove the top and install the faucet per manufacturer’s installation
instructions.
4. Tighten the pop-up drain with a wrench. Be careful not to over-tighten
the pop-up drain. Over tightening may cause cracks on the marble top.
5. Attach water lines to faucet and connect the p-trap and drain.
6. Apply a thin bead of silicone compound around the vanity base and set
the vanity top carefully in place. Remove any excess silicone compound
with a wet rag.
7. Connect the water lines to the water supply.
HOW TO INSTALL MIRROR
DETERMINE WHERE TO PLACE THE MIRROR
Determine the desired location of the mirror.
Use appropriate screws or wall anchors (not provided) to hang mirror.
Be sure the hanging hardware is rated to handle the weight of the mirror.
The mirror weight is approximately 20 lbs.
Your vanity top will remain in its original state if you maintain and clean it properly. Clean the surface with a glass cleaner or other
household cleansers that do not contain chlorine. Avoid using abrasive cleaners as they will damage the surface.
Should the top become stained or scratched use a 600-grit sand paper and water.
LIMITED LIFETIME WARRANTY
The product has been manufactured by WoodCrafters Home Products, LLC and is warranted under normal use and service, to be free
from defects in material and workmanship for the life of the product from the date purchased. During this warranty period, Wood-
Crafters Home Products, LLC will repair or replace at WoodCrafters Home Products, LLC sole option, free of charge, any defective part
or parts returned with shipping charges prepaid to the distribution center listed below. Please include the original receipt with date
of purchase and the nature of the problem. Merchandise not returned prepaid will be refused. Our warranty does not cover damage
or failure caused by abuse, misuse, abnormal usage, faulty installation, improper maintenance or any repair other than those by
WoodCrafters Home Products, LLC There are no obligations or liabilities on the part of WoodCrafters Home Products, LLC for conse-
quential damage arising out of or in connection with the use or performance of the product or any indirect damages included, but not
limited to labor charges for installation or removal. This warranty gives you specific legal rights, and you may also have other rights
that may vary from state to state. Further information regarding this warranty may be obtained without charge by contacting Wood-
Crafters Home Products, LLC Customer Service. If any Parts are missing or damaged, please call WoodCrafters Home Products, LLC
Customer Service at (800) 235-7747, between 8:00 AM and 5:00 PM C.S.
WoodCrafters Home Products, LLC
2700 Camino de Verdad, Weslaco, TX 78596-1266

DETERMINE EL AREA EN DONDE VA A COLOCAR EL GABINETE
CUIDADO Y MANTENIMIENTO
No utilize limpiadores abrasivos.
AJUSTE DE BISAGRAS
INSTRUCCIONES DE INSTALACION
DEL GABINETE DE BAÑO
Soporte trasero
superior
AJUSTE DEL FRENTE DE CAJÓN
1. Determine en donde va a estar colocado el gabinete. Fije el gabinete a los barrotes de la
estructura de la pared o a una área firme de madera con tornillos para madera apropiados
(tornillos de 3” deberán ser suficientes, no incluidos) a través del soporte trasero del gabinete.
Use taquetes si es necesario.
2. Las manivelas de los cajones están instaladas por la parte interior del cajón para evitar que se
dañen durante la transportación del producto. Las manivelas deberán ser desatornilladas e
instaladas por la parte externa para que sean funcionales.
3. Las manivelas de la puerta estan normalmente grapadas al soporte trasero superior (dentro de
una bolsita de plástico).
4. Use el diagrama mostrado en la parte inferior para alinear los frentes de su gabinete.
NOTA: Herraje decorativo y tornillos para alineamiento se encuentran dentro del cajón.
1. Remueva el herraje decorativo del frente del cajón.
2. Sostenga el frente del cajón en su lugar y afloje un poco los tornillos.
3. Mueva el frente hacia la izquierda, derecha, hacia arriba o abajo hasta lograr la
posición deseada.
4. Sosteniendo el frente del cajón en su lugar, apriete los tornillos.
5. Instale el herraje decorativo por el frente del cajón.
Ajuste entre las puertas
Ajuste entre puerta y
gabinete
Ajuste de altura de
la puerta
cajón
Herraje decorativo
frente del cajón
tornillos para
alineamiento
2700 Camino de Verdad
Weslaco, TX 78596
1 (800) 235-7747

CUIDADO Y LIMPIEZA
SILICON
CÓMO SUJETAR EL LAVABO AL GABINETE DE BAÑO
1. Asegúrese que la base del gabinete esté nivelada colocando un nivel
de burbuja diagonalmente sobre la parte superior del gabinete.
2. Coloque el lavabo sobre la base del gabinete verificando la ubicación
correcta de la trampa y el drenaje.
3. Remueva el lavabo e instale las llaves de acuerdo con las instrucciones
de instalación del fabricante.
4. Ajuste manualmente el tubo del drenaje, luego gire ¼ de vuelta con una llave
apropiada. Sea cuidadoso de no sobre ajustar el tubo del drenaje pues esto
puede ocasionar quebraduras en el lavabo.
5. Conecte las líneas de agua a las llaves, posteriormente la trampa y el drenaje.
6. Aplique una capa delgada de silicón alrededor de la base del gabinete
y coloque cuidadosamente el lavabo. Remueva cualquier exceso del
compuesto sellador con un trapo húmedo.
7. Conecte las líneas de agua al suministro de agua.
INSTALACION DEL ESPEJO
Determine el area en donde va a colocar el espejo.
Determine donde desea colocar el espejo.
Fíjelo usando un tornillo o taquete apropiado (no incluido) para colgar el espejo.
Asegúrese que el herraje que use para colgar sea recomendado para el peso del espejo.
Aproximadamente 20 lbs. (9 kilos)
Su lavabo permanecerá en su estado original si lo mantiene y limpia correctamente. Limpie la superficie con limpiador de vidrios
o cualquier otro limpiador que no contenga cloro. Evite usar limpiadores abrasivos ya que pueden dañar la superficie
del lavabo. En caso de presentar una rayadura, utilice lija 600 y agua.
GARANTIA LIMITADA
El producto ha sido fabricado por WoodCrafters TX L.P. y tiene garantía, bajo uso y servicio normales, lo que garantiza al producto
por defectos de materiales y fabricación. Durante este periodo, WoodCrafters TX L.P. reparará o reemplazará, bajo su propio costo,
cualquier parte o partes defectuosas, que sean enviadas con gastos de envío pagados, al centro de distribución que se enlista al final
de este párrafo. Favor de incluir el recibo original de compra, que indique la fecha de compra y la causa del problema. No se
recibirá mercancía enviada por cobrar. Nuestra garantía no cubre daños, por el uso inapropiado o abuso que le den al producto,
así como ningún cargo de instalación. Esta garantía tiene específicos derechos legales, así como los derechos que lleguen a cambiar
de estado a estado. Si faltará alguna parte o estuviera dañada, favor de llamar al Centro de Atención al Cliente, al número de
teléfono sin costo, dentro de los Estado Unidos de América, (800) 235-7747, en el horario de 8:00 AM a 5:00 PM Tiempo del
Centro. Para mayor información relacionada a esta garantía, favor de comunicarse al Centro de Atención al Cliente.
WoodCrafters Home Products, LLC
2700 Camino de Verdad, Weslaco, TX 78596-1266
October 2008
550375
/