Page is loading ...

When using electrical appliances, basic safety
precaution should be followed, including the
following:
1. Read all instructions before using.
2. Do not touch hot surfaces. Use handles and
knobs when available.
3. This appliance must be properly installed
and located in accordance with these
instructions before it is used.
4. The use of an accessory not evaluated for
use with this appliance may cause injuries.
5. Do not place on or near a hot gas or electric
burner, or in a heated oven.
6. Do not use outdoors.
7. To protect against electric shock, do not
immerse cords, plugs, or the appliance in
water or any other liquid.
8. Do not overfill the Water Reservoir with
water.
9. Use only water in this appliance! Do not put
any other liquids or foods in the Water
Reservoir except as instructed in the
Cleaning Instructions in this guide.
10. Unplug the coffee brewer before cleaning or
draining. Allow to cool before attaching or
removing parts and before cleaning the
appliance.
11. For best operation, plug the appliance into
its own electrical outlet on a dedicated cir-
cuit to prevent flickering of lights, blowing of
fuses or tripping a circuit breaker.
12. Do not operate any appliance with a dam-
aged cord or plug or after the appliance
malfunctions or is damaged in any manner.
Contact your Keurig Authorized Dealer to
arrange for replacement.
13. Do not let the cord hang over the edge of
the table or counter, or touch hot surfaces.
14. To disconnect, press the Power Button on
the right-rear of the Brewer to ‘OFF’ status
and then remove the plug from the wall out-
let.
15. Close supervision is necessary when any
appliance is used by or near children.
16. Do not lift the Handle to open the Lid of the
Brewer while brewing is in progress.
17. This appliance is equipped with a power
cord having a grounding wire with a
grounding plug. The appliance must be
grounded using a 3-hole properly grounded
outlet. In the event of an electrical short cir-
cuit, grounding reduces the risk of electrical
shock.
18. If the outlet is a standard 2-prong wall out-
let, it is your personal responsibility and
obligation to have it replaced with a properly
grounded 3-prong wall outlet.
19. Do not, under any circumstances, cut or
remove the third (ground) prong from the
power cord or use an adapter.
20. Consult a qualified electrician if the ground-
ing instructions are not completely under-
stood, or if doubt exists as to whether the
appliance is properly grounded.
22. Do not use the appliance for other than its
intended use.
SAFE OPERATION & USE
IMPORTANT SAFEGUARDS
2
SAVE THESE INSTRUCTIONS
KEURIG
®
GOURMET SINGLE CUP
COMMERCIAL BREWING SYSTEM
Model B200 Use & Care Guide

WARNING
WARNING: TO REDUCE THE RISK OF FIRE
OR ELECTRIC SHOCK, DO NOT REMOVE
THE BOTTOM COVER. NO USER
SERVICEABLE PARTS ARE INSIDE. REPAIR
SHOULD BE DONE BY AUTHORIZED
SERVICE PERSONNEL ONLY.
RISK OF FIRE OR ELECTRIC SHOCK
DO NOT OPEN
3
KEURIG
®
GOURMET SINGLE
CUP BREWING SYSTEM
Model B200 Use & Care Guide
TABLE OF CONTENTS
SECTION 1
SET-UP & OPERATION
Helpful Hints . . . . . . . . . . . . . . . . . . . . . . . . 4
Unpacking . . . . . . . . . . . . . . . . . . . . . . . . . . . 4
Features . . . . . . . . . . . . . . . . . . . . . . . . . . . . 5
Set-Up & First Brew . . . . . . . . . . . . . . . . . . 9
Draining the Brewer . . . . . . . . . . . . . . . . . . 11
SECTION 2
CLEANING & MAINTENANCE
Cleaning External Parts . . . . . . . . . . . . . . . 12
De-Scaling Your Brewer . . . . . . . . . . . . . . 13
SECTION 3
MENU FUNCTIONS
Entering and Navigating . . . . . . . . . . . . . . . 14
Menu Items . . . . . . . . . . . . . . . . . . . . . . . . . 14
SECTION 4
MAINTENANCE MENU FUNCTIONS
Entering and Navigating . . . . . . . . . . . . . . . 15
Menu Items . . . . . . . . . . . . . . . . . . . . . . . . . 15
SECTION 5
TROUBLESHOOTING . . . . . . . . . . . . . . . . . 16
SECTION 6
COIN MECHANISM ACCESSORY
Outline of Operation . . . . . . . . . . . . . . . . . . 17
STORAGE . . . . . . . . . . . . . . . . . . . . . . . . . . . . 17
WARRANTY . . . . . . . . . . . . . . . . . . . . . . . . . . 18
CAUTION: There are two sharp needles that
puncture the K-Cup
®
portion pack, one
above the K-Cup
®
Holder and the other in
the bottom of the K-Cup
®
Holder.
T
o avoid risk of injury, do not put your
fingers in the K-Cup Chamber.
CAUTION: There is extremely hot water in
the K-Cup
®
Holder during the brew process.
T
o avoid risk of injury, do not lift the Handle
or open the K-Cup
®
chamber during the
brew process.
THIS PRODUCT IS FOR COMMERCIAL USE ONLY
If an extension cord is used, (1) the marked
electrical rating of the cord set or extension
cord should be at least as great as the electrical
rating of the appliance. (2) The cord should be
arranged so that it will not drape over the
countertop or tabletop where it can be pulled
on by children or tripped over unintentionally
and (3) the extension cord must include a 3-
prong grounding plug.
Record your Brewer Serial Number here.
The Serial Number is located on the UL
label found on the front of the Brewer
behind the Drip Tray on the
identification sticker.
_________________________________
WARNING: This product contains chemicals,
including lead, known to the State of
California to cause cancer, birth defects or
other reproductive harm.

4
1. Keep your Brewer turned ‘ON’ at all times.
To brew a fresh cup of coffee or tea anytime
you want, we suggest you keep your Brewer
turned ‘ON’ all the time.
2. Keurig requires the use of filtered water
on this brewer. Contact your Keurig
Authorized Dealer for the B200 Filter
part number.
3. Plug Brewer into its own grounded outlet.
If the electric circuit is overloaded with other
appliances, your Brewer may not function
properly. If possible, The Brewer should be
operated on its own circuit, separate from
other appliances.
4. Brewing into a travel mug.
To brew into a travel mug, simply remove the
Drip Tray Assembly and place the travel mug
on the Drip Tray Base.
1. Place Brewer box on a large steady surface
(such as a table or countertop) or on the
floor. Open the box.
2. Remove the Quick Start Guide, Use & Care
Guide and other literature if included.
3. Reach into the box and grasp the plastic
bag that contains the Brewer.
4. Carefully pull the plastic bag (and packag-
ing materials) toward you and out of the
box. The Brewer will still be encased in the
poly foam.
5. Remove the poly foam packaging material.
6. Place the brewer upright on a flat, steady
surface.
7. Lift plastic bag off of Brewer.
8. Remove the Drip Tray from the brewer and
record on page 3 of this book the Serial
Number located on the identification sticker.
The Serial Number is also located on the
Brewer box.
9. We recommend you save all packing
materials in case future shipping of the
product is necessary.
SET-UP & OPERATION
Helpful Hints
SECTION 1
WARNING: Keep all plastic bags away
from children.
Unpacking Instructions

5
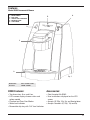
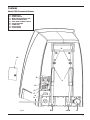
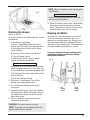
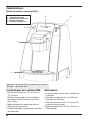
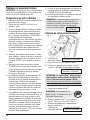
Features
Model B200 Commercial Brewer
1
5
4
2
Fig. 1
Dimensions: 16H x 10.25W x 18D”
Electrical 1400W, 120VAC
1 – BREW HANDLE
2 – DRIP TRAY
3 – WATER LEVEL INDICATOR
4 – BREW BUTTONS
5 – LCD SCREEN
3
B200 Features:
• Two brew sizes: 8 oz. and 6 oz.
• LCD screeen displays brewer status and
action needed
• Plumbed and Pour-Over Modes
• Water level indicator
• Removable drip tray with 'Full" level indicator
Accessories:
• Coin Acceptor Kit #5063
• User instructions displayed on the LCD
screen
• Accepts US 25¢, 10¢, 5¢, and Keurig token
• Accepts Canadian $1, 25¢, 10¢ and 5¢

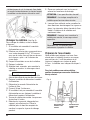
6
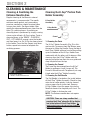
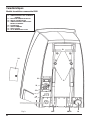
Features
Model B200 Commercial Brewer
9
10
Fig. 4
9 – FILL DOOR
10 – REMOVABLE FILL SCREEN
6
7
8
Fig. 2
6 – K-CUP
®
PORTION PACK HOLDER
7 – FUNNEL
8 – K-CUP
®
PORTION PACK
ASSEMBLY HOUSING

14
12
11
17
15
13
16
19
HOT COLD
7
18
Fig. 3
11 – DRAIN PLUGS
12 – POWER SWITCH
13 – MAINTENANCE MENU BUTTON
14 – WATER PLUMBING INLET
15 – POUR OVER/PLUMBED SWITCH
16 – CIRCUIT BREAKER
17 – COMM PORT
18 – ACCESS DOOR
19 – FILTER MOUNT
Features
Model B200 Commercial Brewer

8
Plumbing Fitting Connections
(For Plumbed mode only)
CAUTION: This brewer is designed to handle
local water pressures up to 125 psig. Consult a
licensed plumber for water pressures in your
area. Use plumbing fittings and tubing speci-
fied to withstand 125 psig.
WARNING: This brewer requires the use of an
external water filter such as the Omnipure
KQ8A, available from Keurig Incorporated.
1. An external filter (KQ8A) can be mounted
on the rear surface of the brewer using the
mounting screws provided (Item 19, FIG.3)
2. Loosen the two mounting screws located
on the upper-rear of the brewer and hang
the KQ8A filter assembly.
3. Tighten the two mounting screws (be care-
ful not to over tighten).
NOTE: The KQ8A Filter assembly comes
with
1
/4 FPT ports for both inlet and outlet
and the plumbed water inlet to the brewer
is
3
/4 Male Garden Hose Thread.
1
/4 OD
LLDPE (Linear Low Density Polyethylene)
tubing is recommended between the filter
assembly and the brewer.
4. Connect the ‘INLET’ port of the filter
assembly to the local water supply.
5. Connect a long length of tubing to the
‘EXIT port of the filter assembly. DO NOT
CONNECT TO THE BREWER YET.
6. The filter needs an initial flush to clear any
carbon deposits. Bring the long length tub-
ing to a container or sink.
7. Turn on water supply and allow at least 4
gallons of water to flush through the filter.
8. Turn off water supply.
9. Cut the long length tubing connected to the
exit of the filter assembly to proper length
and connect to inlet plumbing port on the
brewer.
10. Turn on water supply.
11. Verify there are no leaks at any of the exter-
nal plumbing fittings.
12. Remove small access door on rear of
brewer. From a standing position in front
of the brewer, slide the Pour-Over/Plumbed
switch to the right. This puts the Brewer
into plumbed mode.

9
Set-Up & First Brew
IMPORTANT: You cannot use your Keurig
brewer until it has been primed for its first use
as set forth below.
Priming your Brewer
1. Unwrap cord and plug the brewer into a
grounded outlet.
2. Place an 8 oz. cup or mug on the Drip Tray
Plate.
3. If you plan to use the brewer in Pour-Over
mode, move the Pour-Over/Plumbed switch
to the left. The Pour-Over/Plumbed switch is
located behind a small door at the lower
right-rear of the brewer. During the priming
sequence, the brewer will prompt you to add
water at the appropriate time and proceed to
step you through the priming process.
4. Remove the small access door located on
the right rear of the brewer and verify the
breaker switch is in the ‘reset’ position and
replace door.
5. Press Power Button found on lower right
rear panel of the Brewer. The LCD screen,
water level indicator and brew buttons will
become illuminated.
6. The Brewer will automatically fill with water
(if plumbed) and then the water will be heat-
ed. During the priming and heating period
the LCD screen will indicate the state of the
brewer. Once the water is heated (about 3
minutes), the LCD screen will indicate that a
cleansing brew will start and steps you
through the process.
7. If the brewer is in Pour-Over mode, the LCD
screen will prompt you to add water. The
water fill door is located above the silver
brew handle. Check that the water screen is
in place before pouring water into the brew-
er. Continue to add water until the Brewer
alerts you that the Cold Water Tank is full by
way of an audible beep and a flashing of all
the water level indicator bars.
8. After the Brewer steps you through the
priming process and cleansing brew, it will
ask you to discard the cleansing brew liquid.
9. The priming process is now complete and
you are ready to brew.
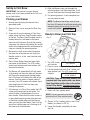
Ready to Brew your First Cup
1. The LCD screen
will indicate
2. Place a cup or mug on the Drip Tray Plate.
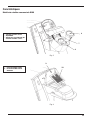
3. Lift the Handle and the K-Cup
®
Holder will
open toward you. The LCD screen will
indicate
4. Select a K-Cup
®
portion pack.
5. Place a K-Cup
®
portion pack in the K-Cup
®
Holder (as shown in FIG. 5).
6. Lower the Handle completely to close
the Lid.
NOTE: Do not remove the foil lid or
puncture the K-Cup
®
portion pack.
CAUTION: There are two sharp needles that
puncture the K-Cup
®
portion pack, one above
the K-Cup Holder and the other in the bottom
of the K-Cup Holder. T
o avoid risk of injury,
do not put your fingers in the K-Cup Chamber.
NOTE: The Brewer Hot Water tank will take
less than 20 seconds to refill and reheat water
between brews during which time the LCD
screen will indicate
Fig. 5
HEATING -
PLEASE WAIT
READY - CHOOSE K-CUP
LIFT HANDLE
INSERT NEW K-CUP
CLOSE HANDLE

10
7. The LCD screen will indicate
Both brew buttons will flash
until you make your selection. After you
make your selection, the selected button
will remain lit while the other extinguishes.
Select the Small Mug button for a 6 oz.
brew, or the Large Mug button for an 8 oz.
brew. Once you press either of the brew
buttons the LCD will indicate
8. There may be a short pause before the
brewing process begins. The entire brew
process lasts for approximately 40 to 50
seconds and ends with a burst of air to
remove all liquid coffee or tea from the
K-Cup
®
. When the brew process is completed
the LCD will display
the brewer may
then go into a reheat mode,
this will be displayed as
9. Lift the Handle to remove and dispose of the
used K-Cup
®
. CAUTION: K-Cup
®
will be hot.
10. Enjoy your first cup of Keurig Brewed
®
gourmet coffee or tea!
11. The Brewer will be ready again for use in
approximately 20 seconds.The LCD may
display
12. If you lift the handle while brewing the
LCD will display if
you close the handle
the brewing will continue.
NOTE: Following the brew, your Brewer will
fill in preparation for the next brew. The
pump will make a vibrating sound. This is
normal.
Stopping the Brew Process
If you need to stop the brewing after the process
has started, you can either lift the handle , in
which case the LCD will
display and ’the flow of
coffee or tea will stop or you can press the
Power Button to turn the Brewer ‘OFF’, the flow
of coffee or tea will stop, the heating element
will shut off and the LCD screen, water level
indicator and brew buttons will extinguish.
Adding Water (Pour-Over Mode)
The LCD screen of your Brewer will indicate
when to add water. To fill, lift the fill door and
pour in water. (Fig. 7) It is recommended that
you fill the Brewer completely each time. The
water level indicator on the upper left side of
the brewer will show the relative water level
and the brewer will signal you when to stop
adding water by flashing all the bars of the
water level indicator accompanied by an audible
beep. When water level becomes too low, the
Brewer LCD screen will signal
you to and will prevent
brewing until a refill is completed. The fill
screen can be removed for cleaning. (Fig. 4)
NOTE: If you do not push a Brew Button in
60 seconds, the Brew Buttons will be
disabled to prevent accidental activation.
Re-activate the Brew Button by raising and
lowering the Handle completely, without
removing the unused K-Cup
®
.
NOTE: You may get less coffee or tea in your
cup during your next brew if you power off
while brewing. We recommend that you per-
form a cleansing brew without a K-Cup
®
after
a terminated brew. Then your NEXT brew will
be the proper selected volume.
CAUTION: There is extremely hot water in
the K-Cup Holder during the brew process.
T
o avoid risk of injury, do not lift the
Handle or open the K-Cup
®
Chamber
during the brew process.
NOTE: If the Brewer is in plumbed mode, it
will refill the cold water tank completely after
every six brews of either size. If the Brewer is
shut off over night, then the brewer will
replenish the cold water tank automatically if
needed, when the Brewer is turned back on
in the morning.
Fig. 6
PLACE YOUR CUP
SELECT BREW SIZE
HEATING -
PLEASE WAIT
KEURIG BREWED
ENJOY!
HEATING -
PLEASE WAIT
BREWING STOPPED
CLOSE HANDLE
ADD WATER
TO CONTINUE
PLACE YOUR CUP
SELECT BREW SIZE
BREWING
BREWING STOPPED
CLOSE HANDLE

11
Draining the Brewer
(Refer to Fig. 8)
To drain the brewer, the following steps should
be followed:
1. If the Brewer is plumbed:
A) Brew a Large Mug without a K-Cup
®
portion pack OR, verify that the water level
is well below the full mark on the Water
Level Indicator.
B) Shut off water supply to the Brewer.
C) Turn off power switch.
D) Wait three seconds, turn on power
switch, the brewer will display:
answering YES, will activate the inlet water
valve and relieve pressure in the water line.
E) Turn off Brewer and disconnect power cord.
F) Disconnect the water supply fitting at the
inlet of the filter.
G) Proceed to Step 3 below.
2. If Brewer is
not
plumbed. Turn off the
Brewer and unplug power cord.
3. Turn the brewer around so the back is
facing you.
4. Unclip the drain hose(s) from their holders
and lower them. Move the brewer close to
the edge of the counter so that the drain
hoses over hang.
5. Place a container under the hoses and
remove the drain plugs.
6. When the flow of water stops, replace both
drain plugs and clip the hoses back into
place. The brewer’s internal hot water tank
and cold water tank are now empty.
Brewing Hot Water
Your Brewer is able to produce a cup of hot
water for making hot chocolate, for use in
cooking, for making soups, etc. Simply raise
and lower the handle on the Brewer without
adding a K-Cup
®
portion pack. The brewer will
step you through the process as normal.
If you are experiencing any problems with
your Brewer, please contact your Keurig
Authorized Distributor.
NOTE: When you power up the brewer again
it will display:
Answer YES to the question so that it will
start to prime the brewer
HOT
WATER
DRAIN
COLD
WATER
DRAIN
Fig. 8
Fig. 7
DRAIN
PLUGS
WAS THE BREWER DRAINED? YES NO
WAS THE BREWER DRAINED? YES NO
CAUTION: The water may be very hot!
NOTE: The process to completely drain the
brewer takes about 2 minutes.

12
SECTION 2
CLEANING & MAINTENANCE
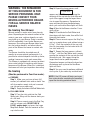
Cleaning & Sanitizing the
Entrance Needle Area
Regular cleaning of the Brewer’s external
components is recommended. The needle,
entrance needle gasket, and surrounding
puncture mechanism should be wiped clean
using a clean cloth. See figure below. After
wiping the aforementioned areas clean then do
three (3) sanitizing brews. A sanitizing or
cleansing brew is performed by simply running
a brew cycle without a K-Cup in place. To do a
cleansing brew, at the ‘READY - CHOOSE K-
CUP - LIFT HANDLE’ prompt, raise the handle
and then lower it as if a K-Cup has been placed
in the holder. Press the 8oz (largest size) brew
button; repeat twice more to complete the
sanitizing process.
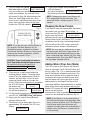
Cleaning the K-Cup
®
Portion Pack
Holder Assembly
1. Cleaning the Parts
The K-Cup
®
Holder Assembly (Fig. 9) is dish-
washer safe. To remove from the Brewer, open
the cover by lifting the Handle. Grasp the top of
the K-Cup
®
Holder with one hand while pushing
up on the bottom of the K-Cup
®
Holder from
underneath with the other until it releases. After
cleaning, align the K-Cup
®
Holder with the
opening using the two front ribs as a guide and
snap into place from the top.
2. Cleaning the Funnel
The Funnel can be removed from the K-Cup
®
Holder by pulling on it until it snaps off. The
Funnel is dishwasher safe. To replace it just snap
it back onto the K-Cup
®
Holder Assembly.
3. Cleaning the Exit Needle
The Exit Needle is located on the inside bottom
of the K-Cup
®
Holder Assembly. Should a clog
arise due to coffee grinds, it can be cleaned
using a paper clip or similar tool. Remove
K-Cup
®
Holder, insert the paper clip into the
Needle to loosen the clog and push it out. The
K-Cup
®
Holder is dishwasher safe.
NOTE: The Entrance needle does not require
cleaning
K-Cup Holder
Assembly
K-Cup Holder
Funnel
CAUTION: There are sharp needles that
puncture the K-Cup
®
above the K-Cup Holder
and in the bottom of the K-Cup Holder. T
o
avoid risk of injury, do not put your fingers in
the K-Cup Chamber.
Fig. 9
A. ENTRANCE NEEDLE GASKET
B. ENTRANCE NEEDLE
C. NEEDLE SURROUND SURFACE
A
B
C

13
WARNING: THE REMAINDER
OF THIS DOCUMENT IS FOR
SERVICE PERSONNEL ONLY.
PLEASE CONTACT YOUR
KEURIG AUTHORIZED DEALER
FOR ALL SERVICE RELATED
ISSUES.
De-Scaling Your Brewer
Mineral content in water varies from place to
place. Depending on the mineral content of the
water in your area, calcium deposits or scale
may build up in your Brewer. Scale is nontoxic,
but left unattended, it can hinder Brewer per-
formance. De-scaling your Brewer helps main-
tain the heating element, and other internal
parts of the Brewer that come in contact with
water.
The Brewer should be de-scaled every 6
months to ensure optimal performance. It is
possible for calcium deposits to build up faster,
making it necessary to de-scale more often.
This Brewer is equipped with sensors to detect
when scale buildup is interfering with the per-
formance of the Brewer. When this is detected,
the brewer will alert you to perform de-scaling.
De-Scaling
(Must be performed in Pour-Over mode).
a. PREPARE
Step 1: Make sure you have at least (64
ounces) of undiluted citric acid on hand. You
will also need an empty sink and a ceramic
cup (do not use a paper cup.)
Step 2: Empty the water in the Cold Water tank.
b. FILL AND CLEAN
Step 1: Pour the citric acid into the Cold
Water tank, filling until the brewer alerts you
of a full tank.
Step 2: Place a ceramic cup in the Drip Tray
and run a brew cycle. DO NOT USE A
K-CUP
®
portion pack, just press the Large
Mug Brew Button. Pour the contents of the
cup into the sink.
Step 3: Repeat the brew process until
appears on the LCD screen, pouring the
contents of the cup into the sink after each
cycle. We suggest using the largest brew
size to speed the process. Remember to
open and close the brew handle between
each cycle so the blue Brew lights will flash.
Step 4: Now let the Brewer stand for 1 hour
while still on.
Step 5: Fill and drain the Cold Water tank
three times with fresh water, then refill a final
time with fresh water.
Step 6: Place a ceramic cup on the Drip Tray
and run a regular brew cycle without using a
K-Cup
®
. Pour the contents of the cup into
the sink (remember, the hot water tank still
has citric acid in it).
Step 7: Repeat the brew process, without
K-Cups
®
. until the Cold Water tank is empty,
pouring the contents of the cup into the sink
after each cycle. We suggest using the
largest brew size to speed the process.
Remember to open and close the brew han-
dle between each cycle so the blue Brew
lights will flash.
Step 8: You may need to perform additional
rinse cycles if you notice any residual taste.
NOTE: If the LCD screen still alerts you to per-
form a descale after completing the procedure,
repeat the descaling procedure above.
ADD WATER
TO CONTINUE

14
Entering and Navigating:
1. Turn the power switch to ‘off’.
2. Remove the small access door located on
the lower right rear of the brewer.
3. Turn the power switch to ‘on’ and push the
menu button within 10 seconds.
4. The LCD screen will show the current brew
count (number of brews since beginning of
use). This setting is not changeable.
5. To navigate the menus, use the lower brew
button (Small Mug), to switch between
menu items and the upper brew button
(Large Mug), to change the setting for
each menu item.
6. NOTE: Your changes are saved automati-
cally.
7. Use the lower brew button to step through
the remainder of the menu items until you
come back to the brewer ‘Ready’ screen.
Menu Items:
(Use the lower button- Small Mug, to toggle
through the menu items. Use the upper button-
Large Mug, to make changes to each item.
Your changes are saved automatically as you
toggle forward through the menus).
You must
proceed through all the menu items including
each digit of the service phone number to exit
the menu or maintenance menu.
‘BREWS’
This item reports the number of brews
completed and is unchangeable by the user.
‘HAS THE BREWER BEEN DRAINED’
This item allows the user to enter the priming
routine required after a full draining of the Hot
and Cold water tanks.
‘LANGUAGE’
This item allows the user to select the LCD
display language among English, French and
Spanish.
‘SET VEND/NO VEND’
If the Brewer is equipped with a Coin
Mechanism, this item allows the user to initiate
the Vending software so that a brew occurs
only after the specified price is satisfied (Skip
this item if not using a Coin Mechanism
Accessory).
‘VEND $’
This item allows the user to set the price of a
brew from $.05 to $3.00 (Skip this item if not
using a Coin Mechanism Accessory)
‘EXCESS COIN CREDIT’
This item allows the user to set whether a
customer gets a credit toward the next brew if
they deposit more than the asking price. This is
helpful for times when a person is buying
coffee for a large group of people. The excess
credit will disappear after 60 seconds.
‘BREW TEMP’
This item allows the user to adjust the temper-
ature of the brew as high as 193°F.
‘SERVICE PHONE #’
This item allows the user to enter the phone
number of the Keurig Authorized Dealer. This
will appear on the screen under any of the
error conditions monitored as well as an error
condition number. The user can also find this
number by simply entering the menu and
toggling to this item.
SECTION 3
MENU FUNCTIONS

15
SECTION 4
Entering and Navigating:
1. Turn the power switch to ‘off’.
2. Remove the small access door located on
the lower right rear of the brewer.
3. Turn the power switch to ‘on’ and push the
menu button within 10 seconds.
4. The LCD screen will show the current brew
count (number of brews since beginning of
use). This setting is not changeable.
5. Press and hold the top (Large Mug) button
and press the lower (Small Mug) button
twice to enter the maintenance menus.
6. To navigate the menus, use the lower brew
button (Small Mug), to switch between
menu items and the upper brew button
(Large Mug), to change the setting for
each menu item.
7. NOTE: Most Menu items in the
Maintenance Menu are not changeable and
are only there to report data used in quality
control of this and future products from
Keurig, Inc.
8. Use the lower brew button to step through
the remainder of the menu items until you
come back to the brewer ‘Ready’ screen.
Menu Items:
(Use the lower button- Small Mug, to toggle
through the menu items. Use the upper button-
Large Mug, to make changes to each item.
Your changes are saved automatically as you
toggle forward through the menus).
You must
proceed through all the menu items including
each digit of the service phone number to exit
the menu or maintenance menu.
‘SOFTWARE’
This item reports the current software version
loaded on the brewer.
‘FILL 6 TIME OUTS’
This item reports how many times the brewer
failed to refill the hot water tank after a brew in
the allowable time (Refilling the hot water tank
with 6 ozs of water from the cold water tank).
‘ADD2 TIME-OUTS’
This item reports how many times the Brewer
failed to add water to the hot water tank before
a brew within the allowable time (Adding 2 oz
to the hot water tank before a brew if the user
calls for a Large Mug – which is 8 ozs).
‘DISPENSE TIME-OUTS’
This item reports how many times the brewer
failed to dispense the hot liquid to the user cup
within the allowable time.
‘OVER PRESSURE EVENTS’
This item reports overpressure events that can
occur from a plugged or nearly plugged brew
line caused by an obstruction such as water
scale or coffee grounds.
‘SELF CALIBRATION’
(Used only for Pour-Over Mode)
This is the only item changeable in the mainte-
nance menu. It allows the technician to calibrate
the Cold Water Tank Water Level bars if this
becomes necessary:
A. If you perform a self-calibration, you must
first switch the brewer power to ‘off’, dis-
connect the power cord and drain the Cold
Water Tank.
B. Turn power back on and enter the mainte-
nance menu.
C. Toggle to the self-calibration menu item
and follow the screen prompts to conduct
a calibration.
When you move from this menu item you will
be returned to the normal menu section. You
can proceed through these items until you
reach the main screen of the Brewer.
MAINTENANCE-MENU FUNCTIONS

16
SECTION 5
TROUBLESHOOTING
SITUATION SOLUTION
Brewer will not
brew when used
for the first time
• Plug Brewer into an independent outlet.
• Check to be sure that it is plugged in securely.
• Plug into a different outlet.
• Reset the power outlets’ circuit breaker if necessary.
• Reset the brewer breaker button located on the maintenance panel. The
maintenance panel is at the lower right rear of the brewer behind a small
access door.
• The Brewer must be primed for use by filling the internal hot water tank
before the first brew. The brew size LED’s will be flashing on the right side of
the brewer. (refer to page 9)
• If Brewer is cold/frozen, wait for two hours for it to reach room temperature
before powering on.
Brewer will
not brew
• After placing the K-Cup
®
portion pack in the K-Cup
®
Holder, make sure that
the Handle is pushed all the way down securely and the back lit blue Brew
Buttons on the right side of the brewer are flashing.
• If the LCD screen is alerting you to ‘ADD WATER TO CONTINUE’, add
water to the Cold Water tank.
Brewing a
partial cup
• If a prime sequence has been performed, without a cleansing brew, the first
cup may be “oversized”. The next cup brewed will be brewed to the proper
selected size.
• The Exit Needle may be clogged. (refer to page 12).
• Clean K-Cup
®
Holder if necessary and rinse under faucet. (refer to page 12).
• If the brewer is alerting you to perform a 'DE-SCALE', descale the Brewer
(refer to page 13).
Brewer does not
have power
If any problems persist, contact Customer Service at 1-888-CUP-BREW (287-2739).
Brewer
indicates TCO
error
• Hot water tank drain valve is open.
• Tubing to hot water tank is leaking
• Faulty TCO (Thermal Cut Out device)

17
SECTION 6
If a Coin Acceptor Accessory kit is ordered
with this Brewer, the accessory package will
include an Installation Guide. To activate the
Coin Mechanism Accessory, enter the menu as
outlined in section 3.
The Coin Acceptor Accessory kit comes with a
faceplate for the right side of the Brewer. This
faceplate includes the entrance slot for deposit-
ing coins, a coin return button to return a
jammed coin and the coin return slot at the
bottom. The Brewer will step the customer
through normal usage automatically.
The Coins are collected in a container inside
the brewer and are accessed through a locked
door behind the Drip Tray. When the coin
container becomes full, the Coin Acceptor will
no longer register a coin deposit. It is at this
time that the user should empty the container.
The Coin Acceptor accessory will accept US
25¢, 10¢, 5¢ and Keurig token and Canadian
$1, 25¢, 10¢ and 5¢ coins.
Storage
Drain both the Hot Water and Cold Water tanks
before storing and take care to ensure that you
store your Brewer in a safe and frost free envi-
ronment. It is suggested to store your brewer
in the upright position. If you store the Brewer
in a cold environment, you run the risk of
water freezing inside the Brewer and causing
damage. When you prepare to use it after
storage, we recommend rinsing the Water
Reservoir with fresh water and running three
cleansing brews without a K-Cup
®
.
If you plan to move your Brewer to a different
location, turn the Brewer off, unplug it and
empty both the Hot Water and Cold Water
tanks. If your Brewer has been in an environ-
ment below freezing, please be sure to let it
warm to room temperature for 2 hours before
using.
COIN MECHANISM ACCESSORY

18
WARRANTY
Keurig warrants that your Keurig B200
Brewer will be free of defects in materials or
workmanship under normal use for one year
from the date of purchase. Keurig will, at its
option, repair or replace the Brewer without
charge upon its receipt of proof of the date of
purchase. If a replacement Brewer is neces-
sary to service this warranty, the replacement
Brewer may be new or reconditioned. If a
replacement Brewer is sent, it will carry the
remaining warranty of the original product.
Keurig will cover all shipping costs for
authorized returns.
This warranty only applies to brewers operat-
ed in the United States and Canada. This war-
ranty gives you specific legal rights, and you
may also have other rights that vary from
state to state and, in the case of Canada, from
Province to Province.
What is not covered by the Limited
Warranty?
THIS WARRANTY DOES NOT COVER CONSE-
QUENTIAL OR INCIDENTAL DAMAGES SUCH
AS PROPERTY DAMAGE AND DOES NOT
COVER INCIDENTAL COSTS AND EXPENSES
RESULTING FROM ANY BREACH OF THIS
WARRANTY, EVEN IF FORESEEABLE. Some
states or Provinces do not allow the exclusion
or limitations of incidental or consequential
damages, so the above limitation or exclusion
may not apply to you depending on the state
or Province of purchase.
Nor does this warranty cover damages
caused by services performed by anyone
other than Keurig or its authorized service
providers, use of parts other then genuine
Keurig parts, or external causes such as
abuse, misuse, inappropriate power supply or
acts of God.
Other Limitations
THIS WARRANTY IS EXCLUSIVE AND IS IN
LIEU OF ANY OTHER EXPRESS WARRANTY,
WHETHER WRITTEN OR ORAL. THE DURA-
TION OF ANY IMPLIED WARRANTIES,
INCLUDING BUT NOT LIMITED TO ANY
IMPLIED WARRANTIES OF MERCHANTABIL-
ITY OR FITNESS FOR A PARTICULAR PUR-
POSE, IS EXPRESSLY LIMITED TO THE
PERIOD OF DURATION OF THIS LIMITED
WARRANTY. Some states or Provinces do
not allow limitations on how long an implied
warranty lasts, so the above limitation may
not apply to you depending on the state or
the Province of purchase.
How do you obtain warranty service?
Keurig Brewers are high quality appliances
and, with proper care, are intended to provide
years of satisfying performance. However,
should the need arise for warranty servicing,
simply call Customer Service at our toll free
number 1-888-CUP-BREW (1-888-287-
2739). Please do not return your Brewer for
servicing without first speaking to Keurig
Customer Service to obtain an Authorization
to Return number (ATR). Keurig brewers
returned without an ATR number will be
returned to the sender without servicing.
Keurig Incorporated
101 Edgewater Drive
Wakefield, MA 01880
1-888-CUP-BREW
(1-888-287-2739)
Keurig, Incorporated
55 Walkers Brook Drive
Reading, MA 01867
1-888-287-2739
Page is loading ...
Page is loading ...
Page is loading ...
Page is loading ...

23
Caractéristiques
Modèle de cafetière commerciale B200
9
10
Fig. 4
9 – PORTE DE REMPLISSAGE
10 – FILTRE DE REMPLISSAGE
AMOVIBLE
6
7
8
Fig. 2
6 – SUPPORT À GODET K-CUP
MC
7 – ENTONNOIR
8 – BOÎTIER DE L’ASSEMBLAGE DU
SUPPORT À GODET K-CUP
MC
Page is loading ...
Page is loading ...
Page is loading ...
Page is loading ...
Page is loading ...
Page is loading ...
Page is loading ...
Page is loading ...
Page is loading ...
Page is loading ...
Page is loading ...
Page is loading ...
Page is loading ...
Page is loading ...
Page is loading ...
Page is loading ...

TO CONTACT CUSTOMER SERVICE:
POUR COMMUNIQUER AVEC LE
SERVICE À LA CLIENTÈLE :
www.keurig.com
or/ou
1-888-CUP-BREW (287-2739)
KEURIG INCORPORATED
Part #: / Pièce 60-200719-000
Revision D, November 2007 / Novembre 2007
Made in China / Fabriqué en Chine
Keurig, Keurig Brewed, Brewing Excellence One Cup at a
Time, and K-Cup are trademarks or registered trademarks
of Keurig, Incorporated.
Keurig, Keurig Brewed, l’infusion par excellence une tasse
à la fois et K-Cup sont des marques de commerce ou des
marques déposées de Keurig, Inc.
All other trademarks used herein are the property of their
respective owners.
Toutes les autres marques de commerce utilisées dans le
présent guide sont la propriété de leur propriétaires
respectifs.
© 2006 Keurig, Incorporated
All rights reserved
. Tous droits réservés.
Covered by US Patents Nos. 7,165,488 and
D544,299
Protégé par les brevets Numéros7,165,488
des D544,299
For Commercial Use Only
Pour usage commercial seulement
-
 1
1
-
 2
2
-
 3
3
-
 4
4
-
 5
5
-
 6
6
-
 7
7
-
 8
8
-
 9
9
-
 10
10
-
 11
11
-
 12
12
-
 13
13
-
 14
14
-
 15
15
-
 16
16
-
 17
17
-
 18
18
-
 19
19
-
 20
20
-
 21
21
-
 22
22
-
 23
23
-
 24
24
-
 25
25
-
 26
26
-
 27
27
-
 28
28
-
 29
29
-
 30
30
-
 31
31
-
 32
32
-
 33
33
-
 34
34
-
 35
35
-
 36
36
-
 37
37
-
 38
38
-
 39
39
-
 40
40


Ask a question and I''ll find the answer in the document
Finding information in a document is now easier with AI
in other languages
- français: Keurig B200 Manuel utilisateur


