7. Using the template provided, drill four 3/8" holes into the tile
and cement board. Then drill four 5/32" pilot holes into the
header. Use a level to insure the holes are level. Be precise.
Do not oversize or undersize the holes. Drill the pilot holes to
the full 3" depth (length of the screws).
NEVER drill into electrical lines. Drilling into electrical
lines may cause electrical shock which may result in fire, injury or
even death.
NEVER drill into plumbing. Drilling into plumbing may
cause interior wall water leaks, which may result in rot, mold and
other property damage.
Failure to drill pilot holes properly may result in
mounting failure and may result in serious injury.
Failure to space and locate pilot holes properly,
according to the template holes, may result in misalignment be-
tween the seat and the mounting brackets, and the seat
may not fit into the mounting brackets.
If the pilot holes are not properly spaced, do not en-
large the holes. NEVER drill multiple holes near each other. En-
larging the holes or drilling multiple holes near each other may
cause mounting failure and result in serious injury.
8. Fill the mounting holes with silicone (provided) before mounting
the brackets to the wall as required to prevent moisture from
penetrating into the wall and/or wall cavity.
Failure to fill the mounting holes properly may allow
moisture to penetrate into the wall and/or wall cavity and result in
mold, moisture damage or other moisture related problems.
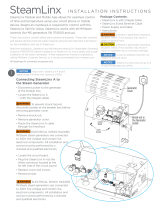
9. Correctly position and mount the left and right brackets to
the wall using the #12 x 3” screws provided. See figure 2 for
correct positioning of both brackets. Do not over or under tighten
the screws. NEVER use any other screws other than the screws
provided. If the screws are missing, misplaced or
damaged please call MrSteam for free replacement screws.
Failure to use the screws provided, or failure to
tighten the screws properly may result in mounting failure and
may result in serious injury.
Mounting the WallSeat on a wall that is not
vertical, modifying the WallSeat or mounting the WallSeat to
a wall with unconventional framing or metal studs may result
in serious injury.
4. Mount the seat in a location away from direct steam
emissions. Temperatures within steam rooms vary. Test the
WallSeat location by using a suitable portable seat during
several steam baths to insure the safety and comfort of the
user and confirm there are no direct steam emissions near
the WallSeat.
NEVER install the WallSeat in a location where the
WallSeat is near direct steam emission. Failure to heed this
warning may cause severe burns, scalding injuries or death.
5. The wall thickness (total thickness of materials not including
the studs but including cement board or equal, mastic,
tiles or marble...etc.) must not be more than
1
1
/
8
” thick.
A wall thickness of more than
1
1
/
8
” may prevent the mount-
ing screws from adequately penetrating the header. See
figure 2.
Failure to limit the wall thickness to a maximum
thickness of
1
1
/
8
” may result in WallSeat mounting failure
and result in serious injury.
6. Mount the seat at a height above the floor according to
personal prefer-ence. For ADA compliance, the seat is
mounted 17”- 19” above the floor. NEVER mount the seat
more than 24" above the floor.
Failure to mount the WallSeat 24" or less above
the floor may result in serious injury.
Failure to locate the seat away from direct steam
emissions may result in elevated temperature of the WallSeat
itself and sitting or contacting the WallSeat may result in
serious injury.
Failure to locate the seat away from direct steam
emissions may result in elevated temperature of the WallSeat
and may result in seat damage.
M
in.
1
/2
”
T
hick
Cement Board
Brackets
Opening
F
acing Up
Left Bracket
S
crews
17
1
/3
2
”
Min.
1
/4
”
Thick Tile
Max. 1
1
/8
”
Thick Wall
R
ight Bracket
(with hole hinge pin
on the left side)
(with hole hinge pin
o
n the right side)
Fig. 2 Mounting Brackets
t
o Finished Wall
WALLSEAT INSTALLATION INSTRUCTIONS
2
____________________________________________________________________________________
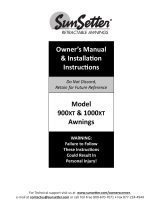
Hinge
Pins
Finished
Wall Surface
Seat
Assembly
Place seat with the
MrSteam logo and
fasteners on the bottom
Fig. 3 Mounting Seat
Assembly