1 2 3
Image Quality Adjustment Quick Guide (Printer Driver Edition) Image Quality Adjustment Quick Guide (Printer Driver Edition)
Image Quality Adjustment Quick Guide
(Printer Driver Edition)
Revision 1. 0 2005. 8
302G756320
1
Select “Printers and Faxes” via the Start menu.
2
Right-click on the icon for this printer in the “Printers
and Faxes” window.
3
Select “Printing Preference” from the resulting pulldown
menu. The “Printing Preference” window for this printer
driver will appear.
I. Color setting adjustments
You can change the settings in the “Color” tab of the printer driver’s “Printing Preference” window,
such as “Color Mode”, “Color Adjustment” and “Color Correction”, as desired.
* These settings can also be changed from the “Print” menu of the application in use.
* The following explains the procedure when using Windows XP as your operating system. If you are using any other
operating system, use this procedure merely as reference.
To display the “Color” tab in the “Printing Preference” window...
4
Click on the “Color” tab to display its contents.
*Refer to the following explanations for more information on each
setting in the “Color” tab.
Color Mode
You can select the desired color mode.
1
Click on the “Color” tab to display its contents.
2
Use the pulldown menu for the “Color Mode” field to
select the desired mode:
Color (CMYK) ... Color data will be printed in color.
Monochrome ... Printing will be accomplished in
monochrome (B/W).
Custom ... Lets you select from 3 different options.
<When you select “Custom”...>
1
Click on the “...” button to the right of the “Color Mode”
field. The “Color Mode Settings” dialogue box will appear
and you can select the desired options.
To make clearer prints, select “Continuous Tone”, and “Gloss Mode” if desired, under
the “Custom” setting.
Continuous Tone ... Printing will be accomplished with the same result as selecting the “Fine”
setting for the Tone mode.
Gloss Mode ... High-gloss printing will be accomplished.
Note: If you select the “Gloss Mode”, the prints will be clear and have a glossier finish, but
printing may take as much as twice as long. In addition, because a greater amount of memory is
required to use the “Continuous Tone” option, it may be necessary to increase your memory
capacity in order to perform certain print jobs when using that option.
Color Adjustment
You can adjust the color of prints as desired. You can also register a set of adjustments as a single
custom setting.
1
Click on the “Color” tab to display its contents.
2
Use the pulldown menu for the “Color Adjustment” field
to select the desired mode (Custom 1 through 3).
3
Click on the “...” button to the right of the “Color
Adjustment” field. The “Color Adjustment (Custom 1-3)”
dialogue box will appear and you can select the desired
options.
* If you do not want color adjustment to be performed, select
“None”. The default setting for color adjustment is “None”.
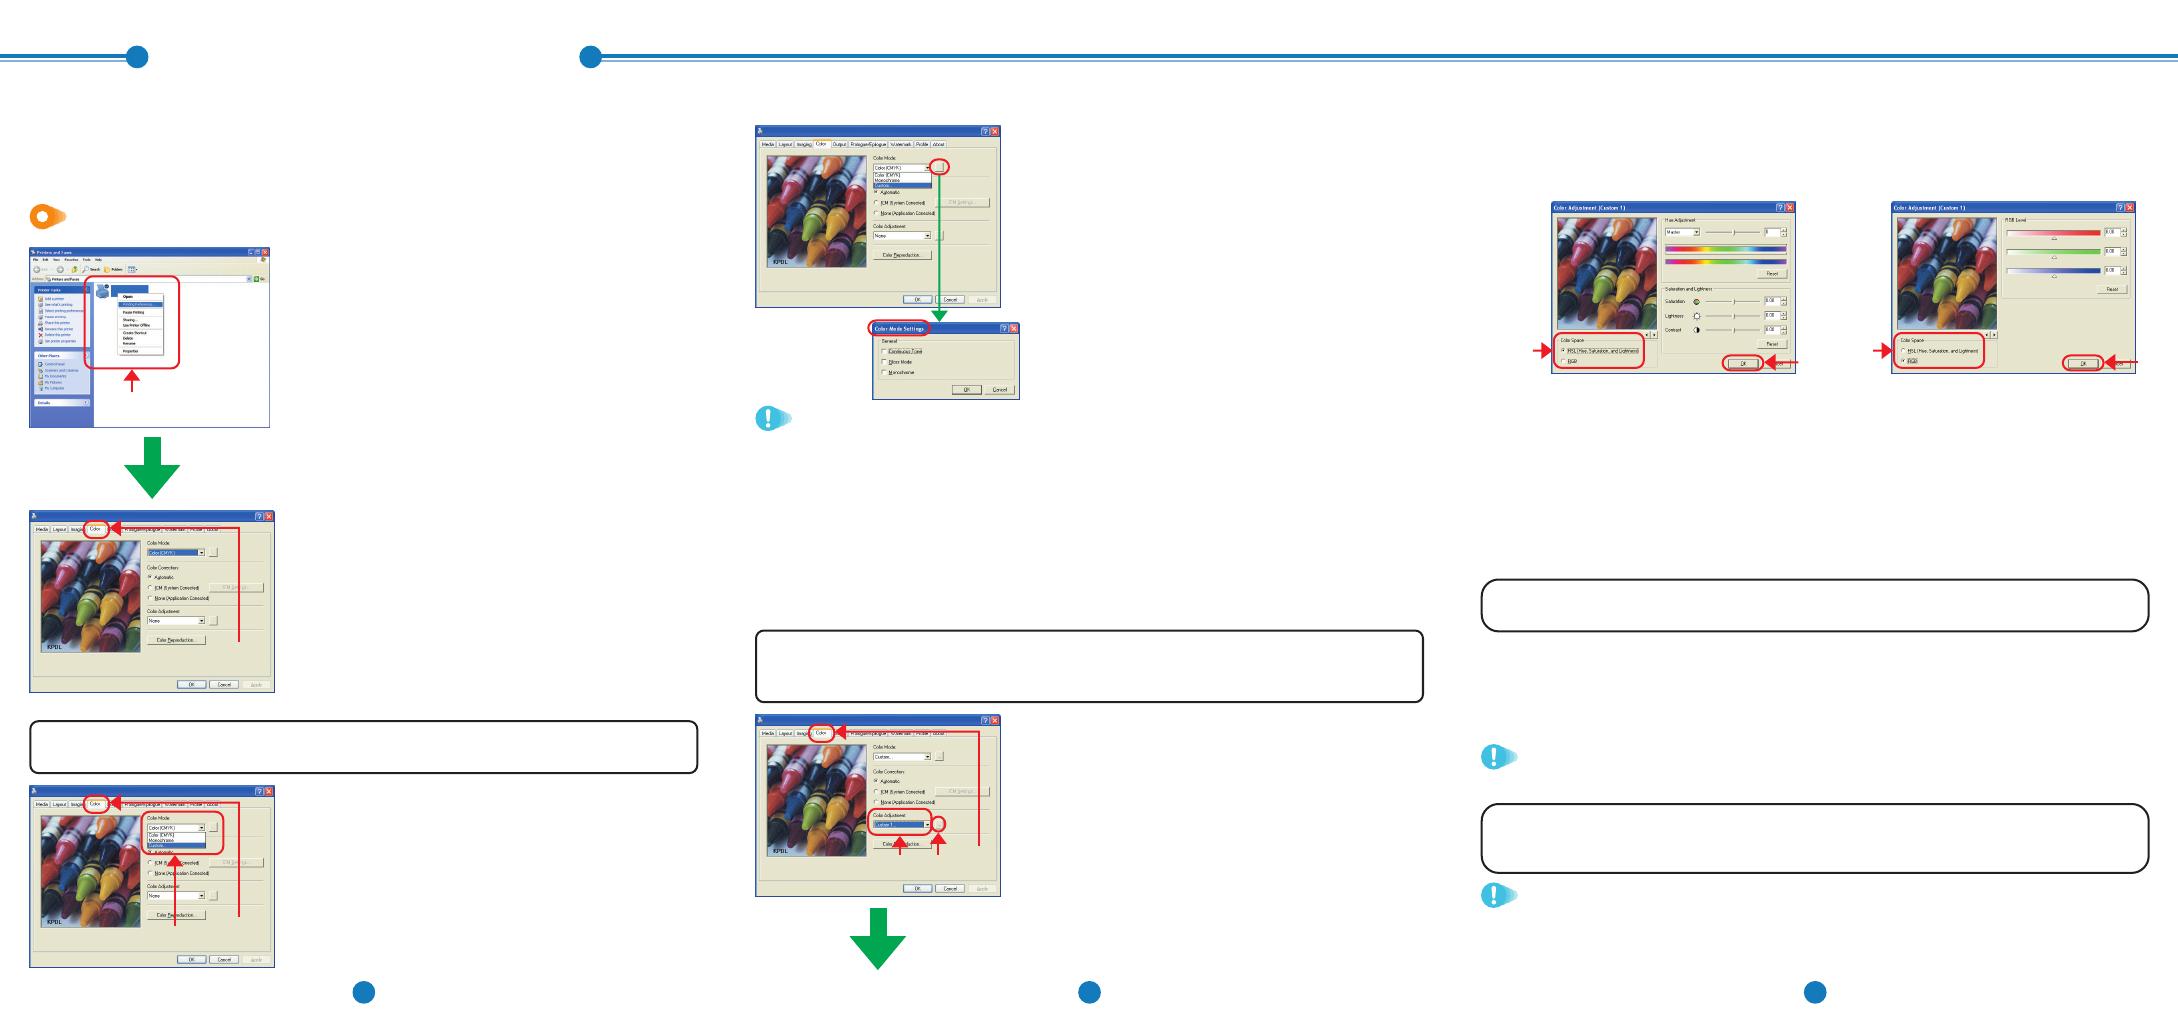
4
Select either “HSL (Hue, Saturation, and Lightness)” or “RGB” under “Color Space”. Make the
desired color adjustment settings for the selected option.
5
Once you are finished with the corresponding settings, click on the “OK” button. If you want to
return the settings to their default values, click on the “Reset” button.
<When you select “HSL (Hue, Saturation, and Lightness)”...>
Other settings are possible as well.
Automatic ... Color correction is accomplished based on the settings made on the printer’s operation
panel. The default setting for color correction is “Automatic”.
ICM (System Corrected) ... Color correction will be accomplished based on one of 3 different user-
selected color representation methods that will be available.
None (Application Corrected) ... Color correction is accomplished based on the settings made in the
application software.
If you don’t have any specific requirements for the color correction method, it is
recommended that you select “Automatic”.
Hue Adjustment
Use the slide bar to make the color adjustment as desired.
Select “Master” in the “Hue Adjustment” field to adjust all
colors at one time. You can also select to adjust the setting
for each color individually.
Saturation and Lightness
Saturation ... Adjusts the color saturation of the image.
Lightness ... Adjusts the brightness of the image.
Contrast ... Adjusts the contrast of the image.
RGB level
You can adjust each of the 3 primary
colors that make up all color on the
monitor: RGB (Red, Green, Blue).
Color Correction
You can select the method of color correction.
2, 3
4
2
1
1
32
If you don’t have any specific requirements for the color correction method, it is
recommended that you select “Auto 1”.
Color Reproduction
If you select “Automatic” as the color correction setting, you will be able to choose the desired color
reproduction mode from among the 7 different modes available.
<When you select “RGB”...>
4
5
4
5

