Page is loading ...

1
MODEL: 58813TS
Read this g rill g uide before attempting to assemble or operate your grill.
Follow all safety instructions.
Check for your leaks according to directions in this grill guide before operating
your grill, even if you purchased this grill assembled.
K eep this grill guide for future reference.
Always read and follow all
notices in this g rill g uide. Failure to follow these notices may result in
property damage, bodily injury,or death.
1. Grill installation must conform with local codes, or in their absence, with either the
National Fuel Gas Code, ANSI Z223.1/NFPA 54, Natural Gas and Propane
Installation Code, CSA B149.1, or Propane Storage and Handling Code, B149.2.
“
“
“
“Before
Before
Before
Before returning
returning
returning
returning to
to
to
to your
your
your
your retailer,
retailer,
retailer,
retailer, call
call
call
call our
our
our
our customer
customer
customer
customer service
service
service
service department
department
department
department at
at
at
at
1-877-292-9888
1-877-292-9888
1-877-292-9888
1-877-292-9888 with
with
with
with hours
hours
hours
hours of
of
of
of operation
operation
operation
operation 9:00am
9:00am
9:00am
9:00am –
–
–
–5:00pm
5:00pm
5:00pm
5:00pm EST,
EST,
EST,
EST, Monday
Monday
Monday
Monday –
–
–
–Friday.
Friday.
Friday.
Friday. ”
”
”
”

2
2. This gas grill, when installed, must be electrically grounded in accordance with local
codes, or, in the absence of local codes, with the National Electrical Code,
ANSI/NFPA 70, or the Canadian Electrical Code, CSAC22.1.
3. This gas grill is intended for outdoor use only, and should not be used in a building,
garage, or any other enclosed area.
4. This gas grill is not intended to be installed in or on recreational vehicles and/or
boats.
5. Never use any other type of fuel for this grill other than LP gas (propane).
6. Only use the pressure regulator with a type 1 connector that is supplied with this gas
grill.
7. Before each use, check the gas hose for excessive abrasion, cracking, fraying, wear,
or cuts. Replace a hose assembly showing those signs with the hose assembly
specified in the parts list before using the grill.
8. Always perform a l eak t est before operating your grill.
1 Do not store or use gasoline or other flammable vapors and liquids in the vicinity of
this or any other appliance.
2
A
LP cylinder not connected for use should not be stored in the vicinity of this or any
other appliance.
If you smell gas:
1 Shut off gas to the appliance.
2 Extinguish any open flame.
3 Open lid.
4 If odor continues, keep away from appliance and call your local fire department.

3
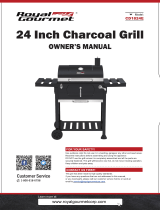
Parts
Parts
Parts
Parts List
List
List
List
(1)Lid Handle Base-4pcs (2)Lid Handle -4pcs (3)Stack ( Gas)-2pcs
(4)Stack ( Gas) cover-2pcs (5)Thermometer Bottom-2pcs (6) Thermometer-2pcs
(7 )Stack ( Charcoal)-1pc (8) Chimney Lid-1pc (9)Warming Rack-2pcs
(10)Cooking Grate-4 pcs (11)Lifter-2pcs (12)Charcoal Panel-1pc
(13)Flame Shield-3pcs (14)Burner-3pcs (15)Side Burner with Regulator and hose-1pc

4
(16)Knob-4pcs (17) Firebox-1pc (18 -1 ) Gas Lid (18 -2 ) Charcoal Lid
(19)Gas Tank Hook-1pc ( 20)Control Panel-1pc (21)Accessories-1pc
(22)Smoker Side Handle-1pc (23)Smoker Handle Base-4pcs (24)Smoker 1pc
(25)Smoker Handle-1pc (26)Smoker Charcoal Grate-1pc (27)Smoker Cooking Grate-2pcs

5
(28)Smoker Ash Pan-1pc (29)Drip Pan-1pc (30)Grease tray-1pc
(31)Ash Pan-1pc (32)Stabilizing Plate(Left)-1pcs 33Stabilizing Plate-2pcs
(34)Stabilizing Plate(Right)-1pc (35)Gas Tank -1pc (36)Legs 4pcs
(37)Caster-4pcs (38)Bottom Shelf-1pc (39)Fire Rod

6
Hardware
Hardware
Hardware
Hardware List
List
List
List
( H) Battery(AA) Qty: 1pc
(A) M8 Nut Qty: 1pc
(B)Spring Qty: 1pc ( I ) Hinge Pins Qty: 4 pcs
(C) M5 ×8bolt Qty:9pcs (J ) Cotter Pins Qty: 4 pcs
(D) M6 ×12 bolt Qty:68pcs
(E) M6 ×25 bolt Qty: 8pcs
(F) M6 Nut Qty:58pcs
(G) M6 ×35 bolt Qty: 4pcs

7
Befor eassembl yrea dinstructio ncarefully.Assembl e gril lo n aclean ,fla t surface .Thi s
uni tisheavy .
2 . Turn the Firebox(18) assembly upside
down. Attach the legs (36) and fire rod
(39) to the Lid&Firebox (18) using M6 x 12
bolts (D) for each corner. The fire rod (39)
in the left. Only hand tighten until all bolts
are in, then tighten with a Phillips
screwdriver.
3 . Us ehardwar e M6 x 12 bolts ( D) to
attac hth ebotto m shel f( 28 )tolegs .
Als oassembl eth ega stan khoo k an d
ga s tan kholde r ( 1 9,35 )a s show n
usin g hardwar e M6 x 12 bolts ( D).
Mak esur e i tisplace d unde r th ega s
sectio n o fth e grill .Thi sisth esectio n
wit hth e ven t slot s in th ebody .
1. Attach the g as Lid(18 -1 ) and charcoal
lid(18-2) to the firebox (17) by insert ing
hinge pins ( I ) through the holes on the
upper hinges and lower hinges Insert
cotter pins ( J ) into the ends of the hinge
pins ( I ).

8
4 .
Tak
eou tcaster s ( 37 )an dscre w the m
tightl yint o th ebotto m hole s o flegs .
5 . Turn the grill assembly upright and attach
the Stabilizing Plate(Left)(32),Stabilizing
Plate(33),Stabilizing Plate(Right)(34) to the
legs. Us ehardwar e M6 x 12 bolts ( D)and M6
Nuts (F).
6. Instal lth e as hpa n ( 31 ) and Instal lth e
dri p pa n (3 0 )unde r th ega ssection .Pu t
th egreas e tra y ( 29 )unde r th edri p pa n (3 0 )

9
7 . Assembl e th eaccessorie s
shel f( 21 )toth echarcoa l
sectio n usin g hardwar e M6 x 12
bolts (D). Se e illustratio n below .
8 . Assembl e th econtro lpane l( 20 )
toth ega ssectio n b yusin g hardwar e
M6 x 12 bolts (D). Instal lth e knob s
( 16 )toth epanel .Tighte nal l
connections .
Put into the Battery(AA)( H) Control
Panel( 20)

10
9 . Attac hth e burner s (1 4 )int o ga s valv e
bod yusin g hardware M5 ×8bolt ( C) .
Se e th e illustratio n a s below .
10 . Insta ll th e kno bs ( 16 ) to the side
burner with regulator and hose (15) .
Assembl e th e sid e burne r t o t he
body . Use hardwar e M6 x 12 bolts
( D) and M6 Nuts (F). Inser t th e
regulat or a s shown . Tighte n al l
connection s a t thi s time .

11
1 1 . Attach the Smoker Side Handle (22)
with Smoker Handle Base(23) and the
Smoker Handle (25) with Smoker Handle
Base(23) to the Smoker (24) using M6 ×
25 bolt s ( E ). And to the firebox Us e
hardwar e M6 x 12 bolts ( D)and M6 Nuts
(F). Tighte n al lconnection s a tthi s
time .
12. Put the Smoker Charcoal Grate (26)
into Smoker Ash Pan(28), Instal lth e
Smoker Ash Pan(28) to the smoker (24).Put
the Smoker Cooking Grate (27) into the
smoker (24).

12
1 3 . Positio n Lifters (11) on
Charcoal Panel(12). Rais ean d
positio n Lifters (11) onsid e
support singril lbody .Instal lth e
flam eshield s( 13 )ove rth e
burner .
1 4 .The thermometer Bottom(5) to the lid
using M6 ×35 bolts (G) and M6 Nuts
(F) ,Unscrew the pre-assembled nut
from the Thermometer (6) . Attach the
thermometer ( 6 ) to the lid , re-attach
nut and tighten .
Insert the Stacks ( Gas) (3) through the
inside of the lid . Secure the Stacks
( Gas) (3) to the lid using M6 x 12
bolts ( D)and M6 Nuts (F) ,
1 5 .Attach the Stack (Gas) cover(4)
using M5 ×8bolt s(C).
Attach the Stack ( Charcoal)(7) to
the Chimney Lid (8) using spring
( B ) and M8 nut ( A ) .

13
1 6 . Inser t warmin g rac ks (9 )ta b
int o hol e o feac hgril lli dan d
botto mend .
1 7 . Plac e th e cookin g grate s ( 10)
int o eac h gril l body .
T
wo piece s
o f eac h section .

14
This
This
This
This charcoal
charcoal
charcoal
charcoal grill
grill
grill
grill is
is
is
is warranted
warranted
warranted
warranted for
for
for
for 1
1
1
1 year
year
year
year against
against
against
against broken
broken
broken
broken or
or
or
or damaged
damaged
damaged
damaged parts
parts
parts
parts at
at
at
at the
the
the
the time
time
time
time
of
of
of
of purchase.
purchase.
purchase.
purchase. It
It
It
It is
is
is
is warranted
warranted
warranted
warranted to
to
to
to be
be
be
be free
free
free
free of
of
of
of defects.
defects.
defects.
defects. Paint
Paint
Paint
Paint is
is
is
is warranted
warranted
warranted
warranted to
to
to
to be
be
be
be free
free
free
free of
of
of
of
defects
defects
defects
defects except
except
except
except for
for
for
for rust,
rust,
rust,
rust, which
which
which
which may
may
may
may appear
appear
appear
appear after
after
after
after repeated
repeated
repeated
repeated use.
use.
use.
use. This
This
This
This warranty
warranty
warranty
warranty does
does
does
does not
not
not
not
cover
cover
cover
cover damage
damage
damage
damage or
or
or
or issues
issues
issues
issues related
related
related
related to
to
to
to neglect,
neglect,
neglect,
neglect, abuse,
abuse,
abuse,
abuse, or
or
or
or modifications
modifications
modifications
modifications to
to
to
to the
the
the
the appliance.
appliance.
appliance.
appliance.
Repair
Repair
Repair
Repair labor
labor
labor
labor is
is
is
is not
not
not
not covered.
covered.
covered.
covered. All
All
All
All parts
parts
parts
parts that
that
that
that meet
meet
meet
meet the
the
the
the warranty
warranty
warranty
warranty requirements
requirements
requirements
requirements will
will
will
will be
be
be
be
shipped
shipped
shipped
shipped at
at
at
at no
no
no
no charge,
charge,
charge,
charge, via
via
via
via Federal
Federal
Federal
Federal Express
Express
Express
Express or
or
or
or US
US
US
US Mail.
Mail.
Mail.
Mail. All
All
All
All warranty
warranty
warranty
warranty claims
claims
claims
claims apply
apply
apply
apply only
only
only
only
to
to
to
to the
the
the
the original
original
original
original purchaser
purchaser
purchaser
purchaser and
and
and
and require
require
require
require a
a
a
a proof
proof
proof
proof of
of
of
of a
a
a
a purchase
purchase
purchase
purchase verifying
verifying
verifying
verifying purchase
purchase
purchase
purchase date
date
date
date
1 8 . The grill is now assembled.

15
OPERATION
OPERATION
OPERATION
OPERATION INSTRUCTIONS
INSTRUCTIONS
INSTRUCTIONS
INSTRUCTIONS
c
This grill has an adjustable charcoal tray. By turning the crank handle, the charcoal tray
can be
raised or lowered to desired height. This allows for different heat settings depending on
the food you are cooking and the temperature you want to cook at. It also allows easy
cleaning of the interior of the firebox after the unit has cooled down completely. It is not
recommended to raise a fully loaded charcoal tray higher than the middle height setting.
NOTE:
The grate is coated with porcelain which is a fragile coating. Handle with care to avoid
damag e . Do not cool the grate in cold water while it is still hot or the coating may
crack. Let the grate cool off by itself.
Some parts of this grill have been pre-oiled at the factory. Please burn off the oils
before cooking
Lighting
Lighting
Lighting
Lighting the
the
the
the Fire
Fire
Fire
Fire
Open the hood of your CHARCOAL GRILL, as well as all of the butterfly dampers.
Remove the cooking grates. Add charcoal. Do not put more than 6 pounds of
charcoal briquettes or 3 pounds of lump charcoal into the pan. Lower the adjustable
charcoal pan to its lowest setting – use charcoal lighter fluid to start the fire, following
directions supplied by the manufacturer of the lighter fluid.
Allow the charcoal enough time to completely ash over before beginning to cook, so
that the lighter fluid has enough time to burn off. Starting to cook too soon can leave
your food tasting like lighter fluid. After ash - over is complete, use long-handled tongs
to spread the charcoal into a single layer on the pan.
Chimney starters, electric starters, or other types of fire starters may be used instead
of lighter fluid to light the fire – but only according to those manufacturers ’
instructions. When using charcoal lighting fluid, allow charcoal to burn with grill lid
open until covered with a light ash (approximately 20 minutes). This will allow
charcoal lighting fluid to burn off. Failure to do this could trap fumes from charcoal
lighting fluid in grill and may result in a flash fire or explosion when lid is opened.

16
OPERATION
OPERATION
OPERATION
OPERATION INSTRUCTIONS
INSTRUCTIONS
INSTRUCTIONS
INSTRUCTIONS
Controlling
Controlling
Controlling
Controlling the
the
the
the Fire
Fire
Fire
Fire
Allow enough time for properly building the fire and getting the grill up to desired
temperature before attempting to cook. You simply cannot cook properly in a cold
grill, nor can you nurse a fire to life while busy with the food. Both deserve your best!
Once a fire is
burning happily, it is easy to keep it going with just a little attention. You will be
pleased at how long your CHARCOAL GRILL will burn on a little charcoal.
Rising heat will move up and out of the grill, pulling in cooler air behind it, which
provides oxygen for the fire. Your CHARCOAL GRILL has four butterfly dampers that
control airflow, which lets you fine tune the temperature.
NOTE: Dampers will become very hot after lighting the charcoal - be sure to wear
insulated grill mitt during adjustment.
After the fire is established and the grill reaches the desired cooking temperature,
the butterfly dampers can be left completely open, providing maximum airflow for a
higher temperature or closed as needed to decrease airflow for a lower temperature.
Use the color-coded heat indicator to monitor the grill temperature.
Fully opening the upper damper on one side and fully opening the opposite lower
damper (closing the remaining damper) will create a convection effect inside the grill
when hood is closed . This will allow for extended cooking times when barbecuing.
Th e adjustable charcoal grate can also be used to control the temperature. Raise it
to its highest setting for quick searing and lower it to its lowest setting for slow
cooking.
Adding
Adding
Adding
Adding Additional
Additional
Additional
Additional Charcoal
Charcoal
Charcoal
Charcoal
To achieve the extended cooking times needed for barbecuing or slow smoking (or if
you ’ re using your CHARCOAL GRILL to make enough hot dogs and hamburgers to
feed an army), additional charcoal can be added through the charcoal pan access
door. Lower the adjustable charcoal pan to its lowest setting. Open the charcoal pan
access door using an insulated grill mitt – as the handle can be hot. Using
long-handled tongs, stoke the coals enough to allow excess ash to fall through the
charcoal pan into the slide out ash pan below. Again using insulated mitts and
long-handled tongs, add charcoal to the pan as needed and close the access door.
Raise the adjustable charcoal pan to the desired level.
Do not use lighter fluid or instant light charcoal when adding additional charcoal to an
existing fire. This can be dangerous, and will leave a lighter fluid aftertaste on your
food.
Do not attempt to empty the ash pan of burning charcoal pieces or hot ash. Wait until
the ashes and grill have completely cooled before emptying the grill.
See the “ Cooking Methods ” section for more information on barbecuing & slo w
smoking.

17
OPERATION
OPERATION
OPERATION
OPERATION INSTRUCTIONS
INSTRUCTIONS
INSTRUCTIONS
INSTRUCTIONS
Cooking
Cooking
Cooking
Cooking Methods
Methods
Methods
Methods
You can use your GRILL to cook three different ways – depending on the type of food,
and how you want to prepare it.
GRILLING
Grilling is cooking directly over the fire, using direct heat. This method is the quickest
and works well for foods that are tender before you cook them – including steaks,
beef or pork tenderloin, burgers, hot dogs, sausages, chicken, seafood, etc.
Vegetables are also wonderful when grilled.
Grilling uses very high temperatures that are over 325 °F. When cooking at these
temperatures, it is important to carefully watch your food to keep it from burning. Also,
closing the lid to put out any grease flare-up that may occur when flipping burgers or
steaks.
BARBECUING
Barbecuing is cooking using indirect heat and smoke. This method takes a little
longer, but can be used for nearly any kind of food you want to cook (including those
above). As barbecuing uses lower temperatures and longer cooking times – this
method works best for cuts of meat that need time to tenderize – such as ribs, brisket,
pork shoulder, wild game, etc.
Barbecuing uses temperatures from 225 °F to 325 °F. Try to maintain 275 °F for
optimal results. Use your imagination when barbecuing, as the possibilities are
endless!
SLOW SMOKING
Slow smoking uses much lower temperatures and much longer cooking times. Slow
smoking is actually a way to cure meats rather than cook them. Slow smoking is
ideal for turkeys, chickens, beef briskets, cheese and sausage.
Slow smoking uses temperatures that range from 140 °F to 225 °F. Most slow
smoking recipes call for the use of a saline brine that helps preserve the meat and
avoid bacterial contamination during the cooking process.
Using
Using
Using
Using Charcoal
Charcoal
Charcoal
Charcoal and
and
and
and Wood
Wood
Wood
Wood
CHARCOAL
Your CHARCOAL GRILL is made to burn either charcoal briquettes or natural wood lump
charcoal – both of which have different cooking attributes. Briquettes typically provide
longer burn times than lump charcoal – but lump charcoal burns hotter than briquettes.
Using the charcoal pan access door to add more charcoal makes both briquettes and
lump easy and convenient for extended cooking times.

18
OPERATION
OPERATION
OPERATION
OPERATION INSTRUCTIONS
INSTRUCTIONS
INSTRUCTIONS
INSTRUCTIONS
SMOKING WOODS
Adding smoking woods to your CHARCOAL GRILL is an easy and effective way to
create wonderful flavor combinations for all types of grilled, barbecued, or slow
smoked foods. Wood chips are typically used for shorter cooking times, where
chunks are better fo r longer cooking times.
When choosing smoking woods, the rule of thumb is to use a fruited hardwood – from
a
tree that bears a nut, fruit, or berry. The most popular and widely available smoking
woods are hickory and mesquite. Hickory imparts a milder flavor, where mesquite is
more intense. Other common wood varieties are oak, apple, pecan, cherry, etc.
It is important to never use pine, cedar, or kiln dried wood – and any smoking woods
should be well cured. Green wood still contains all the sap and moisture needed to
keep the tree alive, and will impart a super strong-tasting smoke that will turn your
foods black. Also, when you try burning green wood, it is hard to reach a good
temperature, because all the moisture inside the wood almost puts the fire out while
it ’ s burning. Well-cured wood lights easily, maintains cooking temperature, and
produces a great tasting smoke flavor that isn ’ t too strong.
The amount of smoke flavor imparted to your food can be controlled by not just
the type of wood you use (whether a mild wood or more intense), but also by
the length of time the meat is smoked. Barbecuing typically adds more smoke
flavor to food than grilling, due to the longer cooking times. You can also
control the amount of smoke flavor by wrapping meats in aluminum foil for part
of the cooking process. Cook meat for ½to 2/3 of the total cooking time, or
until it looks to the perfect color. Then wrap the meat in foil and finish cooking
the meat until done.

19
CARE
CARE
CARE
CARE AND
AND
AND
AND MAINTENANCE
MAINTENANCE
MAINTENANCE
MAINTENANCE
Grill
Grill
Grill
Grill Maintenance
Maintenance
Maintenance
Maintenance
Frequency of cleaning is determined by how often the grill is used. Make sure coals are
completely extinguished and the grates are cooled down before cleaning inside of the unit.
To remove the stains on the lid and front panel caused by the fumigation while grilling, use
of a cleaning pad is recommended. Wipe out the interior of unit with cloth or paper towel.
Clean the grates with warm water and pat dry. The coating is fragile. Do not knock, hit or
drop the grates.
/