Page is loading ...

Kingsford and the Kingsford logo are registered trademarks of the Kingsford Products Company, LLC and are used under license by
Chant Kitchen Equipment(H.K.)Ltd. All rights reserved.
Vendor Stock No.: BC251
INSTRUCTION MANUAL
32” CHARCOAL GRILL
FOR OUTDOOR USE ONLY.
PLEASE READ INSTRUCTIONS CAREFULLY BEFORE ASSEMBLY
RETAIN THIS MANUAL FOR FUTURE REFERENCE.
If you have any questions or problems, you can call our
customer service department at 1-855-CHANT-US
(1-855-242-6887) from 8:00am to 5:00pm Eastern time,
Monday through Friday for assistance.
DO NOT RETURN TO THE PLACE OF PURCHASE.

1
SAFETY WARNINGS – READ CAREFULLY
Before assembling or using your new KINGSFORD® CHARCOAL GRILL -- carefully read the
instruction manual and all safety warnings!
This symbol “!” indicates a safety warning – pay special attention to the information following
this warning when assembling or using your grill.
Use caution and common sense when operating grill to protect persons and property.
Failure to follow safety warnings could result in bodily injury or property damage.
“!” WARNING “!”
ASSEMBLY
Use caution during assembly or operation of grill. Use caution when reaching into or under grill.
Properly dispose of packaging materials.
When moving or lifting grill, use caution to avoid back strains or injuries.
PLACEMENT
Outdoor use only. Do not use grill indoors or in an enclosed or non-ventilated area.
Household use only. Do not operate this grill for other than its intended use.
Never use grill on a wooden surface or other flammable surfaces. Use grill only on a hard,
stable surface that can support the grill’s weight.
Keep 10 feet of clearance between grill and any combustible materials when grill is in use
(including, but not limited to bushes, shrubs, trees, leaves, grass, wooden decks or fences,
buildings, etc.).
Keep grill away from gasoline and/or other flammable liquids, flammable gases, flammable
vapors, or areas where these may be present. Do not store or use grill in these areas.
In windy conditions, place in an outdoor area that is sheltered from wind.
Keep out of reach of children and pets.
When moving or lifting grill, use caution to avoid back strains or injuries.
Do not try to move or reposition grill while it is in use.
Store out of reach of children when not in use.
Don’t place goods over 10kgs/22lbs on side shelf.
LIGHTING A FIRE
Do not use gasoline, kerosene, or alcohol to light charcoal. Using any of these products (or
similar products) could cause a flare up, flash fire, or explosion. Severe bodily injury could be
result.
If using lighter fluid to start fire, leave the hood open until briquettes are ashed over and lighter
fluid has burned off. Closing hood too soon could cause fumes from the lighter fluid to
accumulate inside the grill. This could cause a flare up or explosion when the hood is opened.
Do not open the hood whist the charcoal door is opened. This could cause a flare up or explosion.
Do not add lighter fluid to warm or hot coals. A flash fire may result in bodily injury or property
damage.
Do not add instant light charcoal briquettes to an existing fire. A flash fire may result in bodily
injury or property damage.
Do not light grill without the slide out ash pan in place.

2
GRILL USAGE AND OPERATION
It is always recommended to pre burn your grill prior to your first use. By lighting a small
charcoal fire to simulate the cooking process, you will burn off any residues or oils created during
the manufacturing process.
Grill is hot when in use – do not touch grill surfaces.
Always wear insulated mitts when grill is in use.
Do not wear loose clothing when using grill or allow hair to come in contact with grill.
When in use, never leave grill unattended
Do not operate grill without the slide out ash pan in place.
Use caution when opening the charcoal pan access door. Charcoal pan access door handle may
be hot – use insulated mitts. Follow additional instructions in the “ADDING ADDITIONAL
CHARCOAL” section.
Use caution when adjusting the charcoal pan -- do not allow adjustable charcoal pan to fall
uncontrolled to its lowest position. Adjustable charcoal pan handle may be hot – use insulated
mitts.
Use caution when opening the hood – push back to its fully opened position. If the hood is left
partially open, it may drop suddenly, causing bodily injury. Hood’s handle may be hot – use
insulated mitts.
Use caution when adjusting the butterfly dampers. The butterfly damper handle may be hot –
use insulated mitts.
Do not lean on or place more than 10kgs/22lbs on the side shelf.
Keep a fire extinguisher on hand – in the event the fire gets out of control.
When fresh air comes in contact with flame, a flare up can result. Use caution when opening hood
or charcoal pan access door. Maintain a safe distance from hot steam and flame.
Close hood and butterfly dampers to extinguish flames.
To prolong grill finish and metal life, do not exceed a grill temperature of 400F and do not let
burning charcoal or wood come in contact with the walls of the grill.
After normal operation, if the crank handle does not rotate smoothly, add some lubricating oils into
the crank handle.
Clean the cooking grid and slightly coated with vegetable oil after use.
If there is naked flame or temperature is over 325F, please do not close the hood.
ASH DISPOSAL AND CLEAN UP
Do not leave hot grill or hot coals and ashes unattended.
Do not remove or empty slide out ash pan until coals and ashes have completely cooled.
Using insulated mitts – after coals and ashes have completely cooled – remove slide out ash pan
and empty ashes into a metal container. Douse with water before disposal. Keep container a
safe distance from combustible materials.
Wet the surfaces beneath and around the grill to extinguish any ashes or coals that may have
fallen out of grill.
To prevent excessive rust: clean grill after each use, cover and store in a dry place.

3
SAVE THIS INSTRUCTION MANUAL FOR FUTURE REFERENCE.

4
Parts List
Part
Part Name
Photo
Qty
Part No.
1
※Temperature
Gauge
1pc
2406912
2
※Lid Decorative
Plate
1pc
5204464
3
Hood Assembly
1pc
5204463
4
Upper Hood Hinge
2pcs
5013985
5
Warming Rack
1pc
2406917
6
Cooking Grid
3pcs
2409634
7
Lower Hood Hinge
2pcs
5014001
8
Fire Box Back
Panel
1pc
5207575
9
Fire Box Left Panel
1pc
5109378
10
Left Shaft Support
Bracket
1 pc
5204471

5
Part
Part Name
Photo
Qty
Part No.
11
Butterfly Damper
4pcs
5201618
12
※Butterfly
Damper Handle
4pcs
2100065
13
Side Shelf with
hooks
(pre-assembled)
2pcs
5204476
14
※Small Pipe Plug
4pcs
2100486
15
※Large Pipe Plug
12pcs
2100478
16
※Tool Hook
8pcs
2409448
17
Ash Pan
1pc
5204469
18
※Ash Pan
Decorative Plate
1pc
5204468
19
Left Back Leg
1pc
5204474
20
Left Front Leg
1pc
5204473

6
Part
Number
Part Name
Photo
Qty
Part No.
21
Leg End Cap
2pcs
2404950
22
Hood Handle
1pc
5201617
23
Spacers
2pcs
5201175
24
Fire Box Right
Panel
1pc
5109379
25
Charcoal Tray
1pc
5204467
26
Shaft Assembly
1pc
5204470
27
Fire Box Front
Panel with
charcoal door
(pre-assembled)
1pc
5204465
28
Right Shaft
Support Bracket
1pc
5204472
29
Handle Locking
Bracket
1pc
2307014
30
Crank Handle
1pc
2404949

7
Part
Number
Part Name
Photo
Qty
Part No.
31
※Handle Grip
2pcs
5201622
32
Door Locking
Lever
1pc
5207049
33
Trim
1pc
5207050
34
Charcoal Door
Handle
1pc
2409446
35
Ash Pan Handle
1pc
5201620
36
Bottle Opener
1pc
5014838
37
Right Front Leg
1pc
5201802
38
Right Back Leg
1pc
5201798
39
Wheel
2pcs
2100530

8
Part
Number
Part Name
Photo
Qty
Part No.
40
Axle
1pc
2307601
41
Bottom Shelf
1pc
5204475
※ :NO ASSEMBLY REQUIRED

9
HARDWARE
Note: Tools required for assembly (not included):
Phillips #2 screwdriver
Pliers and Adjustable Wrench
Part
Number
Part Name
Photo
Qty
A
M6x12 Bolt
26pcs
B
M6x35 Bolt
8pcs
C
M6 Half Screw Thread Bolt
8pcs
D
M6 Nut
8pcs
E
M10 Nut
1pc
F
Hinge Pin
2pcs
G
Cotter Pin
2pcs

10
ASSEMBLY INSTRUCTIONS
! Read all safety warnings and assembly instructions carefully before assembling or
operating your grill.
FOR ASSEMBLY ASSISTANCE, MISSING OR DAMAGED PARTS, Contact Customer
Service, Call:1-855-242-6887 Monday thru Friday 08:00 A.M. to 05:00 P.M., Eastern
Standard Time.
(proof of purchase required)
Inspect contents of box to make sure all parts are included and not damaged.
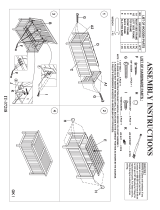
STEP 1
24
9
8
27
STEP 2
Put Leg End Cap (21) into Left Back Leg (19) and Left Front Leg (20),Make
sure the bumping on Leg End Cap is locked into the square hole on the legs.
Loosen pre-assembled Screws and leave the screw heads protruding
approximately 5mm. Hang the side panels onto the screws and tighten them.
19
20
21

11
STEP3
STEP4
A
41
38
A
19
20
37

12
STEP5
STEP6
E
40
39
29
28
A

13
STEP7
STEP8
A
10
30
Self-Tapping Bolt
Loosen the pre-assembled Self-Tapping Bolt from the end of Crank Handle (30),
then rotate the Crank Handle (30) into the hole of the front panel.

14
Self-Tapping Bolt
Fasten the Self-Tapping Bolt to the end of the Crank Handle ( 30),after rotating
the Crank Handle(30) into the hole of the front panel.
Note: Make sure to rotate the crank handle counterclockwise completely to the
end.

15
STEP9
Put the Bolts of the Shaft Assembly (26) into the slot of the Left & Right Fire
box side panel.
Fit the shaft onto the slot of the bracket of the fire box front panel.
26

16
STEP10
STEP11
A
25
A
11
D
Make sure the holes of the charcoal pan(25) are matched with the holes on
Shaft Assembly brackets. Screw the M6x12 Bolts(A) as shown, then tighten
them one by one.

17
STEP12
34
33
Door
32
M8 Nut
Φ8 Spring
Washer
STEP13
7
B
Loosen the pre-assembled M8 Nut and spring washer from the handle (34),
and then assemble the handle to Charcoal Door according to the diagram as
shown.

18
STEP14
STEP15
A
36
6

19
STEP 16
STEP 17
B
4
D
3
B
4
D
A
11
D
D
11
A
/