Page is loading ...

2021 TITAN
QUICK REFERENCE GUIDE

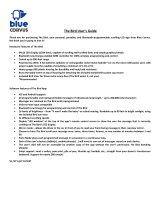
COCKPIT OVERVIEW
Behind the
steering
wheel

Turn Signal / Wiper and Washer Switch
Headlight Control Switch
Low Tire Pressure Warning Light
Vehicle Information Display
Tow Mode Switch
Cruise Control
Steering Wheel Switches for Audio /
Bluetooth
®
/ Siri
®
Eyes Free /
Vehicle Information Display
Fog Light Switch
PUSH
Cargo Lamp Switch
Power Inverter Switch
Headlight Aiming Control
Hood Release
Tilt / Telescopic Steering Column
COCKPIT OVERVIEW

INSTRUMENT PANEL

INSTRUMENT PANEL
Heater and Air Conditioner (automatic)
Vehicle Dynamic Control (VDC) OFF Switch
OFF
Sonar System Switch
P
Warning Systems Switch
Trailer Brake Controller Unit (TBCU)
USB Connection Ports
Heated Steering Wheel Switch
Front Passenger Air Bag Status Light
12V Power Outlet
Climate Controlled Seat Switches

TABLE OF CONTENTS
GETTING STARTED
Nissan Intelligent Key
®
System ........................................................3
Seat Adjustments (if so equipped) and Rear Seats (if so equipped) ...................4
Memory Seat (if so equipped)..........................................................5
Mirror Control Switch (Electric Control Type) (if so equipped) .........................6
HomeLink
®
Universal Transceiver (if so equipped).....................................7
E-Call (SOS) Button (if so equipped) ...................................................8
Heater and Air Conditioner (automatic) (if so equipped) ..............................9
Headlight Control Switch .............................................................10
Wiper and Washer Switch ..............................................................11
Vehicle Information Display...........................................................12
Tire Pressure Monitoring System (TPMS) with Easy-Fill Tire Alert ....................13
Loose Fuel Cap........................................................................14
Starting/Stopping the Engine ........................................................14
Fuel-ller Door ........................................................................15
Driver and Passenger Seat Belt Warning .............................................15
Wide Open Door (King Cab® models only) ............................................15
Opening the Tailgate..................................................................16
Power Outlets.........................................................................16
AUDIO, NAVIGATION AND BLUETOOTH® SYSTEMS
Clock Set/Adjustment ................................................................17
USB (Universal Serial Bus) Connection Ports and iPod
®
Interface ....................17
Bluetooth
®
Hands-free Phone System ...............................................17
• System Operating Tips ...........................................................17
FM/AM/SiriusXM
®
Radio (if so equipped) .............................................20
Apple CarPlay
®
........................................................................21
Android Auto™ . . . . . . . . . . . . . . . . . . . . . . . . . . . . . . . . . . . . . . . . . . . . . . . . . . . . . . . . . . . . . . . . . . . . . . . .22
Navigation System (if so equipped)...................................................23
NissanConnect® Services Powered by SiriusXM® (if so equipped) ....................24
SiriusXM
®
Travel Link and SiriusXM
®
Trac (if so equipped) ..........................25
WI-FI ..................................................................................25
Hands-free Text Messaging Assistant ................................................26
Siri
®
Eyes Free .........................................................................27
Rear Seat Infotainment (RSI) System (if so equipped) ................................27
Please see your Owner’s Manual for important safety information and system operation limitations.
•
A cel
lular telephone should not be used for any purpose while driving
so full attention may be given to vehicle operation.
• Always wear your seat belt.
• Supplemental air bags do not replace proper seat belt usage.
•
Children 12 and under should al
ways ride in the rear seat properly secured
in child restraints or seat belts according to their age and weight.
• Do not drink and drive.
For more information, refer to the “Safety — Seats, seat belts and supplemental restraint system (section 1)”,
the “Monitor, climate, audio, phone and voice recognition systems (section 4)” and the “Starting and driving
(section 5)” of your Owner’s Manual.
Additional information about your vehicle is also available in your Owner’s Manual,
NissanConnect® Owner’s Manual and at www.NissanUSA.com.

DRIVING FEATURES
Forward Driving Aid Sensors (if so equipped).........................................29
Blind Spot Warning (BSW) with Rear Cross Trac Alert (RCTA) .......................29
Automatic Emergency Braking (AEB) with Pedestrian Detection System ........... 30
Lane Departure Warning (LDW) . . . . . . . . . . . . . . . . . . . . . . . . . . . . . . . . . . . . . . . . . . . . . . . . . . . . . . . 31
Hill Start Assist and Hill Descent Control (if so equipped).............................31
Cruise Control (if so equipped) .......................................................32
Intelligent Cruise Control (ICC) (if so equipped).......................................32
Front (if so equipped) and Rear Sonar System .......................................33
Intelligent Around View
®
Monitor (I-AVM) (if so equipped)............................34
Towing ................................................................................36
TABLE OF CONTENTS
Please see your Owner’s Manual for important safety information and system operation limitations.
•
A cel
lular telephone should not be used for any purpose while driving
so full attention may be given to vehicle operation.
• Always wear your seat belt.
• Supplemental air bags do not replace proper seat belt usage.
•
Children 12 and under should al
ways ride in the rear seat properly secured
in child restraints or seat belts according to their age and weight.
• Do not drink and drive.
For more information, refer to the “Safety — Seats, seat belts and supplemental restraint system (section 1)”,
the “Monitor, climate, audio, phone and voice recognition systems (section 4)” and the “Starting and driving
(section 5)” of your Owner’s Manual.
Additional information about your vehicle is also available in your Owner’s Manual,
NissanConnect® Owner’s Manual and at www.NissanUSA.com.

To view detailed instructional videos regarding these and other features,
please go to www.nissanquickguide.com
3
GETTING STARTED
NISSAN INTELLIGENT KEY
®
SYSTEM
The Nissan Intelligent Key
®
system allows you to lock or unlock the vehicle and start
the engine. It is important to make sure the Intelligent Key is with you (that is, in your
pocket or purse).
The operating range of the Intelligent Key is within 31.5 in (80 cm) of the
corresponding request switch.
To lock the vehicle, push either door handle
request switch (if so equipped) or press
the button
on the key fob.
To unlock the vehicle, perform one of the
following procedures:
• Push either door handle request switch
(if so equipped) once and the corresponding
door will unlock. Push the request switch
(if so equipped) again within 5 seconds; all
other doors will unlock, or
• Press the
button
on the key fob to
unlock the driver’s side door. Press the
button
again; all other doors will unlock.
The Intelligent Key can also be used to
activate the panic alarm by pressing and holding the button for more
than 1 second. Once activated, the panic alarm and headlights will stay on for a
period of time.
INTELLIGENT KEY BATTERY DISCHARGE
If the battery of the Intelligent Key is discharged or environmental conditions
interfere with the Intelligent Key operation, start the engine according to the
following procedure:
1. Move the shift lever to the P (Park) position.
2. Firmly apply the foot brake.
3. Touch the ignition switch with the Intelligent Key, and a chime will sound.
4. Within 10 seconds after the chime sounds, push the ignition switch to the ON
position while depressing the brake pedal and the engine will start.
REMOTE ENGINE START WITH INTELLIGENT CLIMATE CONTROL* (if so equipped)
The Remote Engine Start operating range is approximately 200 ft (60 m) from
the vehicle. The eective operating range may be shorter if there are walls,
strong radio wave sources near the operating location or other obstructions
between the key and the vehicle.
For the Remote Engine Start to function, the vehicle must be in the P (Park)
position with the ignition o and all of the doors must be closed and locked.
Please see your Owner’s Manual for additional information.
1

To view detailed instructional videos regarding these and other features,
please go to www.nissanquickguide.com
4
To start your vehicle remotely:
1. Press the button to lock all of the doors.
2. Within 5 seconds,
press and hold the engine start
button for at
least 2 seconds.
The engine will start, and the parking lights will turn on.
While the Remote Engine Start feature is being used, the manual or automatic
climate control system will default to the last used heating or cooling mode.
The engine will run for 10 minutes and then turn o.
Repeat steps 1 through 2 to extend the time for an additional 10-minute period.
Remote Engine Start can only be activated for a maximum of 20 minutes.
• Af
ter two remote starts, the ignition switch must be cycled before the Remote
Engine Start can be used again.
• To c
ancel Remote Engine Start, press the engine start
button .
To start driving, depress the brake pedal and push the ignition switch to
the ON position.
*State laws may apply; review local laws before using.
Please see your Owner’s Manual for important safety information, system limitations, and additional
operating and feature information.
For more information, refer to the “Pre-driving checks and
adjustments (section 3)”, the “Starting and driving (section 5)” and the “Do-it-yourself (section 8)” of
your Owner’s Manual.
SEAT ADJUSTMENTS (if so equipped) AND REAR SEATS
(if so equipped)
To slide the seat forward or backward, push
the switch forward or backward.
To adjust the angle of the seatback, push the
switch forward or backward.
SEAT LIFTER (driver’s seat)
To adjust the angle and height of the seat
cushion, push the front or rear end of the
switch up or down.
POWER LUMBAR SUPPORT (driver’s seat)
To adjust the lumbar area, push the front or
back end of the switch .
REAR SEATS (if so equipped)
To access the under seat storage
(if so equipped):
• Pull up the bottom of the seat toward the
rear of the vehicle to fold the seat.
• Lift the at oor panels
toward the seat.
When not in use, the storage bin’s
cover may be locked.

To view detailed instructional videos regarding these and other features,
please go to www.nissanquickguide.com
5
GETTING STARTED
To use the at oor feature (if so equipped):
• Pull up the bottom of the seat toward the
rear of the vehicle to fold the seat.
• Pull the handle
of the smaller top panel
toward the rear of the vehicle.
• Pull the at oor panels
up and toward
the front seats to fully unfold them and
place them on the oor.
Up to 247 lbs. (112 kg) of cargo can be
attached to the at oor panels using bungee
cords. Only use bungee cords rated at the
appropriate strength.
Please see your Owner’s Manual for important safety
information, system limitations, and additional operating and feature information.
For more information, refer to the “Safety — Seats, seat belts and supplemental restraint system
(section 1)” and the “Instruments and controls (section 2)” of your Owner’s Manual.
MEMORY SEAT (if so equipped)
Two positions for the driver’s seat, steering column and outside mirrors (if so
equipped) can be stored in the Memory Seat.
Follow this procedure to set the memory system:
• Conrm that the shift lever is in the P (Park) position.
• Place the ignition switch in the ON or ACC position.
• Adjust the driver’s seat, steering column and outside mirrors (if so equipped) to
the desired positions using the adjusting switches for each feature.
• Push the SET switch
, and within 5
seconds, push the memory switch (1 or 2). A
chime will sound.
• The indicator light on the memory
switch you select will illuminate for
approximately 5 seconds.
• The driver’s seat, steering column and outside mirror positions (if so equipped)
are now set to your preferences.
These memorized positions can also be linked to your Nissan Intelligent Key
®
. To
link a memorized position to your Nissan Intelligent Key, press the button on
the key fob after completing the previous steps.
Please see your Owner’s Manual for important safety information, system limitations, and additional
operating and feature information.
For more information, refer to the “Pre-driving checks and adjustments (section 3)” of your
Owner’s Manual.

To view detailed instructional videos regarding these and other features,
please go to www.nissanquickguide.com
6
MIRROR CONTROL SWITCH (Electric Control Type)
(if so equipped)
The outside mirror control switch is located
on the driver’s side door panel.
To select the left or right mirror, rotate the
dial
to select the desired mirror.
Adjust each mirror to the desired position by
rotating the dial
up, down, left, or right.
REVERSE TILT-DOWN FEATURE (if so equipped)
The reverse tilt-down feature will turn both outside mirror surfaces downward
to provide better rear visibility close to the vehicle.
1. Apply the brake.
2. Place the ignition switch in the ON position.
3. Move the shift lever to the R (Reverse) position.
4. Both outside mirror surfaces will turn downward. (The mirror control switch
must be out of the center [neutral] position.)
The outside mirror surfaces will return to their original positions when one of
the following conditions occurs:
• The shift lever is moved to any position other than R (Reverse).
• The outside mirror control switch
is set to the center (neutral) position.
• The ignition switch is placed in the OFF position.
POWER FOLDING OUTSIDE MIRRORS (if so equipped)
To open or close the mirrors, push the switch .
Please see your Owner’s Manual for important safety information, system limitations, and additional
operating and feature information.
For more information, refer to the “Pre-driving checks and adjustments (section 3)” of your
Owner’s Manual.

To view detailed instructional videos regarding these and other features,
please go to www.nissanquickguide.com
7
GETTING STARTED
HOMELINK
HOMELINK
®
UNIVERSAL TRANSCEIVER (if so equipped)
The HomeLink
®
Universal Transceiver can learn and consolidate the functions
of up to three dierent hand-held transmitters, operating items such as garage
doors, property gates, outdoor and indoor lights or alarm systems.
Place the ignition switch in the ON or ACC position (without starting the engine)
when programing Homelink.
To program the HomeLink
®
Universal Transceiver:
• Position the handheld transceiver 1-3 in (2-8 cm) away from the HomeLink
surface, keeping the HomeLink indicator light in view.
• Press and hold the desired HomeLink button and the handheld transmitter
button simultaneously until the HomeLink indicator light ashes slowly
and then rapidly.
• Both buttons may be released when the indicator light ashes rapidly.
To verify the programing is complete, press and hold the HomeLink button and
observe the indicator light:
• A solid, continuous light indicates the programing is complete and the
HomeLink button will activate your device.
• A blinking light that turns to a solid, continuous light after 2 seconds indicates
additional steps are required to complete the programing.
An additional person may make the remaining steps easier. To complete the
programing process:
• At the receiver of the device that you are programing to the HomeLink
button, press and release the learn or smart button (the name may vary by
manufacturer, but it is usually located near where the hanging antenna wire
is attached to the unit). You have approximately 30 seconds to initiate the
following step.
• Press and hold the programed HomeLink button for 2 seconds and release.

To view detailed instructional videos regarding these and other features,
please go to www.nissanquickguide.com
8
You may have to repeat the previous two steps up to three times to complete
the programing process. HomeLink should now activate your device.
COMPASS (if so equipped)
Press the button for about 1
second when the ignition switch is placed
in the ON position to toggle the compass
display on or o.
The display will indicate the direction the
vehicle is heading:
• N: North
• E: East
• S: South
• W: West
If the display reads “C”, or for additional information, refer to the “Instruments
and controls (section 2)” of the Owner’s manual.
Please see your Owner’s Manual for important safety information, system limitations, and additional
operating and feature information.
For more information, refer to the “Instruments and controls (section 2)” of your Owner’s Manual, the
HomeLink website at www.homelink.com or call 1-800-355-3515.
E-CALL (SOS) BUTTON (if so equipped)
The E-call (SOS) feature requires a
NissanConnect® Services subscription.
With a paid subscription, it can be used to call
for assistance in case of an emergency.
To use this feature, press the SOS button
on the overhead console.
For additional information, or to enroll your vehicle, refer to
www.NissanUSA.com/connect or call 855-426-6628.
Please see your Owner’s Manual for important safety information, system limitations, and additional
operating and feature information.
For more information, refer to the “Instruments and controls (section 2)” of your Owner’s Manual or refer
to the “Information (section 5)” of your NissanConnect® Owner’s Manual.

To view detailed instructional videos regarding these and other features,
please go to www.nissanquickguide.com
9
GETTING STARTED
HEATER AND AIR CONDITIONER (automatic) (if so equipped)
ON•OFF BUTTON
Press the ON•OFF button to turn the system on or o.
AUTO BUTTON/DRIVER’S SIDE TEMPERATURE CONTROL DIAL
The automatic mode may be used year-round. Press the AUTO button to
turn the automatic mode on, and the system will automatically control the
inside temperature (automatic cooling and/or dehumidied heating), air ow
distribution and fan speed.
Turn the driver’s side temperature control dial left for cooler air or right
for warmer air.
DUAL BUTTON/PASSENGER’S SIDE TEMPERATURE CONTROL DIAL
Press the DUAL button to turn the passenger’s side temperature controls
on or o. This will allow the passenger’s side temperature to be adjusted
independently from the driver’s side.
Turn the passenger’s side temperature control dial left for cooler air or right
for warmer air.
FAN SPEED CONTROL BUTTONS
Press the side or side of the button to decrease or increase
the fan speed.
MODE BUTTON
Press the MODE button to manually control air ow.
Air ows from the center and side vents.
Air ows from the center, side and foot vents.
Air ows mainly from the foot vents.
Air ows from the front defroster and foot vents.
DEFROSTING/DEFOGGING FRONT AND SIDE WINDOWS
Press the front defroster button to turn the system on. The A/C
automatically turns on when the front defroster mode is selected. This
feature removes humidity from the air.
Set the temperature control dial and the fan speed control button to
their maximum settings.

To view detailed instructional videos regarding these and other features,
please go to www.nissanquickguide.com
10
REAR WINDOW AND/OR OUTSIDE MIRROR DEFROSTER SWITCH (if so equipped)
Push the rear window defroster switch to turn the system on or o.
The rear window defroster automatically turns o after
approximately 15 minutes.
FRESH AIR INTAKE CONTROL BUTTON
Press the fresh air intake control button to draw outside air into the
passenger compartment. The indicator light on the button will illuminate.
AIR RECIRCULATION BUTTON
Press the air recirculation button to recirculate air inside the vehicle.
The indicator light on the button will illuminate. This system is used to avoid
certain outside odors and to help adjust the inside vehicle temperature
more eectively.
Press the fresh air intake control button to turn air recirculation o. This
allows outside air to be drawn into the passenger compartment to prevent
fogging in the front defroster, oor or front defroster/oor mode.
The air recirculation mode cannot be activated when the climate control
system is in the front defroster mode .
A/C BUTTON
Press the A/C button to manually turn the A/C on or o.
Please see your Owner’s Manual for important safety information, system limitations, and additional
operating and feature information.
For more information, refer to the “Instruments and controls (section 2)” and the “Monitor, climate,
audio, phone and voice recognition systems (section 4)” of your Owner’s Manual.
HEADLIGHT CONTROL SWITCH
Turn the headlight control switch
to the
position
to turn on the front parking, tail,
license plate and instrument panel lights.
Turn the control switch
to the
position
to turn on the headlights.
AUTOLIGHT SYSTEM (if so equipped)
The autolight system will automatically
turn the headlights on when it is dark and
o when it is light. The system will keep the
headlights on for a period of time after you turn the ignition o and all the
doors are closed.
To activate the autolight system, turn the headlight control switch to the AUTO
position
then place the ignition switch in the ON position. To deactivate the
autolight system, turn the headlight control switch to the OFF position ,
position
or
position
.

To view detailed instructional videos regarding these and other features,
please go to www.nissanquickguide.com
11
GETTING STARTED
WIPER AND WASHER SWITCH
Rotate the control ring to one of the following
positions to operate the windshield wipers:
Mist (MIST) – One sweep
operation of the wipers.
Auto (AUTO) (if so equipped) – Operates
the rain-sensing wipers intermittently.
The intermittent speed can be adjusted
by rotating the control ring to increase or
decrease wiper sensitivity.
Low (LO) – Wipers operate at a continuous low-speed.
High (HI) – Wipers operate at a continuous high-speed.
LO
HI
AUTO
OFF
MIST
HIGH BEAM ASSIST
To activate the High Beam Assist system, turn
the headlight switch to the AUTO position
and push the lever forward . The High
Beam Assist indicator light in the meter will
illuminate while the headlights are turned on.
When the vehicle speed lowers to less than
approximately 16 mph (25 km/h), the headlight uses the low beam.
To turn o the High Beam Assist system, turn the headlight switch to the
position
or select the low beam position by placing the lever in the
neutral position.
Pulling and releasing the lever ashes the headlight high beams on and o.
FOG LIGHT SWITCH (if so equipped)
The headlights must be on with either AUTO or the low beams selected for the
fog lights to operate.
Push the
PUSH
switch to turn on
the fog lights.
To turn them o, push the
PUSH
switch
again.
The fog lights will turn o if the headlights
are turned o.
LANE CHANGE SIGNAL
Move the lever up or down until the turn
signal begins to ash but the lever does not latch to signal a lane change. Hold
the lever until the lane change is completed.
Move the lever up or down until the turn signal begins to ash but the lever does
not latch and release the lever. The turn signal will automatically ash three times.
Choose the appropriate method to signal a lane change based on the road and
trac conditions.
Please see your Owner’s Manual for important safety information, system limitations, and additional
operating and feature information.
For more information, refer to the “Instruments and controls (section 2)” of your Owner’s Manual.

To view detailed instructional videos regarding these and other features,
please go to www.nissanquickguide.com
12
To activate the washer, press the button
on the end of the lever. The wipers will
operate several times.
Please see your Owner’s Manual for important safety
information, system limitations, and additional operating and
feature information.
For more information, refer to the “Instruments and controls (section 2)” of your Owner’s Manual.
VEHICLE INFORMATION DISPLAY
The vehicle information display displays items such as:
Vehicle settings
Auxiliary gauges
O-road information
Fuel economy
Trip computer information
Driving aids (if so equipped)
Cruise control / Intelligent
Cruise Control system
Indicators and warnings
Tire pressure information
Audio
Trac Sign Recognition (TSR) (if so equipped)
Drive system warnings and settings
(if so equipped)
USING THE VEHICLE INFORMATION DISPLAY
The vehicle information display modes can be
changed using the
buttons , the buttons
and the ENTER button located on the
steering wheel.
Press the buttons and push the
buttons to navigate through the items in
the vehicle information display.
Press the ENTER button to change or select an item in the vehicle
information display.
Press the button on the steering wheel
to go back to the previous menu.

To view detailed instructional videos regarding these and other features,
please go to www.nissanquickguide.com
13
Driver Assistance
Meter Settings
Vehicle Settings
Towing Settings
(if so equipped)
Alerts
Maintenance
Unit
Language
Factory Reset
RESETTING THE TRIP COMPUTER
1. Push the TRIP RESET switch
on the left
side of the instrument panel to change the
display as follows:
ODO > Trip A > Trip B > ODO
2. Push the TRIP RESET switch
for
2 seconds to reset the currently displayed trip odometer to zero.
SETTINGS
The setting mode displays the settings that can be changed:
Please see your Owner’s Manual for important safety information, system limitations, and additional
operating and feature information.
For more information, refer to the “Instruments and controls (section 2)” of your Owner’s Manual.
GETTING STARTED
TIRE PRESSURE MONITORING SYSTEM (TPMS) WITH
EASY-FILL TIRE ALERT
The low tire pressure warning light and a Tire Pressure Low - Add Air warning
will illuminate when one or more tires are low in pressure and air is needed.
Current tire pressure of all tires (except the spare) may be visible on the Tire
Pressure screen within the vehicle information display when the vehicle is
driven at speeds above 16 mph (25 km/h).
Adjust the tire pressure to the recommended tire pressure shown on the Tire
and Loading Information label located in the driver’s door opening.
When the low tire pressure warning light ashes for approximately 1 minute
and then remains on, the TPMS is not functioning properly. It is recommended
that you have the system checked by a Nissan dealer.
EASY-FILL TIRE ALERT
When adding air to an under-inated tire, the TPMS with Easy-Fill Tire
Alert provides visual and audible signals to help you inate the tire to the
recommended tire pressure.

To view detailed instructional videos regarding these and other features,
please go to www.nissanquickguide.com
14
LOOSE FUEL CAP
A Loose Fuel Cap warning message
will display in the vehicle information
display when the fuel-ller cap is not
tightened correctly.
To tighten, turn the cap clockwise until a
single click is heard.
If the cap is not properly tightened, the
Malfunction Indicator Light
may also illuminate in the instrument panel.
Please see your Owner’s Manual for important safety information, system limitations, and additional
operating and feature information.
For more information, refer to the “Instruments and controls (section 2)” and the “Pre-driving checks
and adjustments (section 3)” of your Owner’s Manual.
To use the Easy-Fill Tire Alert:
1. Move the shift lever to the P (Park) position and apply the parking brake.
2. Place the ignition switch in the ON position. Do not start the engine.
3. Add air to the under-inated tire, and within a few seconds, the hazard
warning lights will start ashing.
4. When the designated tire pressure is reached, the horn will beep once and the
hazard indicators will stop.
5. Repeat this procedure for any additional under-inated tires.
Please see your Owner’s Manual for important safety information, system limitations, and additional
operating and feature information.
For more information, refer to the “Instruments and controls (section 2)”, the “Starting and driving
(section 5)”, the “In case of emergency (section 6)”, the “Do-it-yourself (section 8)” and the “Technical
and consumer information (section 10)” of your Owner’s Manual.
STARTING/STOPPING THE ENGINE
It is important to make sure the Nissan
Intelligent Key
®
is with you (that is, in your
pocket or purse).
Depress the brake pedal.
Push the ignition switch to the ON position to
start the engine.
TURNING THE ENGINE OFF
Move the shift lever to the P (Park) position.
Push the ignition switch to the OFF position to turn o the engine.
Please see your Owner’s Manual for important safety information, system limitations, and additional
operating and feature information.
For more information, refer to the “Starting and driving (section 5)” of your Owner’s Manual.

To view detailed instructional videos regarding these and other features,
please go to www.nissanquickguide.com
15
GETTING STARTED
FUEL-FILLER DOOR
The fuel-ller door is located on the
driver’s side of the vehicle.
To open the fuel-ller door ,
pull the lid open.
Please see your Owner’s Manual for important safety
information, system limitations, and additional operating and
feature information.
For more information, refer to the “Pre-driving checks and adjustments (section 3)” of your
Owner’s Manual.
WIDE OPEN DOOR (King Cab® models only)
Do not open the driver’s side Wide Open Door to the fully open position while the
fuel-ller door is open; only open it as far as the rst detent.
Opening the door to the fully open position may damage the fuel-ller door and
the Wide Open Door.
Please see your Owner’s Manual for important safety information, system limitations, and additional
operating and feature information.
For more information, refer to the “Pre-driving checks and adjustments (section 3)” of your
Owner’s Manual.
DRIVER AND PASSENGER SEAT BELT WARNING
The warning light will be displayed in
the instrument panel for a period of time
after the ignition switch is placed in the ON
position or until the seat belt is fastened. This
does not indicate a malfunction.
REAR SEAT BELT REMINDER
If any of the rear passenger seat belts are not
fastened, the rear seat belt icon illuminates
in the instrument panel in red to show
which seat belt is not fastened.
When a rear passenger’s seat belt has been
securely fastened, the color of the corresponding seat belt icon will change. The
warning will automatically turn o after approximately 35 seconds
Please see your Owner’s Manual for important safety information, system limitations, and additional
operating and feature information.
For more information, refer to the “Safety-Seats, seat belts and supplemental restraint system
(Section 1)” and the “Instruments and controls (section 2)” of your Owner’s Manual.
/