DE ACCESORIOS LED DECORATIVOS COLGANTES
INSTRUCCIONES DE INSTALACIÓN
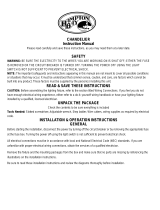
6 Afloje dos tornillos del rosetón lo suficiente para retirar la placa de montaje.
7 Pase los cables del edificio a través del orificio grande de la placa de montaje.
Fije firmemente la placa de montaje a la caja de empalmes con 2 tornillos.
8 Use el tubo de aluminio para pasar el cable del accesorio colgante a través de
la pantalla.
9 Afloje pero no retire totalmente el tornillo de fijación del niple. Use nuevamente
el tubo de aluminio para ayudar a pasar el cable del accesorio colgante por el
niple. Una vez que pasó un tramo del cable a través del rosetón, extraiga
completamente el tubo de aluminio del mismo y deslícelo hacia abajo hasta la
pantalla.
10 Haga las conexiones eléctricas como se indica en la ilustración. Si existe un
cable de tierra de la instalación del edificio, conecte a dicho cable el alambre
desnudo del rosetón con un capuchón de empalme. Si no existe cable de
tierra de la instalación del edificio y la misma está puesta a tierra usando el
conducto metálico, envuelva el alambre desnudo alrededor del tornillo verde
de conexión a tierra y apriete el tornillo.
11 Ajuste la longitud del tramo de cable que sale del rosetón a la longitud
aproximada deseada. Apriete cuidadosamente el tornillo de fijación.
12 Enrolle e introduzca cuidadosamente el exceso de cable en el rosetón. Fije el
rosetón a la placa de montaje y apriete los 2 tornillos.
13 Puede hacerse un ajuste menor de la longitud del cable del accesorio
colgante, hacia arriba o abajo, aflojando el tornillo de fijación. Una vez que
esté satisfecho con la longitud, apriete el tornillo de fijación.
No lo apriete el exceso, puesto que podría cortocircuitar el cable.
© 2011 Juno Lighting, LLC. Rev 10/11 P3249 pág 1 de 1
GARANTÍA
Juno Lighting Group garantiza que sus productos están libres de defectos de material y mano de obra durante un cinco a partir de la fecha de
compra. La obligación de Juno Lighting Group se limita expresamente a la reparación o el reemplazo sin cargo, en la fábrica de Juno Lighting
Group, previo otorgamiento de una autorización de devolución por escrito. Esta garantí a no aplica a productos que hayan sido alterados o
reparados fuera de la planta de Juno Lighting Group. Esta garantí a reemplaza a todas las demás garantí as, expresas o implícitas, y sin limitar
la generalidad de la frase previa, excluye toda garantí a implí cita de comerciabilidad. Además, no existen garantí as que se extiendan más allá
de la descripción del producto en la literatura de la compañía que establece los términos de venta.
Telé fono de Servicios de productos (888) 387-2212
1300 South Wolf Road • Des Plaines, IL 60018 • TEL. 800-323-5068 • www.junolightinggroup.com
INSTRUCCIONES IMPORTANTES PARA LA SEGURIDAD
1 Lea detenidamente todas las instrucciones antes de comenzar la instalación.
Guarde estas instrucciones en lugar seguro para referencia futura.
2 Para reducir el riesgo de incendio y quemaduras, no instale los cables del
accesorio colgante en lugares en que el conductor expuesto pueda ser
cortocircuitado o estar en contacto con cualquier material conductor.
3 No instale ninguna pantalla a una distancia menor de 6 pulgadas (15 cm) de
cortinas o materiales combustibles similares.
4 Para reducir el riesgo de incendio o recalentamiento, asegúrese de que todas las
conexiones estén apretadas.
5 Desconecte el suministro eléctrico antes de comenzar la instalación, cambiar la
lámpara o modificar el sistema de iluminación de cualquier manera.
ADVERTENCIA
ANTES DE LA INSTALACIÓN, DESCONECTE EL SUMINISTRO ELÉCTRICO
DE LA CAJA DE EMPALMES.
PELIGRO
SENSITIVO A DESCARGA ELECTROSTATICA
Este producto contiene componentes que pueden se dañados por descargas
electrostaticas. No remueva o toque la bola difusora sin estar neutralizado
adecuadamente.
GUARDE ESTAS INSTRUCCIONES
TRANSFORMADOR
ROSETÓN
USE
TEMPORALMENTE
AQUÍ EL TUBO DE
ALUMINIO PARA
PASAR EL CABLE
TUBO DE ALUMINIO
PLACA DE MONTAJE
PANTALLA
ENSAMBLADO DE
LAMPARA LED
6
7
9
8
13
11
12
10
BOLA DIFUSSIVA
(INCLUIDA) TIENE
QUE SER INSTALADA