
73014062
73014078
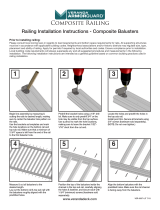
Models
Owner's Manual
Version
1.0
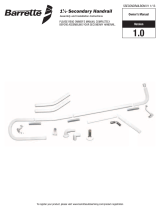
Gate Kit
A
ssembly and Installation Instructions
PLEASE READ OWNER'S MANUAL COMPLETELY
BEFORE ASSEMBLING YOUR GATE KIT.
34106812BOM V1 1/13
For Use With
Premier & Select Railing
To register your product, please visit: www.barretteoutdoorliving.com/product-registration

2
Material Checklist:
Tape Measure
Level
Hacksaw or Chopsaw
Rubber Mallet
Drill
Drill bits
#2 square drive bit
ATTENTION:
Before you assemble the gate kit:
PLEASE TAKE A COMPLETE INVENTORY OF ALL PARTS USING THE KIT CONTENTS.
DO NOT ATTEMPT TO ASSEMBLE THE GATE KIT IF PARTS ARE MISSING OR DAMAGED.
Please do not return the product to the store, for assistance or replacement parts call:
1-800-336-2383
3" Wood Blocks
1
1
Kit Contents:
• Two (2) vinyl uprights with aluminum stiffeners and caps (36" long)
• One (1) gravity latch (includes screws)
• Two (2) telescoping metal braces, with color matched screws (bag packed: four (4) #8 x 3/4" and four (4) #8 x 3/8")
• One (1) Hinge kit (includes two (2) hinges, sixteen (16) mounting screws and one (1) spring tension adjustment wrench)
• One (1) screw pack for bottom rail brackets (bag packed: four (4) #10 x 1")
NOTE:
Before you begin, lay gate components to be assembled on a smooth and clean work surface so as not to scratch/damage
your railing/gate.
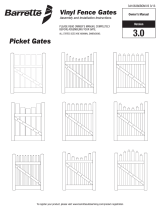
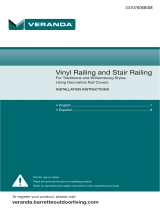
Measure opening between posts where you wish to put gate.
For Premier railing subtract 6
1
⁄
2
" from opening. For Select railing, subtract 6" from opening.
This is the length you will cut your rails for gate.
NOTE: Maximum width of opening between posts is 48".
Align top rail with bottom rail and cut both rails with miter box or hacksaw (See saw blade manufacturer's specs for correct blade).
Prior to cutting, be sure the spacing from the end of the rail to the fi rst routed hole is the same on both ends, which will allow
for the gate balusters to be installed in proportion.
NOTE FOR SELECT: Once cut, mark which rail is top and bottom with tape
(temporarily). The top rail is the one with aluminum inside. Once rails are installed to uprights, you will not be able to see
inside the rails to tell.
Cut rails to needed length
Measure Opening
Not to exceed 48"
Thank you for choosing the Barrette Outdoor Living Railing.
Please read the instructions completely before assembling
your rail. Retain manual and your dated sales slip for future
reference and warranty claims.
Before You Begin…
Make sure your project meets local building codes before
beginning installation.

3
2
2
a. Lay bottom rail on a clean smooth surface and snap balusters into routed holes.
b. Then repeat the process to connect the top rail.
c.
For Premier railing:
make sure bracket dovetails are slid into the back of the brackets.
For Select railing:
slide bracket covers and brackets over the ends of the top and bottom rails on each side.
3
3
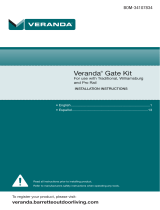
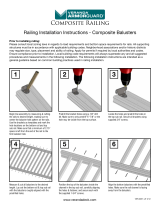
This step is for Premier Railing only. Proceed to
Step 4 if installing Select Railing.
a. Lay the assembled rail section on a fl at surface
and place the uprights on each side.
b. To properly align the rail to the uprights, set the
bottom of the bottom bracket 1
1
⁄
4
" from the
bottom of the upright.
c. Making sure the rail section is tight (push the
top and bottom rails towards each other to
make sure the balusters are not loose), mark the
bottom of all 4 rail brackets on the uprights.
d. Remove the dovetails from the brackets. Place
dovetails on the uprights using the marked lines
from above as a guide. Be sure to center the
dovetails. Mark the holes from the dovetails on
the upright.
e. Pilot drill with a
5
⁄
32
" drill bit through the
marked holes, through the plastic as well as the
aluminum insert.
f. Mount dovetails with provided 2" screws.
DO NOT use 2
1
⁄
2
" screws under any
circumstance.
Assemble rails for gate
Premier
Select
Install bracket dovetails to gate uprights (For Premier Railing Only)
1
1
⁄
4
"
b.
a.
b. c.
d. e.
c.

4
5
5
For Premier Railing:
a. Once all four dovetails are attached to uprights (Step 3)
and brackets are connected to rails (Step 4), then carry
the assembled rail/gate and slide brackets over the
dovetails on the uprights.
b. Then, connect top brackets to uprights. Predrill on
angle through dimpled angled holes, upright, and
aluminum insert with
5
⁄
32
" drill bit. Screw in with 2"
screws as provided in the Rail Bracket Kit.
For Select Railing:
a. From bottom of upright to the fl at bottom part of the bottom
bracket, mark at 1".
b. Align bottom of bracket (already connected to railing in
Step 4b Select) to the line made in Step 5a Select.
c. Predrill through angled holes through upright and aluminum with
5
⁄
32
" drill bit. Screw in with four (4) 1
1
⁄
4
" screws as provided in the Rail
Bracket Kit.
d. Repeat Step 5c for the top rail bracket. Install two (2) screws.
Assemble rails to uprights
4
4
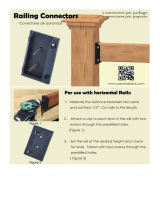
a. For bottom rail, predrill two holes underneath
bracket with a
5
⁄
32
" drill bit (2 per bracket).
b. For bottom rail, use 1" screws (provided in Gate Kit)
(2 per bracket).
c. For top rail, predrill two holes underneath bracket
with a
5
⁄
32
" drill bit (2 per bracket).
d. For top rail, use 2" screws (provided in Rail Kit)
(2 per bracket)
a. For bottom rail, predrill two holes underneath bracket with a
5
⁄
32
"
drill bit (2 per bracket). Be sure that the screws are centered and no
greater than 1
1
⁄
4
" apart.
b. For bottom rail, use 1" screws (provided in Gate Kit) (2 per bracket).
c. For top rail, predrill through the side holes of brackets and through
aluminum insert with a 5/32" drill bit (2 per bracket).
d. For top rail, use 1" fl athead screws (provided in Rail Kit) (2 per bracket).
Permanently attach brackets to rails
Premier Railing
Select Railing
a. c. c.
c.
1
1
⁄
4
"
a.
a.
a. b.

5
6
6
Mount hinges to gate
a. Center the provided hinges on the upright to align
with the top and bottom rails of gate, and mark
screw holes.
b. Predrill holes through aluminum insert.
c. Screw in with two screws (provided with hinge)
d. Relieve tension of hinges as follows:
• Insert allen wrench into the cam at the end of
the hinge barrel
• Press the wrench downward, pushing the cam
into the barrel.
• Rotate the cam counter-clockwise to reduce
spring tension. Adjust one hinge at a time in
1
⁄
4
turn increments.
7
7
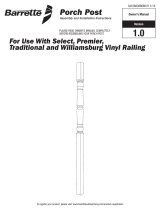
Mounting the cross braces
a. On one side of gate, extend the fi rst brace.
b. Extend brace across gate to the uprights, noting one side will be adjacent to hinge.
c. Once length is determined, mark brace in center with pencil line.
d. Pilot drill though the two provided brace holes with
1
⁄
8
" drill bit. Then, secure brace together at the measured length with provided
#8 x
3
⁄
8
" blunt end screws (2) in the center of the brace.
e. Attach brace to uprights. Predrill one end of brace with a
1
⁄
8
" drill bit through upright and aluminum inside of upright, then anchor
the brace to the upright with #8 x
3
⁄
4
" screw. Repeat for other end of brace.
f. Flip rail over. Repeat instructions 7a–7e, being sure to install second brace on opposite side of gate, and opposite orientation of
brace (making an "X")
b.
e. f.
c.
d.
d.
b.

6
8
8
Hang assembled gate to post
a. Cut two temporary wood blocks (3" tall, not
included), and rest bottom rail of gate on them.
Align gate between the posts.
b. Secure hinges to posts with provided screws.
c. Adjust tension of hinges – See Step 6D.
d. Remove the temporary wood blocks.
9
9
Install gravity latch
Orient the latch at desired height on
gate/post. Latch should be on same side
as hinges.
a. Hold self-closing latch in middle of post,
making sure movable part of latch is on top.
Mark four (4) holes and predrill using a
1
⁄
8
"
drill bit. Fasten with provided four (4) 1
1
⁄
4
"
screws.
b. Close gate and insert the locking bar into
the latch. Mark holes (2) from locking bar
onto gate upright and predrill using a
1
⁄
8
"
drill bit. Attach with
3
⁄
4
" screws.
a. b.
3" Temporary spacer blocks

7

Ten Year Limited Warranty
Vinyl Rail Gate Kit (Gate Frame, Hinges, Latches & Hardware)
© Barrette Outdoor Living • 7830 Freeway Circle • Middleburg Heights, Ohio • 44130
http://www.barretteoutdoorliving.com • 1-800-336-2383
34106812BOM V1 1/13
What is covered: Barrette Outdoor Living warrants vinyl and aluminum products to include; vinyl and aluminum fence, vinyl and
aluminum railing and plastic lattice against defects or workmanship for as long as you own your home. Barrette Outdoor Living
will at its option replace the product in question with new product of the same or equivalent value at no charge. Barrette Outdoor
Living warrants these products against peeling, fl aking, splintering, corrosion, rusting or abnormal discoloration under normal
use and service per ASTMD 2244. This warranty extends to the original purchaser or transferee as specifi ed herein on the
products noted above. Separate and distinct warranties for hardware and other products are not covered under this warranty.
What this warranty does not cover: This limited warranty does not cover damage resulting from accident, unreasonable use,
neglect, alteration, improper service, improper installation, acts of God or any other causes not arising out of defects in materials
or workmanship. Additionally, this warranty does not cover costs of installation, removal, reinstallation or surface mold and
mildew created by excessive environmental conditions. Any service or repair provided outside the scope of this limited warranty
shall be at Barrette Outdoor Living’s rate and terms then in effect.
What do we do to correct the problems? Should your Barrette Outdoor Living product prove defective under warranty, reference
the website or call the phone number listed below. Your problem will be assigned a tracking number and an authorized Barrette
Outdoor Living representative will contact you to arrange a convenient time to schedule an onsite inspection, or request pictures,
if need be. If after inspection product is deemed to be manufacturer defect we will make arrangements to rectify the issue. You
must have proof of your purchase in order for the problem to be corrected.
Transferee Coverage: Warranty coverage will be extended to one transferee on the above listed products with the following
limitations. Transferee must obtain an original or copy of the initial sales receipt (with proof of date) from the previous owner(s).
Additionally, if fence is purchased from a builder or installer, documentation must be supplied that names the product installed
on property and date of transfer.
THIS WARRANTY IS IN LIEU OF ALL CONDITIONS OR WARRANTIES, EXPRESS, OR IMPLIED INCLUDING BUT NOT LIMITED TO
ANY IMPLIED CONDITIONS OR WARRANTIES OR MERCHANTABILITY OR FITNESS FOR A PARTICULAR PURPOSE ON THE PART OF
Barrette OR ITS LICENSORS, SOME STATES DO NOT ALLOW THE EXCLUSIONS OF IMPLIED WARRANTIES OR LIMITATIONS OF
HOW LONG AN IMPLIED WARRANTY LASTS, SO THE ABOVE LIMITATIONS MAY NOT APPLY TO YOU. IF THE PRODUCT IS DEFECTIVE
PER THE ABOVE COVERAGES, YOUR SOLE AND EXCLUSIVE REMEDY SHALL BE REPAIR OR REPLACEMENT AS PROVIDED ABOVE.
BARRETTE AND ITS LICENSORS SHALL NOT BE LIABLE FOR ANY DAMAGES, LOSS OF USE, LOSS OF PROFITS OR INTERRUPTION
OF BUSINESS WHETHER SUCH ALLEGED DAMAGES ARE BASED IN WARRANTY, TORT, CONTRACT, OR INDEMNITY. SOME STATES
DO NOT ALLOW THE EXCLUSION OF LIMITATIONS OF INCIDENTAL OR CONSEQUENTIAL DAMAGES, SO THE ABOVE LIMITATIONS
MAY NOT APPLY TO YOU. This warranty is valid only in the United States and Canada.
Refer to www.BarretteOutdoorLiving.com for specifi c details about warranty limitations.
1-800-336-2383
To register your product, please visit: www.barretteoutdoorliving.com/product-registration
-
 1
1
-
 2
2
-
 3
3
-
 4
4
-
 5
5
-
 6
6
-
 7
7
-
 8
8


Ask a question and I''ll find the answer in the document
Finding information in a document is now easier with AI
Related papers
-
 Veranda 73003243 Installation guide
-
 Veranda 73040745 User manual
-
 Veranda 73011691 Installation guide
-
 Typar FLRA1-001 Installation guide
-
 Veranda 73012477 Installation guide
-
Barrette Outdoor Living 73004694 Installation guide
-
 Veranda ArmorGuard CAPC NE 5 MT BLK Installation guide
-
 Veranda 73028079 Operating instructions
-
 Veranda RLC 6 CC 3PK Installation guide
-
RDI 73012470 Installation guide


Other documents
-
Weatherables WBGA-HINGEALUMNL-NW Operating instructions
-
Freedom 73043931 Installation guide
-
Greenes Fence RC4T8S34B Installation guide
-
Signature Hardware 302799 Installation guide
-
 Myard PNP111902 Installation guide
-
Boerboel 73002218 Installation guide
-
 Storage Concepts 215-FRS3618036 Operating instructions
-
Freedom 73015420 Installation guide
-
Weatherables WBGA-HINGEHD-NW Operating instructions
-
Weatherables GTPI-3R5.5-4X48 Operating instructions

