Dometic Coporation
Warranty Department
1120 North Main Street
Elkhart, Indiana 46514
A Ramp Stand Pads (2 pcs)
with Screws (8 pcs)
B Ramp Stands (2/10 pcs)
C Ramp Door Pole Assembly (9 pcs)
D Fabric Assembly (1 pcs)
E Ramp Roof Pole Assembly (11 pcs)
F Ball End Sockets (4 pcs)
G Ball Ends (2 pcs)
H Center Ridge Pole (3 pcs)
I “C” Clip (1 pc)
J “J” Clip (1 pc)
K Hook Tape Roll (1 pc)
L Screws (6 pcs)
M “J” Hooks (4 pc)
N Snapfast
®
Fastners (2 pcs)
O Storage Bag (1 pc)
P Pole Storage Bag (1 pc)
These instructions must be read and understood before
installation of this kit. Modifi cation of this product can be
extremely hazardous and could result in personal injury
and/or property damage.
To reduce the risk of death, personal injury, fi re or
damage:
1. The stand supports the X-Tend A-Room™ and ramp.
The stands are designed to support a total of 1,200
pounds including persons, equipment and ramp.
2. Do not use grills, hibachis, camp stove or gas burn-
ing lamps inside the X-Tend A-Room™.
3. Never operate generators, motorcycles or any internal
combustion engines inside the X Tend A-Room™.
4. Close attention is necessary when used by or near
children. Do not allow children or adults to lean
against the sides or front of the X Tend A-Room™.
5. Do not suspend electrical lights from the rafter poles
or allow them to come in contact with the X Tend A-
Room™ fabric.
6. Do not modify or change the installation of this X
Tend A-Room™.
7. Follow all trailer manufacturers instructions regarding
ramp use and limitations.
8. Use only as described in this manual.
Failure to place stands under ramp’s door frame could
cause damage to door’s outer fi berglass surface when
ramp is placed under load.
Personal injury may result from falling or stepping off
the end of the cargo ramp when the fabric is open and
rolled up.
The X Tend A-Room™ is designed to be
installed around the loading ramp opening of
a cargo type trailer, allowing users to enjoy
the extra living space. Product features and
specifi cations as described or illustrated are
subject to change without notice. Installation
methods not described in this manual must
have written approval from Dometic
Corporation.
Important: Read the entire instal-
lation and operating instructions
carefully before starting the instal-
lation.
Important: If trailer is equipped
with a bed, DO NOT ROLL BED
DOWN if room poles are in place.
REVISION A
Form No. 3311002.038

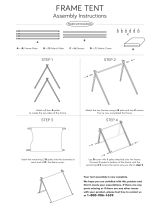
Assemble ramp stands.
Install ramp Stand Pads A at door
corners. Lay sections with the white
nylon insert B2 on the ground,
place cross sections B3 on top,
then screw the lower jack pole B4
into the nylon insert. Sleeve the up-
per jack pole B5 over the lower.
Lower the R
V’s ramp and position
the ramp stands under the outer
corners where Ramp Stand Pads
have been installed. Line up the
holes and insert the cotter pin B6
to adjust height and level the ramp.
1
Lay out the tent for
assembly.
Arrange the tent on the
ramp with the sleeved
edge D on top and
the privacy panels on
the inside.
2
Assemble the C poles.
Assemble the two vertical
poles (black tips on the
bottom), extend to their
max length and lock the
lock levers. Do the same
with the cross pole.
3
Slide C poles into tent
sleeves C2 .
Slide the cross pole into
its sleeve, and repeat
with the vertical poles.
Connect the cross pole
to the vertical poles and
attach the corner straps
C3 to the vertical poles.
4
Raise the C pole frame.
With the black tips in the RV’s
doorway, tilt up the C pole frame
into the doorway. Have a helper
hold it there while you continue
assembly FROM INSIDE THE
RV AND TENT.
5
Adjust the C pole frame to the RV
doorway.
Loosen the lock levers and raise or
lower the poles to fi t. Spread the cross
pole and unzip the dart in the roof fab-
ric D2 to add width if necessary.
6
7
Assemble the E poles and ridge
pole.
Bring remaining pole sections in-
side the RV. Assemble the two
vertical poles (ball tip at bottom),
extend to max length and lock the
lock levers. Snap the ball-socket
clips F onto the ball tips. Assem-
ble the curved cross pole and con-
nect it to the verticals.
Raise the tent.
Use the E pole assembly at a
45-degree angle to lift the tent
at the end of the ramp. Connect
the cross pole to the hook & loop
tape E2 that will hold it in po-
sition. Angle the vertical poles
back to the RV doorway.
8
Permanently attach ball-socket clips F to
the RV fl oor.
Find a location that’s out of the way of your
gear and which will also let you fold the tent
forward and close the ramp to get moving.
That way, you won’t have to completely tear-
down / set-up the tent each time you change
location. Be sure the widest opening on the
socket is facing away from the coach.
9
Install fasteners N for corner grom-
mets D4 . Pull the corners of the tent
tight, away from the RV and mark the
spots where the grommets in the cor-
ners contact the ramp. Then drill a 1/8”
pilot hole (9/16” if ramp is metal) and
install a Snapfast® fastener in each
corner. Attach the grommets to the
fasteners to further secure the tent.
10
NOTE:
The RV ramp can be eas-
ily closed without having
to disassemble the X Tend
A-Room™. Just remove
pole E from F socket
and remove H pole from
J socket. Also, unhook the
J-hooks from the corners
of the ramp and set poles
inside RV. Then simply
close the ramp door while
tucking in the fabric.
Assemble the ridge pole.
Assemble the sections
and attach the clip I in
the center of the E cross
pole. Snap the J-clip J into
the ball at the ball end and
hook the J-clip into then
center of the cross pole in
the RV doorway.
11
Trim the tent.
Extend the ridge
pole and E poles
to max length,
stretching the tent
tight without lifting
it off the ramp.
12
Secure the tent to the
fl oor.
Hook the elastic cord D3
(located in the bottom hem
of the tent) onto the ramp.
If the hooks are too small,
connect the J-hooks M to
the ramp and then con-
nect the cord hooks to the
J-hooks.
14
13
Add hook tape to RV wall.
Once you see how the tent fi ts in the
RV frame, run 12-inch strips of the
hook tape along the interior walls of
the RV to attach to the loop fl aps on
the edge of the tent along the pole
sleeves. Next time you set up the
tent, you can attach it to the hook
tape as soon as you have raised
the C poles into the doorway.
/