
Configuring Modern
Authentication for EWS in
Crestron Fusion® Software
Integration Guide
Crestron Electronics, Inc.

Crestron product development software is licensed to Crestron dealers and Crestron Service Providers (CSPs) under a
limited non-exclusive, non-transferable Software Development Tools License Agreement. Crestron product operating system
software is licensed to Crestron dealers, CSPs, and end-users under a separate End-User License Agreement. Both of these
Agreements can be found on the Crestron website at www.crestron.com/legal/software_license_agreement.
The product warranty can be found at www.crestron.com/legal/sales-terms-conditions-warranties.
The specific patents that cover Crestron products are listed at www.crestron.com/legal/patents.
Certain Crestron products contain open source software. For specific information, visit
www.crestron.com/legal/open-source-software.
Crestron, the Crestron logo, and Crestron Fusion are either trademarks or registered trademarks of Crestron Electronics, Inc.
in the United States and/or other countries. Active Directory, Azure, Microsoft, Office 365, PowerShell, and Windows are
either trademarks or registered trademarks of Microsoft Corporation in the United States and/or other countries. Other
trademarks, registered trademarks, and trade names may be used in this document to refer to either the entities claiming
the marks and names or their products. Crestron disclaims any proprietary interest in the marks and names of others.
Crestron is not responsible for errors in typography or photography.
This document was written by the Technical Publications department at Crestron.
©2018 Crestron Electronics, Inc.

Integration Guide – DOC. 8422A Contents • i
Contents
Introduction ................................................................................................................................... 1
Create a New Application Registration .................................................................................. 2
Register the Application with Azure ...................................................................................................... 2
Add Office 365 API Access ....................................................................................................................... 3
Generate a Self-Signed Certificate ......................................................................................... 6
Add the Certificate to the Application ................................................................................... 9
Configure Crestron Fusion Settings ....................................................................................... 12
EwsOAuthTenantId (O365 tenant ID) ................................................................................................. 12
EwsOAuthClientId (Client ID (Application ID)) ................................................................................. 13
EwsOAuthCertificatePassword (Certificate Password) ................................................................ 14
EwsOAuthCertificate (OAuth Certificate (PFX)) ............................................................................. 14
EwsOAuthServerName (EWS Server URL) ........................................................................................ 14
Configure Office 365 Tenant for OAuth ................................................................................ 15
Test the Configuration .............................................................................................................. 15


Integration Guide – DOC. 8422A Modern Authentication for EWS in Crestron Fusion • 1
Configuring Modern Authentication for
EWS in Crestron Fusion® Software
Introduction
This document provides the procedures required to configure Modern Authentication
(OAuth 2) support for Crestron Fusion® software in the Microsoft® EWS (Exchange Web
Services) service.
The Modern Authentication authorization model is provided by the
Azure® Active Directory® service to integrate managed API applications with the same
authentication model used by the Office 365® software REST APIs. Once Modern
Authentication is configured in EWS, Crestron Fusion uses this access method to provide
heightened user authentication.
NOTE: This authentication method is compatible only with Office 365 at this time.
On-premises support may be available at a future date.

2 • Modern Authentication for EWS in Crestron Fusion Integration Guide – DOC. 8422A
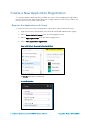
Create a New Application Registration
To configure Modern Authentication in EWS, a Crestron Fusion application registration
must be configured in Azure Active Directory using the Azure portal. This procedure only
must be done once per Office 365 tenant.
Register the Application with Azure
To create a new Crestron Fusion application registration in Azure Active Directory:
1. Sign into the Azure portal with a user ID that has Global Administrator rights.
2. Select Azure Active Directory from the left navigation menu.
3. Select App registrations from the Azure widget menu.
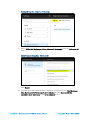
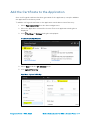
4. Click + New application registration.
App registrations - New application registration
A Create dialog box is displayed.
Create Dialog Box

Integration Guide – DOC. 8422A Modern Authentication for EWS in Crestron Fusion • 3
5. Enter the following information:
• Name: Enter a name for the application. The name must be unique to the
Azure Active Directory profile.
• Application type: Select Web app / API from the drop-down menu.
• Sign-on URL: Enter a sign-on URL for the application. The application name
entered in the
Name text field should be repeated as the URL.
6. Click Create. The application is created and displayed in the widget.
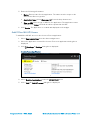
Add Office 365 API Access
To add Office 365 API access to the Crestron Fusion application:
1. Select App registrations from the Azure widget menu.
2. Select the application created for Crestron Fusion. An application dialog box is
displayed.
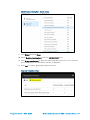
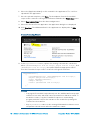
3. Click
Settings. A Settings dialog box is displayed.
Crestron Fusion App Window
4. Select Required permissions under the API ACCESS menu.
5. Click + Add. An Add API access dialog box is displayed.

4 • Modern Authentication for EWS in Crestron Fusion Integration Guide – DOC. 8422A
Settings Dialog Box - Required Permissions
6. Select Office 365 Exchange Online (Microsoft.Exchange) from the Select an API
menu.
Add API access Dialog Box - Select an API
7. Click Select.
8. Click the associated check boxes to display a check mark next to Use Exchange
Web Services with full access to all mailboxes and the Read and write
calendars in all mailboxes in the Enable Access menu.

Integration Guide – DOC. 8422A Modern Authentication for EWS in Crestron Fusion • 5
Add API access Dialog Box - Enable Access
9. Click Select and then Done.
10. Select Required permissions under the API ACCESS menu.
11. Click Grant permissions to grant the Office 365 API permissions to the Crestron
Fusion application. A confirmation window is displayed.
12. Click Yes to confirm granting the API permissions.
Required Permissions Menu

6 • Modern Authentication for EWS in Crestron Fusion Integration Guide – DOC. 8422A
Generate a Self-Signed Certificate
EWS Modern Authentication requires a self-signed certificate to travel with the
application, which provides additional application security.
The self-signed certificate may be generated using various tools (such as
PowerShell® software or openssl). The procedure below explains how to generate the
certificate from the Windows® operating system SDK (software development kit).
To generate a self-signed certificate from the Windows SDK:
1. Open the command prompt in the Windows system.
2. Issue the following command, replacing [ApplicationName] with the application
name created in EWS:
cd C:\Program Files\Microsoft SDKs\Windows\v6.0A\Bin\x64
makecert -r -pe -n "CN=[ApplicationName]" -b 09/05/2018 -e
09/05/2025 -ss my -len 2048
If the certificate is generated, a "Succeeded" message is displayed.
NOTE: The command above may not be compatible with some versions of the Windows
SDK. The command has been confirmed to work with Windows SDK version 6.0a.
• The -b and -e parameters set the validity time range. The date entered for -e
should be at least five years ahead of the date entered for -b.
• The -r parameter indicates that the certificate is self-signed.
• The -pe parameter indicates that the private key is exportable.
• The -ss my parameter sets the certificate in the Personal folder of the cert
store.
To export the self-signed certificate for use with the application:
1. Issue the mmc command in the command prompt to run Certificate Manager.
2. Navigate to File > Add/Remove Snap-In.
3. Move the Certificates snap-in from the Available snap-ins menu to the Selected
snap-ins menu.
4. Select the My user account radio button in the dialog box that displays, and then
click
Finish.
5. Navigate to Console Root > Certificates - Current User > Personal >
Certificates in the menu tree.

Integration Guide – DOC. 8422A Modern Authentication for EWS in Crestron Fusion • 7
Console 1 - Personal Cert Store
6. Right-click the application cert.
7. Select All tasks > Export. A certificate export wizard opens.
a. When prompted, select the No, do not export the private key radio button.
b. When prompted, select the Base-64 encoded X.509 (.CER) radio button.
c. When prompted, name the certificate "[ApplicationName].cer". where
[ApplicationName] is the application name created in EWS.
d. Click OK to exit the wizard once the export has completed.
8. Right-click the application cert.
9. Select All tasks > Export. A certificate export wizard opens.
a. When prompted, select the Yes, export the private key radio button.
b. Retain the default file export settings.
c. When prompted, enter and confirm a password for the private key.
d. When prompted, name the certificate "[ApplicationName].pfx". where
[ApplicationName] is the application name created in EWS.
e. Click OK to exit the wizard once the export has completed.
10. Run the following PowerShell script, pointing to the saved .cer file as highlighted
below.
# This will print out the values needed to put into the AD App manifest.
#
$Cert = New-Object
System.Security.Cryptography.X509Certificates.X509Certificate2
$Cert.Import("c:\Temp\[ApplicationName].cer")
$BinaryData = $Cert.GetRawCertData()
$Base64Value = [System.Convert]::ToBase64String($BinaryData)
$BinaryData = $Cert.GetCertHash()
$Base64Thumbprint = [System.Convert]::ToBase64String($BinaryData)
$Keyid = [System.Guid]::NewGuid().ToString()
Write-Host "Base-64 Thumbprint:"
$Base64Thumbprint
Write-Host "Keyid:"
$Keyid
Write-Host "Base-64 Value:"
$Base64Value

8 • Modern Authentication for EWS in Crestron Fusion Integration Guide – DOC. 8422A
The PowerShell output appears as follows:
PS C:\WINDOWS\system32> C:\Projects\Other\ExchScripts\EwsCert.ps1
Base-64 Thumbprint:
ehg0qxkvD12mFqjT8u88MzSZW1Y=
Keyid:
ff144009-ce5c-46e1-8cd2-1c0733e92195
Base-64 Value:
MIIDHzCCAgegAwIBAgIQ/AQnORgvc5hAdvZUXIuSLTANBgkqhkiG9w0BAQQFADAgMR4wHAYDVQQDExV
DcmVzdHJvbkZ1c2lvbkV3c0FwcDQwHhcNMTgwOTA1MDQwMDAwWhcNMjUwOTA1MDQwMDAwWjAgMR4wHA
YDVQQDExVDcmVzdHJvbkZ1c2lvbkV3c0FwcDQwggEiMA0GCSqGSIb3DQEBAQUAA4IBDwAw
ggEKAoIBAQDE+y6HyO8r8r+kj0BlG1ffRMf7RiwMAFOhWGlNxSUYEVPQTjTzkARme8oClrlTyxk0ftv
56LleR0xqBrIxufqjru0qyx1lY1sqTMNNPquaGehlvIny75tClz+tAtOuw6wOlJQ28P3RjrlOnqQ4tY
gi98C2GcaNHSPsExZY36B8cMZCbIirQqPENSqwKg/SudNoNjX/LMFLJBcJoD5r7xdg/5JG
symhuRKhxfo58th1Pdu1nOeQfGzlcxjXW8YSGMelgK97eTOQCPqCAWEwI9wiY8hfjVUDNxg9WBM76Pq
5y17QV7rK+IS1xON1FusYxiof+SMYnclnHZLRAopQJoU/AgMBAAGjVTBTMFEGA1UdAQRKMEiAEA4PF6
eu27gCKKeFugtFfGihIjAgMR4wHAYDVQQDExVDcmVzdHJvbkZ1c2lvbkV3c0FwcDSCEPwE
JzkYL3OYQHb2VFyLki0wDQYJKoZIhvcNAQEEBQADggEBAGLXnaeVqSvOefiV/sit5cS+8eyEArrPZAK
MmfPnUm5gVsMZtI/ivqgVp8TpvSp3DQhrQkkW1qHHlJOf2PyhwEpv3ZEbEPwkk+xW1udhjwVVrTIbMm
vqQQMIiAxxL3ymQ0A9Xd+FfRuhYQvozZVyDYWDaqVG8CBYH8Yj55FJhhjR2LkEdgyEVq8o
5UK9lMbN2LWRRu5c2NHmGuNAakp7+RFCEdT4u9s5ADFVgpl21lpNUI2nwVasyn2p6zWW5jVQD9VPfpT
1tWaZwsVqEJIRfpeQ8ZFPsTWFAR0P1ArJi1PhtEg267a3pzlPe3E+fnrt2EXC6+4H0xI/AEEtgKYDDq
o=
Ensure that this output is available for the remaining procedures.

Integration Guide – DOC. 8422A Modern Authentication for EWS in Crestron Fusion • 9
Add the Certificate to the Application
Once a self-signed certificate has been generated for the application, it may be added to
the application in the Azure portal.
To add the self-signed certificate to the application via the Azure Active Directory:
1. Select App registrations from the Azure widget menu.
2. Select the application created for Crestron Fusion. An application dialog box is
displayed.
3. Click
Settings. A Settings dialog box is displayed.
Crestron Fusion App Window
4. Select Keys under the API ACCESS menu.
5. Click Upload Public Key.
Keys Menu - Upload Public Key

10 • Modern Authentication for EWS in Crestron Fusion Integration Guide – DOC. 8422A
6. Select the [ApplicationName].cer file created for the application. The .cer file is
uploaded to the application.
7. Once the upload completes, click Save. The thumbprint from the PowerShell
script used to create the self-signed certificate is added to the
Public Keys menu.
8. Select App registrations from the Azure widget menu.
9. Select the Crestron Fusion application. An application dialog box is displayed.
10. Click Manifest. The JSON manifest for the application is displayed in an Edit
screen.
Crestron Fusion App Window
11. In the keyCredentials section, replace the existing code with the code below,
where [Base64Thumbprint from PS script], [Keyid from PS script], and
[Base64Value from PS script], are replaced with the appropriate values
from the PowerShell script used to create the self-signed certificate.
"keyCredentials": [
{
"customKeyIdentifier": "[Base64Thumbprint from PS script]",
"keyId": "[Keyid from PS script]",
"type": "AsymmetricX509Cert",
"usage": "Verify",
"value": "[Base64Value from PS script]"
}
],
NOTES:
∙ Copying the PowerShell output directly into the JSON manifest may add
extraneous line ends, which will cause the manifest to fail when saved. To
avoid this scenario, copy the PowerShell output into a text editing
program, and then remove the extraneous line ends before pasting the
content into the manifest.
∙ Any keyCredentials values in the existing JSON manifest that are not in
the pasted code will return after the manifest is saved.

Integration Guide – DOC. 8422A Modern Authentication for EWS in Crestron Fusion • 11
The following code uses the sample PowerShell output shown on page 8 as an
example.
"keyCredentials": [
{
"customKeyIdentifier": " ehg0qxkvD12mFqjT8u88MzSZW1Y=",
"keyId": " ff144009-ce5c-46e1-8cd2-1c0733e92195",
"type": "AsymmetricX509Cert",
"usage": "Verify",
"value":
"MIIDHzCCAgegAwIBAgIQ/AQnORgvc5hAdvZUXIuSLTANBgkqhkiG9w0BAQQFADAgMR4w
HAYDVQQDExVDcmVzdHJvbkZ1c2lvbkV3c0FwcDQwHhcNMTgwOTA1MDQwMDAwWhcNMjUwO
TA1MDQwMDAwWjAgMR4wHAYDVQQDExVDcmVzdHJvbkZ1c2lvbkV3c0FwcDQwggEiMA0GCS
qGSIb3DQEBAQUAA4IBDwAwggEKAoIBAQDE+y6HyO8r8r+kj0BlG1ffRMf7RiwMAFOhWGl
NxSUYEVPQTjTzkARme8oClrlTyxk0ftv56LleR0xqBrIxufqjru0qyx1lY1sqTMNNPqua
GehlvIny75tClz+tAtOuw6wOlJQ28P3RjrlOnqQ4tYgi98C2GcaNHSPsExZY36B8cMZCb
IirQqPENSqwKg/SudNoNjX/LMFLJBcJoD5r7xdg/5JGsymhuRKhxfo58th1Pdu1nOeQfG
zlcxjXW8YSGMelgK97eTOQCPqCAWEwI9wiY8hfjVUDNxg9WBM76Pq5y17QV7rK+IS1xON
1FusYxiof+SMYnclnHZLRAopQJoU/AgMBAAGjVTBTMFEGA1UdAQRKMEiAEA4PF6eu27gC
KKeFugtFfGihIjAgMR4wHAYDVQQDExVDcmVzdHJvbkZ1c2lvbkV3c0FwcDSCEPwEJzkYL
3OYQHb2VFyLki0wDQYJKoZIhvcNAQEEBQADggEBAGLXnaeVqSvOefiV/sit5cS+8eyEAr
rPZAKMmfPnUm5gVsMZtI/ivqgVp8TpvSp3DQhrQkkW1qHHlJOf2PyhwEpv3ZEbEPwkk+x
W1udhjwVVrTIbMmvqQQMIiAxxL3ymQ0A9Xd+FfRuhYQvozZVyDYWDaqVG8CBYH8Yj55FJ
hhjR2LkEdgyEVq8o5UK9lMbN2LWRRu5c2NHmGuNAakp7+RFCEdT4u9s5ADFVgpl21lpNU
I2nwVasyn2p6zWW5jVQD9VPfpT1tWaZwsVqEJIRfpeQ8ZFPsTWFAR0P1ArJi1PhtEg267
a3pzlPe3E+fnrt2EXC6+4H0xI/AEE"
}
],
12. Click Save on the Edit screen.
Exit the Edit screen, and then click Manifest to display the Edit screen again. The
keyCredentials section should now appear as follows:
keyCredentials Section
Confirm that the startDate and endDate values match the start and end dates
specified when creating the certificate. If so, the application has read the uploaded
certificate successfully.
NOTE: It is normal that null is shown for value.

12 • Modern Authentication for EWS in Crestron Fusion Integration Guide – DOC. 8422A
Configure Crestron Fusion Settings
Modern Authentication for EWS configuration parameters must be set in
Crestron Fusion. The
Microsoft Exchange page in the Crestron Fusion Configuration
web client has been extended so that Modern Authentication may be configured outside
of the
All Config page.
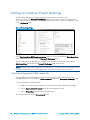
Microsoft Exchange Page
If the Use OAuth for EWS authentication option is selected, additional OAuth settings
are provided at the bottom of the Microsoft Exchange page.
The following sections identify the configuration variable name and the associated
OAuth settings setting in the Microsoft Exchange page (if present).
NOTE: Sample values are used in the following sections for reference. These values must
be replaced with values from the application created using the previous sections.
EwsOAuthTenantId (O365 tenant ID)
The EwsOAuthTenantId variable sets the tenant ID of the Office 365 account. This
variable may also be set using the
O365 tenant ID field in the Microsoft Exchange page.
To locate the Office 365 tenant ID:
1. Sign into the Azure portal with a user ID that has Global Administrator rights.
2. Select Azure Active Directory from the left navigation menu.
3. Select Properties from the Azure widget menu.
The tenant ID is listed in the Directory ID field.

Integration Guide – DOC. 8422A Modern Authentication for EWS in Crestron Fusion • 13
Azure Active Directory Properties - Directory ID
EwsOAuthClientId (Client ID (Application ID))
The EwsOAuthClientId variable sets the application ID. This variable may also be set
using the
Client ID (Application ID) field in the Microsoft Exchange page.
To locate the application ID:
1. Sign into the Azure portal with a user ID that has Global Administrator rights.
2. Select Azure Active Directory from the left navigation menu.
3. Select App registrations from the Azure widget menu.
4. Select the application created for Crestron Fusion. An application dialog box is
displayed.
The application ID is listed in the Application ID field.
Crestron Fusion App Window

14 • Modern Authentication for EWS in Crestron Fusion Integration Guide – DOC. 8422A
EwsOAuthCertificatePassword (Certificate Password)
The EwsOAuthCertificatePassword variable sets the certificate private key password.
This variable may also be set using the
Certificate Password field in the Microsoft
Exchange page.
For this variable, enter the private key password created while exporting the self-signed
certificate.
EwsOAuthCertificate (OAuth Certificate (PFX))
The EwsOAuthCertificate variable sets the contents of the .pfx file created when the
certificate with the private key was exported. This variable may also be set using the
OAuth Certificate (PFX) field in the Microsoft Exchange page.
For this variable, enter the path of the .pfx file on the network, or use the Browse button
on the
Microsoft Exchange page to locate the file on the network.
NOTE: The read-only Currently Loaded Certificate text field shows the .pfx file that is
loaded to the application. The file path of the .pfx file is not included.
EwsOAuthServerName (EWS Server URL)
The EwsOAuthServerName variable sets the URL of the EWS server. This variable may
also be set using the
EWS ServerURL field in the Microsoft Exchange page.
For this variable, enter "https://outlook.office365.com/".

Integration Guide – DOC. 8422A Modern Authentication for EWS in Crestron Fusion • 15
Configure Office 365 Tenant for OAuth
The Office 365 tenant must be configured to enable OAuth if it is not already configured
by setting the OAuth2ClientProfileEnabled variable to $True.
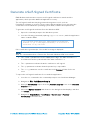
The following PowerShell script queries the OAuth settings for the Office 365 tenant:
$UserCredential = Get-Credential # Enter your O365 admin credentials in the pop-up
$Session = New-PSSession -ConfigurationName Microsoft.Exchange -ConnectionUri
https://outlook.office365.com/powershell-liveid/ -Credential $UserCredential -
Authentication Basic -AllowRedirection
Import-PSSession $Session -DisableNameChecking
Get-OrganizationConfig | Format-Table -Auto Name,OAuth*
#Set-OrganizationConfig -OAuth2ClientProfileEnabled $true
The command to enable OAuth is commented at the bottom of the script.
Test the Configuration
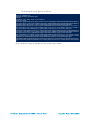
A new TEST OAUTH command has been added to the Crestron Fusion Services
controller to help validate the configuration for OAuth settings.
Crestron Fusion Services Controller - TEST OAUTH
The readout shown in the image above indicates a successful test run.
NOTE: The CONFIG RELOAD command must be run if any changes have been made to
the OAuth configuration prior to issuing a new TEST OAUTH command. If changes are
made to the configuration, the Groupware service may take up to 10 minutes to receive
the new values; otherwise, the service app pool may be cycled again to receive the new
values immediately.

Crestron Electronics, Inc. Integration Guide – DOC. 8422A
15 Volvo Drive, Rockleigh, NJ 07647 (2053079)
Tel: 888.CRESTRON 12.18
Fax: 201.767.7576 Specifications subject to
www.crestron.com change without notice.
-
 1
1
-
 2
2
-
 3
3
-
 4
4
-
 5
5
-
 6
6
-
 7
7
-
 8
8
-
 9
9
-
 10
10
-
 11
11
-
 12
12
-
 13
13
-
 14
14
-
 15
15
-
 16
16
-
 17
17
-
 18
18
-
 19
19
-
 20
20


Ask a question and I''ll find the answer in the document
Finding information in a document is now easier with AI
Related papers
-
Crestron SW-FUSION User guide
-
-
-
-
-
-
-
-
-
Other documents
-
Dell Data Guardian User guide
-
-
Kofax eFlow ePortal 2.0.1 User guide
-
HP PrinterOn Enterprise Configuration Guide
-
Xerox FreeFlow Process Manager User guide
-
Kofax TotalAgility 7.9.0 Operating instructions
-
Extron TLS 525M NC User manual
-
 Azure A224WC 24-Inch Wine Center User manual
-
Broadcom ESG User guide
-
