Page is loading ...

CTV-4190SR
INSTRUCTION MANUAL
ULTRA-SLIM TV (21")
DEAR CUSTOMER
In order to achieve the best performance of your product, please read this instruction manual carefully before using,
and keep it for future reference.
If you need extra support, please write to [email protected]
m
u
l
t
i
-
s
y
s
t
e
m
m
u
l
t
i
-
s
y
s
t
e
m


NOTE
Please confirm the model you have purchased before reading the manual
and refer to the appendix to make sure features your TV has.
Thank you very much for your purchase of this product-the most natural
Colour Television Receiver.
To enjoy your set to the full from the very beginning, read this manual
carefully and keep it handy for ready reference.
If a television is not positioned in a sufficiently stable location, it can be
potentially hazardous due to falling. Many injuries, particularly to children, can be
avoided by taking simple precautions such as:
Using cabinets or stands recommended by the manufacturer of the television.
Only using furniture that can safely support the television.
Ensuring the television is not overhanging the edge of the supporting furniture.
Not placing the television on tall furniture (for example,cupboards or
bookcases) without anchoring both the furniture and the television to a suitable
support.
Not standing the televisions on cloth or other materials placed between the
television and supporting furniture.
Educating children about the dangers of climbing on furniture to reach the
television or its controls.
IMPORTANT INFORMATION

Precaution
1. Read these instructions.
2. Keep these instructions.
3. Heed all warnings.
4. Follow all instructions.
5. Do not use this apparatus near water, the apparatus shall not be exposed to
dripping or splashing and that no objects filled with liquids, such as vases, shall
be placed on the apparatus.
6. Clean only with dry cloth.
7. Do not install this apparatus in windtight places such as the wall-unit. Do not block
any ventilation openings.
8. Do not install near any heat sources such as radiators, heat registers,
stoves, or other apparatus (including amplifiers) that produce heat.
9. Do not defeat the safety purpose of the polarized or grounding-type plug. A
polarized plug has two blades with one wider than the other. A grounding type
plug has two blades and a third grounding prong. The wide blade or the third prong
are provided for your safety. If the provided plug does not fit into your outlet,
consult an electrician for replacement of the obsolete outlet.
10. Protect the power cord from being walked on or pinched particularly at plugs,
convenience receptacles, and the point where they exit from the apparatus.
11. Only use attachments/accessories specified by the manufacturer.
12. Use only with the cart, stand, tripod, bracket, or table specified by the
manufacturer, or sold with the apparatus. When a cart is used, use caution
when moving the cart/apparatus combination to avoid injury from tip-over.
13. Unplug this apparatus during lightning storms or when unused for long periods
of time.
14. Refer all servicing to qualified service personnel. Servicing is required when
the apparatus has been damaged in any way, such as power-supply cord or plug
is damaged, liquid has been spilled or objects have fallen into the apparatus, the
apparatus has been exposed to rain or moisture, does not operate normally, or
has been dropped.
Danger of explosion if battery is incorrectly replaced.
Replace only with the same or equivalent type.
Batteries shall not be exposed to excessive heat such as sunshine,
fire or the like.
Used batteries should not be thrown into the garbage can, please
leave them at an appropriate depot.
CAUTION
Where the MAINS plug or an appliance coupler is used as the
disconnect device, the disconnect device shall remain readily
operable.
CAUTION
These servicing instructions are for use by qualified service
personnel only. To reduce the risk of electric shock, do not perform
any servicing other than that contained in the operating instructions
unless you are qualified to do so.
CAUTION
Page 1

Specifications
Note: We will not notify customers particularly when there is any change happened in the
design and specification of the product. The pictures in the handbook may bear slight
differences from the real one. Please take actual products as the standard.
1. Television system
RF input: NTSC / PAL M / PAL N
Video input: NTSC / PAL M / PAL N
2. Receive frequency range
US CH
181 Channels (Air+CATV)
3 Picture resolution
Horizontal 220
Vertical 320
4. Intermediate frequency
Picture IF 45.75MHz
Volume IF 41.25MHz
5. Luminance grades 8 grade
6. Sound power output 3W 2
7. Power supply AC 90-260V 50/60Hz
8. Power consumption 75W (standard status)
9. Screen size: 54cm
10. Dimension
11. Net Weight
585(W)x335(D)x455(H)mm
18.5kg
Note
All specifications are subject to change without notice.
All quality and size are approximate value.
Page 2

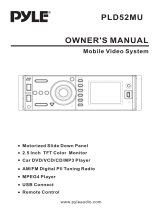
Control Location
For control knobs (all panels subject to the real object), please refer
to your own TV set.
Front and Back Control Panel
14
15
13
2
1. Speaker
2. Side AV In
3. AV/TV
4. Menu Button
5. Volume Down Button
6. Volume Up Button
7.Program Down Button
8. Program Up Button
9. Power Indicator
10. Remote Sensor
11. Main Switch
12. Speaker
13. AC power Cord
14. Audio/Video-in/out
15. Terminal Antenna(75 Ohm)
16. USB
AV/TV
Press or toggle between channels and AV input. The input source is selected between the RF
input of antenna and the Audio Video input for display.
Menu
Press MENU button to display the On Screen Menu.
Volume +/-
Press these buttons to decrease or increase the volume and they are also used for menu
selection.
Program +/-
Press these buttons to select channel.
Power Indicator
Indicates On/ Off state of a television. It will be ON when the set is powered on or whenever
any key on remote is pressed.
Remote Sensor
Point your remote towards the sensor to operate the functions on the Remote control.
Main switch
Press the main switch on the control panel to turn ON or OFF.
Video
Video input socket for camcorder, VCR, DVD sets
Page 3
3
4
5
6
7
8
1
12
11
10
9
16

OPERATION INSTRUCTIONS OF PANEL
First insert power plug and then insert antenna or cable antenna into the socket
of antenna.
SWITCH ON AND OFF TV
When press Power button, power is connected. When press Power button
again, power is off. When TV is at stage of sleep, it can not be switched on or
off by pressing the power button.
NOTE:
when TV is at stage of sleep, it can be switched on or off by pressing the
sleep button on the remote controller.
CAUTIONS:
In case that electricity is cut when watching TV, switch off the power. If
TV is not watched, please switch off the power. When TV is at stage of
sleep, there is a part of circuit working and consuming electricity.
Operation of Function Board
Press "MENU" button and enter "Installation"
with P+/P- button selected "Auto search"
function and then press V+ or V- button starting
to search the channels automatically.
P+P-V+V-
TV/AV
MENU
Automatic Search Channel
Page 4

This TV set can be connected to videotape player, videodisc player,video camera,
game player or audio player.
NOTE:
Side AV terminal
Connection to Other Equipment
Back AV terminal
Video/ Audio equipment can be connected to sockets of AUDIO IN or VIDEO IN
in rear, If use the AV IN function , please make sure the image and sound play
normally, and then connect the AV out terminal.
VCD PLAYER
Y
Cr
Cb
DVD PLAYER
Y
Cr
Cb
TV
L
Y
CrCb
IN
IN
OUT
VR
L
VR
Y, Cr, Cb, input (OPTION)
VIDEO OUT
R AUDIO
OUT
L
Page 5

Remote Controller
Don't mix different battery types. Take out of the batteries from the remote if not
in use for a long time.
Page 6
POWER
SCAN
P.P
0
2
3
4
5
6
7
8 9
MUTE
DISP
^
^
+
VOL
CH
X
SLEEP
OK
SOURCE
CCD
CALE.
MENU
ZOOM
USB
RS25-11115D
INFO
SUBTITLE
SETUP
V-CHIP
REPEAT
A-B
1. [POWER]: Standby turn on and off.
2. [SOURCE]: Select the signal source.
3. [0~9]: Continue to press the keys to
select a channel.
4. [ REPEAT]: TV mode: Return to previous channel.
MEDIA mode: Repeat playing the current chaper
5. [CCD]: TV mode: CCD button.
MEDIA mode: Program serial number increment ,
for example 10+,20+,30+
6. [SCAN]: TV mode: SCAN
MEDIA mode: Setup repeat play segment or Select
the picture showing mode
7. [SLEEP]: Sleep button.
8. [CALE.]: Calendar button.
9. [P.P]: Picture Effect
10. [MUTE]: Mute sound.
11. [VOL+/-]: Sound volume up/down.
12. [CH ] [CH ]: Channel up/down.
13. [MENU]: Display the main menu.
14. [DISPLAY]: Display channel status.
17. [V-CHIP]: TV mode: V-CHIP button.
MEDIA mode: enter or exit LANGUAGE SETUP menu.
18. [ZOOM]: Zoom in or out the current picture(Optional).
19. [USB]: Switch USB mode.
NOTE: Only for MEDIA
15.[ ] [ ] [ ] [ ]: Move the cursor in the menu.
16. [OK]: Confirm or enter mode.
20. [INFO]: Display information for current channel in
USB mode.
21. [SUBTITLE]: In USB mode, enable or disable subtitle;
select subtitle language.
22. [ ]: Stop playing or go back.
23. [ ]: Press to Play or Pause the file.
24. [ ]: Fast backward.
25. [ ]: Fast forward
26. [ ]: Skip backward.
27. [ ]: Skip forward.
button
1
3
5
4
10
11 12
15
16
19
14
23
18
2
6
7
8
9
13
21
22
24
25
26
20
17
27
CTV-4190SR

0
2
3
4
5
6
7
8 9
1) Power/Stand-By ON/OFF
With Mains status On, you can also turn off using Remote Control Hand
Unit. This status is called Stand-By mode. In this mode, You can also turn
on the TV by pressing the Program Up/Down keys on the front controls.
The TV has an Automatic Power OFF function. With no signal condition, the
TV will automatically turn off after 10 minutes.
2) Program Up/Down
Press [ ] key, to change Program Up.
Press [ ] key, to change Program Down.
CH
CH
3) Direct Access Tuning
Using the numeric keys on Remote Control
Hand Unit, Programs can be selected directly.
4) Volume Control
Press [VOL +] key, for Volume Up.
Press [VOL - ] key, for Volume Down.
2
5) SCAN
By Pressing this key, Programs will change automatically. Each program
will be previewed for 2 seconds, and stop at original program. Skipped
programs will not be previewed.
6)
You can select your video source by the
[ SOURCE] key.
SOURCE
16
Volume
1
Control your TV
+
VOL
^
^
CH
SCAN
A-B
SOURCE
AV2
AV1
3
MEDIA
Page 7

8) Quick View
Program will quick back to the previous program
being watched.
10
2
10) PICTURE EFFECT
By repeatedly pressing this key, picture effects will change as follows:
11) V-CHIP
By pressing this key, the parental
menu appears.
9) DISPLAY
TV / AV MODE
This key will call the On Screen Display.
Press again, to remove the On Screen Display.
Menu MODE
Pressing the DISPLAY key, current menu will exit directly.
Standard Dynamic User Mild
Standard
Parental
Lock Code - - - -
Lock Off
PG Rating
MPAA Rating: Off
Can. english: Off
Can. french: Off
Change code
REPEAT
MUTE
X
12) CALENDAR
By pressing this key, CALENDAR will
be appear.
Using [ ]/[ ] keys, to change the year.
Using [VOL+]/[VOL-] keys, to change the month.
CH CH
SU
5
12
19
2008 1
26
MO
TU WE TH FR
ST
2
3
4
7
8
14
15
1
10
11
9
1816
17
21
28
22
29
23
30
24
31
25
6
13
20
27
DISP
P.P
SETUP
V-CHIP
CALE.
7) MUTE
By pressing this key, sound output will be muted.
Press MUTE key again, or Volume Up, and sound
Volume will return.
Page 8

14) SLEEP
Repeatedly pressing this key, sleep timer
will change as follows:
"" 0 15 30 45 60 75 90 105 120 135 150 165 180 195 210 225 240 0
SLEEP
13.MAIN MENU BUTTON
When you press the main menu button, TV displays as follow in turn:
PICTURE SOUND TIMER FEATURES INSTALLATION
15)USB
Press [ USB ] key ,
Switch USB mode.
120
USB
Page 9
The max. memory size of USB device which can be supported is 32GB
16)ZOOM
Press [ZOOM] key ,to change as follows:
(Optional)
ZOOM
NORMAL WIDE

1) Auto Search Function:
Automatic Search and Memory (ASM)
Using the [MENU] key on the front or
the [MENU] key on the Remote for ASM.
A. Press [MENU] key repeatedly to select
INSTALLATION
B. Press [ ]/[ ]keys to select
Tuning mode .
Repeatedly pressing [VOL+] key, signal input model will change as follows:
and select input model.
C. Press [ ]/[ ] keys to select Auto search
D. Press [VOL+] key, to start ASM .
2) FINE TUNING Function: Fine Tuning for current setting.
A. Using [ ]/[ ]keys, to select Channel .
Using [VOL+]/[VOL-] keys, to change Program Number.
B. Using [ ]/[ ] keys, to select Fine ture .
C. Using [VOL+]/[VOL-] keys, to adjust for best tuning.
3) SKIP Function: Use to SKIP Programs. After setting to ON , the
program will not be selected by program Up/Down keys.
A. Using[ ]/[ ]keys, to select Channel .
Using [VOL+]/[VOL-] keys, to change Program Number.
B. Using [ ]/[ ] keys, to select Skip .
Using [VOL+]/[VOL-] keys, to select ON or OFF .
CH CH
CH CH
CH CH
CH CH
CH CH
CH CH
Tuning Procedure
INSTALLATION
Tuning mode Air
Channel 6
Color system Auto
Skip On
AFT On
Auto search
Fine ture
Air CATV/Cable(STD) CATV/Cable(HRC) CATV/Cable(IRC)
Air CATV/Cable
This item is option.
Page 10

Change code
New code - - - -
Confirm - - - -
7) CCD
Select the program which is broadcasting the CCD
you want to watch. Press [CCD] key on the remote
control, "CCD On" appear on the screen and after
it disappears, the information of CCD will display
on the screen. By repeatedly pressing [CCD] key,
CCD will change between ON and OFF.
6) CHANGE PASSWORD
Select and enter "Change Code"menu,
A. Input a new PIN.
B. Input the PIN again to confirm.
CCD On
Parental
Lock Code - - - -
Lock Off
PG Rating
MPAA Rating: Off
Can. english: Off
Can. french: Off
Change code
4) MPAA RATING
When you select " MPAA RATING",Using [VOL+]/[VOL-] keys, to change setup.
5) CANADA ENGLISH AND CANADA FRENCH
When you select "Can.english" or "Can french" Using [VOL+]/[VOL-] keys, to
change setup.
1) SELECT VCHIP MODE
A. Press [MENU] key repeatedly to select
"FEATURES".
B. Press [ ]/[ ]keys,
to select "parental".
C. Press [VOL+]/[VOL-] keys,
to parental menu appears.
CH CH
PG Rating
TV-Y View FV V S L D
TV-Y7 View V
TV-G View
TV-PG View V V V V
TV-14 View V V V V
TV-MA View V V V
VCHIP and CCD
2) VCHIP Password
A. Factory mode PIN is "0000", the common PIN is "4100".
B. Input the correct PIN, then can set the next items, include "PG Rating",
"MPAA Rating", "Can.english", " Can. french".
C. "Lock" is general lock, only when this item is on, parental mode can be
effective. When parental mode is effective, the screen is blue background
and sound is mute.
D. Using [ ]/[ ] keys, to move the cursor.
Using [VOL+]/[VOL-] keys, to select each item.
CH CH
Page 11
3) PG RATING
When you select " U.S. TV" ,using[ ]/
[ ]keys, to move the cursor for up and
down.
Using [VOL+]/[VOL-] keys, to preset view
or block.
Using the [MENU] key, to return.
CH
CH

PICTURE
Bright 75
Contrast 75
Color 50
Sharpness 50
Tint 00
1) [MENU] key
Press [MENU] key continuously, to scroll through the MENU selection,
as follows:
2) PICTURE MENU
A. Select each function using
[ ]/[ ] keys.
B. Each value can be controlled by
[VOL+]/[VOL-] keys.
C. Repeat any functions if required.
CH CH
3) SOUND MENU
A.Select each function using
[ ]/[ ]keys.
B.Each value can be controlled
by [VOL+]/[VOL-] keys.
C.Repeat any functions if required.
CH CH
Balance , AVL is option.
Menu Operation
The TINT will only appear when receiving the signals of NTSC system.
PICTURE SOUND TIMER FEATURES INSTALLATION
SOUND
Volume 16
Balance 00
AVL Off
TIMER
Timer Off
Clock 11:09PM
Off time -- : --
On time -- : --
On channel 1
4) TIMER MENU Function: Time and Timer setting.
A. Using[ ]/[ ]keys, to select
"Timer", "Clock","On time", "Off time"
or "On channel"
B. Using [ ]/[ ] keys, select "Timer".
Using [VOL+]/[VOL-] keys, channge Timer
On or Off.
C. For "Clock", "On time", "Off time"
setting.
Using [VOL+]/[VOL-] keys, select minutes
or hours.
Using [ ]/[ ] keys, set minutes or hours.
D. For "On Channel" setting.
Using [ ]/[ ]keys, select "On Channel" .
Using [VOL+]/[VOL-] keys, change On Channel number.
CH CH
CH CH
CH CH
CH CH
Page 12

FEATURES
Language English
Blue screen On
Picture enhance Off
CCD On
CC mode CC1
Parental
Game
5) FEATURES MENU Function: other functions setting.
A. Using [ ]/[ ] keys,
to select each item.
Using [VOL+]/[VOL-] keys,
to change the value
of each item.
B.Using [ ]/[ ] keys, to select
Language .
Using [VOL+]/[VOL-] keys, Language will
change as follows:
C.Using [ ]/[ ] keys, select the"Blue screen".
Using [VOL+]/[VOL-] keys, select "On"or "Off".
D.Using [ ]/[ ] keys, select the"
Using [VOL+]/[VOL-] keys, select "On"or "Off".
E.Using [ ]/[ ]keys, to select "CCD .
Using [VOL+]/[VOL-] keys, to preset "ON"or "OFF".
F.Using [ ]/[ ]keys, to select the"C.C mode .
Using [VOL+]/[VOL-] keys, caption mode will change as follows.
G.Using [ ]/[ ]keys, to select the"GAME .
Using [VOL+]/[VOL-] keys, to enter the game.
CH CH
CH CH
CH CH
CH CH Picture enhance".
CH CH
CH CH
CH CH
"
"
"
English Francais Espanol
Portugues
CC1 CC2 CC3 CC4 T1 T2 T3 T4
Page 13

1.1 MEDIA Function
Support multimedia file:
MULTIMEDIA
Multimedia data
JPEG
AUDIO
Video
E-BOOK
Format
JPG,JPEG
MP3, WMA
Digital movies
.txt
Note: 1. Don't connect a portable hard disk or PC to the USB interface.
2. Compatible USB devices: The format is FAT or FAT32.
3. We cannot guarantee compatibility (operation and/or bus power) with
all USB mass storage devices and assumes no responsibility for any loss of
data that may occur when connected to this unit.
4. The USB playing may be broken by abnormal operation or U disk worse
connection. You can try to play again plug the U disk out and into the socket again
to get better playing.
1.2 USB Function
Adjustment of the USB
1 Press the SOURCE or USB button to enter "MEDIA" mode,
2 Press or button to select "AUDIO", "JPEG", "VIDEO" or "E-BOOK"
3.Press OK button to go into the function,
4.Press the button to return or exit.
1.2.1 LANGUAGE SETUP
A. Press SETUP button to enter or exit LANGUAGE SETUP.
B. Press or button to select Osd language.
C. Press or button to select the setting item.
D. Press OK button to confirm.
OK
Enjoy your Audio in this mode.
ex: mp3, wma
Osd language
SV:
English
Chinese
German
Spanish
French
Portuguese
LANGUAGE SETUP
Page 14
5.The max. memory size of USB device which can be supported is 32GB.

1.2.2 AUDIO
A.Press or button to select the music that you want ,Then press button
to play.
B.Select the button to get the function.
C.Press or quick flip. Press CCD button and number button quickly to select
play track.
D.Press button to select the . Press OK button to return to the previous menu.
E. Press button to stop current playing and return to main menu.
1.2.3 JPEG
A. Press or button to select the photos that you want ,Then press button
to play.
B.Select the button to get the function.
C.Press or quick flip. Press CCD button and number button quickly select play
track.
D.Press button to select the . Press OK button to return to the previous menu.
E. Press button to stop current playing and return to main menu.
A-B
NULL
NULL
NULL
PGUP/DN
BACK
0001.JPG_1BK
[ PHOTO ] JPG_IBK_15360X8640 (B
A - B MODE
0002.JPG_1BK
0003.JPG_1BK
0004.JPG_1BK
15360X8640
none
2011:04:16
f/0
0
0 mm
Page 15

1.2.5 E-BOOK
A. Press or button to select the books that you want ,Then press button
to play.
B.Press or to browse the E-book page up and down.
C.Press or quick flip.PressCCD button and number button quickly select play
track.
D.Press button to select the . Press OK button to return to the previous menu.
E. Press button to stop current playing and return to main menu.
1.2.4 VIDEO
A. Press or button to select the movies that you want ,Then press button
to play.
B.Select the button to get the function.
C.Press or quick flip. Press CCD button and number button quickly select play
track.
D.Press button to select the . Press OK button to return to the previous menu.
E. Press button to stop current playing and return to main menu.
PGUP/DN
BACK
[ ENGLISH _ ] TEXET Doc.TXT
0001.TXT
PGUP/DN
[ FRENCH ] FRENCH.AV1
0001.FRENCH
1. We suggest to set the PICTURE in soft mode when you play video.
2. Please make the TV in WIDE mode when you play the video of 16:9 aspect ratio.
You can press ZOOM button and set the TV in "WIDE" mode then press P. P
button to set the TV in "MILD" mode.
BACK
Page 16

Battery Installation(Remote Control Unit)
1.Remove the battery cover.
2.insert the batteries making sure the polarity(+or -)of the batteries
matches the polarity marks inside the unit.
3.Replace the battery cover.
Replace with new batteries when the TV set begins to show the following symptoms:
operation is unsteady or erratic. Sometimes the TV set does not function with Remote
control unit.
2 UM-4 AAA 1.5V
Remark:
1) Alkaline batteries recommended.
2) Remove batteries when they are exhausted or if the remote control is not to be
used for a long time.
The Causes of Interference
Incorporated in your TV receiver are the most
up-to-date devices to eliminate interference.
Local radiation however, can create
disturbances which Visibly affect your picture.
Proper installation, a good aerial are your best
safeguards against these disturbances.
INTERFERENCE
Moving ripples across the screen are caused
by nearby transmitting or receiving shortwave
radio equipment.
DIATHERMY
Herringbone pattern and partial picture loss
can result from the operation of diathermy
equipment from a nearby doctors surgery or
hospital.
SNOW
Weak TV signals from long distant stations
result In an unsteady picture and give the
effect of falling snow. An antenna
adjustment or antenna amplifier may be
needed.
GHOST
Multiple images caused by TV signals
reflected back from surrounding buildings,
hills, aircraft, etc. are minimized by correct
aerial positioning.
CAR IGNITION
Nearby cars and electrical motors can
cause small streaks across the picture or
make the picture roll.
WARNING:
The battery(battery or batteries or battery pack)shall not be exposed to excessive
heat such as sunshine,fire or the like.
Page 17
/