Page is loading ...

PAGE 01
CLASSIC COLLECTION
PRESSURE BALANCED TUB AND SHOWER WITH “DD” HANDLE
##
PART
DESCRIPTION
PART #
1
2
3
4
5
6
7
Complete Shower head *
Shower Arm *
Complete DD Handle for Shower *
Complete Wall Mount Tub Spout *
P0285
P0286
P0281
* Please specify the finish when ordering the part.
KEEP THIS INSTRUCTION BOOKLET FOR FUTURE REFERENCE
Shower Flange *
P0287
11
22
33
00YY-DD-R
PH29750
55
H
C
66
77
Tub/shower Trim Plate *
PB-3950
Pressure Balanced Tub/Shower Valve
S
T
8
Trim Plate Grommet
1334DD _ _-_ _
ITEM NUMBER
88
9
10
Diverter Knob *
P0258
Allen Key for Set Screw
PM-465
99
1010
44

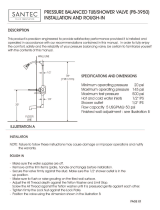
DESCRIPTION
This product is precision engineered to provide satisfactory performance provided it is installed and operated in
accordance with our recommendations contained in this manual. In order to fully enjoy the comfort, safety and the
reliability of your pressure balancing valve, be certain to familiarize yourself with the contents of this manual.
SPECIFICATIONS AND DIMENSIONS
Minimum operating pressure 20 psi
Maximum operating pressure 145 psi
Maximum test pressure 500 psi
Hot and cold water inlets ½" IPS
Shower outlet ½" IPS
Flow capacity 5 USGPM@ 50 psi
Finished wall adjustment : see Illustration B
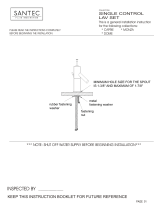
INSTALLATION
NOTE: Failure to follow these instructions may cause damage or improper operations and nullify the warranty.
ROUGH IN
- Make sure the water supplies are off.
- Remove all the trim items (plate, handle and bell) before installation.
- Secure the valve firmly against the stud. Make sure the ½" shower outlet is in the up position.
- Make sure to flush or raise grouting on the tiled wall surface.
- Adjust the All Thread depth against the Teflon Washer and Limit Stop.
Screw the All Thread against the Teflon washer until it is pressured gently against each other.
- Tighten firmly the Lock Nut against the Lock Plate.
- Position the valve using the dimension shown in the illustration B.
WALL LINE
78"
(1981 mm)
FLOOR
LINE
½”
½”
33"
INSTALLATION INSTRUCTIONS
3.00”
All Thread
Stem
Lock Nut
Lock Plate
Trim Plate
S
T
Diverter Rod
Diverter Knob
Trim plate grommet
ILLUSTRATION B
PAGE 02
HANDLE BELL
HANDLE
HANDLE FLANGE
1334DD _ _

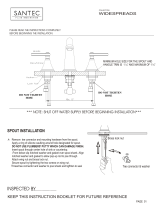
TRIM INSTALLATION
- Place the shower plate on the all thread.
- Screw the handle bell and flange onto the all thread, make sure that
both parts are flushed firmly against the plate. Mark the position and
remove the handle bell and flange and cut off the excess thread.
Re-insert the handle bell and flange onto the all thread.
- Insert the handle onto the stem. Measure the excess between the handle
bell and the handle. Take off the handle and cut the excess stem.
- Reinsert the handle onto the stem. Using the Allen key provided, tighten the
handle set screw firmly.
- Place the Trim Plate Grommet onto the designated hole for the
Diverter Rod on the Trim Plate.
- Screw the Diverter Knob onto the Diverter Rod.
INSTALLATION INSTRUCTIONS
All Thread
Lock Nut
Lock Plate
S
T
Diverter Rod
Trim Plate
Diverter Knob
Plate Grommet
Stem
S
T
PM-280 - SERVICE VALVE (OPTIONAL)
VALVE CARTRIDGE - TE010
MECHANICAL STOP- TE013
LIMIT STOP- TE014
PM-010 - STEM
TEFLON WASHER
PM-009 - LOCK PLATE
PM-012 - LOCK NUT
PM-011 - ALL THREAD
FILTER SCREEN - TE012
DIVERTER CARTRIDGE- TE050
PM-460 - DIVERTER SLEEVE
DIVERTER KNOB-P0258
PLATE GROMMET- PM-465
PAGE 03
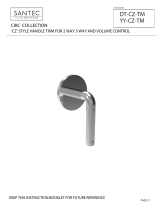
ILLUSTRATION C
HANDLE FLANGE
HANDLE BELL
HANDLE
COLD
WARM
WARMER
HOT
CC
HH
CC
HH
1334DD _ _

TROUBLE SHOOTING
MALFUNCTION CAUSE REMEDY
Shower control opening through hot.
Tub filler or Shower head drips after
shutting off the valve.
Shower insufficiently hot.
No flow of hot or cold water.
Valve body too deep into
the wall.
- Hot and cold water supplies have been connected
in reverse
- Water remains in the piping column to the shower
head (this is normal).
- Incorrect setting of the mechanical stop against the
stop post causing a partially opened cartridge.
- O-ring seal on the inlet of the cartridge is faulty.
- Adjustable handle position stop incorrectly set.
- Either the hot or cold side is not fully pressurized.
- Debris caught inside the inlet of the cartridge.
.
- The measured rough in or finished wall surface is
incorrect.
Rotate cartridge
- Allow approximately 3-5 minutes to drain column.
- Reset the mechanical stop as described in this page
- Check O-ring for cut or damage and replace if necessary.
- Check hot water source temperature setting.
- Be sure service stops (when applicable) are both wide open
and system is fully pressurized.
- Remove cartridge and flush out or remove any debris lodged
inside the hot or cold inlet.
install the extension kit.
PM460X(long sleeve).
PM461X (long plastic upper link)
NOTE: AT NO TIME TRY TO STOP DRIPPING BY APPLYING EXTREME FORCE WHEN CLOSING THE VALVE.
O-RING
FILTER
INLET
FILTER INSERT
VALVE
FILTER SCREEN REMOVAL AND CLEANING
The valve has filter screens that prevent debris from obstructing the pressure balancing cartridge.
If excessive in-line debris accumulates in the filter screen you will notice a decrease in flow from the valve.
PLEASE NOTE - SHUT OFF BOTH HOT AND COLD WATER SUPPLIES BEFORE SERVICING VALVE.
- The filter screen are attached to an insert that is fitted into the valve body inlets.
With the cartridge removed the 2 inserts and filter screens can be easily removed from the valve body.
- Remove the insert by pressing the top corner. This will rotate the insert allowing easy removal.
- There is a place on either side of the filter insert where you can get your finger nail underneath the filter screen.
By pulling the filter screen away from the insert it will "pop out".
- All debris can be now be easily removed from the filter screen.
Replace the filter screen into the insert and push together gently until it clicks into place.
- Place the insert back into the valve body, making sure the angled edge of the insert faces out.
The insert should sit flush against the wall of the valve body when properly installed.
Santec Inc.
3501 Challenger Street, Torrance, CA 90503
Tel: (310) 542-0063 Fax (310) 542-5681
www.santecfaucet.com
03/03
STOP POST
Illustration D1
Illustration D2
MECHANICAL STOP
STOP POST
LIMIT STOP
LIMIT STOP
TEMPERATURE LIMIT STOP SET UP
-Santec Pressure Balanced Valve has a temperature limit stop ( please see Illustration C)
which once set properly can provide a safe and comfortable hot water.
Below is the limit stop installation procedure:
- Remove all Handle trim parts, including the trim plate.
- remove all internal parts up to the Limit Stop, do not remove the Mechanical Stop.
After Mechanical Stop is removed please follow the instruction bellow
- Turn the cartridge clockwise until it is stopped. Do not force to avoid damaging the cartridge.
- Insert the Mechanical Stop onto the cartridge
- Turn the cartridge counterclockwise to open the water line. Turn until it reaches the maximum
hot water desired by the user.
- Place Limit Stop as shown in the Illustration D2.
- Reinstall all the parts accordingly to the Illustration C.
MECHANICAL STOP
INSTALLATION INSTRUCTIONS
1334DD _ _
PAGE 04
/