
C ommunicator
User guide
Events Edition
R9806075
R5976790/00
09/0
7/2004

Barco nv Events
Noordlaan 5, B-8520 Kuurne
Phone: +
32 56.36.89.70
Fax: +32 56.36.88.24
E-mail: [email protected]
Visit us at
the web: www.barco.com
Printed in Belgium

Changes
Barco provides this manual ’as is’ without warranty of any kind, either expressed or implied, including but not
limited to the implied warranties or merchantability and fitness for a particular purpose. Barco may make im-
provements and/or changes to the product(s) and/or the program(s) described in this publication at any time
without notice.
This publication could contain technical inaccuracies or typographical errors. Changes are periodically made
to the information in this publication; these changes are incorporated in new editions of this publication.
Copyright ©
All rights reserved. No part of this document may be copied, reproduced or translated. It shall not otherwise
be recorded, transmitted or stored in a retrieval system without the prior written consent of Barco.
Guarantee and Compensation
Barco provides a guarantee relating to perfect manufacturing as part of the legally stipulated terms of gu
arantee.
On receipt, the purchaser must immediately inspect all delivered goods for damage incurred during transport, as
well as for material and manufacturing faults Barco must be informed immediately in writing of any complaints.
The period of guarantee begins on the date of transfer of risks, in the case of special systems and software
on the date of commissioning, at latest 30 days after the transfer of risks. In the event of justified notice of
compliant, Barco can repair the fault or provide a replacement at its own discretion within an appropriate period.
If this measure proves to be impossible or unsuccessful, the purchaser can demand a reduction in the purchase
price or cancellation of the contract. All other claims, in particular those relating to compensation for direct or
indirect damage, and also damage attributed to the operation of software as well as to other services provided
by Barco, being a component of the system or independent service, will be deemed invalid provided the damage
is not proven to be attributed to the absence of properties guaranteed in writing or due to the intent or gross
negligence or part of Barco.
If the purchaser or a third party carries out modifications or repairs on goods delivered by Barco, or if the goods
are handled incorrectly, in particular if the systems are commissioned operated incorrectly or if, after the trans-
fer of risks, the goods are subject to influences not agreed upon in th
e contract, all guarantee claims of the
purchaser will be rendered invalid. Not included in the guarantee coverage are system failures which are at-
tributed to programs or special electronic circuitry provided by the purchaser, e.g. interfaces. Normal wear as
well as normal maintenance are not subject to the guarantee provi
ded by Barco either.
The environmental conditions as well as the servicing and maintenance regulations specified in the this manual
must be complied with by the customer.
Trademarks
Brand and product names mentioned in this manual may be tra
demarks, registered trademarks or copyrights
of their respective holders. All brand and product names mentioned in this manual serve as comments or
examples and are not to be understood as advertising for the products or their manufactures.


Table of contents
TABLE OF CONTENTS
1. Introduction..........................................................................................3
1.1 General introduction............................................................................................ 3
2. Softwareinstallationand startup...............................................................5
2.1 Required Configuration......................................................................................... 5
2.2 Installing the Software.......................................................................................... 5
2.3 Upgrading the Software........................................................................................ 6
2.4 Removing the Communicator software....................................................................... 6
3. Projector Connection..............................................................................7
3.1 Introduction...................................................................................................... 7
3.2 Network connection ............................................................................................ 7
3.2.1 Introduction ................................................................................................ 7
3.2.2 Hardware connection ..................................................................................... 7
3.2.3 Add new projector......................................................................................... 8
3.2.4 Delete a projector ......................................................................................... 9
3.2.5 Edit projector settings....................................................................................10
3.2.6 Making connection.......................................................................................11
3.2.7 Selecting the Read-Write projector.....................................................................11
3.3 Serial Network Connection ...................................................................................11
3.4 Disconnecting from the XLM projector ......................................................................12
3.5 Controlling one or more projectors...........................................................................13
3.6 Shortcut keys...................................................................................................13
4. Projector Setup....................................................................................15
4.1 Control Interface Set up.......................................................................................15
4.2 Internal Patterns Shortcuts ...................................................................................15
4.3 Lamp ON/OFF .................................................................................................16
4.4 Shutter Open or Close ........................................................................................17
4.5 Lens shift .......................................................................................................17
4.6 Lens Focus.....................................................................................................18
5. Adjustment.........................................................................................19
5.1 General introduction...........................................................................................19
5.2 Create a new layout ...........................................................................................19
5.3 Edit an existing layout.........................................................................................21
5.4 Renaming a layout.............................................................................................21
5.5 Deleting a layout...............................................................................................22
5.6 Windowing......................................................................................................23
5.6.1 Window selection ........................................................................................23
5.6.2 Enabling or disabling a Window ........................................................................25
5.6.3 Moving Windows.........................................................................................26
5.6.4 Scaling Windows.........................................................................................27
5.6.5 Z-order ....................................................................................................27
5.6.6 Full size ...................................................................................................28
5.6.7 Aspect Ratio..............................................................................................29
5.7 Settings .........................................................................................................30
5.7.1 Introduction ...............................................................................................30
5.7.2 Load a file.................................................................................................31
5.7.3 Save a file.................................................................................................33
5.7.4 Save all file................................................................................................33
5.7.5 Rename a file.............................................................................................33
5.7.6 Delete a file ...............................................................................................34
5.7.7 Auto Load Enabled.......................................................................................35
5.7.8 Image Settings ...........................................................................................35
5.7.9 Input Settings.............................................................................................36
5.7.10 Apply settings to all projectors..........................................................................37
5.8 Input slot configuration ........................................................................................38
R5976790 COMMUNICATOR 09/07/2004
1

Table of contents
6. Projector Configuration.........................................................................39
6.1 Set up of the Serial Bus Address ............................................................................39
6.2 Set up of the Network Properties ............................................................................39
6.2.1 Ethernet Connection.....................................................................................39
6.2.2 Assign an Ethernet address via DHCP ................................................................40
6.2.3 Manually assign an Ethernet address..................................................................41
7. Projector Status...................................................................................45
7.1 General overview ..............................................................................................45
7.2 General projector properties..................................................................................45
7.3 Status overviews...............................................................................................46
7.3.1 Voltage statuses..........................................................................................46
7.3.2 Temperature statuses....................................................................................47
7.3.3 Fan statuses..............................................................................................49
7.4 Projector log information ......................................................................................50
8. VersionInfo ........................................................................................53
8.1 Version Information............................................................................................53
Glossary................................................................................................55
Index ....................................................................................................57
2 R5976790 COMMUNICATOR 09/07/2004

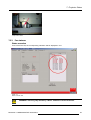
1. Introduction
1. INTRODUCTION
1.1 General introduction
XLM configuration tool
A uniquely powerful and easy to use configuration program for the Barco XLM projector, Communicator,
Events Edition, provides all of the tools necessary for the total projector set-up and control. A compre-
hensive array of easy to access menu pages provide control of the XLM’s digital input, output and screen
display via a combination of simple buttons and WYSIWYG displays.
Quick and Easy configuration
Via clearly indicated tab pages for control of Projector Connection, Configuration.
Total Control
Of the Projector Input selection, alignment and switching, Screen Display output
.
With extensive projector Status indication, Lamp run-time register.
About this manual
This User Guide provides detailed information about the Communicator, Events Edition, features. This
guide is designed to be a reference tool in your everyday work with the Communicator
.
The following icons are used in the manual :
Caution
Warning
Info, term definition. General info about the term.
Note, gives extra information about the described subject.
Tip, gives extra advice about the described subject.
Typography:
• Clickable menu items or buttons are indicated in bold, e.g. Open
• A menu window is ind
icated in italic, e.g. Measure CLO.
• Step related notes, tips, warnings or cautions are printed in italic.
• Procedure related notes, tips, warnings or cautions are printed in bold between 2 lines preceding by
the corresponding ic
on.
R5976790 COMMUNICATOR 09/07/2004
3

1. Introduction
4 R5976790 COMMUNICATOR 09/07/2004

2. Software installation and start up
2. SOFTWARE INSTALLATION AND START
UP
Overview
• Required Configuration
• Installing the Software
• Upgrading the Software
• Removing the Communicator software
2.1 Required Configuration
PC requirements
• Windows 2000, Windows NT, Win95, Win98 and WinME
• 266 MHz, 64 MB Ram
• Minimum disk space : 30 MB
2.2 Installing the Software
How to install
1. Insert the CD-ROM in the CD-ROM drive.
2. Is the AutoPlay active on your PC.
If yes, go to step 6
If no, from within the Windows environment go to the Start Menu. Choose Run... from the menu and
proceed with the next steps.
3. Open windows explorer.
4. Select the CD-ROM drive.
5. Double click ’setup.exe’ file.
6. Press OK to run the installation.
Follow the instruction of the Installation shield.
7. The setup program will ask you for to specify an install directory. Y
ou can accept the default location or
browse to a specific directory. Click NEXT.
8. Read the Licence agreement and click Yes to continue the installation.
The program will be installed on the PC system and the user will be prompted to ask a icon will be
placed on the desktop
.
R5976790 COMMUNICATOR 09/07/2004
5

2. Software installation and start up
2.3 Upgrading the Software
How to update
1. Download or copy the update zip file locally.
2. Unzip the update file in the communicator install directory..
3. Run Se tu p.exe.
The windows install shield opens.
4. Click on Next to continue.
The install shield check the PC for an old version of the Communicator software.
A selection window will be displayed.
5. Select the radio button in front of Upgrade Software to version xxxx.
6. Click now Next.
The actual version on the PC will be replaced by the new one.
See Communicator release notes to find out the differences with previous versions.
2.4 Removing the Communicator software
How to remove
1. Run Se tu p.exe.
The windows install shield opens.
2. Click on Next to continue.
A selection window will be displayed.
3. Select the radio button in front of De lete th e cur rent ins talled so ftware.
4. Click on Next.
The software will be removed from the PC.
6
R5976790 COMMUNICATOR 09/07/2004

3. Projector Connection
3. PROJECTOR CONNECTION
Overview
• Introduction
• Network connection
• Serial Network Connection
• Disconnecting from the XLM projector
• Controlling one or more projectors
• Shortcut keys
3.1 Introduction
Overview
The Communicator can be connected to the XLM projector in one of the following ways:
• Via an Ethernet connection (network connection)
• Via a serial connection
3.2 Network connection
Overview
• Introduction
• Hardware connection
• Add new projector
• Delete a projector
• Edit projector settings
• Making connection
• Selecting the Read-Write projector
3.2.1 Introduction
Overview
Up to 8 projectors can be added to the list of projectors, and these 8 projectors can be controlled all at
the same time. The Communicator can only see the settings of one projector, the master, but it can write
to all projectors at the same time. The master projector will be indicated as RW, what means “read/write”
projector. All others have the indication W, what means “write”.
To control these projectors, set up first a hardware connection and add the projectors to the list of projec-
tors.
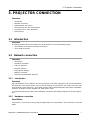
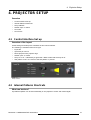
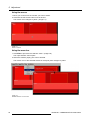
3.2.2 Hardware connection
Possibilities
Connect port 1 or port 2 to a LAN by using a straight cable or a crossed cable. The connection is a 10/100
baseT.
R5976790 COMMUNICATOR 09/07/2004
7

3. Projector Connection
MONITOR OUT
2
1
3
PUSH
2 1
3
PUSH
HARDWIRED REMOTE 10/100 BASE T
SERIAL NETWORK
MONITOR OUT
RS232/422 OUT
RS232/422 IN
WIRELESS REMOTE
CTRL 3
CTRL 2 CTRL 1 PORT 1
PORT 2
BI-DIRECT IONAL UNI-DIRECT IONAL
Image 3-1
Ethernet connection
The projector must have an IP address and the IP address of the connected PC must be within the same
range of IP addresses.
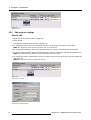
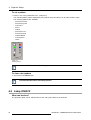
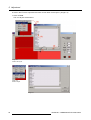
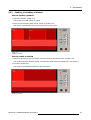
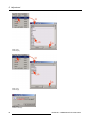
3.2.3 Add new projector
Whatcanbedone?
Up to 8 projectors can be added to the list. Once added, this projector can be controlled with the Com
-
municator.
How to add ?
1. Right click in the projector list pane.
A pop-up window appears (image 3-2)
2. Select Add projector.
The projector settings window opens. (image 3-3)
3. Click in the Projector Name input field and fill out a name for the projector.
Note: The projector name should be unique.
4. Click in the left I P Address input field and enter the IP address of the projector.
Note: An address contains 4 octets with a maximum value of 255.
5. Click on the Port Number drop down box and select the port.
Note: The combination IP address and port number must be unique.
Default 43680.
It is possible to enter the same IP address with a different port number. That means that the same
projector can be accessed by 2 different Communicator via a different port.
6. If you want to add a short cut for this projector, click on the drop down box and select the desired short
cut.
Note: The short cut must be unique for each projector.
Short cuts for F1 to F8 can be associated with the projector. When a short cut is associated to a pro-
jector, this projector can be selected (as read/write) from any pane in the software.
7. Click OK to add the projector.
8
R5976790 COMMUNICATOR 09/07/2004

3. Projector Connection
Image 3-2
Add projector
Image 3-3
Projector settings
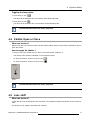
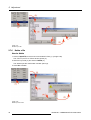
3.2.4 Delete a projector
Whatcanbedone?
Any projector in the list can be deleted out of the list.
How to delete ?
1. Right click on the projector which has to be removed.
A pop-up menu appears. (image 3-4)
2. Click on Delete.
The projector will be removed from the list.
R5976790 COMMUNICATOR 09/07/2004
9

3. Projector Connection
Image 3-4
Delete projector
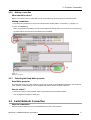
3.2.5 Edit projector settings
How to edit
1. Right click on a projector name. (image 3-5)
2. Click on Edit.
The projector settings window opens. (image 3-6)
3. To change the name, click in the input field next to Projector Name and enter the new name.
Note: The projector name must be unique in the list of projectors.
4. To change the IP address, click in the input field next to IP address and change to the new value.
5. To change the port number, click on the drop down box next to Port Number and select the desired port.
Note: The combination IP address and Port Number must be unique.
6. To change the short cut association, click on the drop down box next to Shortcut Key and select the
new short cut.
Note: The shortcut should be unique in the list.
Image 3-5
Edit projector settings
Image 3-6
Edit projector settings window
10 R5976790 COMMUNICATOR 09/07/2004

3. Projector Connection
3.2.6 Making connection
What should be done ?
Before a connection can be made with one or more projectors, these projectors should be check.
Making connection
1. Check first the projectors to which the Communicator should make a connection (1). (image 3-7)
2. Click on Connect (2).
When a connection is possible, the connection status will change from Disconnected to Connected (4).
All other tabs of the GUI become enabled and accessible.
Image 3-7
Making a connection
3.2.7 Selecting the Read-Write projector
Read-Write projector
The read-write projector is the projector from
which the settings are loaded (monitored) in the Communi-
cator software. These settings can be adapted and used to control all write projectors.
How to select ?
1. Click on the name of the projector which must become the read-write projector.
The background changes to dark grey.
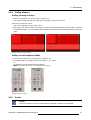
3.3 Serial Network Connection
Physical connection
Connect a serial cable from PC to the RS232IN connector of the projector.
R5976790 COMMUNICATOR 09/07/2004
11

3. Projector Connection
MONITOR OUT
2
1
3
PUSH
2 1
3
PUSH
HARDWIRED REMOTE 10/100 BASE T
SERIAL NETWORK
MONITOR OUT
RS232/422 OUT
RS232/422 IN
WIRELESS REMOTE
CTRL 3
CTRL 2 CTRL 1 PORT 1
PORT 2
BI-DIRECT IONAL UNI-DIRECT IONAL
Image 3-8
Serial connection, physical location
Necessary parts
Straight serial cable
Software connection
1. Click on the tab button Serial Connection.
The tab page opens.
2. Set up the communication port by clicking on the drop down menu (1) and selecting the correct port.
3. Click on the bits per second drop down menu (2) to set up the desired baud rate.
4. Click on the up or down arrows in the projector address menu (3) to set up the desired address.
Or,
click on the projector address input field and enter the desired address with the keyboard.
5. Click on Connect
When a connection is possible, connected will be indicated.
All other tabs will become enabled and accessible.
3.4 Disconnecting from the XLM projector
Software disconnection
1. Click on Disconnect.(image3-9)
A disconnect indication will be displayed. (image 3-10)
Image 3-9
Disconnecting from projector
Image 3-10
Disconnected from projector
12 R5976790 COMMUNICATOR 09/07/2004

3. Projector Connection
3.5 Controlling one or more projectors
To control only one projector
1. Go to Connections,selectNetwork connections and check only those projector you want to control.
Now it is possible to fully control these projector.
To control different projectors at the same time.
1. Go to Connections, select Network connections and check those projectors you want to control at
thesametime.
All checked projectors can now be controlled.
3.6 Shortcut keys
How to use the shortcut keys ?
Withineachpaneaprojectorcanbeselectedbyitsshortcut.
The selected projector becomes the RW (Read-Write) projector and its name will be displayed in the title
bar of the window.
Example:
When e.g. F3 is pressed, Demo 3 projector becomes RW.
Image 3-11
F3 selected
The name Demo 3 appears in the title bar of any pane.
R5976790 COMMUNICATOR 09/07/2004
13

3. Projector Connection
14 R5976790 COMMUNICATOR 09/07/2004

4. Projector Setup
4. PROJECTOR SETUP
Overview
• Control Interface Set up
• Internal Patterns Shortcuts
•LampON/OFF
• Shutter Open or Close
• Lens shift
• Lens Focus
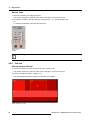
4.1 Control Interface Set up
Overview of the layout
All the settings and setups are visualized in this control interface.
The following is visualized from left to right:
• layout file
• Input files per source
• Name projector with projector logo
• Shutter open or closed
• Lamp on or off : indicated by a light beam. Black means that the lamp is off.
• Test pattern on/off + the name of the test pattern or preview
Image 4-1
Setup interface
4.2 Internal Patterns Shortcuts
Whatcanbedone?
A predefined pattern can be set immediately on the projection screen and cleared again.
R5976790 COMMUNICATOR 09/07/2004
15

4. Projector Setup
To set a pattern
1. Click on one of the predefined icons. (image 4-2)
The selected pattern will be displayed by the projector when the lamp is on and the shutter is open.
The following patterns are available:
- Full screen white
- Full screen green
- Color bars
- Focus
- Outline
- Full screen red
- Full screen blue
- CheckerBoard
- Convergence
-Hatch
Image 4-2
Internal patterns
Command will be send to all write projectors
To clear a test pattern
1. Just click on the Clear button.
Command will be send to all write projectors
4.3 Lamp ON/OFF
Whatcanbedone?
The projection lamp can be switched ON or OFF using the buttons in the software.
16
R5976790 COMMUNICATOR 09/07/2004
Page is loading ...
Page is loading ...
Page is loading ...
Page is loading ...
Page is loading ...
Page is loading ...
Page is loading ...
Page is loading ...
Page is loading ...
Page is loading ...
Page is loading ...
Page is loading ...
Page is loading ...
Page is loading ...
Page is loading ...
Page is loading ...
Page is loading ...
Page is loading ...
Page is loading ...
Page is loading ...
Page is loading ...
Page is loading ...
Page is loading ...
Page is loading ...
Page is loading ...
Page is loading ...
Page is loading ...
Page is loading ...
Page is loading ...
Page is loading ...
Page is loading ...
Page is loading ...
Page is loading ...
Page is loading ...
Page is loading ...
Page is loading ...
Page is loading ...
Page is loading ...
Page is loading ...
Page is loading ...
Page is loading ...
Page is loading ...
Page is loading ...
-
 1
1
-
 2
2
-
 3
3
-
 4
4
-
 5
5
-
 6
6
-
 7
7
-
 8
8
-
 9
9
-
 10
10
-
 11
11
-
 12
12
-
 13
13
-
 14
14
-
 15
15
-
 16
16
-
 17
17
-
 18
18
-
 19
19
-
 20
20
-
 21
21
-
 22
22
-
 23
23
-
 24
24
-
 25
25
-
 26
26
-
 27
27
-
 28
28
-
 29
29
-
 30
30
-
 31
31
-
 32
32
-
 33
33
-
 34
34
-
 35
35
-
 36
36
-
 37
37
-
 38
38
-
 39
39
-
 40
40
-
 41
41
-
 42
42
-
 43
43
-
 44
44
-
 45
45
-
 46
46
-
 47
47
-
 48
48
-
 49
49
-
 50
50
-
 51
51
-
 52
52
-
 53
53
-
 54
54
-
 55
55
-
 56
56
-
 57
57
-
 58
58
-
 59
59
-
 60
60
-
 61
61
-
 62
62
-
 63
63


Barco Events Communicator User manual
- Category
- Projectors
- Type
- User manual
Ask a question and I''ll find the answer in the document
Finding information in a document is now easier with AI
Related papers
-
Barco DMX adapter Installation guide
-
-
-
Barco Projector Toolset User guide
-
Barco iCon H600 User manual
-
-
Barco CLM R10+ User manual
-
-
Barco iCon H250 User guide
-