Page is loading ...

1410218
1410219
15.01.2010
MANUALE DI USO E MANUTENZIONE
USE AND MAINTENANCE MANUAL
MANUEL D’UTILISATION ET D’ENTRETIEN
MANUAL DE USO Y MANTENIMIENTO
ÅÃ×ÅÉѺÄÉÏ ×ѹÓÇÓ ÊÁÉ ÓÕÍÔ¹ÑÇÓÇÓ
SV4000 - SV4000E
SEGHETTO A LAMA OSCILLANTE
OSCILLATING BLADE SAW
SCIE A LAME COULISSANTE
SIERRA DE CUCHILLA OSCILANTE
ÐÑÉÏÍÉ ÌÅ ÐÁËÉÍÄÑÏÌÉÊÇ ËÅÐÉÄÁ
SCHIO (VI) ITALY
ATTENZIONE! Prima di usare la macchina, leggete attentamente le istruzioni per l’uso
CAUTION! Before starting the machine, read the operating instructions carefully
ATTENTION! Avant la mise en service de la machine, lire scrupuleusement le mode d’emploi
ATENCIÓN! Antes de usar la máqiuna, leer atentamente las instrucciones de empleo
ÐÑÏÓÏ×Ç! Ðñéí ÷ñçóìïðïéÞóåôå ôï ìç÷Üíçìá äéáâÜóôå ðñïóåêôéêÜ ôéò ïäçãßåò ÷ñÞóçò

2
FIG.A
110 11 2
9 7 21 8 15 18 6 14
5
3
17
22
13
4
19
20
12
4
16
12
13
23
SV4000
SV4000E

3
FIG.B
FIG.C FIG.D
BASSO
BOTTOM
BAS
BAJO
×ÁÌÇËÁ
ALTO
TOP
HAUT
ALTO
ØÇËÁ
10 3 4
2 6 5
789
1

4

5
RISCHI PRINCIPALI DELLA MACCHINA - MAIN RISKS OF THE MACHINE
PRINCIPAUX RISQUES DE LA MACHINE - RIESGOS PRINCIPALES DE LA MÁQUINA
ÊÕÑÉÏÔÅÑÏÉ ÊÉÍÄÕÍÏÉ ÌÇ×ÁÍÇÓ
Queste illustrazioni mostrano i rischi principali nell’uso della macchina. Leggete attentamente il libretto di istruzioni allegato alla macchina.
These illustrations show the main risks involved with using the machine. Carefully read the instructions manual enclosed with the machine.
Ces illustrations montrent les principaux risques quand on utilise la machine. Lire attentivement le manuel d’instructions annexé à la machine.
Estas ilustraciones muestran los principales riesgos que comporta el uso de la máquina. Lea atentamente el libro de instrucciones que se entrega con ella.
Ïé áðåéêïíßóåéò áõôÝò äåß÷íïõí ôïõò êõñéüôåñïõò êéíäýíïõò óôç ÷ñÞóç ôçò ìç÷áíÞò. ÄéáâÜóôå ðñïóåêôéêÜ ôï åã÷åéñßäéï ïäçãéþí ðïõ
åðéóõíÜðôåôáé óôç ìç÷áíÞ.
- Lancio di materiale e polvere verso gli occhi ed il corpo dell’operatore: indossate
occhiali di protezione e maschera antipolvere.
- Material and dust flying towards the operator’s eyes and body: Use eye protection
and an anti-dust mask.
- Projection de matériel et de poussières vers les yeux et le corps de l’opérateur :
mettez des lunettes de protection et un masque anti-poussière.
- Proyección de materiales y polvo hacia los ojos y el cuerpo del operador: lleve
puestas gafas de protección y una careta antipolvo.
- Åêôüîåõóç õëéêïý êáé óêüíçò ðñïò ôá ìÜôéá êáé ôï óþìá ôïõ
÷åéñéóôÞ: íá öïñÜôå ðñïóôáôåõôéêÜ ãõáëéÜ êáé ìÜóêá ãéá ôç
óêüíç.
- Rumore elevato generato dalla macchina: indossate cuffie a protezione dell’udito
- Loud noise generated by the machine: Use ear protection.
- Bruit élevé engendré par la machine : mettez des protecteurs d’oreilles.
- La máquina genera un alto nivel de ruido: utilice cascos de protección auditiva.
- Õøçëüò èüñõâïò ðáñáãüìåíïò áðü ôç ìç÷áíÞ: íá öïñÜôå
ùôïáóðßäåò êáé ðñïóôáôåõôéêÜ áêïÞò.
- Lama e schegge di legno possono provocare ferite alle mani: indossate guanti
protettivi e mantenete una distanza di sicurezza dalla zona di taglio.
- Blade and wood chips could injure hands: Wear protective gloves and keep a safe
distance from the cutting area.
- La lame et les éclats de bois peuvent provoquer des blessures aux mains : mettez
des gants de protection et gardez une distance de sécurité par rapport à la zone
de coupe.
- La cuchilla y las astillas de la madera pueden provocar heridas en las manos:
lleve guantes de protección y mantenga una distancia de seguridad con respecto
a la zona de corte.
- Ëåðßäá êáé îýëéíá èñáýóìáôá ìðïñåß íá ðñïêáëÝóïõí ôñáýìáôá
óôá ÷Ýñéá: íá öïñÜôå ðñïóôáôåõôéêÜ ãÜíôéá êáé íá êñáôÜôå ìéá
áðüóôáóç áóöáëåßáò áðü ôçí ðåñéï÷Þ êïðÞò.
- Rischio di scossa elettrica con pericolo di morte: non toccate le parti in tensione
elettrica e mantenete una distanza di sicurezza. Prima di ogni manutenzione
scollegate la spina dalla presa di alimentazione.
- Risk of electric shock and danger of death: Do not touch the electrically live parts
and keep a safe distance. Before any maintenance operations, unplug the machi-
ne from the power supply.
- Risque d’électrocution et de danger de mort : ne touchez pas les composants
sous tension électrique et gardez une distance de sécurité. Avant chaque entre-
tien, détachez la fiche de la prise de courant.
- Riesgo de electrocución con peligro de muerte: no toque las partes bajo tensión
eléctrica y mantenga una distancia de seguridad. Antes de efectuar cualquier
operación de mantenimiento, desconecte el enchufe de la toma de corriente.
- Êßíäõíïò çëåêôñïðëçîßáò ìå êßíäõíï èáíÜôïõ: ìçí áããßæåôå
ôá ìÝñç õðü çëåêôñéêÞ ôÜóç êáé äéáôçñåßôå ìéá áðüóôáóç
áóöáëåßáò. Ðñéí áðü êÜèå óõíôÞñçóç íá âãÜæåôå ôï âýóìá áðü
ôçí çëåêôñéêÞ ðñßæá.

6
i
Ci congratuliamo con Voi per l’ottima scelta. Il Vostro nuovo apparecchio, pro-
dotto secondo elevati standard di qualità, Vi garantirà rendimento e sicurezza
nel tempo.
Questo istruzioni riportano le informazioni e quanto ritenuto necessario per il buon
uso, la conoscenza e la normale manutenzione della macchina. Esse non riportano
le informazioni sulle tecniche delle lavorazioni del legno alle macchine utensili, né
trattano l’argomento sulle tipologie e grado di lavorabilità dei vari tipi di legno; l’uti-
lizzatore troverà maggiori notizie su libri e pubblicazioni specifiche o partecipando a
corsi di specializzazione.
Le avvertenze d’uso e le norme di manutenzione si riferiscono a necessità normali di
esercizio. Dalla loro osservanza e dall’adempimento di quanto prescritto, dipende il
regolare funzionamento, la durata e l’economia di esercizio della macchina.
Queste istruzioni sono parte integrante della macchina e devono accompagnarla in
caso di riparazione o di rivendita. Conservate con cura ed a portata di mano la docu-
mentazione fornita in modo da poterla consultare in caso di necessità.
Per eventuali riparazioni o revisioni che comportino operazioni di una certa com-
plessità è necessario rivolgersi ai Centri di Assistenza autorizzati che dispongono di
personale specializzato.
La Ditta costruttrice declina qualsiasi responsabilità per danni dovuti a negligenza,
alla mancata osservanza di quanto descritto nel presente manuale e a danni diretti
e/o indiretti causati da un uso improprio della macchina.
La negligenza a quanto indicato, un cattivo ed inadeguato uso della macchina e l’ese-
cuzione di modifiche non autorizzate, possono essere causa di annullamento della
garanzia. La prevenzione di qualsiasi inconveniente è quindi vincolata alla scrupolosa
osservanza di quanto prescritto.
Verificate, all’atto dell’acquisto, che la macchina sia integra e completa.
ATTENZIONE! Prima di usare la macchina, per eseguire correttamente il tra-
sporto, la messa in servizio, l’avviamento, l’uso, l’arresto e la manutenzione,
leggete ed applicate attentamente le istruzioni di seguito riportate che fanno
riferimento alle figure ed ai dati tecnici. Prima di iniziare il lavoro prendete fami-
liarità con i comandi e con il corretto uso della macchina assicurandovi di saper
arrestarla in caso di emergenza. L’uso improprio della macchina può provocare
gravi ferite e danni alle cose. Pensate sempre alla vostra e altrui sicurezza e
comportatevi di conseguenza.
ATTENZIONE! La macchina è destinata esclusivamente per uso hobbystico
ed è idonea ad eseguire tagli su pezzi di legno a forma di parallelepipedo, come
tagli trasversali ed inclinati. Non è consentita la lavorazione di metalli, materiali
plastici, stoffe, materiali infiammabili e materiali che generano polveri e nebbie
pericolose o nocive alla salute. Ogni altro impiego, diverso da quello indicato in
queste istruzioni, può recare danno alla macchina e costituire serio pericolo per
le persone e le cose.
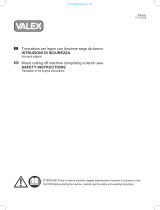
DESCRIZIONE MACCHINA (FIG. A)
1-Basamento
2-Fori per fissaggio al banco
3-Piano di lavoro inclinabile
4-Volantino inclinazione piano di lavoro
5-Lama
6-Bloccalama superiore
7-Braccio superiore fisso
8-Attacco per soffiaggio polveri
9-Volantino regolazione tensione lama
10-Carter vano inferiore
11-Impianto soffiaggio polveri
12-Interruttore acceso/spento
13-Motore
14-Protezione zona di taglio
15 -Attacco protezione zona di taglio e fermapezzo
16-Attacco aspirazione polveri (se presente)
17-Fermapezzo
18-Braccio superiore oscillante
19-Regolatore velocità oscillazioni lama (se presente)
20-Fusibile (se presente)
21-Volantino regolazione altezza protezione
22-Spazzole motore (se presenti)
23-Spina e cavo di alimentazione
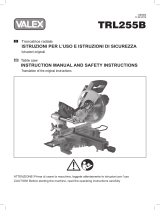
DESCRIZIONE MARCATURE E SIMBOLI (FIG. B)
1 Modello macchina e dati tecnici.
2 Codice macchina, numero di matricola o numero lotto, anno di fabbricazione, mar-
chi di certificazione (se presenti).
3 ATTENZIONE!
4 Leggete attentamente le istruzioni prima dell’uso.
5 Attenzione! Pericolo taglio e schiacciamento mani. E’ obbligatorio indossare guanti
di protezione.
6 Attenzione! Pericolo lancio materiale e polveri dannose. E’ obbligatorio indossare
occhiali di protezione e una maschera a difesa delle vie respiratorie.
Pericolo rumore elevato. E’ obbligatorio indossare cuffie a difesa dell’udito.
7 Attenzione! Pericolo di schiacciamento ed impigliamento. Prima di ogni controllo,
regolazione o manutenzione, staccate l’alimentazione elettrica scollegando la spina
della macchina. In caso di cavo di alimentazione danneggiato, estraete la spina dalla
presa della rete di alimentazione prima di procedere ad un controllo.
8 Attenzione! Pericolo di taglio ed impigliamento. Mantenete le mani lontano dalla
zona di taglio.
9 Attenzione! Pericolo di schiacciamento. Mantenete le mani lontane dalle parti in
movimento.
10 I rifiuti elettrici ed elettronici possono contenere sostanze pericolose per l’am-
biente e la salute umana; non devono pertanto essere smaltiti con quelli domestici
ma mediante una raccolta separata negli appositi centri di raccolta o riconsegnati al
venditore nel caso di una apparecchiatura nuova analoga. Lo smaltimento abusivo
dei rifiuti comporta l’applicazione di sanzioni amministrative.
DATI TECNICI
SV4000 cod.1410218
Tensione di aliment. e frequenza nomin. ______________________ 230V ~50Hz
Potenza nominale motore _____________________________________ 165 W
Velocità di rotazione a vuoto ______________________________n
o
1480 min-1
Pressione acustica LpA _____________________________________ 79 dB(A)
Dimensioni totali macchina (b x l x h) ___________________ 320x630x360 mm
Lama:
Lunghezza (tra i sostegni) ____________________________________ 127 mm
Spessore lama ____________________________________________ 0,5 mm
Spessore denti ____________________________________________ 0,6 mm
Codice ricambio __________________________________________ 1452622
Prestazioni:
Inclinazione tavola di lavoro ______________________ 0° - 45° senso antiorario
Capacità di taglio 0° _________________________________________55 mm
Massima profondità di taglio __________________________________406 mm
SV4000E cod.1410219
Tensione di aliment. e frequenza nomin. ______________________ 230V ~50Hz
Potenza nominale motore _____________________________________ 112 W
Velocità di rotazione a vuoto _________________________ n
o
520~1400 min-1
Pressione acustica LpA _____________________________________ 79 dB(A)
Dimensioni totali macchina (b x l x h) ___________________ 305x630x360 mm
Fusibile (se presente) ___________________________________________5 A
Lama:
Lunghezza (tra i sostegni) ____________________________________ 127 mm
Spessore lama ____________________________________________ 0,5 mm
Spessore denti ____________________________________________ 0,6 mm
Codice ricambio __________________________________________ 1452622
Prestazioni:
Inclinazione tavola di lavoro _______________________0° - 45° senso antiorario
Capacità di taglio 0° _________________________________________55 mm
Massima profondità di taglio __________________________________406 mm
NORME DI SICUREZZA GENERALI
1) I SACCHI DI NYLON NON SONO DEI GIOCATTOLI
ATTENZIONE! Pericolo di soffocamento. I sacchi di nylon presenti nell’im-
ballaggio possono provocare soffocamento se infilati sul capo e devono essere
tenuti lontani dai bambini; se non più riutilizzabili devono essere tagliati e smaltiti
nei rifiuti.
2) PERSONE ABILITATE ALL’USO DELLA MACCHINA
L’uso della macchina è vietato ai bambini, alle persone inesperte non perfettamente
a conoscenza delle istruzioni d’uso contenute nel presente manuale ed agli estranei.
Leggi e regolamenti locali possono prevedere una età minima per l’uso della macchi-
na. L’operatore deve essere adeguatamente addestrato all’utilizzo, alla regolazione e
al funzionamento in sicurezza della macchina.
3) RESPONSABILITA’ DELL’OPERATORE
L’operatore è responsabile verso terzi di eventuali incidenti o danni a persone e cose
causati dall’uso della macchina.
4) MANTENETE UNA POSIZIONE DI LAVORO STABILE E SICURA
Quando lavorate mantenete una posizione di lavoro stabile e sicura, non sbilancia-
tevi.
5) FATE ATTENZIONE ALLA ZONA DI LAVORO
Fate attenzione alle mani, al pezzo in lavorazione, all’utensile di taglio, ai trucioli pro-
dotti dalla lavorazione e in generale a tutte le parti in movimento.
6) OPERATE CON ATTENZIONE
Non distraetevi e controllate sempre quello che state facendo: usate il buon senso.
Non usate mai la macchina in condizioni di stanchezza, malessere, sotto l’effetto di
alcool, droghe o farmaci che riducono la vigilanza.

7
7) MANTENETE UNA DISTANZA DI SICUREZZA
Mantenete le persone e gli animali lontano dalla vostra zona di lavoro e dalla macchi-
na. Non toccate le parti che sono in tensione elettrica.
8) PROTEGGETE IL VOSTRO CORPO
L’uso della macchina genera rumore, calore, polveri, fumi, vibrazioni, il lancio di
trucioli e schegge. Operate sempre con dei dispositivi di protezione individuale a
norma per evitare lesioni al corpo, alle mani, agli occhi, all’udito, alle vie respiratorie.
Indossate abbigliamento robusto con maniche e polsini stretti, occhiali di protezione,
guanti da lavoro, cuffie antirumore, maschera antipolvere e calzature antinfortunisti-
che. Non indossate abbigliamento largo, sciarpe, nastri di tessuto e gioielli perché
potrebbero impigliarsi nelle parti in movimento della macchina. Indossare copricapi
di protezione per raccogliere i capelli lunghi. Gli occhiali da vista non sono adatti a
proteggere gli occhi.
9) EFFICIENZA DELLA MACCHINA
Controllate sempre l’efficienza e l’integrità della macchina; se in cattivo stato può
provocare gravi incidenti. Non utilizzate la macchina se l’interruttore non consente di
accendere o spegnere la macchina.
10) INTEGRITA’ DELLA MACCHINA
Non togliete alcun componente dalla macchina se non espressamente indicato nelle
presenti istruzioni e non modificate in alcun modo la configurazione originale.
11) NON SMONTATE LA MACCHINA
Non smontate per alcun motivo la macchina. Non utilizzate la macchina senza le
protezioni.
12) NON MANOMETTETE ALCUN COMPONENTE DELLA MACCHINA
Non manomettete, non modificate, non togliete alcun componente della macchina.
13) VERIFICATE LA SOLIDITA’ DELLA MACCHINA
Verificate periodicamente il serraggio della viteria e il fissaggio della lama.
14) UTILIZZATE LA MACCHINA IN UN LUOGO BEN AERATO E VENTILATO
La macchina deve essere utilizzata in un luogo ben aerato e ventilato in modo assicu-
rare un sufficiente raffreddamento e un ricambio d’aria del locale.
15) NON UTILIZZATE LA MACCHINA IN AMBIENTI PERICOLOSI
Non utilizzate la macchina in un ambiente con pericolo di esplosione e/o incendio,
in locali poco ventilati, in presenza di liquidi, umidità, gas, vapori, acidi ed elementi
infiammabili e/o esplosivi.
16) TRASPORTO DELLA MACCHINA
Le operazioni di trasporto della macchina devono essere eseguite con attenzione.
Trasportatela afferrandola con due mani sul basamento. Non trasportate la macchina
tirandola per il cavo di alimentazione o altre sue parti.
17) POSIZIONAMENTO DELLA MACCHINA
Posizionate e fissate la macchina mediante bulloneria sopra un banco da lavoro o
piedistallo con superficie piana, solida e ininfiammabile che dovrà supportare il peso
totale e le sollecitazioni derivate dall’uso. E’ vietato usare la macchina senza fissarla
solidamente e su superfici infiammabili come legno, plastica ecc. Periodicamente
verificate il fissaggio.
18) LAVORATE CON LUMINOSITA’ ADEGUATA
Lavorate solo durante le ore di buona luminosità o con una illuminazione artificiale
corrispondente.
19) NON ESPONETE LA MACCHINA AGLI AGENTI ATMOSFERICI
Non lasciate la macchina esposta agli agenti atmosferici quali pioggia, nebbia, sole,
alte o basse temperature.
20) NON TOCCATE LA MACCHINA SE SIETE BAGNATI
Non usare la macchina a piedi nudi o bagnati. Non toccare la macchina con le mani
bagnate.
21) CONTROLLO PRIMA DI AVVIARE LA MACCHINA
Prima di inserire la spina alla rete elettrica verificare che l’interruttore sia su OFF “O”
(spento) e che le chiavi di servizio siano state tolte. Non utilizzate la macchina se
l’inserto del piano è usurato e la protezione è rotta.
22) VERIFICHE CORRETTO MONTAGGIO
Non utilizzate la macchina se il tubo dell’aspiratrucioli/polvere (non in dotazione) è
scollegato e l’aspiratore (non in dotazione) è spento.
23) VERIFICHE FUNZIONALI
Controllate che la protezione della lama non sia danneggiata. La protezione lama deve
appoggiarsi sul pezzo e coprire completamente la zona di taglio.
24) POSIZIONATE BENE IL PEZZO IN LAVORAZIONE
E’ molto importante per la vostra sicurezza che il pezzo in lavorazione sia ben appog-
giato sul piano di lavoro. Il pezzo deve avere almeno un lato piano come tavole, listelli
ecc.; non tagliate rami, tronchi d’albero o a sezione circolare. Non tagliate pezzi che
contengono chiodi o viti, oppure avvolti da nastro, corde o altro. Non tagliate pezzi in
costa, ma appoggiate il lato lungo sul piano di lavoro.
25) MATERIALI NON CONSENTITI
Non è consentita la lavorazione di metalli, materiali plastici, materiali infiammabili ed
esplodenti, materiali che generano polveri e nebbie pericolose o nocive alla salute.
26) PREVENITE POSSIBILI INCIDENTI
Effettuate sempre una prova di funzionamento a vuoto prima di iniziare il lavoro; du-
rante questo periodo fate in modo che nessuno si avvicini alla macchina e mantenete
una distanza di sicurezza. Utilizzate sempre dei dispositivi di protezione individuale.
A macchina in funzione non toccate la lama, pericolo di lesioni gravi! Dopo aver
sostituito dei componenti effettuate sempre un controllo generale prima di accingervi
alla lavorazione. Non accedere a parti interne della macchina.
27) UTILIZZATE SOLO LAME ADATTE A QUESTA MACCHINA
Questa macchina è stata progettata per utilizzare lame specifiche per il taglio del
legno; è vietato utilizzare lame adatte ad altri materiali. Utilizzate lame conformi alle
normative in vigore nel paese in cui vi trovate.
28) MANEGGIATE LA LAMA CON ATTENZIONE
La lama ha parti molto taglienti: maneggiatela con attenzione e indossate sempre
guanti protettivi, pericolo di lesioni gravi!
29) UTILIZZATE SOLO LAME IN PERFETTE CONDIZIONI
Non utilizzate lame danneggiate e deformate; se usurata sostituitela con una nuova.
30) NON SOLLECITATE LA LAMA
Non sottoponete la lama a sollecitazioni quali: urti, flessioni, pressioni eccessive,
tensioni termiche, variazioni irregolari di velocità, vibrazioni. In queste condizioni
l’utensile ha una durata limitata e può rompersi senza preavviso con pericoloso lan-
cio di frammenti.
31)A MACCHINA IN FUNZIONE NON TOCCATE LE PARTI IN MOVIMENTO
ATTENZIONE! Pericolo di ferite gravi! Durante il funzionamento non toccate la
lama e tutte le parti in movimento. Fate attenzione a come muovete le braccia e
le mani. Togliete il pezzo solo dopo aver spento la macchina e scollegato il cavo
di alimentazione dalla presa elettrica.
32) MACCHINA NON OPERATIVA
Posizionare l’interruttore su OFF “O” (spento), staccate l’alimentazione elettrica scol-
legando la spina della macchina quando: non la usate, la lasciate incustodita, la
trasportate, il cavo di alimentazione è danneggiato, appoggiate o togliete il pezzo in
lavorazione, effettuate le regolazioni, la manutenzione e la pulizia.
33) ATTENDETE L’ARRESTO COMPLETO DELLA MACCHINA
Il motore, le parti meccaniche rotanti e la lama girano ancora per diversi secondi
dopo aver spento la macchina. Durante la fase di arresto queste parti non devono
essere toccate, pericolo di lesioni gravi!
34) NON ABBANDONATE LA MACCHINA FINCHE’ E IN FUNZIONE
Non abbandonate la macchina finché è in funzione e nella fermata rimanete accanto
fino al completo arresto delle parti in movimento.
35) MANTENETE PULITO E IN ORDINE IL POSTO DI LAVORO
Il disordine e la mancanza di pulizia sono fonti di pericolo. Fate in modo che attorno
alla macchina non ci siano attrezzi od oggetti che potrebbero essere danneggiati. Non
posizionate attrezzi od oggetti sulla macchina che potrebbero cadere accidentalmen-
te. Eliminate frequentemente i residui di taglio dalla macchina e dal pavimento.
36)POLVERI DANNOSE ALLA SALUTE
ATTENZIONE! Le polveri di alcuni tipi di legno sono molto dannose alla salute.
Indossate le protezioni alle vie respiratorie, aspirate i trucioli dalla macchina e
dotate il locale di un estrattore per il ricambio dell’aria.
37)
LE RIPARAZIONI DEVONO ESSERE EFFETTUATE DA PERSONALE AUTORIZZATO
Non tentate di riparare la macchina o di accedere a organi interni, rivolgetevi sempre
presso i centri assistenza autorizzati. Interventi effettuati da personale non autorizzato
fa decadere immediatamente la garanzia e potrebbe generare pericolo. Conservate la
prova d’acquisto per eventuali interventi in garanzia.
38) RICHIEDETE E FATE INSTALLARE SOLO RICAMBI ORIGINALI
Richiedete e fate installare solo ricambi originali, rivolgetevi al vostro rivenditore di
fiducia. L’utilizzo di ricambi non originali fa decadere la garanzia e potrebbe generare
pericolo.
39) RIPONETE LA MACCHINA IN UN LUOGO SICURO
Quando non la usate, riponete la macchina in un luogo asciutto e lontano dalla por-
tata dei bambini.
40 )RISCHI RESIDUI
ATTENZIONE! La scrupolosa osservanza di queste istruzioni con l’utilizzo dei
mezzi di protezione individuale minimizzano i rischi di incidente ma non li elimi-
nano completamente.
41) ATTENETEVI SEMPRE A QUESTE ISTRUZIONI
Utilizzate la macchina solo nei modi descritti in queste istruzioni. Non utilizzatela per
scopi a cui non è destinata.
NORME DI SICUREZZA ELETTRICHE
1) NON TOCCATE LE PARTI IN TENSIONE ELETTRICA
ATTENZIONE! Pericolo di scossa elettrica. Alcune parti della macchina sono
in tensione elettrica.
2)
MANTENETE I BAMBINI E GLI ANIMALI LONTANI DAGLI APPARECCHI ELETTRICI
I bambini e gli animali devono essere tenuti lontani dagli apparecchi collegati alla
rete elettrica.
3) VERIFICATE LA TENSIONE DI ALIMENTAZIONE
La tensione di alimentazione deve corrispondere a quella dichiarata sulla targhetta
dati tecnici. Non utilizzate altro tipo di alimentazione.
4) UTILIZZATE UN APPARECCHIO SALVAVITA
È consigliato l’uso di un apparecchio salvavita sulla linea di alimentazione elettrica
per un campo di intervento secondo le normative vigenti nel Paese di utilizzo; consul-
tate il vostro elettricista di fiducia.
5) COLLEGAMENTO ALLA RETE ELETTRICA
Prima di collegare o scollegare la macchina dalla rete di alimentazione, assicuratevi
che l’interruttore si trovi nella posizione OFF “O” (spento).
6) NON MANOMETTETE IL CAVO DI ALIMENTAZIONE
Non manomettete il cavo di alimentazione. Non sostituite la spina del cavo di alimen-
tazione; utilizzate solo una presa adattata alla spina della macchina. Utilizzate il cavo
di alimentazione esclusivamente per gli scopi a cui è destinato.
7) CONTROLLATE IL CAVO DI ALIMENTAZIONE
Il cavo di alimentazione e il cavo di prolunga (se presente) devono essere controllati
periodicamente e prima di ogni uso per vedere se presentano segni di danneggia-
mento o di invecchiamento. Se non risultassero in buone condizioni scollegate im-
mediatamente il cavo e non usate la macchina ma fatela riparare presso un centro di
assistenza autorizzato.
8) MANTENETE IL CAVO DI ALIMENTAZIONE IN POSIZIONE SICURA
Tenete il cavo di alimentazione e il cavo di prolunga (se presente) lontani dalla zona di
lavoro e dall’utensile di taglio, da superfici umide, bagnate, oliate, da bordi taglienti,
da fonti di calore, da combustibili e da zone di transito veicolare e pedonale.
9) NON CALPESTATE O SCHIACCIATE IL CAVO DI ALIMENTAZIONE
Non passate mai sopra il cavo di alimentazione. Siate coscienti della sua posizione
in ogni momento.

8
10) NON USATE LA MACCHINA IN PRESENZA DI LIQUIDI
Non bagnate la macchina con liquidi e non esponetela ad ambienti umidi. Non la-
sciatela all’aperto.
11) UTILIZZATE UN CAVO DI PROLUNGA IDONEO ALLA MACCHINA
Utilizzate solamente cavo per prolunga omologato idoneo alla potenza della mac-
china che utilizzate e dimensionato in base alla sua lunghezza; consultate il vostro
elettricista di fiducia.
12) SCOLLEGATE LA MACCHINA IMPUGNANDO SOLO LA SPINA
Per estrarre la spina dalla presa impugnate solo la spina ; non tirare il cavo!
13) EVITATE IL CONTATTO DEL CORPO CON SUPERFICI MESSE A MASSA O A
TERRA
Evitate il contatto del corpo con superfici messe a massa o a terra, come frigoriferi,
termosifoni, tubi e serramenti metallici ecc. E’ consigliato l’utilizzo di una pedana che
isoli elettricamente l’utilizzatore dal pavimento.
TRASPORTO E SOLLEVAMENTO (FIG. A)
ATTENZIONE! La Ditta Costruttrice declina ogni responsabilità per gli even-
tuali danni diretti e/o indiretti causati da errati trasporti o sollevamenti.
Le operazioni di trasporto e sollevamento della macchina devono essere eseguite
con attenzione per evitare incidenti e danni.
Sollevate la macchina con estrema cautela afferrandola con entrambe le mani sul
basamento e trasferitela lentamente, senza scosse o movimenti bruschi.
Non trasportatela tirandola per il cavo di alimentazione o altre sue parti.
MESSA IN SERVIZIO (FIG. A)
ATTENZIONE! La Ditta Costruttrice declina ogni responsabilità per gli even-
tuali danni diretti e/o indiretti causati da errate installazioni e allacciamenti.
ATTENZIONE! Prima di effettuare le seguenti operazioni assicuratevi che la
spina della macchina sia scollegata dalla rete elettrica.
La macchina è fornita con alcuni componenti smontati e prima di usarla deve essere
pulita ed installata.
Nella scelta della posizione della macchina è opportuno considerare:
-che la posizione prevista non sia umida e sia al riparo dagli agenti atmosferici.
-che la zona di appoggio risulti perfettamente in piano, su di un pavimento antisdruc-
ciolo e con una capacità di carico adeguata al peso della macchina.
-
che attorno alla macchina sia prevista un’ampia zona operativa libera da impedimenti.
-che il locale sia custodito e chiuso per impedire il libero accesso.
-che vi sia una buona illuminazione.
-che sia posizionata in vicinanza dell’interruttore generale con differenziale.
-che l’impianto di alimentazione sia dotato di messa a terra conforme alle norme.
-che la temperatura ambiente sia compresa tra 10° e 35° C.
-che l’ambiente di lavoro non sia in atmosfera esplosiva.
Togliete la parte superiore dell’imballo e verificate visivamente la perfetta integrità
della macchina e dei componenti; a questo punto eliminate l’imballo e procedete ad
una accurata pulizia per togliere gli eventuali oli protettivi utilizzati per il trasporto.
1) Procuratevi un banco (non in dotazione) su cui appoggerete la macchina e una
serie di bulloneria (non in dotazione) per fissarla ad esso.
2) Posizionate la macchina e fissatela in maniera ben salda utilizzando i fori presenti
sulla base (pos.2).
3) Procedete al montaggio dei componenti come illustrato in figura; in caso di dubbio
rivolgetevi al vostro rivenditore.
4) Nei punti indicati in fig.A con il simbolo dell’ampollina, lubrificate con alcune
gocce d’olio (non in dotazione) le bronzine; rimuovete con un panno eventuali tracce
di olio in eccesso.
5) Inclinate il piano di lavoro (pos.3) a 0° (orizzontale).
6) Verificate che la lama sia correttamente posizionata e tensionata (vedere capitoli
seguenti).
7) Montate la protezione della zona di taglio (pos.14) sul supporto (pos.15) me-
diante la vite e il dado; non serrare il dado a fondo, in modo che la protezione possa
aprirsi all’indietro.
Assicuratevi di avere montato correttamente tutte le parti, verificate la solidità del-
l’assemblaggio e la stabilità della macchina.
REGOLAZIONI (FIG. A)
ATTENZIONE! Prima di ogni controllo o regolazione posizionate l’interruttore
su OFF”O” (spento) e staccate l’alimentazione elettrica scollegando la spina del-
la macchina. Utilizzate guanti per proteggere le mani.
La macchina viene fornita già regolata e non necessita di particolari regolazioni; se
necessario effettuate le seg. operazioni.
REGOLAZIONE TENSIONE LAMA
Al fine di ottenere la migliore resa dalla macchina, effettuare la verifica della tensione
della lama.
Una tensione eccessiva può portare alla rottura della stessa ed una eccessiva usura
dei componenti mobili della macchina; una tensione scarsa può portare al piega-
mento della lama e alla fuoriuscita della stessa dai due bloccalama.
Per effettuare la regolazione della tensione ruotate il volantino (pos.9):
- senso orario per aumentarla
- senso antiorario per diminuirla.
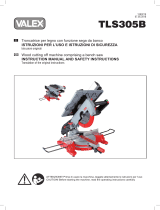
REGOLAZIONE PERPENDICOLARITA’ LAMA 90° (vedi fig.C)
Per effettuare la regolazione della perpendicolarità della lama rispetto al piano di
lavoro, intervenite sul volantino (pos.4) in modo da inclinare il piano (pos.3) fino a
formare un angolo a 90°; utilizzare una squadretta a 90° (non in dotazione) posta tra
lama e piano.
Verificate che l’indicatore sia posizionato sullo zero ed eventualmente, mediante un
cacciavite (non in dotazione), riposizionatelo.
REGOLAZIONE INCLINAZIONE PIANO DI LAVORO
Per effettuare la regolazione dell’inclinazione del piano (pos.3) rispetto alla lama
(pos.5), intervenite sul volantino (pos.4) in modo da inclinare il piano fino a formare
l’angolo desiderato.
REGOLAZIONE ALTEZZA FERMAPEZZO E PROTEZIONE
Per effettuare la regolazione dell’altezza del fermapezzo e della protezione (pos.14-
17) rispetto al piano (pos.3) e al pezzo in lavorazione, intervenite sul volantino
(pos.21), regolate e rifissate bene.
Il fermapezzo dovrà trovarsi appena sopra al pezzo, in modo da consentire lo scor-
rimento sotto di esso ma anche trattenere il pezzo per evitare spostamenti verso
l’alto.
AVVIAMENTO E ARRESTO
ATTENZIONE! Prima di avviare la macchina è obbligatorio indossare occhiali,
guanti, cuffie e maschera di protezione (non in dotazione alla macchina).
ATTENZIONE! Durante l’avviamento e l’arresto della macchina fate in modo
che nessuno si avvicini alla macchina. Mantenete una distanza di sicurezza da
tutte le parti in movimento e dalla zona di taglio.
ATTENZIONE! Il motore, le parti meccaniche rotanti e la lama girano ancora
per diversi secondi dopo aver spento la macchina. Durante la fase di arresto
queste parti non devono essere toccate, pericolo di lesioni gravi!
Prima di mettere in funzione la macchina, verificate l’integrità dei componenti e con-
trollate che le viteria sia serrata.
AVVIAMENTO
1) Verificate che le chiavi di servizio siano state riposte.
2) Verificate che la protezione sia correttamente posizionata sulla zona di taglio.
3) Inserite la spina del cavo di alimentazione alla presa.
4) Posizionatevi di fronte alla macchina ed assicuratevi che persone ed animali siano
lontani.
5) Per avviare premete l’interruttore (pos.12) ON “I” acceso.
Se osservate delle anomalie di funzionamento, spegnete la macchina e consultate il
capitolo “Ricerca guasti ed interventi ammessi”.
ARRESTO
Per arrestare la macchina premete l’interruttore (pos.12) OFF “O” spento.
REGOLAZIONE DELLA VELOCITA’ (se presente)
Mediante la manopola (pos.19) è possibile regolare la velocità di oscillazione della
lama.
Quando non lavorate spegnete la macchina e staccate la spina dalla presa.
AVVERTENZE E CONSIGLI D’USO
ATTENZIONE! Prima di ogni controllo o regolazione posizionate l’interrutto-
re su OFF”O” (spento) e staccate l’alimentazione elettrica scollegando la spina
della macchina.
Dopo aver letto attentamente i capitoli precedenti, seguite scrupolosamente queste
avvertenze e consigli che vi permetteranno di ottenere il massimo delle prestazioni
dalla vostra macchina. Procedete con calma, solo dopo aver acquisito una buona
esperienza riuscirete a sfruttarne a fondo le potenzialità. Per prendere familiarità con
tutti i comandi, fate delle prove di utilizzo a vuoto senza usare pezzi in lavorazione.
OPERATORE
La posizione normale dell’operatore è quella davanti la macchina (lato interruttore),
con entrambe le mani a guidare e trattenere il pezzo; solo in questa posizione è
possibile eseguire il taglio.
Attenzione! Mantenete le mani e il viso lontano dalla lama e dalla zona di taglio,
pericolo di lesioni gravi!
PEZZO IN LAVORAZIONE
Il pezzo che tagliarete dovrà avere forma, dimensioni e peso compatibili con la mac-
china. I legni duri non sono adatti a questa macchina.
Sul pezzo segnate con una matita la linea di taglio; avviate la macchina e posiziona-
telo sopra il piano di lavoro, facendo attenzione a non toccare la lama. Il lato più largo
del pezzo deve essere appoggiato alla base; non tagliate pezzi con lato maggiore
messo in verticale (in costa).
Allineate la linea precedentemente tracciata con il tagliente della lama ed avanzate
verso di essa; completate il taglio e spegnete la macchina.
Su questa macchina si possono montare pezzi di dimensioni definite (spessore H e
profondità P, vedasi cap. Dati Tecnici).
Attenzione! Per la vostra sicurezza è importante che la macchina sia fissata al
banco o piedistallo.
Attenzione! Per la vostra sicurezza è importante che il pezzo sia correttamente

9
bloccato. Non tagliate pezzi a sez. circolare, legni vecchi o fragili, legni irregolari,
legni con crepe, legni con chiodi o viti, rami o tronchi. Effettuate sempre uno
scrupoloso controllo visivo del pezzo.
Attenzione! Rammentate sempre che la lama può provocare il sollevamento im-
provviso del pezzo ed è possibile che vi sfugga dalle mani.
UTENSILE LAMA
Verificate prima di ogni utilizzo la sua perfetta integrità, l’assenza di rotture e defor-
mazioni. Periodicamente controllate l’affilatura della lama.
Quando è necessario sostituirla seguite le indicazioni dei capitoli seguenti.
Attenzione! L’efficienza e la perfetta integrità della lama producono un miglior
risultato e minimizzano il rischio di incidenti.
SOFFIAGGIO TRUCIOLI E POLVERI
La macchina è dotata di un dispositivo che soffia un piccola quantità d’aria sulla
zona di taglio. Questo fa sì che la polvere prodotta venga rimossa, a vantaggio di un
taglio preciso.
Verificate che il tubetto in gomma sia collegato da un lato all’attacco di mandata
(pos.8) e dall’altro al diffusore (pos.11) posto in prossimità della zona di taglio.
Mediante una vite laterale è possibile regolare l’inclinazione del diffusore, fare atten-
zione a non stringere eccessivamente per non schiacciare il tubetto.
ASPIRAZIONE TRUCIOLI E POLVERE (se presente)
La macchina può essere dotata di un collettore (pos.16) per l’aspirazione dei tru-
cioli/polvere.
E’ comunque da tener presente che durante il taglio parte del materiale asportato
verrà scagliato anche attorno alla macchina e sul pezzo.
Per una aspirazione ottimale, collegate il collettore ad un aspiratore di trucioli/polvere
di legno, mediante un tubo flessibile in materiale plastico (entrambi non forniti con la
macchina); il vostro rivenditore di fiducia potrà consigliarvi nella scelta più idonea.
Attenzione! Non avviate la macchina se non è montato il tubo di aspirazione. Non
infilate all’interno del collettore le dita o attrezzi per tentare di estrarre il materiale,
pericolo di lesioni gravi!
REGOLAZIONE VELOCITA’ OSCILLAZIONI (se presente)
La macchina può essere dotata di un regolatore elettronico (pos.19) che varia la
velocità delle oscillazioni della lama.
LAVORAZIONE, TAGLI E MOVIMENTI
Il pezzo in lavorazione è in movimento sul piano di lavoro, mentre l’utensile si muove
verticalmente con moto alternativo per asportare il materiale; solo durante la fase di
discesa la lama asporta il materiale.
Il motore fornisce l’energia per il movimento dell’utensile, mediante un gruppo biella
/manovella e coppia di bracci collegati con una molla.
Seguite le seguenti avvertenze che sono valide per tutti i tipi di taglio:
- verificate che leve, pomelli e viti siano avvitati in modo da fissare saldamente
le parti mobili
- mantenete ben saldo il pezzo in lavorazione
- il pezzo deve appoggiarsi contro il piano di lavoro
- non tagliate più pezzi contemporaneamente
- mantenete una distanza di sicurezza dalla zona di taglio
- avvicinate con gradualità ed attenzione il pezzo verso la lama
- il taglio deve avvenire in un’unica passata
- non caricate troppo il gruppo di taglio per non sollecitare la lama e il motore
-
sollecitazioni eccessive provocano la rottura improvvisa della lama e/o del pezzo
- non sollecitate lateralmente la lama
- la lama ferma non deve toccare il pezzo
- non avviare la macchina se la lama è a contatto del pezzo
- non avviare la macchina se la lama è scoperta dalla protezione
- per pulire la zona di taglio utilizzate un pennello con impugnatura lunga
La macchina permette di eseguire vari tipi di tagli:
- taglio trasversale al pezzo
- taglio curvo a sagoma (solo per raggi ampi e su pezzi sottili)
- taglio inclinato (da 0° a 45°)
Esecuzione taglio:
- premere l’interruttore (pos.12) per avviare la macchina
- con entrambe le mani afferrate il pezzo, spingetelo in avanti e contemporaneamente
premetelo sul piano di lavoro (la lama tenderà a trascinare il pezzo verso l’alto)
ATTENZIONE! Mantenere le mani lontano dalla zona di taglio
- completare il taglio
- spegnere la macchina.
Per eseguire un taglio a foro:
- effettuate un foro di Ø10mm con un trapano all’interno della zona da tagliare, smon-
tate la lama, infilatela sul foro appena eseguito e rimontatela con il pezzo (vedere
cap. seguenti).
- prima di riavviare verificate bene il corretto montaggio e che la lama non tocchi il
pezzo.
- eseguite il taglio seguendo il tracciato sul pezzo, spegnete la macchina e smontate
la lama con il pezzo; a questo punto eliminate la parte tagliata.
LAMA
ATTENZIONE! La parte tagliente può provocare gravi ferite, utilizzate guanti
di protezione!
- Utilizzate lame di qualità con caratteristiche idonee alla macchina che utilizzate in
base ai dati tecnici della stessa; il vostro rivenditore di fiducia potrà aiutarvi nella
scelta più idonea. Osservate anche le eventuali istruzioni fornite a corredo.
- Non utilizzate lame di dubbia provenienza e prive dei dati tecnici.
- Le dimensioni devono essere uguali a quelle riportate sui dati della macchina.
- Utilizzate lame conformi alle normative in vigore nel paese in cui vi trovate.
- Eseguire sempre un controllo visivo: non deve presentare deformazioni, rotture o danni.
La nostra azienda fornisce una serie completa di lame adatte alla vostra macchina,
che possono essere acquistate presso il vostro rivenditore di fiducia.
SOSTITUZIONE DELLA LAMA (FIG.D)
ATTENZIONE!
Prima di ogni sostituzione posizionate l’interruttore su OFF”O”
(spento) e staccate l’alimentazione elettrica scollegando la spina della macchina.
ATTENZIONE! A fine taglio la lama raggiunge temperature elevate: attendete
il suo raffreddamento prima di sostituirla.
ATTENZIONE! Anche se al lama è ferma è comunque molto tagliente: per
evitare ferite gravi utilizzate i guanti.
ATTENZIONE! Il montaggio della lama deve essere eseguito a perfetta regola
d’arte. Un montaggio errato genera pericoli molto gravi.
Per eseguire la sostituzione procedete come di seguito indicato. L’operazione deve
essere fatta da una persona esperta; in caso di dubbio rivolgetevi ad un centro as-
sistenza autorizzato.
1) Staccate la spina dalla presa elettrica.
2) Per eseguire correttamente il successivo rimontaggio, osservate attentamente i
vari componenti prima di procedere.
3) Sollevate la protezione della zona di taglio (pos.14).
4) Ruotate in senso antiorario il volantino (pos.9) di alcuni giri, in modo da allentare
la tensione della lama.
5) Con una mano trattenete la lama, mentre con l’altra spingete verso il basso il bloccalama
superiore (pos.6) e contemporaneamente sfilate la lama dalla sede che la trattiene.
6) Sfilate la lama dal bloccalama inferiore (visibile attraverso la feritoia presente sul
piano di lavoro).
7) Pulire i componenti e la lama nuova.
8) Montare la nuova lama prestando attenzione a rispettare il senso di taglio: i denti
devono essere rivolti verso il basso (fig.D).
9) Inserire la lama prima nel bloccalama inferiore e poi sul bloccalama superiore.
10) Agire sul volantino (pos.9) in modo da dare tensione alla lama (vedere cap.
REGOLAZIONI).
11) Riabbassare la protezione sulla zona di taglio.
12) Verificate con attenzione che la protezione copra la zona di taglio.
13) Verificate che la lama sia correttamente montata.
14) Effettuate una prova di funzionamento a vuoto.
MANUTENZIONE
ATTENZIONE! Prima di ogni controllo o manutenzione posizionate l’interrutto-
re su OFF”O” (spento) e staccate l’alimentazione elettrica scollegando la spina
della macchina.
ATTENZIONE! Non manomettete o tentate di riparare parti del motore o parti
elettriche. Non accedere ad organi interni.
La durata e il costo d’esercizio della macchina dipendono anche da una costante e
scrupolosa manutenzione, osservate sempre le seguenti istruzioni.
PULIZIA DOPO OGNI UTILIZZO
- Pulite regolarmente ed abbiate cura della vostra macchina, vi garantirete una perfet-
ta efficienza ed una lunga durata della stessa.
- Rimuovete i trucioli/polvere utilizzando una spazzola morbida e un aspiratore; con-
segnate il materiale ad un punto di raccolta per il riciclaggio.
- Rimuovete le tracce di resina che si attaccano sulla macchina.
- Non spruzzate o bagnate d’acqua la macchina.
- Non usate infiammabili, detergenti o solventi vari, potreste rovinare irrimediabilmen-
te la macchina. Le parti in plastica sono aggredibili da agenti chimici.
- Non utilizzate un getto d’aria compressa per la pulizia: pericolo lancio trucioli e
schegge!
- Prestate particolare attenzione alla pulizia dell’interruttore, alle feritoie di ventilazione
del motore, alla lama, ai pomelli di regolazione, al piano di lavoro, all’inserto del piano
di lavoro, al tubo di soffiaggio polveri.
Per la vostra sicurezza verificate periodicamente lo stato dei seg. componenti, se
danneggiati o usurati fateli sostituire:
- interruttore (pos.12)
- lama (pos.5)
- protezione lama (pos.14)
- collettore di scarico (pos.16)
- inserto in plastica del piano di lavoro (pos.13)
- spina e cavo di alimentazione (pos.23)
LUBRIFICAZIONE
Nei punti indicati in fig.A con il simbolo dell’ampollina, lubrificate con alcune gocce d’olio di
qualità le bronzine, poste sul braccio superiore fisso (pos.7) in entrambi i lati:
- al primo avviamento
- dopo 5 ore di funzionamento
- successivamente ogni 10 ore di funzionamento.
Rimuovete con un panno eventuali tracce di olio in eccesso.

10
COPPIA SPAZZOLE (se presenti)
Il motore di questa macchina può essere equipaggiato con una coppia di spazzole
in grafite; la verifica e la sostituzione deve essere eseguita da un centro assistenza
autorizzato.
FUSIBILE (se presente)
Il circuito elettrico di questa macchina può essere dotato di una protezione con fu-
sibile.
Per verificare le condizioni del fusibile o per sostituirlo svitate a mano il tappo “FUSE”
(pos.20) posto a fianco del regolatore di velocità.
Sostituite il fusibile con uno di caratteristiche e dimensioni uguali; infilate il fusibile
nella sede del tappo ed avvitateli nel foro filettato.
RICERCA GUASTI E INTERVENTI AMMESSI
LA MACCHINA NON SI AVVIA OPPURE SI ARRESTA E NON RIPARTE:
Mancanza di energia elettrica:
- Controllate che il cavo elettrico e la prolunga (se presente) non siano danneggiati.
- Controllate l’interruttore generale dell’impianto di alimentazione.
Spazzole in grafite usurate (se presenti):
- Rivolgetevi ad un centro assistenza autorizzato.
Guasto elettrico:
- Rivolgetevi ad un centro assistenza autorizzato.
LA MACCHINA VIBRA ECCESSIVAMENTE:
Lama senza tagliente, danneggiata o deformata:
- Sostituite la lama.
Lama montata in modo errato:
- Smontate la lama e rimontatela correttamente seguendo le istruzioni
Fissaggio insufficiente della macchina al banco:
- Migliorate il fissaggio della macchina.
LA MACCHINA FA FATICA A TAGLIARE:
Lama senza tagliente o danneggiata:
- Sostituite la lama.
IL DISPOSITIVO SOFFIAGGIO POLVERI NON FUNZIONA:
Tubazione piegata:
- Raddrizzare la tubazione.
Tubazione o diffusore ostruiti:
- Pulire.
Pompa guasta:
-Rivolgetevi ad un centro assistenza autorizzato.
ATTENZIONE! Se dopo aver eseguito gli interventi sopra descritti la macchina
non funziona correttamente o in caso di anomalie diverse da quelle indicate, spe-
gnetela e portatela presso un centro di assistenza autorizzato o fate intervenire
un tecnico autorizzato richiedendo ricambi originali. Fate sempre riferimento al
modello macchina e numero di matricola riportati sull’etichetta dati tecnici.
RIMESSAGGIO
- Scollegate la macchina dalla rete elettrica.
- Effettuate una accurata pulizia di tutta la macchina e sue parti accessorie (vedi
paragrafo Manutenzione).
- Proteggete le parti non verniciate e le bronzine con un olio protettivo.
- Riponete la macchina lontano dalla portata dei bambini, in posizione stabile e sicura
e in luogo asciutto, temperato e libero da polveri. Al locale di rimessaggio non devono
avere accesso i bambini e gli estranei.
- Proteggete la macchina dalla luce diretta, tenetela possibilmente al buio o in pe-
nombra.
- Non chiudete la macchina in sacchi di nylon, potrebbe formarsi dell’umidità e dan-
neggiare la macchina.
- Utilizzate l’imballo originale per proteggere la macchina.
DEMOLIZIONE
I rifiuti elettrici ed elettronici possono contenere sostanze pericolose per l’am-
biente e la salute umana; non devono pertanto essere smaltiti con quelli domestici
ma mediante una raccolta separata negli appositi centri di raccolta o riconsegnati al
venditore nel caso di una apparecchiatura nuova analoga. Lo smaltimento abusivo
dei rifiuti comporta l’applicazione di sanzioni amministrative.
Modifiche: testi, figure e dati corrispondono allo standard aggiornato all’epoca del-
la stampa del presente manuale. Il costruttore si riserva la facoltà di aggiornare la
documentazione qualora venissero apportate delle variazioni alla macchina, senza
incorrere per questo in alcun obbligo.
Nessuna parte di questa pubblicazione e della documentazione allegata alla macchi-
na può essere riprodotta senza un permesso scritto del costruttore.
GARANZIA
Il prodotto è tutelato a norma di legge contro ogni non conformità rispetto alle
caratteristiche dichiarate purchè sia stato utilizzato esclusivamente nel modo
descritto nel presente manuale d’uso, non sia stato manomesso in alcun modo,
non sia stato riparato da personale non autorizzato e, ove previsto, siano utilizzati
solamente ricambi originali. Sono comunque esclusi materiali di consumo e/o
componenti soggetti a particolare usura come ad esempio batterie, lampadine,
elementi di taglio e finitura etc.Consegnate il prodotto al rivenditore o ad un centro di
assistenza autorizzato, esibendo la prova di acquisto.
DICHIARAZIONE DI CONFORMITA’
La ditta Valex - Via Lago Maggiore 24, 36015 Schio (VI) Italy
dichiara sotto la propria responsabilità che il prodotto:
SEGHETTO A LAMA OSCILLANTE
SV4000 (cod. 1410218)
SV4000E (cod. 1410219)
è conforme ai requisiti di sicurezza e salute delle direttive
2006/95/CE, 2006/42/CE, 2004/108/CE
Schio, 01.2010
Un procuratore - Bruno Anzolin

11

12
g
Congratulations on your excellent choice. Your new tool has been manufactured
according to the highest quality standards, guaranteeing you long term service
and safety.
This manual contains information and that deemed necessary for proper use, knowle-
dge and standard machine maintenance. It does not include information on machine
tool woodworking techniques nor does it discuss the types and processing capabilities
of the various types of wood; the user will find further information in specific books
and publications or by attending special training classes.
Warnings on use and maintenance regulations refer to normal operating needs. Normal
machine operations, working life and economy depend on their observance.
These instructions are an integral part of the machine and must accompany it in the
case of repair or resale. Carefully keep the documentation supplied with the machine
close at hand for consultation in case of need.
For any repairs or revisions that require complex operations, please contact authorised
service centres which have specialised personnel.
The manufacturer is not liable for damages due to negligence, failure to observe the
instructions in this manual and direct and/or indirect damages caused by improper
use of the machine.
Failure to observe what indicated, poor and inadequate machine use and unauthorised
tampering may void the warranty. Accident prevention therefore depends on the strict
observance of what is established in this manual.
Upon purchase, make sure the machine is integral and complete.
WARNING! Before using the machine, in order to ensure that handling, initial
start-up, starting, use, stopping, and maintenance are carried out properly, read
the instructions below that refer to the drawings and technical data and apply them
carefully. Before starting work you should be familiar with the controls and the cor-
rect use of this machine. Make sure you know how to stop it in case of emergency.
Incorrect use of this machine may result in serious injury and damage to property.
Always consider your safety and the safety of others and act accordingly.
WARNING! The machine is exclusively intended for hobby use and it is suited
to make cross and tilted cuts on parallelepiped shaped wood. Cutting metal, plastic,
fabric, flammable materials and materials that generate harmful or toxic dust and
vapours is prohibited. Any use other than that indicated in these instructions may
damage the machine and constitute a serious risk to both people and property.
MACHINE DESCRIPTION (FIG.A)
1 Base
2 Counter fastening holes
3 Adjustable work surface
4 Work surface adjustment hand wheel
5 Blade
6 Upper blade lock
7 Fixed upper arm
8 Dust blowing connection
9 Blade power adjustment hand wheel
10 Lower compartment guard
11 Dust blowing system
12 On/off switch
13 Engine
14 Cutting area guard
15 Cutting area and piece lock guard connection
16 Dust extraction connection (if applicable)
17 Piece lock
18 Oscillating upper arm
19 Blade oscillation speed regulator (if applicable)
20 Fuse (if applicable)
21 Guard height adjustment hand wheel
22 Motor brushes (if applicable)
23 Power supply plug and cable
DESCRIPTION OF MARKS AND SYMBOLS (FIG. B)
1 Machine model and technical specifications.
2 Machine code, serial number or lot number, year of manufacture, certification
symbols (if applicable).
3 WARNING!
4 Read these instructions carefully before using the machine.
5 Warning! Risk of cutting and crushing hands. It is compulsory to wear protection
gloves.
6 Warning! Risk of flying material and dangerous dust. It is compulsory to wear eye
protection and a mask to protect your respiratory tracts.
Risk of loud noise. It is compulsory to use ear protection.
7 Warning! Risk of crushing and getting trapped. Before any control, adjustment or
maintenance, always disconnect the machine from the power supply by unplugging it.
Should the power supply cable be damaged, remove the plug from the power supply
socket before inspecting it.
8 Warning! Risk of cutting and getting trapped. Keep hands away from the cutting area.
9 Warning! Risk of crushing. Keep hands away from parts in motion.
10 Electric and electronic waste may contain potentially hazardous substances for the
environment and human health. It should therefore not be disposed of with domestic
waste, but by means of differentiated collection at specific centres or returned to the
vendor in the event of purchasing a new identical tool. The illegal disposal of such
equipment may result in prosecution to the full extent of the law.
TECHNICAL DATA
SV4000 cod.1410218
Power voltage and nominal frequency _______________________ 230V ~50Hz
Nominal engine power ________________________________________ 165 W
Idle rotation speed ______________________________________no 1480 min-1
Acoustic pressure LpA _____________________________________ 79 dB(A)
Total machine dimensions (b x l x h) ____________________ 320x630x360 mm
Blade:
Length (between supports) ___________________________________ 127 mm
Blade thickness ____________________________________________ 0.5 mm
Teeth thickness ____________________________________________ 0.6 mm
Spare part code __________________________________________ 1452622
Performance:
Work surface tilt ______________________________0° - 45° counterclockwise
Cutting capacity 0° __________________________________________55 mm
Maximum cutting depth _____________________________________406 mm
SV4000E cod.1410219
Power voltage and nominal frequency _______________________ 230V ~50Hz
Nominal engine power ________________________________________ 112 W
Idle rotation speed _________________________________ no 520~1400 min-1
Acoustic pressure LpA _____________________________________ 79 dB(A)
Total machine dimensions (b x l x h) ____________________ 305x630x360 mm
Fuse (if applicable) _____________________________________________5 A
Blade:
Length (between supports) ___________________________________ 127 mm
Blade thickness ____________________________________________ 0.5 mm
Teeth thickness ____________________________________________ 0.6 mm
Spare part code __________________________________________ 1452622
Performance:
Work surface tilt ______________________________0° - 45° counterclockwise
Cutting capacity 0° __________________________________________55 mm
Maximum cutting depth _____________________________________406 mm
GENERAL SAFETY REGULATIONS
1) NYLON BAGS ARE NOT TOYS
WARNING! Suffocation hazard. Nylon packaging bags can cause suffocation
if placed on the head and must be kept out of the reach of children. If they cannot
be reused they must be cut up and thrown in the garbage.
2) PEOPLE AUTHORIZED TO USE THE MACHINE
The use of this machine by children or anyone that is not properly informed on the
operating instructions contained in this manual is forbidden. Local laws and regulations
may establish a minimum age for use of the machine. The operator must be adequately
trained to use, adjust and safely operate the machine.
3) OPERATOR’S RESPONSIBILITY
The operator is responsible for other people as far as accidents or damage to people
or property caused by the use of the machine is concerned.
4) MAINTAIN A STABLE AND SAFE WORKING POSITION
When working, maintain a stable, safe position and do not lose balance.
5) PAY ATTENTION IN THE WORK AREA
Be careful of hands, the piece to be processed, the cutting tool, chips produced during
work and, in general, all parts in motion.
6) USE CAUTION WHILE WORKING
Do not allow yourself to be distracted and always pay attention to what you are doing.
Use your common sense. Never use the machine when tired, ill or under the influence
of alcohol, drugs or medicines that reduce alertness.
7) KEEP A SAFE DISTANCE FROM THE MACHINE
Keep people and animals away from the machine and your work area. Do not touch
electrically-powered parts.
8) PROTECT YOUR BODY
The use of the machine generates noise, heat, dust, smoke, vibrations, flying chips
and splinters. Always use personal protective equipment in accordance with the law
to prevent injury to the body, hands, eyes, hearing and respiratory tracts. Wear strong
clothing, with tight sleeves and cuffs, eye protection, working gloves, safety earmuffs,
dust masks and safety shoes. Do not wear loose clothing, scarves, ribbons and jewel-
lery that could be caught in moving parts of the machine. Wear a protective hairnet to
gather long hair. Normal glasses are not suitable for protecting your eyes.
9) EFFICIENCY OF THE MACHINE
Always check the efficiency and integrity of the machine; it could cause serious
accidents if in poor conditions. Do not use the machine if the switch does not allow
you to switch the machine on or off.
10) INTEGRITY OF THE MACHINE
Do not remove any components from the machine unless expressly indicated in these
instructions and do not modify the original configuration in any way.

13
11) DO NOT DISASSEMBLE THE MACHINE
Do not disassemble the machine for any reason. Do not use the machine without the
guards installed.
12) DO NOT TAMPER WITH ANY OF THE MACHINE’S COMPONENTS
Do not tamper, modify or remove any component from the machine.
13) VERIFY THE SOLIDITY OF THE MACHINE
Periodically check screw and blade tightness.
14) USE THE MACHINE IN A WELL-VENTILATED ROOM
The machine must be used in a well-ventilated area in order to ensure sufficient
cooling and air circulation.
15) DO NOT USE THE MACHINE IN DANGEROUS ENVIRONMENTS
Do not use the machine in areas with a risk of explosion and/or fire, in poorly ventilated
spaces or in the presence of inflammable and/or explosive materials, dampness,
gases, vapours, and acids.
16) MOVING OF THE MACHINE
The machine should be moved with caution. Hold it with two hands under the base
to move. Do not attempt to move the machine by pulling on the power cord or other
machine parts.
17) POSITIONING OF THE MACHINE
Use the nuts and bolts to position and secure the machine on the work bench or stand
with a flat, solid and non-flammable surface that must support the total machine weight
and vibrations caused by use. Using the machine without securing it and on flammable
surfaces such as wood, plastic, etc. is prohibited. Periodically check fastenings.
18) WORK WITH ADEQUATE LIGHTING
Only work when there is sufficient daylight or suitable artificial lighting.
19) DO NOT EXPOSE THE MACHINE TO THE ATMOSPHERIC AGENTS
Do not expose the machine to the elements such as rain, fog, sun, high and low
temperatures.
20) DO NOT TOUCH THE MACHINE IF YOU ARE WET
Never use this machine when your feet are bare or wet. Do not touch the machine
when your hands are wet.
21) CHECK BEFORE STARTING UP THE MACHINE
Before plugging the machine in, make sure the switch is OFF “O” (switched off) and
that the service keys are removed. Do not use the machine if the surface insert is
worn and the guard broken.
22) CORRECT ASSEMBLY CHECKS
Do not use the machine if the sawdust vacuum tube (not supplied) is disconnected
and the vacuum (not supplied) is off.
23) FUNCTIONAL CHECKS
Make sure the blade guard is not damaged. The blade guard should rest against the
piece and fully cover the cutting area.
24) ACCURATELY POSITION THE WORK PIECE
For your safety, it is important that the work piece is well-rested on the work surface.
The piece must have at least one flat side like tables, panels, etc.; do not cut bran-
ches, tree trunks or circular sections. Do not cut pieces that contain nails or screws
or wrapped in tape, cord or other. Do not cut pieces on a slant. Rest them on the
work surface.
25) PROHIBITED MATERIALS
Cutting metal, plastic, fabric, flammable materials and materials that generate harmful
or toxic dust and vapours is prohibited.
26) PREVENT POSSIBLE ACCIDENTS
Always test operations without a work piece before beginning work; in this phase,
make sure no one nears the machine and keep safety distances. Always use personal
safety devices. When the machine is running, do not touch the blade. Serious injury
hazard! After replacing components, always run a general check before starting work.
Do not access internal machine parts.
27) ONLY USE BLADES SUITED FOR THIS MACHINE
This machine was designed to use specific blades to cut wood; using blades suited
for other materials is prohibited. Use blades which conform to the regulations in force
in the country of use.
28) HANDLE THE BLADE WITH CAUTION
The blade has very sharp parts: Handle it with caution and always wear protective
gloves. Serious injury hazard!
29) ONLY USE BLADES IN PERFECT WORKING CONDITIONS
Do not use damaged or deformed blades; if worn, replace with new blades.
30) DO NOT FORCE THE BLADE
Do not subject the blade to: Collision, bending, excessive pressure, heat, irregular
speed changes, vibrations. In these conditions, the tool has a limited working life and
may break without warning with the risk of flying fragments.
31) DO NOT TOUCH PARTS IN MOTION WHILE THE MACHINE IS RUNNING
WARNING! Serious injury hazard! Do not touch the blade or any part in motion
while the machine is running. Be careful as how you move your arms and hands.
Only remove the work piece after turning off and unplugging the machine.
32) MACHINE MALFUNCTION
Turn the switch to OFF “O” (switched off), disconnect the power supply to the machine
by removing the plug from the socket when: Not in use, left unattended, moved, the
power cord is damaged, rested or when removing the work piece, during adjustments,
maintenance and cleaning.
33) WAIT FOR THE MACHINE TO STOP COMPLETELY
The engine, the moving parts and the blade continue to run for a short while after the
machine is switched off. During this time, these parts must not be touched. Serious
injury hazard!
34) DO NOT LEAVE THE MACHINE UNATTENDED WHILE RUNNING
Do not leave the machine unattended while running and wait until all moving parts
fully stop before leaving the machine after turning it off.
35) KEEP THE WORKPLACE CLEAN AND TIDY
Mess and dirt are sources of danger. Make sure there are no tools or objects around the
machine that could be damaged. Do not place tools or objects on the machine that could
accidentally fall. Frequently eliminate cutting residue from the machine and floor.
36) HARMFUL DUST
WARNING! The dust produced by some types of wood is very harmful to
your health. Wear appropriate masks, extract the saw dust from the machine and
equip the room with an extractor for air exchange.
37) REPAIRS MUST BE CARRIED OUT BY AUTHORISED PERSONNEL
Do not attempt to repair this machine or to gain access to its internal parts. Always
contact an authorised assistance centre. Interventions by unauthorized personnel will
cause the warranty to be annulled and could create a dangerous situation. Keep proof
of purchase for warranty service.
38) REQUEST AND HAVE ORIGINAL SPARE PARTS ONLY INSTALLED
Request and use only original spare parts. Please contact your dealer. The use of
non-original spare parts will cause the warranty to be annulled and could create a
dangerous situation.
39) STORE THE MACHINE IN A SAFE PLACE
When not in use, keep the machine in a dry place out of reach of children.
40) RESIDUAL RISKS
WARNING! Strict observance of the instructions with the use of individual
means of protection minimalizes risks of accidents but does not completely rule
them out.
41) ALWAYS FOLLOW THESE INSTRUCTIONS
Only use this machine as described in these instructions. Do not use it for purposes
for which it was not intended.
ELECTRICAL SAFETY REGULATIONS
1) DO NOT TOUCH ELECTRICALLY-POWERED PARTS
WARNING! Risk of electric shocks. Some parts of the machine are electri-
cally-powered.
2) KEEP CHILDREN AND ANIMALS AWAY FROM THE ELECTRICAL DEVICES
Keep children and animals away from the devices connected to the power supply.
3) CHECK THE POWER SUPPLY VOLTAGE
The power supply voltage must correspond to that indicated on the technical data
plate. Do not use any other type of power supply.
4) USE A TRIP SWITCH
It is advisable to fit a trip switch on the power supply line that trips at the levels laid
down in standards currently in force in the Country in which the machine is used.
Contact your local electrician.
5) CONNECTION TO THE POWER SUPPLY
Before connecting or disconnecting the machine to or from the power supply, make
sure that the switch is in the OFF “O” (switched off) position.
6) DO NOT TAMPER WITH THE POWER CORD
Do not tamper with the power cord. Do not replace the power cord; only use a socket
suited for the machine plug. Only use the power cord as intended.
7) CHECK THE POWER CORD
The power cord and extension cable (where applicable) must be checked periodically
and must be checked for signs of damage and wear every time they are used. If it
is not found to be in good condition disconnect it immediately and do not use the
machine until an authorized assistance centre has repaired it.
8) KEEP THE POWER CORD IN A SAFE POSITION
Keep the power cord and extension cable (where applicable) away from the working
area, damp, wet or oily surfaces, or surfaces with sharp edges, heat sources, fuel
and transit areas for vehicles or pedestrians.
9) DO NOT STEP ON OR FLATTEN THE POWER CORD
Never step on the power cord. Be aware of its position at all times.
10) DO NOT USE THE MACHINE IN THE PRESENCE OF LIQUIDS
Do not wet it with liquids and do not expose it to damp environments. Do not leave
it outdoors.
11) USE AN EXTENSION CABLE SUITABLE FOR THE MACHINE
Only use an extension cable that is suitable for the power of the machine you are using
and dimensioned according to its length; consult your local electrician.
12) DISCONNECT THE MACHINE BY PULLING THE PLUG ONLY
To remove the plug from the socket, pull on the plug only and not the power cord!
13) AVOID TOUCHING SURFACES THAT ARE EARTHED
Avoid body contact with earthed surfaces such as refrigerators, radiators, pipes and
metallic fixtures, etc. Using a platform to electrically insulate the user from the floor
is recommended.
TRANSPORT AND LIFTING (FIG. A)
WARNING! The Manufacturer is not liable for any direct and/or indirect damage
caused by incorrect transport or lifting.
The machine must be transported and lifted with caution to avoid accidents and
damages.
Lift the machine with extreme caution, holding it with both hands under the base and
moving it slowly, without jerky or sudden movements.
Do not attempt to move the machine by pulling on the power cord or other machine
parts.
STARTING UP (FIG. A)
WARNING! The Manufacturer is not liable for any direct and/or indirect damage
caused by incorrect installation or connections.
WARNING! Before carrying out the following operations, make sure that the

14
machine’s plug is disconnected from the mains.
The machine is supplied with some disassembled components and before using it, it
must be cleaned and installed.
When choosing where to put the machine, the following should be considered:
- that the planned position is not damp and is protected from atmospheric agents.
- that the area where it will be placed is completely flat, on a non-slip floor and with
appropriate load capacity.
- that there should be a large operational area around the machine free from ob-
stacles.
- that the room should be attended and closed in order to prevent free access.
- that there is good lighting.
- that it needs to be positioned close to the general differential switch.
- that the power supply system is earthed and conforms to the standards.
- that the room temperature should be between 10° and 35° C.
- that the work environment is not in an explosive atmosphere.
Remove the upper part of the packaging and visually check that the machine and its
components are perfectly intact. Then remove the packaging and proceed to carefully
clean the machine in order to remove any protective oils used for transport.
1) Get a bench (not provided) to rest the machine on and a series of nuts and bolts
(not provided) for fixing it to the bench.
2) Position the machine and fix it firmly using the holes present on the base (pos. 2).
3) Proceed to assemble the components as illustrated in the figure. If in any doubt,
please contact your retailer.
4) At the points marked in Fig. A by the bottle symbol, lubricate bushings with a few
drops of oil (not supplied); remove any excess oil with a cloth.
5) Tilt the work surface (pos. 3) to 0° (horizontal).
6) Make sure the blade is correctly positioned and tensioned (see following chapters).
7) Assemble the cutting area guard (pos. 14) on the support (pos. 15) using the screw
and nut; do not fully tighten the nut so that the guard can open backwards.
Make sure that all the parts have been properly and securely assembled and that the
machine is stable before starting it.
ADJUSTMENTS (FIG. A)
WARNING! Before conducting checks and adjustments, turn the switch to OFF
“O” (switched off) and unplug the machine from the electric power supply. Wear
gloves to protect your hands.
The machine is supplied factory adjusted and does not require special adjustments;
if necessary, perform the following operations.
BLADE TENSION ADJUSTMENT
For best machine performance, check blade tension.
Excessive tension could break the blade and excessively wear mobile machine compo-
nents; poor tension could bend the blade and it could slip from the two blade locks.
Rotate the hand wheel to adjust tension (pos. 9):
- clockwise to increase it
- counterclockwise to decrease it.
90° PERPENDICULAR BLADE ADJUSTMENT (see also Fig. C)
To adjust blade perpendicular to the work surface, use the hand wheel (pos. 4) to
tilt the work surface (pos. 3) to form a 90° angle; use a 90° square (not supplied)
between the blade and surface.
Check that the indicator is on zero and, if necessary, use a screwdriver (not supplied)
to reposition it.
WORK SURFACE TILT ADJUSTMENT
To adjust work surface tilt (pos. 3) to the blade (pos. 5) use the hand wheel (pos. 4)
in order to tilt the surface to the required angle.
PIECE LOCK AND GUARD HEIGHT ADJUSTMENT
To adjust piece lock and guard height (pos. 14 – 17) to the surface (pos. 3) and work
piece use the hand wheel (pos. 21), adjust and firmly tighten.
The piece lock should be just over the piece so as to allow the piece to slide under it
while preventing it from lifting off the surface.
STARTING AND STOPPING
WARNING! Before starting the machine it is compulsory to put on goggles,
gloves, headphones and dust mask (not provided with the machine).
WARNING! Whilst starting and stopping, make sure that nobody approaches
the machine. Keep a safe distance to the side and not facing the machine. Keep
safety distance from all parts in motion and from the cutting area.
WARNING! The engine, the moving parts and the blade continue to run for a
short while after the machine is switched off. During this time, these parts must
not be touched. Serious injury hazard!
Before starting the machine check the integrity of all the components and that all the
bolts and couplings are tight.
STARTING UP
1) Make sure service keys are inserted.
2) Make sure the guard is correctly positioned on the cutting area.
3) Insert the power cord plug into the socket.
4) Stand in front of the machine and make sure people and animals are kept away.
5) To start press the ON ‘I’ switch (switched on) (pos. 12).
If you notice any working defects, switch off the machine and consult the chapter
“Troubleshooting”.
STOPPING
To stop the machine press the OFF “O” switch (switched off) (pos. 12).
SPEED ADJUSTMENT (if applicable)
Use the knob (pos. 19) to adjust blade oscillation speed.
When not using the machine, turn it off and disconnect the plug from the socket.
OPERATING WARNINGS AND TIPS
WARNING! Before conducting checks and adjustments, turn the switch to
OFF“O” (switched off) and unplug the machine from the electric power supply.
After having read the previous chapters carefully, apply these tips scrupulously to
obtain maximum performance from your machine. Proceed with caution. You will only
be able to make full use of the machine’s potential after gaining sufficient experience.
Acquaint yourself with all controls. Run trials without work pieces.
OPERATOR
The normal operator position is in front of the machine (switch side), with both hands
guiding and holding the piece; cutting is only possible from this position.
Warning! Keep your hands and face far from the blade and cutting area. Serious
injury hazard!
WORK PIECE
The shape, size and weight of the piece to be cut must be compatible with the machine.
Hard wood is not suited for this machine.
Trace the cutting line on the piece with a pencil; start the machine and place the piece
on the work surface being careful not to touch the blade. The wider side of the piece
must rest on the base; do not cut pieces with the wider side upright (on a slant).
Align the previously traced line with the blade edge and move it towards the blade;
turn the machine off after cutting.
Specifically sized pieces can be used on this machine (thickness H and depth P, see
Technical Data).
Warning! For your safety, it is important that the machine is secured to the bench
or stand.
Warning! For your safety, it is important that the piece is correctly locked. Do not
cut circular sections, old or fragile wood, irregular wood, cracked wood, wood with
nails or screws, branches or trunks. Always carefully inspect the piece.
Warning! Always remember that the blade can suddenly lift the piece and it may
slip from your hands.
BLADE TOOL
Make sure the blade is integral, without cracks or deformations before use. Periodically
check blade sharpness.
When necessary, replace it following the instructions in the next chapters.
Warning! Blade efficiency and perfect integrity provide better results and minimise
accident risks.
CHIP AND DUST BLOWING
The machine is equipped with a device that blows a small amount of air on the cutting
area. This removes produced dust to promote precise cuts.
Make sure the rubber tube is connected to the supply fixture on one side (pos. 8) and
to the distributor on the other (pos. 11) near the cutting area.
Distributor tilt can be adjusted using a lateral screw. Be sure not to excessively tighten
the screw so as not to crush the tube.
SAWDUST SUCTION SYSTEM (if applicable)
The machine can be equipped with a manifold (pos. 16) for the sawdust suction.
Please remember that the part of material removed while cutting will also be thrown
around the machine and on the piece.
For best results, connect the manifold to a wood sawdust suction system using the plastic
tube (both not supplied with the machine); your dealer can suggest the best choice.
Warning! Do not start the machine if the vacuum hose is not installed. Do not insert your
fingers or tools in the manifold in the attempt to remove material. Serious injury hazard!
OSCILLATION SPEED ADJUSTMENT (if applicable)
The machine can be equipped with an electronic regulator (pos. 19) that varies blade
oscillation speed.
OPERATIONS, CUTTING AND MOVEMENTS
The work piece moves on the work surface while the tool moves vertically with
alternating motion to remove material; the blade only removes material during the
descent phase.
The engine provides power to move the tool using a piston rod/crank group and pair
of arms connected with a spring.
Observe the following warnings that apply to all types of cuts:
- make sure that levers, knobs and screws are tightened to firmly secure mobile
parts.
- keep the work piece firmly
- the piece must rest against the work surface
- do not cut several pieces simultaneously
- keep safety distance from the cutting area
- gradually and cautiously near the piece to the blade
- cut in a single stroke
- do not over load the cutting group so as not to strain the blade and the engine
- excessive strains cause the blade and/or piece to suddenly break
- do not strain the blade laterally
- the idle blade should not touch the piece
- do not start the machine if the blade is in contact with the piece
- do not start the machine if the guard is not positioned over the blade
- to clean the cutting area, use a brush with a long handle

15
The machine can make various types of cuts:
- cut across the piece
- curved shaped cut (only wide angles and on thin pieces)
- tilted cut (from 0° to 45°)
Cutting:
- press the switch (pos. 12) to start the machine
- hold the piece with both hands, push it forwards and downwards against the work
surface (the blade tends to drag the piece upwards)
WARNING! Keep hands away from the cutting area.
- finish cutting
- turn off the machine.
For hole-shaped cut:
- drill a Ø10mm hole in the area to be cut. Remove the blade and insert it in the hole
and reassemble with the piece (see following chapters).
- before starting, make sure assembly is correct and that the blade does not touch
the piece.
- cut following the line traced on the piece. Turn off the machine and remove the blade
and piece; at this point, eliminate cut parts.
BLADE
WARNING! The cutting part can cause serious injuries – use protection gloves!
- Use good quality blades with the same characteristics as the machine based on its
technical data – your retailer will be able to help you make the correct choice. Also
observe any instructions provided with the equipment.
- Do not use blades if you do not know where they are from or without technical
specifications.
- The dimensions must correspond to those shown on the machine.
- Use blades which conform to the regulations in force in the country of use.
- Always carry out a simple visual check: there must be no deformations, breakages
or damages.
Our company provides a complete series of blades suitable for your machine, which
you can buy from your retailer.
BLADE REPLACEMENT (FIG. D)
WARNING! Before replacing parts, turn the switch to OFF “O” (switched off)
and unplug the machine from the electric power supply.
WARNING! After cutting the blade reaches high temperatures: Wait for it to
cool down before replacing it.
WARNING! Even if the blade has stopped, it is still very sharp: Use gloves to
prevent serious injuries.
WARNING! The assembly of the blade must be carried out with absolute
precision. Incorrect assembly causes very serious danger.
When replacing the blade, proceed as follows. The operation must be carried out by
an expert; if in doubt please contact an authorised service centre.
1) Unplug the machine from the electric power supply.
2) For correct reassembly, observe carefully the various components before pro-
ceeding.
3) Lift the cutting area guard (pos. 14).
4) Rotate the hand wheel counterclockwise (pos. 9) a few turns to loosen the blade
tension.
5) Hold the blade with one hand and push the upper blade lock down with the other
(pos. 6) while simultaneously extracting the blade from its housing.
6) Extract the blade from the lower blade lock (which can be seen through the slot
on the work surface).
7) Clean components and the new blade.
8) Install the new blade observing the cutting direction: Teeth must face down (fig.
D).
9) Insert the blade in the lower blade lock first and then in the upper one.
10) Use the hand wheel (pos. 9) to tension the blade (see chapter ADJUSTMENTS).
11) Lower the cutting area guard.
12) Carefully check that the guard covers the cutting area.
13) Make sure the blade is assembled correctly.
14) Carry out a test with the machine running idle.
MAINTENANCE
WARNING! Before conducting checks or maintenance, turn the switch to OFF
“O” (switched off) and unplug the machine from the electric power supply.
WARNING! Do not tamper with or attempt to repair engine or electrical parts.
Do not access internal parts.
Machine working life and costs also depend on constant and meticulous maintenance.
Always observe the following instructions.
CLEANING AFTER USE
- Routinely clean and care for your machine to ensure that it remains perfectly efficient
and has a long working life.
- Remove sawdust using a soft brush and vacuum; take scrap material to a recycling
centre.
- Remove any traces of resin that stick to the machine.
- Do not spray or soak the machine with water.
- Do not use any inflammable substances, detergents or solvents as these may
damage the machine beyond repair. The plastic parts can easily be damaged by
chemical agents.
- Do not use compressed air for cleaning: Risk of flying chips and splinters!
- Pay the utmost attention when cleaning the switch, engine fan slots, blade, adjustment
knobs, work surface, work surface insert and dust blowing tube.
For your safety, periodically check the conditions of the following components.
Replace them if damaged or worn:
- switch (pos. 12)
- blade (pos. 5)
- blade guard (pos. 14)
- exhaust manifold (pos. 16)
- work surface plastic insert (pos. 13)
- power supply plug and cable (pos. 23)
LUBRICATION
At the points indicated in Fig. A with the bottle symbol, lubricate the bushings on the
fixed upper arm (pos. 7) on both sides with a few drops of oil.
- at first use
- after 5 hours of use
- then every 10 hours of use.
Remove any excess oil with a cloth.
PAIR OF BRUSHES (if applicable)
The engine of this machine is equipped with a pair of graphite brushes. They must be
checked and replaced by an authorised service centre.
FUSE (if applicable)
This machine’s electric circuit may include a fuse protection.
To check fuse conditions or to replace it, manually unscrew the “FUSE” cap (pos. 20)
next to the speed regulator.
Replace the fuse with one of equal characteristics and dimensions; insert the fuse in
the cap housing and screw it into the threaded hole.
TROUBLESHOOTING AND PERMITTED OPERATIONS
THE MACHINE DOES NOT START OR IT STOPS AND DOES NOT RESTART:
No power:
- Make sure the power cord and extension (if applicable) are not damaged.
- Check the power supply system’s main switch.
Worn graphite brushes (if applicable):
- Contact an authorised assistance centre.
Electrical fault:
- Contact an authorised assistance centre.
THE MACHINE VIBRATES EXCESSIVELY:
Dull, damaged or deformed blade:
- Replace the blade.
Incorrectly assembled blade:
- Remove the blade and reassemble it correctly following the instructions
Machine insufficiently secured to the bench:
- Improve machine fastening.
THE MACHINE HAS TROUBLE CUTTING:
Dull or damaged blade:
- Replace the blade.
THE DUST BLOWING DEVICE DOES NOT WORK:
Tube bent:
- Straighten the tube.
Tube or distributor clogged:
- Clean
Pump broken:
- Contact an authorised assistance centre.
WARNING! If the machine still fails to function correctly after you have carried
out the above operations, or in the event of anomalies other than those described
above, turn the machine off and take it to an authorised service centre or have
an authorised technician repair it with original spare parts. Always provide the
machine model and serial number shown on the technical data label.
STORAGE
- disconnect the machine from the power supply.
- Clean the machine and all its accessories thoroughly (see “Maintenance” section).
- Protect non painted parts and bushings with protective oil.
- Keep the machine out of reach of children, in a stable safe position, in a dry place not
subject to extreme temperatures and free of dust. Keep children and unauthorised
personnel out of the storage room.
- Protect the machine from direct sunlight, keeping it in the dark where possible, or
in the shade.
- Do not close the machine in nylon bags as damp could form and damage the
machine.
- Use original packaging to protect the machine.
DEMOLITION
Electric and electronic waste may contain potentially hazardous substances for the
environment and human health. It should therefore not be disposed of with domestic
waste, but by means of differentiated collection at specific centres or returned to the
vendor in the event of purchasing a new identical tool. The illegal disposal of such
equipment may result in prosecution to the full extent of the law.

16
Amendments: The texts, figures and data correspond to the standard in place on the
date of printing of this manual. The manufacturer reserves the right to update the
documentation if changes are made to the appliance, without being bound by any
obligations.
No part of this publication or the documentation enclosed with the machine may be
reproduced without written permission by the manufacturer.
WARRANTY
The product is legally protected against all non-conformities with respect to its stated
characteristics, as long as it is used solely for the purposes described in this user
manual, that it has not been tampered with, that it has not been repaired by unauthorised
personnel and, where necessary, only original spare parts have been used. However,
consumer materials or parts subject to wear such as batteries, light bulbs, cutting
and finishing elements etc. are excluded from the warranty. Take the product to the
retailer or an authorised service centre, showing proof of purchase.
DECLARATION OF CONFORMITY
Valex - Via Lago Maggiore 24, 36015 Schio (VI) Italy
declares, under its own responsibility, that the product:
OSCILLATING BLADE SAW
SV4000 (cod. 1410218)
SV4000E (cod. 1410219)
meets the safety and health requisites stated in directives
2006/95/EC, 2006/42/EC, 2004/108/EC
Schio, 01.2010
Attorney - Bruno Anzolin
f
Compliments pour votre excellent choix. Votre nouvel appareil, fabriqué en adoptant
de hauts standards de qualité, vous garantira efficacité et sécurité dans le temps.
Ce manuel contient les informations et indications considérés nécessaires pour la
connaissance de la machine et pour une utilisation et un entretien courant corrects. Ces
informations ne concernent pas les techniques d’usinage du bois sur les machines-
outils ni les typologies et le degré d’utilisation des différents types de bois ; l’utilisateur
trouvera de plus amples informations sur les livres et les publications spécifiques ou
en participant à des cours de spécialisation.
Les avertissements d’utilisation et les normes d’entretien se réfèrent à des exigences
normales de service. Le respect de ces avertissements, des normes et des prescrip-
tions indiquées est indispensable pour assurer le fonctionnement correct, la durée de
vie et la rentabilité d’exploitation de la machine.
Ces instructions font partie intégrante de la machine et doivent l’accompagner en
cas de réparation ou de cession. Conservez soigneusement et à portée de main la
documentation ci-jointe afin de pouvoir la consulter en cas de besoin.
Pour les éventuelles réparations ou les révisions comportant des opérations d’une
certaine complexité, il est nécessaire de s’adresser aux Centres d’assistance agrées
qui disposent d’un personnel spécialisé.
Le constructeur décline toute responsabilité pour des éventuels dommages dus à la
négligence, à l’inobservation des indications reportées dans ce manuel et pour les dom-
mages directs et/ou indirects provoqués suite à un usage impropre de la machine.
L’inobservance des indications, une utilisation négligente et inadéquate de la machine
et l’exécution de modifications non autorisées peuvent déterminer la perte de la
garantie. La prévention de tout inconvénient est donc liée au respect scrupuleux des
prescriptions fournies.
Au moment de l’achat, vérifiez que la machine est intacte et que toutes ses parties
sont présentes.
ATTENTION ! Avant d’utiliser cette machine, lisez attentivement les instructions
indiquées ci-après, qui se réfèrent aux figures et aux données techniques et appli-
quez-les. Cela vous permettra d’exécuter correctement son déplacement, sa mise
en service, sa mise en marche, son utilisation, son arrêt et son entretien. Avant de
commencer le travail, familiarisez-vous avec les commandes et avec l’utilisation
correcte de la machine et assurez-vous que, en cas d’urgence, vous êtes en me-
sure de l’arrêter. L’utilisation inappropriée de l’appareil peut provoquer de graves
blessures. Travaillez toujours en pensant à votre sécurité et à celle d’autrui.
ATTENTION ! L’appareil est destiné exclusivement pour une activité de
bricolage et il est approprié pour exécuter des coupes sur des pièces de bois de
forme parallélépipède, comme des coupes transversales et inclinées. Il n’est pas
approprié pour les usinages sur des métaux, des matières plastiques, des étoffes,
des matières inflammables ou des matières qui produisent des poussières et des
brumes dangereuses ou nocives pour la santé. Toute utilisation autre que celle
indiquée dans ces instructions peut provoquer des dommages à la machine et
entraîner des risques graves pour les personnes et les choses.
DESCRIPTION DE LA MACHINE (FIG. A)
1 Base
2 Trous pour fixation à l’établi
3 Plan de travail inclinable
4 Vis pour l’inclinaison du plan de travail
5 Lame
6 Blocage supérieur de la lame
7 Bras supérieur fixe
8 Raccord pour soufflette dépoussiérage
9 Bouton de réglage tension lame
10 Carter logement inférieur
11 Soufflette de dépoussiérage
12 Interrupteur marche/arrêt
13 Moteur
14 Protection zone de coupe
15 Raccord protection zone de coupe et bloque-pièce
16 Raccord d’aspiration poussières (si présent)
17 Bloque-pièce
18 Bras supérieur oscillant
19 Bouton vitesse oscillations lame (si présent)
20 Fusible (si présent)
21 Bouton réglage hauteur protection
22 Balais moteur (si présents)
23 Fiche et cordon d’alimentation
DESCRIPTION MARQUAGES ET SYMBOLES (FIG. B)
1 Modèle machine et données techniques.
2 Code machine, numéro de matricule ou numéro de lot et année de fabrication,
marques de certification (si présentes).
3 ATTENTION !
4 Lisez avec attention les instructions avant l’utilisation.
5 Attention ! Danger de coupe et d’écrasement des mains. Portez des gants de
protection.
6 Attention ! Danger de projection de matériel et de poussières dangereuses. Il est obli-
gatoire de porter des lunettes et un masque pour protéger les voies respiratoires.
Danger de bruit élevé. Il est obligatoire de porter des protecteurs d’oreilles.
7 Attention ! Danger d’écrasement et de coincement. Avant chaque contrôle, réglage
ou entretien, coupez l’alimentation électrique en débranchant la fiche de la machine.
Si le cordon d’alimentation est endommagé, débranchez la fiche de la prise du réseau
d’alimentation avant de procéder à un contrôle.
8 Attention ! Danger de coupe et de coincement. Tenez les mains à l’écart de la zone
de coupe.
9 Attention ! Danger d’écrasement. Tenez les mains à l’écart des organes en mou-
vement.

17
10 Les déchets électriques et électroniques peuvent contenir des substances dange-
reuses pour l’environnement et la santé de l’homme ; ils doivent donc être éliminés
séparément des déchets ménagers en les apportant dans les centres de collecte
sélective prévus à cet effet ou remis au revendeur lors de l’achat d’un appareil neuf
similaire. L’élimination abusive des déchets est punie par l’application de sanctions
administratives.
DONNÉES TECHNIQUES
SV4000 code 1410218
Tension d’alim. et fréquence nominale ________________________230V~50Hz
Puissance nominale moteur ___________________________________ 165 W
Vitesse de rotation à vide________________________________ no 1480 min-1
Pression acoustique LpA ____________________________________ 79 dB(A)
Dimensions totales machine (b x l x h) __________________ 320x630x360 mm
Lame :
Longueur (entre les soutiens) _________________________________127 mm
Épaisseur lame ____________________________________________ 0,5 mm
Épaisseur des dents ________________________________________ 0,6 mm
Code pièce de rechange ____________________________________ 1452622
Performances :
Inclinaison table de travail ______ 0° - 45° sens inverse des aiguilles d’une montre
Capacité de coupe 0° ________________________________________ 55 mm
Profondeur de coupe maximum _______________________________ 406 mm
SV4000E code 1410219
Tension d’alim. et fréquence nominale ________________________230V~50Hz
Puissance nominale moteur ___________________________________ 112 W
Vitesse de rotation à vide____________________________ no 520~1400 min-1
Pression acoustique LpA ____________________________________ 79 dB(A)
Dimensions totales machine (b x l x h) __________________ 305x630x360 mm
Fusible (si présent) _____________________________________________ 5A
Lame :
Longueur (entre les soutiens) _________________________________127 mm
Épaisseur lame ____________________________________________ 0,5 mm
Épaisseur des dents ________________________________________ 0,6 mm
Code pièce de rechange ____________________________________ 1452622
Performances :
Inclinaison table de travail ______ 0° - 45° sens inverse des aiguilles d’une montre
Capacité de coupe 0° ________________________________________ 55 mm
Profondeur de coupe maximum _______________________________ 406 mm
NORMES GÉNÉRALES DE SÉCURITÉ
1) LES SACHETS EN NYLON NE SONT PAS DES JOUETS
ATTENTION ! Risque d’étouffement. Les sachets en nylon présents dans l’em-
ballage peuvent provoquer l’étouffement s’ils sont mis sur la tête ; c’est pourquoi
ils doivent être gardés hors de la portée des enfants ; s’il n’est plus possible de
les utiliser, ils doivent être coupés et éliminés.
2) PERSONNES AUTORISÉES À UTILISER LA MACHINE
Il est interdit aux enfants, aux personnes non concernées et à celles ne connaissant
pas parfaitement les instructions d’utilisation contenues dans ce manuel d’utiliser la
machine. Il se peut que des lois et des règlements locaux prévoient un âge minimum
pour l’utilisation de l’appareil. L’opérateur doit être formé de manière appropriée pour
utiliser, régler et mettre la machine en fonction en toute sécurité.
3) RESPONSABILITÉ DE L’OPÉRATEUR
L’opérateur est responsable vis-à-vis des tiers pour les éventuels dommages aux
personnes et aux choses, suite à l’utilisation de la machine.
4) MAINTENEZ UNE POSITION DE TRAVAIL STABLE ET SURE
Quand vous travaillez, maintenez une position de travail stable et sûre et maintenez
l’assiette.
5) SURVEILLEZ LA ZONE DE TRAVAIL
Faites attention à vos mains, à la pièce à usiner, à l’outil de coupe, aux copeaux produits
par l’usinage et, de manière générale à tous les organes en mouvement.
6) AGISSEZ AVEC ATTENTION
Ne soyez pas distrait et contrôlez toujours ce que vous êtes en train de faire : agissez
avec bon sens. N’utilisez jamais la machine quand vous êtes fatigué, malade, sous
l’effet de l’alcool, de drogues ou de médicaments réduisant l’attention.
7) GARDEZ UNE DISTANCE DE SÉCURITÉ
Ne laissez pas s’approcher les personnes et les animaux de votre zone de travail et de
la machine. Ne touchez pas les composants sous tension électrique.
8) PROTÉGEZ VOTRE CORPS
L’utilisation de la machine engendre du bruit, de la chaleur, des fumées, des vibrations,
la projection de copeaux et d’éclats. Travaillez toujours en portant des équipements de
protection individuelle conformes aux normes afin d’éviter des lésions au corps, aux
mains, aux yeux, à l’ouïe et aux voies respiratoires. Mettez des vêtements résistants
avec des manches et des poignets serrés, des lunettes de sécurité, des gants de travail,
des protecteurs d’oreilles, un masque anti-poussière et des chaussures de sécurité.
Ne portez pas des vêtements amples, des écharpes, des rubans de tissus ni de bijoux
car ils pourraient se prendre dans les organes en mouvement de la machine. Mettez
des coiffures de protection pour recueillir les cheveux longs. Les lunettes de vue ne
remplacent pas les lunettes de sécurité spécifiques.
9) EFFICACITÉ DE LA MACHINE
Contrôlez toujours que la machine est intacte et qu’elle fonctionne correctement,
autrement on risque de graves accidents. N’utilisez pas la machine si l’interrupteur
ne permet pas de mettre en marche et/ou arrêter la machine.
10) ÉTAT DE LA MACHINE
N’enlevez aucun composant de la machine, sauf quand cela est expressément indiqué
dans ces instructions, et ne modifiez en aucune façon la configuration d’origine.
11) NE DÉMONTEZ PAS LA MACHINE
Ne démontez en aucun cas la machine. N’utilisez pas la machine dépourvue de ses
protections.
12) NE MODIFIEZ PAS LES PIECES DE LA MACHINE
Ne modifiez et n’enlevez aucune pièce de la machine.
13) CONTRÔLEZ LA SOLIDITE DE LA MACHINE
Vérifiez périodiquement le bon serrage des vis et la bonne fixation de la lame.
14) UTILISEZ LA MACHINE DANS UN ENDROIT CORRECTEMENT AÉRÉ ET VENTILÉ
La machine doit être utilisée dans un endroit bien aéré et ventilé afin d’assurer un
refroidissement suffisant et un bon rechange d’air dans le local.
15) N’UTILISEZ PAS LA MACHINE DANS DES ENDROITS DANGEREUX
N’utilisez pas la machine dans un lieu présentant des risques d’explosion et/ou incen-
die, dans des locaux fermés ou peu ventilés, en présence de liquides, humidité, gaz,
vapeurs, acides et éléments inflammables et/ou explosifs.
16) TRANSPORT DE LA MACHINE
Les opérations de transport de la machine doivent être effectuées avec le maximum
d’attention. Déplacez-la en empoignant la base des deux mains. Ne déplacez pas la
machine en la tirant par le cordon d’alimentation ou d’autres parties.
17) POSITIONNEMENT DE LA MACHINE
Positionnez et fixez la machine par des boulons sur un établi ou un piédestal à surface
plane, solide et ininflammable pouvant supporter le poids total et les sollicitations
dérivant de l’utilisation. Il est strictement défendu d’utiliser la machine sans l’avoir
préalablement fixée solidement et sur des surfaces inflammables comme le bois, le
plastique, etc. Vérifiez périodiquement la fixation.
18) TRAVAILLEZ AVEC UN ÉCLAIRAGE ADÉQUAT
Travaillez uniquement pendant le jour avec une excellente luminosité ou avec un
éclairage artificiel adéquat.
19) N’EXPOSEZ PAS LA MACHINE AUX AGENTS ATMOSPHÉRIQUES
Ne laissez pas la machine exposée aux agents atmosphériques comme pluie, brouillard,
soleil, hautes ou basses températures.
20) NE TOUCHEZ PAS LA MACHINE SI VOUS ÊTES MOUILLÉ
N’utilisez pas la machine pieds nus ou avec les pieds mouillés. Ne touchez pas la
machine avec les mains mouillées.
21) CONTRÔLES AVANT DE METTRE EN MARCHE LA MACHINE
Avant de brancher la fiche au réseau électrique, vérifiez que l’interrupteur se trouve sur
OFF “O” (éteint) et que les clés de service ont été enlevées. N’utilisez pas la machine
si l’insert du plan est usé et la protection est cassée.
22) VERIFICATIONS POUR UN BON MONTAGE
N’utilisez pas la machine si le tuyau de l’aspirateur de copeaux/poussière (non fourni)
est débranché et l’aspirateur (non fourni) est éteint.
23) CONTRÔLES FONCTIONNELS
Contrôlez que la protection de la lame n’est pas endommagée. La protection de la lame
doit se poser sur la pièce et couvrir complètement la zone de coupe.
24) BIEN POSITIONNER LA PIECE À USINER
Il est très important pour votre sécurité que la pièce soit bien posée sur l’établi. La
pièce doit avoir au moins un côté plat comme planches, liteaux, etc. ; ne coupez pas
des branches, des troncs d’arbre ou des pièces à section circulaire. Ne coupez pas
des pièces contenant des clous ou des vis ou bien enveloppées de ruban, cordes ou
autres. Ne coupez pas des pièces posées sur le bord mais uniquement avec le côté
long posé sur l’établi.
25) MATERIAUX NON ADMIS
Il n’est pas approprié pour les usinages sur des métaux, des matières plastiques, des
matières inflammables et explosives, des matières qui produisent des poussières et
des brumes dangereuses ou nocives pour la santé.
26) PRÉVENEZ LES ACCIDENTS PRÉVISIBLES
Effectuez toujours un essai de fonctionnement à vide avant de commencer le travail ;
durant cette période, faites en sorte que personne ne s’approche à la machine et gardez
une distance de sécurité. Utilisez toujours des équipements de protection individuelle.
Quand la machine est en fonction, ne touchez absolument pas la lame, cela est très
dangereux ! Après avoir remplacé des pièces, effectuez toujours un contrôle général
avant de vous mettre au travail ! Il est interdit d’accéder aux composants internes de
la machine.
27) UTILISEZ SEULEMENT DES LAMES SPÉCIFIQUES POUR CETTE MACHINE
Cette machine a été conçue pour utiliser des lames spécifiques pour la coupe du bois ;
il est interdit d’utiliser des lames appropriées pour d’autres matériaux. Utilisez des
lames conformes aux normes en vigueur dans le pays d’utilisation.
28) MANIPULEZ LA LAME AVEC ATTENTION
La lame possède des parties très coupantes : manipulez-la avec très attention et portez
toujours des gants de protection car il existe un risque de lésions graves !
29) UTILISEZ SEULEMENT DES LAMES EN PARFAITES CONDITIONS
N’utilisez pas de lames endommagées et déformées ; remplacez les lames usées.
30) NE SOLLICITEZ PAS LA LAME
Ne soumettez pas la lame à des sollicitations telles que : chocs, flexions, pressions
excessives, contraintes thermiques, variations de vitesse irrégulières, vibrations. Dans
ces conditions, l’outil aura une durée limitée et pourra se casser subitement d’où
danger de projections de fragments.
31) NE TOUCHEZ PAS LES ORGANES EN MOUVEMENT QUAND LA MACHINE EST
EN FONCTION
ATTENTION ! Danger de blessures graves ! Pendant le fonctionnement, ne touchez
pas la lame ainsi que tous les organes en mouvement. Prêtez attention aux mouve-
ments de vos bras et de vos mains. Enlevez la pièce seulement après avoir éteint
la machine et avoir débranché le cordon d’alimentation de la prise électrique.

18
32) MACHINE NE FONCTIONNANT PAS
Positionnez l’interrupteur sur OFF « O » (arrêt), coupez l’alimentation électrique en
débranchant la fiche de la machine quand : vous ne l’utilisez pas, vous la laissez
sans surveillance, vous la transportez, le cordon d’alimentation est endommagé, vous
posez ou vous enlevez la pièce en usinage, vous effectuez les réglages, l’entretien
et le nettoyage.
33) ATTENDEZ QUE LA MACHINE SOIT COMPLÈTEMENT ARRÊTÉE
Le moteur et les pièces mécaniques mobiles ainsi que la lame tournent encore pendant
quelques instants après que l’on a arrêté la machine. Lors de la phase d’arrêt, ces
parties ne doivent pas être touchées car il existe un réel danger de lésions graves !
34) N’ABANDONNEZ PAS LA MACHINE QUAND ELLE EST EN FONCTION
N’abandonnez pas la machine quand elle est en fonction et quand elle s’arrête, restez
jusqu’à l’arrêt total des parties en mouvement.
35) MAINTENEZ LE POSTE DE TRAVAIL PROPRE ET EN ORDRE
Le désordre et un nettoyage insuffisant peuvent entraîner des risques. Assurez-vous
qu’autour de la machine, il n’y ait pas d’outils ou d’objets qui pourraient être endom-
magés. Ne mettez pas des outils et des objets sur la machine qui pourraient tomber
accidentellement. Eliminez souvent les résidus de la coupe de la machine et du sol.
36) POUSSIÈRES DANGEREUSES POUR LA SANTÉ
ATTENTION ! Les poussières de certains types de bois sont très dangereuses
pour la santé. Portez des protections des voies respiratoires, aspirez les copeaux
de la machine et dotez le local d’un extracteur pour le rechange de l’air.
37) LES RÉPARATIONS DOIVENT ÊTRE EFFECTUÉES PAR DU PERSONNEL AUTORISÉ
N’essayez pas de réparer la machine ou d’accéder à des composants internes,
adressez-vous toujours à des centres d’assistance agréés. L’exécution d’interventions
de la part de personnel non autorisé entraîne immédiatement la perte de la garantie
et peut comporter des risques. Conservez la preuve d’achat pour les éventuelles
interventions en garantie.
38) DEMANDEZ ET FAITES INSTALLER UNIQUEMENT DES PIÈCES DE RECHANGE
D’ORIGINE
Demandez et faites installer uniquement des pièces de rechange d’origine, adressez-
vous à votre revendeur. L’utilisation de pièces de rechange non d’origine entraîne la
perte de la garantie et peut comporter des risques.
39) RANGEZ LA MACHINE DANS UN ENDROIT SÛR
Quand vous n’utilisez pas la machine, rangez-la dans un endroit sec et hors de la
portée des enfants.
40) RISQUES RÉSIDUELS
ATTENTION ! Le respect scrupuleux de ces instructions et l’utilisation des
équipements de protection individuelle réduisent au minimum les risques d’acci-
dent, mais ne peuvent pas les éliminer complètement.
41) RESPECTEZ TOUJOURS CES INSTRUCTIONS
Utilisez la machine uniquement de la façon décrite dans ces instructions. Ne l’utilisez
pas pour des utilisations auxquelles elle n’est pas destinée.
NORMES DE SÉCURITÉ ÉLECTRIQUE
1) NE TOUCHEZ PAS LES COMPOSANTS SOUS TENSION ÉLECTRIQUE
ATTENTION ! Risque d’électrocution. Certains composants de la machine sont
sous tension électrique.
2) MAINTENEZ LES ENFANTS ET LES ANIMAUX À L’ÉCART DES APPAREILS
ÉLECTRIQUES
Les enfants et les animaux doivent être tenus à l’écart des appareils branchés au
réseau électrique.
3) VÉRIFIEZ LA TENSION D’ALIMENTATION
La tension d’alimentation doit correspondre à la tension déclarée sur la plaquette des
données techniques. N’utilisez aucun autre type d’alimentation.
4) UTILISEZ UNE ALIMENTATION PROTÉGÉE PAR UN DISJONCTEUR
Il est conseillé de prévoir un disjoncteur différentiel sur la ligne d’alimentation électri-
que ayant un champ d’intervention conforme aux normes en vigueur dans le Pays
d’utilisation ; consultez votre électricien habituel.
5) BRANCHEMENT AU RÉSEAU ÉLECTRIQUE
Avant de brancher ou débrancher la machine du réseau d’alimentation, assurez-vous
que l’interrupteur se trouve dans la position OFF « O » (arrêt).
6) NE MODIFIEZ PAS LE CORDON D’ALIMENTATION
Ne modifiez pas le cordon d’alimentation. Ne remplacez pas la fiche du cordon d’ali-
mentation, utilisez seulement une prise adaptée à la fiche de la machine. Utilisez le
cordon d’alimentation exclusivement pour les utilisations auxquelles il est destiné.
7) CONTRÔLEZ LE CORDON D’ALIMENTATION
Vous devez contrôler le cordon d’alimentation et le câble de rallonge (si présent)
périodiquement et avant toute utilisation de façon à détecter les éventuels signes
d’endommagement ou d’usure. S’ils ne sont pas en bon état, débranchez immédia-
tement le cordon et n’utilisez pas la machine, faites-la d’abord réparer dans un centre
d’assistance agréé.
8) MAINTENEZ LE CORDON D’ALIMENTATION DANS UNE POSITION SÛRE
Tenez le cordon d’alimentation et le câble de rallonge (si présent) éloignés de la zone
de travail et de l’outil de coupe, des surfaces humides, mouillées, huilées, des bords
tranchants, des sources de chaleur, des combustibles et des zones de passage de
véhicules et piétons.
9) NE MARCHEZ PAS SUR LE CORDON D’ALIMENTATION ET NE L’ÉCRASEZ PAS
Ne marchez jamais sur le cordon d’alimentation. Sachez toujours où il se trouve.
10) N’UTILISEZ PAS LA MACHINE EN CAS DE PRÉSENCE DE LIQUIDES
Ne la mouillez pas avec des liquides et ne l’exposez pas à des environnements humides.
Ne la laissez pas à l’extérieur.
11) UTILISEZ UN CABLE DE RALLONGE ADAPTÉ A LA MACHINE
Utilisez uniquement un câble de rallonge homologué, adapté à la puissance et aux
dimensions de la machine que vous utilisez ; consultez votre électricien.
12) DÉBRANCHEZ LA MACHINE EN NE SAISISSANT QUE LA FICHE
Quand vous extrayez la fiche de la prise, saisissez uniquement la fiche : ne tirez pas
sur le cordon !
13) ÉVITEZ QUE LE CORPS ENTRE EN CONTACT AVEC DES SURFACES CONNECTÉES
À LA MASSE OU À LA TERRE
Évitez de mettre en contact votre corps avec des surfaces connectées à la mise à
la masse ou à la terre tels que réfrigérateurs, radiateurs, tuyaux et constructions
métalliques, etc… Il est conseillé d’utiliser un plancher pour isoler électriquement
l’utilisateur du sol.
TRANSPORT ET SOULEVEMENT (FIG. A)
ATTENTION ! Le Fabricant décline toute responsabilité pour les éventuels dommages
directs et/ou indirects provoqués par des transports ou des soulèvements erronés.
Les opérations de transport et de soulèvement de la machine doivent être effectuées
avec attention pour éviter tout accident ou endommagement.
Soulevez la machine avec grand soin en la prenant la base des deux mains et tran-
sférez-la lentement sans chocs ou mouvements brusques.
Ne la déplacez pas en la tirant par le cordon d’alimentation ou d’autres parties.
MISE EN SERVICE (FIG. A)
ATTENTION ! Le Fabricant décline toute responsabilité pour les éventuels
dommages directs et/ou indirects provoqués par une installation et un branchement
non corrects.
ATTENTION ! Avant d’effectuer les opérations indiquées ci-après, assurez-vous
que la fiche de la machine est débranchée du réseau électrique.
La machine est fournie munie de quelques composants démontés et, avant de l’utiliser,
elle doit être nettoyée et installée.
Pour le positionnement de la machine, vous devez veiller à ce que :
-la position choisie ne soit pas humide et soit à l’abri des agents atmosphériques.
-la zone d’appui soit parfaitement à niveau, sur un sol anti-dérapant et avec une limite
de charge adéquate au poids de la machine.
-une ample zone de travail libre de tout obstacle soit prévue autour de la machine.
-le local d’installation soit surveillé et fermé afin d’empêcher un accès libre.
-l’éclairage soit correct.
-la machine soit placée à proximité de l’interrupteur général avec disjoncteur.
-l’installation d’alimentation au réseau soit pourvue de mise à la terre conforme aux
normes en vigueur.
-la température ambiante soit comprise entre 10° et 35 °C.
-le lieu de travail ne soit pas dans une atmosphère explosive.
Enlevez la partie supérieure de l’emballage et contrôlez visuellement que la machine
et les composants sont parfaitement intacts ; à ce point, éliminez l’emballage et
effectuez un nettoyage soigné afin d’enlever les éventuelles huiles de protection
utilisées pour le transport.
1) Procurez-vous un établi (non fourni) sur lequel poser la machine et la boulonnerie
(non fournie) nécessaire pour la fixation.
2) Positionnez la machine et fixez-la solidement en utilisant les trous sur la base
(pos.2).
3) Procédez au montage des composants de la façon indiquée sur la figure ; en cas
de doutes, contactez votre revendeur.
4) Aux endroits indiqués sur la fig. A avec le symbole d’une ampoule, lubrifiez les
coussinets avec quelques gouttes d’huile (non fournie) ; enlevez l’excèdent d’huile
à l’aide d’un chiffon.
5) Inclinez l’établi (pos.3) à 0° (à l’horizontale).
6) Vérifiez que la lame est correctement positionnée et tendue (voir chapitres sui-
vants).
7) Montez la protection de la zone de coupe (pos.14) sur le support (pos.15) au moyen
des vis et de l’écrou ; ne serrez pas l’écrou à fond de manière à ce que la protection
puisse s’ouvrir vers l’arrière.
Assurez-vous que toutes les pièces ont été montées correctement, contrôlez la solidité
de l’assemblage et la stabilité de la machine.
RÉGLAGES (FIG. A)
ATTENTION ! Avant tout contrôle ou réglage, positionnez l’interrupteur sur
OFF « O » (arrêt) et coupez l’alimentation électrique en débranchant la fiche de la
machine. Utilisez des gants pour protéger vos mains.
La machine est fournie déjà réglée et il n’est pas nécessaire d’effectuer d’autres
réglages ; si nécessaire, procédez de la manière suivante.
RÉGLAGE DE LA TENSION DE LA LAME
Afin d’obtenir un meilleur rendement de la machine, vérifiez la tension de la lame.
Une tension excessive peut porter à la rupture de la lame et à une usure excessive
des composants mobiles de la machine ; une mauvaise tension peut porter au pliage
de la lame et à sa sortie des deux blocages de la lame.
Pour effectuer le réglage de la tension, tournez la vis (pos.9) :
- dans le sens des aiguilles d’une montre, pour l’augmenter
- dans le sens contraire pour la diminuer.
RÉGLAGE DE LA PERPENDICURALITÉ DE LA LAME 90° (voir aussi fig. C)
Pour effectuer le réglage de la lame par rapport au plan de travail, intervenez sur la
vis (pos.4) de façon à incliner le plan (pos.3) jusqu’à arriver à un angle à 90° ; utilisez
une équerre à 90° (non fournie) placée entre la lame et l’établi.
Vérifiez que l’indicateur soit positionné sur le zéro et, éventuellement, le repositionner
à l’aide d’un tournevis (non fourni).
RÉGLAGE DE L’INCLINAISON DE L’ÉTABLI
Pour effectuer le réglage de l’inclinaison de l’établi (pos.3) par rapport à la lame
(pos.5), intervenez sur la vis (pos.4) de manière à incliner l’établi jusqu’à former
l’angle souhaité.

19
RÉGLAGE DE LA HAUTEUR DU BLOQUE-PIÈCE ET DE LA PROTECTION
Pour effectuer le réglage de la hauteur du bloque-pièce et de la protection (pos.14-
17) par rapport à l’établi (pos.3) et à la pièce à usiner, intervenez sur la vis (pos.21),
réglez et fixez à nouveau.
Le bloque-pièce devra se trouver à peine au-dessus de la pièce afin de lui permettre de
coulisser mais il devra aussi retenir la pièce pour éviter tout déplacement vers le haut.
MISE EN MARCHE ET ARRÊT
ATTENTION ! Avant de mettre en marche la machine, il faut obligatoirement
mettre des lunettes, des gants, des protecteurs pour les oreilles et un masque de
protection (non fournis avec la machine).
ATTENTION ! Pendant la mise en marche et l’arrêt de la machine, veillez à
ce que personne ne s’approche de la machine. Gardez une distance de sécurité
de tous les organes en mouvement et de la zone de coupe.
ATTENTION ! Le moteur et les pièces mécaniques mobiles ainsi que la lame
tournent encore pendant quelques instants après que l’on a arrêté la machine.
Lors de la phase d’arrêt, ces parties ne doivent pas être touchées car il existe un
réel danger de lésions graves !
Avant de mettre en marche la machine, vérifiez l’état des composants et contrôlez
que les vis sont serrées.
MISE EN MARCHE
1) Vérifiez que les clés de service ont été rangées.
2) Vérifiez que la protection est correctement placée sur la zone de coupe.
3) Branchez la fiche du cordon d’alimentation dans la prise.
4) Mettez-vous face à la machine et assurez-vous qu’aucune autre personne ou animal
ne se trouve à proximité.
5) Pour mettre en marche, appuyez sur l’interrupteur (pos.12) ON « I » de mise en
marche.
Si vous constatez des anomalies de fonctionnement, arrêtez la machine et consultez
le chapitre « Recherche des pannes et interventions autorisées».
ARRÊT
Pour arrêter la machine, appuyez sur l’interrupteur (pos.12) OFF « O » arrêté.
RÉGLAGE DE LA VITESSE (si présent)
Par la manette (pos.19), on peut régler la vitesse d’oscillation de la lame.
Quand vous ne travaillez pas, arrêtez la machine et débranchez la fiche de la prise.
AVERTISSEMENTS ET CONSEILS D’UTILISATION
ATTENTION ! Avant tout contrôle ou réglage, positionnez l’interrupteur sur OFF « O
» (arrêt) et coupez l’alimentation électrique en débranchant la fiche de la machine.
Après avoir lu avec attention les chapitres précédents, suivez scrupuleusement ces
avertissements et ces conseils qui vous permettront d’obtenir les meilleures per-
formances de votre machine. Procéder avec calme ; ce n’est qu’après avoir acquis
l’expérience que vous pourrez exploiter au mieux les potentialités de la machine. Pour
vous familiariser avec toutes les commandes, faites des essais à vide sans aucune
pièce à usiner.
OPÉRATEUR
La position normale de l’opérateur est devant la machine (côté interrupteur) avec les
deux mains qui devront accompagner et retenir la pièce ; il est possible de procéder
à la coupe seulement dans cette position.
Attention ! Gardez les mains et le visage éloignés de la lame et de la zone de coupe
car il existe un réel danger de lésions graves !
PIECE À USINER
La pièce que vous allez couper devra avoir une forme, des dimensions et un poids
compatibles avec la machine. Les bois durs ne sont pas adaptés à cette machine.
A l’aide d’un crayon, indiquez la ligne de coupe sur la pièce ; mettez en marche la
machine et positionnez la pièce sur l’établi en veillant à ne pas toucher la lame. Le
côté le plus large de la pièce devra être posé sur la base ; ne coupez pas des pièces
ayant le côté plus grand mis à la verticale.
Mettez la ligne indiquée préalablement au crayon sous le tranchant de la lame et
avancez vers celle-ci ; terminez la coupe et arrêtez la machine.
Sur cette machine, on peut monter des pièces ayant des dimensions préétablies
(épaisseur H et profondeur P, Voir chap. Données techniques).
Attention ! Pour votre sécurité, il est important que la machine soit fixée à l’établi
ou au piédestal.
Attention ! Pour votre sécurité, il est important que la pièce soit correctement
bloquée. Ne coupez pas des pièces à section circulaire, des vieux bois ou des
bois fragiles, des bois irréguliers, des bois présentant des fissures, des bois ayant
des clous ou des vis, des branches ou des troncs d’arbre. Effectuez toujours un
contrôle visuel scrupuleux de la pièce.
Attention ! Rappelez-vous toujours que la lame peut provoquer le soulèvement
soudain de la pièce et qu’il est possible que celle-ci vous échappe des mains.
OUTIL LAME
Avant toute utilisation, assurez-vous qu’elle est intègre, qu’elle ne présente aucune
rupture ou déformation. Contrôlez de temps en temps l’affûtage de la lame.
Si nécessaire, la remplacer en suivant les indications des chapitres suivants.
Attention ! Une lame efficace et intègre fournit un meilleur résultat et évite au
maximum le risque d’accidents.
SOUFFLAGE DES COPEAUX ET DES POUSSIÈRES
La machine est pourvue d’un dispositif qui souffle une petite quantité d’air sur la zone
de coupe. Ceci permet d’enlever la poussière produite et facilite une coupe précise.
Vérifiez que le petit tuyau en caoutchouc est relié d’un côté au raccord de refoulement
(pos.8) et de l’autre au diffuseur (pos.11) placé à proximité de la zone de coupe.
Par une vis latérale, on peut régler l’inclinaison du diffuseur ; faire attention à ne pas
trop serrer car on risque d’écraser le tuyau.
ASPIRATION DES COPEAUX ET DES POUSSIÈRES (si présente)
La machine peut être dotée d’un collecteur (pos.16) pour l’aspiration des copeaux/
poussières.
Il faut toutefois tenir compte qu’une partie du matériel enlevé lors de la coupe sera
projetée tout autour de la machine et sur la pièce même.
Pour une aspiration optimale, reliez le collecteur à un aspirateur de copeaux/pous-
sières par le biais d’un tuyau flexible en plastique (aucun des deux n’est fourni avec
la machine) ; votre revendeur pourra vous conseiller pour bien choisir.
Attention ! Ne mettez pas la machine en marche si elle est dépourvue du tuyau d’aspi-
ration. Ne mettez pas vos doigts ou des outils à l’intérieur du collecteur dans le but
d’enlever du matériel car il existe un réel danger de lésions graves !
RÉGLAGE VITESSE DES OSCILLATIONS (si présent)
La machine peut être pourvue d’un régleur électronique (pos.19) qui change la vitesse
des oscillations de la lame.
USINAGE, COUPE ET MOUVEMENTS
La pièce à usiner est en mouvement sur l’établi tandis que l’outil se déplace verticale-
ment avec un mouvement alternatif pour enlever le matériel ; la lame enlève le matériel
seulement durant la phase de descente.
Le moteur fourni l’énergie pour le mouvement de l’outil par le biais d’un groupe de
bielle/manivelle et un couple de bras reliés par un ressort.
Respectez les avertissements qui suivent, valables pour tous les types de coupe:
- vérifiez que les leviers, les pommeaux et les vis sont bien vissés afin de fixer
fermement les parties mobiles
- maintenez fermement la pièce en usinage
- la pièce doit être placée contre l’établi
- ne coupez pas plusieurs pièces à la fois
- gardez une distance de sécurité de la zone de coupe
- approchez graduellement et avec attention la pièce vers la lame
- la coupe doit avoir lieu par un seul passage
- ne chargez pas trop le groupe de coupe pour ne pas solliciter la lame et le
moteur
- des sollicitations excessives provoquent la rupture soudaine de la lame et/ou
de la pièce
- ne sollicitez pas la lame latéralement
- la lame arrêtée ne doit pas toucher la pièce
- ne mettez pas en marche la machine si la lame se trouve en contact avec la
pièce
- ne mettez pas en marche la machine si la lame se trouve sans protection
- pour nettoyer la zone de coupe, utilisez un pinceau à manche long
La machine permet d’effectuer divers types de coupe :
- coupe transversale à la pièce
- coupe courbe façonnée (seulement pour des rayons amples et sur des pièces
fines)
- coupe inclinée (de 0° à 45°)
Exécution de la coupe :
- pour mettre la machine en marche, appuyez sur l’interrupteur (pos.12)
- des deux mains, saisir la pièce et la pousser en avant et, en même temps, appuyez-la
sur l’établi (car la lame aura tendance à entraîner la pièce vers le haut)
ATTENTION ! Tenez les mains à l’écart de la zone de coupe
- procédez à la coupe
- arrêtez la machine.
Pour effectuer une coupe en forme de trou :
- effectuez un trou de Ø 10 mm à l’aide d’une perceuse à l’intérieur de la zone à couper,
démontez la lame et introduisiez-la dans le trou et remontez-la avec la pièce (voir
chapitres suivants).
- avant de remettre en marche, bien vérifiez le bon montage et contrôlez que la lame
ne touche pas la pièce.
- procédez à la coupe en suivant le tracé sur la pièce, arrêtez la machine et démontez
la lame avec la pièce ; à ce point, éliminez la partie qui a été coupée.
LAME
ATTENTION ! Le côté tranchant peut provoquer de graves blessures ; utilisez
des gants de protection !
- Utilisez des lames de qualité ayant des caractéristiques appropriées à la machine que
vous utilisez conformément aux données techniques de celle-ci ; votre revendeur
pourra vous aider dans le choix le plus approprié. Observez aussi les éventuelles
instructions jointes.
- N’utilisez pas de lames dont la provenance est douteuse ou qui sont démunies des
données techniques.
- Les dimensions doivent être les mêmes que celles reprises sur les données de la
machine.
- Utilisez des lames conformes aux normes en vigueur dans le pays d’utilisation.
- Procédez toujours à un contrôle visuel : elle ne doit pas présenter de déformations,
de ruptures ou être endommagée.
Notre société fournit une série complète de lames adaptées à votre machine qui peuvent
être achetées auprès de votre revendeur.
REMPLACEMENT DE LA LAME (FIG. D)
ATTENTION ! Avant tout remplacement, positionnez l’interrupteur sur OFF « O »
(arrêt), coupez l’alimentation électrique en débranchant la fiche de la machine.

20
ATTENTION ! A la fin de la coupe, la lame aura atteint des températures
élevées: attendez qu’elle se refroidisse complètement avant de la changer.
ATTENTION ! Même si elle est arrêtée, la lame est toujours très tranchante :
pour éviter des blessures graves, utilisez des gants.
ATTENTION ! Le montage de la lame doit être exécuté parfaitement selon les règles
de l’art. Un montage erroné engendrera des dangers particulièrement graves.
Pour exécuter le remplacement, agissez comme suit : L’opération doit être faite par une
personne experte ; en cas de doute, adressez-vous à un centre d’assistance agréé.
1) Détachez la fiche de la prise de courant.
2) Pour effectuer correctement le remontage successif, observez avec attention les
différents composants avant de procéder.
3) Soulevez la protection de la zone de coupe (pos.14).
4) Tournez la vis (pos.9) de quelques tours dans le sens contraire des aiguilles d’une
montre afin de relâcher la tension de la lame.
5) D’une main, retenez la lame tandis que de l’autre vous pousserez le bloque-lame supérieur
vers le bas (pos.6) et, en même temps, enlevez la lame du siège qui la retient.
6) Enlevez la lame du bloque-lame inférieur (visible au travers de la fente sur l’établi).
7) Nettoyez les composants et la nouvelle lame.
8) Montez la nouvelle lame en respectant le sens de coupe : les dents doivent se
trouver vers le bas (fig.D).
9) Insérez la lame tout d’abord dans le bloque-lame inférieur et ensuite dans le
bloque-lame supérieur.
10) Agissez sur la vis (pos.9) afin de tendre la lame (voir chap. RÉGLAGES).
11) Abaissez à nouveau la protection sur la zone de coupe.
12) Vérifiez avec attention que la protection couvre bien la zone de coupe.
13) Vérifiez que la lame est montée correctement.
14) Effectuez un essai de fonctionnement à vide.
ENTRETIEN
ATTENTION ! Avant tout contrôle ou entretien, positionnez l’interrupteur sur
OFF « O» (arrêt) et coupez l’alimentation électrique en débranchant la fiche de
la machine.
ATTENTION ! Ne modifiez pas des pièces du moteur ou des composants électri-
ques et n’essayez pas de les réparer. N’accédez pas aux organes internes.
La durée de vie et les coûts d’exercice de la machine dépendent également de
l’exécution d’un entretien constant et scrupuleux. Respectez toujours les instructions
suivantes.
NETTOYAGE APRÈS CHAQUE UTILISATION
- Nettoyez régulièrement votre machine et prenez-en soin, vous lui garantirez un
fonctionnement correct et une longue durée de vie.
- Enlevez les copeaux/poussières en utilisant une brosse souple et un aspirateur ;
remettez ce matériel à un centre de collecte pour le recyclage.
- Enlevez les éventuelles traces de résine sur la machine.
- Ne pulvérisez pas de l’eau sur la machine et ne la mouillez pas.
- N’utilisez pas des détergents ou solvants divers, vous pourriez abîmer irrémédia-
blement la machine. Les pièces en plastique peuvent subir l’agression d’agents
chimiques.
- N’utilisez pas de jet d’air comprimé pour le nettoyage : danger de projection de
copeaux et éclats !
- Prêtez une attention particulière au nettoyage de l’interrupteur, aux fentes de ventilation
du moteur, à la lame, aux boutons de réglage, au plan de travail, à l’insert du plan
de travail, au tuyau de soufflage des poussières.
Pour votre sécurité, vérifiez périodiquement l’état des composants suivants et,
s’ils sont endommagés ou usés, remplacez-les :
- interrupteur (pos.12)
- lame (pos.5)
- protection lame (pos.14)
- collecteur de décharge (pos.16)
- insert en plastique du plan de travail (pos.13)
- fiche et cordon d’alimentation (pos.23)
LUBRIFICATION
Aux endroits indiqués sur la fig. A portant le symbole de l’ampoule, lubrifiez à l’aide
de quelques gouttes d’huile de qualité les coussinets se trouvant sur les deux côtés
du bras supérieur fixe (pos.7) :
- à la première mise en marche
- après 5 heures de fonctionnement
- ensuite, toutes les 10 heures de fonctionnement.
A l’aide d’un chiffon, enlevez toute trace d’huile en excédent.
PAIRE DE BALAIS (si présente)
Le moteur de cette machine est muni d’une paire de charbons en graphite ; le contrôle
et le remplacement doivent être exécutés dans un centre d’assistance agréé.
FUSIBLE (si présent)
Le circuit électrique de cette machine peut être pourvu d’une protection avec fusible.
Pour vérifier les conditions du fusible ou pour le remplacer, dévissez à main le bouchon
“FUSE” (pos.20) se trouvant à côté du régulateur de vitesse.
Remplacez le fusible avec un autre ayant les mêmes caractéristiques et les mêmes
dimensions ; placez le fusible dans le logement du bouchon et vissez-les dans le
trou fileté.
RECHERCHE DES PANNES ET INTERVENTIONS AUTORISÉES
LA MACHINE NE SE MET PAS EN MARCHE OU S’ARRÊTE ET NE SE REMET PAS
EN MARCHE :
Absence d’énergie électrique :
- Contrôlez que le cordon électrique et le câble de rallonge (si présent) ne sont pas
endommagés.
- Contrôlez l’interrupteur général du lieu de travail.
Balais en graphite usés (si présents) :
- Adressez-vous à un centre d’assistance agréé.
Panne électrique :
- Adressez-vous à un centre d’assistance agréé.
LA MACHINE VIBRE EXCESSIVEMENT :
Lame sans tranchant, endommagée ou déformée :
- Remplacez la lame.
Lame mal montée :
- Démontez la lame et remontez-la correctement en suivant les instructions
Fixation insuffisante de la machine à l’établi :
- Améliorez la fixation de la machine.
LA MACHINE A DU MAL À COUPER :
Lame sans tranchant ou endommagée :
- Remplacez la lame.
LA SOUFFLETTE POUR ENLEVER LA POUSSIÈRE NE FONCTIONNE PAS :
Tuyau plié :
- Redresser le tuyau.
Tuyau ou diffuseur obstrués :
- Nettoyez-les.
Pompe endommagée :
- Adressez-vous à un centre d’assistance agréé.
ATTENTION ! Si la machine ne fonctionne toujours pas correctement après
que vous avez exécuté les interventions décrites ci-dessus ou en cas d’anomalies
différentes de celles susmentionnées, arrêtez-la et apportez-la dans un centre
d’assistance agréé ou faites intervenir un technicien agréé en demandant des
pièces de rechange d’origine. Référez-vous toujours au modèle machine et au
numéro de matricule reportés sur l’étiquette des données techniques.
RANGEMENT
- Débranchez la machine du réseau électrique.
- Procédez à un nettoyage soigné de toute la machine et de ses accessoires (voir
paragraphe Entretien).
- Protégez les parties non vernies et les coussinets avec de l’huile de protection.
- Rangez l’appareil hors de la portée des enfants, en position stable et sûre, dans un
endroit sec non poussiéreux et à l’abri du froid. Les enfants et les personnes non
concernées ne peuvent avoir accès au local où est rangée la machine.
- Protégez l’appareil de la lumière directe ; le ranger si possible dans l’obscurité ou
en pénombre.
- Ne rangez pas la machine dans des sacs en nylon, de l’humidité pourrait se former
et endommager la machine.
- Utilisez l’emballage d’origine pour protéger la machine.
ÉLIMINATION
Les déchets électriques et électroniques peuvent contenir des substances dange-
reuses pour l’environnement et la santé de l’homme ; ils doivent donc être éliminés
séparément des déchets ménagers en les apportant dans les centres de collecte
sélective prévus à cet effet ou remis au revendeur lors de l’achat d’un appareil neuf
similaire. L’élimination abusive des déchets est punie par l’application de sanctions
administratives.
Modifications : les textes, les figures et les données correspondent aux standards
en vigueur à l’époque de l’impression du présent manuel. Le fabricant se réserve la
faculté de mettre à jour la documentation lors de variations apportées à la machine,
sans avoir aucune obligation pour ce faire.
Aucune partie de cette publication et de la documentation annexée à la machine ne
peut être reproduite sans l’autorisation écrite du fabricant.
GARANTIE
Le produit est protégé conformément à la loi contre toute non-conformité par rapport
aux caractéristiques déclarées à condition qu’il soit utilisé exclusivement de la manière
décrite dans ce manuel d’utilisation, qu’il n’ait pas été modifié en aucune manière,
qu’il n’ait pas été réparé par du personnel non autorisé et, où prévu, que seules des
pièces de rechange d’origine soient utilisées. Toutefois, les matériaux consommables
et/ou les composants sujets à usure particulière sont exclus, comme par exemple les
batteries, les lampes, les éléments de coupe et finition, etc... Remettez le produit au
revendeur ou à un centre agréé en présentant la preuve d’achat.
DÉCLARATION DE CONFORMITÉ
La société Valex - Via Lago Maggiore 24, 36015 Schio (VI) Italie
déclare sous sa responsabilité que l’appareil :
SCIE A LAME COULISSANTE
SV4000 (cod. 1410218)
SV4000E (cod. 1410219)
est conforme aux exigences de sécurité et de santé prescrites par les directives
2006/95/CE, 2006/42/CE, 2004/108/CE
Schio, 01.2010
Un fondé de pouvoir - Bruno Anzolin
/