Page is loading ...

1

2
CONTENTS
IMPORTANT SAFETY INSTRUCTIONS ……………………………………………….. 3
PRECAUTIONS …………………………………………………………………………….. 4
BEFORE USE ……………………………………………………………………………….. 5
TURNTABLE PARTS ………………………………………………………………………. 5
LISTENING TO A RECORD ………………………………………………………………. 5
HOW to REPLACE the TURNTABLE STYLUS (NEEDLE) ………………………….... 6
RECORD YOUR VINYL to PC using WINDOWS SYSTEM …………………………… 6
- SOFTWARE INTRODUCTION ………………………………………………….. 6
- SOFTWARE INSTALLATION and USB CONNECTION ……………………… 6
- RECORDING OPERATION STEPS ……………………………………………… 11
- CONVERTING RECORDED FILES to .WAV and .MP3 FILE FORMATS ….. 13
RECORD YOUR VINYL to PC using a MAC SYSTEM ……………………………........ 19
TIPS for BETTER TURNTABLE PERFORMANCE ……………………………………... 21
SPECIFICATIONS …………………………………………………………………………… 22
CUSTOMER SERVICE & SUPPORT ……………………………………………………… 22

3
IMPORTANT SAFETY INSTRUCTIONS
When using electrical products, basic precautions should always be followed. Please refer below:
1. Read Instructions - All safety and operating instructions should be read before operated.
2. Retain Instructions - Safety and operating instructions should be retained for future reference.
3. Follow Warnings - All warnings on the product and in the manual should be adhered to.
4. Follow Instructions - All operating and user instructions should be followed.
5. Cleaning - Unplug this product from the wall outlet before cleaning. Do not use liquid or
aerosol cleaners instead use a damp cloth for cleaning.
6. Attachments - Do not use attachments not recommended by the product manufacturer as they
may cause hazards.
7. Water and Moisture - Avoid exposing the product to water and moisture.
8. Accessories - Securely place this unit before use. The product may fall if not properly placed
causing serious injury to child or adult and may damage the product. Use only with a stand,
bracket, or table recommended by the manufacturer If the product needs to be mounted, you
should follow the manufacturer's instructions and should use a mounting accessory recommended
by them.
9. Transporting - This product should be moved with care to avoid
damage or injury.
10. Ventilation - Slots and openings in the cabinet are provided for
ventilation. This is to ensure reliable operation of the product and to
protect it from overheating. Openings must not be blocked or covered.
This product should not be placed in a built-in installation such as a
bookcase or rack unless proper ventilation is provided or the
manufacturer's instructions have been adhered to.
11. Power Sources - This product should be operated only from the
type of power source indicated on the marking label. If you are not
sure of the type of power supply to your home, consult your product
dealer or local power company. For products intended to operate from
battery power, or other sources, refer to the instruction manual.
12. Power-Cord Protection - Power-supply cords should be properly secured so that they are not
likely to be entangled in any way.
13. Lightning - For added protection for this product during a lightning storm, or when it is left
unattended for long periods of time, unplug it from the wall outlet and disconnect the antenna or
cable system. This will prevent damage to the product due to lightning and power-line surges.
14. Overloading - Do not overloads wall outlets and extension cords, as this can result in a risk of
fire or electric shock.
15. Object and Liquid Entry - Never push objects of any kind into this product through openings
as they may touch dangerous voltage points or short-out parts that could result in a fire or electric
shock.
16. Servicing - Do not attempt to repair this product yourself as opening or removing covers may
expose you to dangerous voltage or other hazards. Refer all servicing to qualified service
personnel.
17. Damage Requiring Service - Unplug this product from the wall outlet and refer servicing to
qualified service personnel under the following conditions:
a. If the power-supply cord or plug is damaged.
b. If liquid or objects have fallen into the product.
c. If the product has been exposed to rain or water.
d. If the product does not operate and you have followed the manual for troubleshooting.
e. If the product has been dropped or damaged in any way, and the product exhibits a distinct
change in performance may indicate a need for service and/or repair.
18. Replacement Parts - If a part needs to be replaced, be sure the service technician has used
replacement parts specified by the manufacturer or have the same characteristics as the original
part. Unauthorized substitutions may result in fire, electric shock, or other hazards.
19. Safety Check - Upon completion of any service or repairs to this product, ask the service
technician to perform safety checks to determine that the product is in proper operating condition.
20. Wall or Ceiling Mounting-The product should be mounted to a wall or ceiling only as

4
recommended by the manufacturer.
21. Heat-The product should be situated away from heat sources such as radiators, heat registers,
stoves or other products (including amplifiers) that produce heat.
PRECAUTIONS
1. In order to shut off the unit completely, unplug the power cord from the wall outlet, be sure to
unplug the unit if you do not intend to use it for a long period of time.
2. Incorrect use of controls, adjustments and performance other than those specified herein may
result in hazardous radiation exposure.
3. Should this product malfunction, discontinue use and contact a qualified service center.
WARNING
To reduce the risk of fire or electric shock, do not expose this appliance to rain or moisture.
CAUTION
RISKS OF ELECTRIC SHOCK- DO NOT OPEN!
To reduce the risk of electric shock, do not remove casing.
No user serviceable parts inside. Refer servicing to qualified service personnel.
The light flash with arrowhead symbol, within an equilateral triangle, is intended to
alert User to the presence of “dangerous voltage” which may be of sufficient
magnitude to cause electric shock to persons.
The exclamation point inside an equilateral triangle is intended to alert
User to the
presence of important operating and maintenance (servicing) instructions in the
literature that may accompany the appliance.
This product may contain cheimcals listed in Proposition 65
(http://www.oehha.ca.gov/prop65/prop65_list/Newlist.html)
That may be known to cause cancer, birth defects or other reproductive harm
CAUTION: To prevent shock, match wide blade of plug to wide slot, fully inserted
BEFORE USE
1. Choose a safe location and avoid placing the unit in direct sunlight or near any heat source.
2. Avoid locations subject to vibrations, excessive dust, cold or moisture.
3. Do not open the cabinet as this may result in electrical shock. If a foreign object is inserted
accidentally contact your dealer.
4. When removing the power plug from the wall outlet, pull directly on the plug, NOT the cord.
5. Do not attempt to clean the unit with chemical solvents as this might damage the finishing. A
clean, dry cloth is recommended for cleaning.
6. In order to completely turn off the unit, unplug the power cord from the wall outlet.
7. Keep this manual for future reference.
TURNTABLE PARTS
1. Dust Cover
2. Platter
3. 45 rpm Adapter
4. Tone Arm
5. Lift Lever
6. Speed Selection
7.
Auto Stop Control
8.
Tone Arm Rest
9.
USB Jack
10.
RCA Output

5
11. AC Power Cord
12. Turntable Feet
13. Style (Needle) Cartridge
LISTENING to a RECORD
1. Raise the dust cover _
2. Connect the AC power cord
_
11 to an electrical outlet (120V~60Hz)
3. Use a RCA cable to connect unit’s RCA output
_
10 with your powered speaker. Make sure
the red RCA and white cables are inserted in the red and white jacks accordingly.
4. Place a record on the turntable and select the player speed (33/45/78)
_
6 according to the
desired record speed. NOTE: when playing a 45 rpm record, use the 45 rpm adapter _.
5. Remove the tone arm from the rest
_
8, push Lift Lever backward
_
5 to raise the tone arm
and gently move the tone arm to the desired position over the record. The turntable will begin
to spin when the arm is moved toward the record. Push the Lift Lever
_
5 forward lower the
tone arm slowly onto the desired position on the record to begin playing the record.
6. If Auto Stop Control
_
7 is turned ON, record will stop automatically when finished.
If Auto Stop Control
_
7 is turned OFF, record will NOT stop automatically when finished.
7. For best performance and product maintenance, unplug the Turntable when not in use.
HOW to REPLACE the TURNTABLE STYLUS (NEEDLE)
To replace the turntable stylus (needle), please refer on the instructions below:
REMOVING the STYLUS from the CARTRIDGE
1. Place a screwdriver at the tip of the stylus and push downward as shown in direction “A”.
2. Remove the stylus by pulling the stylus forward and pushing downward.
INSTALLING the STYLUS (NEEDLE)
1. Hold the tip of the stylus and insert the stylus by pressing as shown in direction “B”.
2. Push the stylus upward as in direction "C" until the stylus locks into the tip position.
RECORD YOUR
VINYL TO PC in WINDOWS
SYSTEM
SOFTWARE INTRODUCTION
Audacity application software is included with your Vinylwriter and is designed to record and
save music from the photograph to a computer. The software then allows for the same recorded
files to be converted and edited to .WAV and/or .MP3 file formats. The recorded music can then
be played using Windows Media Player and other applications that support .WAV and .MP3

6
formats.
SOFTWARE INSTALLATION and USB CONNECTION
To install the Audacity software in your computer, please follow the instructions below.
1. Insert the Audacity software (included) into your computer's disc tray.
The Audacity Setup Wizard will appear. Click on "Next" to install the software.
2. Select “I accept the agreement” and click on Next

7
3. Continue to click on the "Next" button until the software installation begins.

8
4. Click on the "Install" button to start the Audacity software installation.

9
5. Click on "Finish" to complete installation.
6. You can now open the Audacity software and start recording your files.

10
RECORDING OPERATION STEPS
1. Connect the USB cable to your turntable and your computer. No extra driver is required to
drive the USB.
2. Power and play your record by lifting the tone arm towards the platter.
3. Double click the Audacity program and you will see this interface screen on your computer.
4.
Adjust the output and input volume.

11
5. Select the RECORD button to start recording.
6. Select the to skip to start.
7. Select the
button to go to end.
8. Select the PAUSE
button to pause the recording.
9. Select the STOP
button to stop the recording.
10. You can see the recorded file on your computer and convert the recorded file to other formats
including .WAV and MP3.

12
11. Play the saved file.
Put the saved file in the Audacity program and press the PLAY
button to play the file.
CONVERTING RECORDED FILES to .WAV and .MP3 FILE FORMATS
Please make sure that you have properly connected the Vinylwriter USB to your computer and
follow the instructions below to convert your files to “.wav and .mp3” file formats
1. Make sure that the Audacity installation disc is still inserted in your computer. Go to your
Desktop and double click on the "My Computer" icon.
2. Locate the CD ROM Drive and double click on the icon.
3. Copy the lame_enc.dll file and paste it to your Desktop.

13
4. After copying the file, open the Audacity Software. Click on the "RECORD" Button to start the
recording process. Make sure that a vinyl record is playing on the turntable and the USB cable is
connected to the turntable and your computer.
5. You may press the Stop Button at any desired time. Once you have the recorded file that will be
converted, press the "Edit" tab and select "Preferences"
6. Locate "File Format" tab and click on the "Find Library" button

14
7. Click "Yes" button, then go to your Desktop and highlight the lame_enc.dll.
Next, click on the "Open" button.

15
8. Click on the "OK" button and return to the default window of the Audacity Software.

16
9. Click on the "File" tab and the option will be given to export the recorded file as “.wav”,
“.mp3” or “.ogg” file formats.
10. Once you have selected the desired file format to export your recorded music, enter the file
name and location where you want to save the file on your computer. Once finished, click on the
"Save" button.
11. Enter the title, artist and any other information about the MP3 file that you have created and
click on the "OK" button.

17
12. Next, go to the location of the file you have converted. You can play the converted file on any
application that supports .WAV or MP3 formats.
NOTE: Converted files can be transferred (burned) to a CD. Please refer to the manufacturer's
instructions provided with your CD burner or computer for additional details.
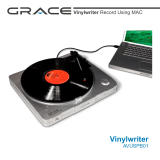
RECORD YOUR VINYL to PC using a MAC
1. Plug your Vinylwriter’s power cord into a power outlet.
2. Connect your Vinylwriter to your MAC using the supplied USB cable.
3. Press the power button on your Vinylwriter.

18
4. Open “System Preferences” on your MAC: Applications > System Preferences
5. Under ‘Hardware’ click on ‘Sound’ (icon of speaker)
6. Select ‘Input’ and choose the AK5371 USB device.
7. Close the System Preferences window.
8. Ensure the Audacity Software has been downloaded and installed to your computer.
Audacity can be downloaded here: http://audacity.sourceforge.net/download/mac
9. Launch Audacity Software from the saved location (commonly saved under ‘Applications’)
10. Open Preferences for the Audacity Software under the Audacity Menu.
11. Refer to the ‘Audio I/O tab’ and under ‘Recording’ select AK5371 and press ‘OK’.

19
12. Press the RECORD button in the Audacity Software (NOTE: recordings will begin as soon as
you release the RECORDING button). Position the needle on your vinyl record where you would
like the recording to begin.
13. Press the STOP button when you would like the recording to end.
14. You can edit your recorded track(s) using the Audacity features.
15. You can save your recordings as various file types under the File Menu.
TIPS for BETTER TURNTABLE PERFORMANCE
1.
When opening or closing the turntable cover, handle it gently, moving it either at the
center or equally from both sides.
2.
Do not touch the stylus (needle) tip with your fingers; avoid bumping the stylus on the

20
turntable or record’s edge
3. Clean the stylus tip frequently - use a soft brush in a ‘back-to-front’ motion only.
4. If you must use a stylus cleaning fluid, use very sparingly.
5. Wipe the dust cover and turntable housing gently with a soft cloth. Use only a small
amount of mild detergent solution to clean the turntable and dust cover.
6. Never apply harsh chemicals or solvents to any part of the turntable system.
7. Always unplug the unit from the AC outlet and secure the tone arm before moving
SPECIFICATIONS:
Power Requirements: AC 120V~50Hz
Power Consumption: 8W
Motor: EG-530SD-3F
Drive System: Belt
Speeds: 33-1/3, 45, 78 rpm
S/N Ratio: 35 dB
Tone Arm: Straight Plastic & Aluminum
Cartridge/ Stylus (Needle): Ceramic Stereo/ Jewel Stylus
Base & Platter: MDF Cabinet Base, Plastic Core & Platter
Dimensions (LxDxH): 10.7 x 13.1 x 4.0 inches (approx.)
Weight: 4.5 lbs (approx.)
Accessories: User Guide, 45rpm Adapter, USB & RCA Cords, Audacity Software
CUSTOMER SERVICE & SUPPORT
Should you have any questions regarding your Vinylwriter please
visit us at www.gracedigitalaudio.com or
send us an email to [email protected] or
call Toll-Free 866-446-0961
Our Customer Service hours are scheduled for
Monday to Friday 8:30AM to 5:00PM Pacific Standard Time
/