Page is loading ...

1

2
Trademarks
Xanté
®
and Ilumina Digital Envelope
Press
®
are registered trademarks of
Xanté Corporation.
Adobe
®
and Adobe
®
PostScript®
are registered trademarks of Adobe
Systems Incorporated.
Windows
®
is a registered trademark of
Microsoft Corporation.
Hammermill
®
is a registered trademark
of International Paper Company.
All other brand and product names are
trademarks, registered trademarks, or
service marks of their respective holders.
This manual is Copyrighted © 2010 by
Xanté Corporation. All Rights Reserved.
Printed in the USA. This manual may
not be copied in whole or in part, nor
transferred to any other media or language
without the express written permission of
Xanté Corporation.
Xanté Corporation reserves the right to
make changes to this manual and to the
equipment described herein without notice.
Every effort has been made to ensure that
this manual is free of inaccuracies and
omissions.
However, Xanté Corporation makes
no warranty of any kind including, but
not limited to, any implied warranties of
merchantability and fi tness for a particular
purpose with regard to this manual.
Xanté Corporation
2800 Dauphin Street
Mobile, AL 36606-2400
Phone: (800) 926-8393, (251) 473-4920
Fax: (251) 473-6503
www.xante.com
Xanté Europe
Marketing 1
6921 RE Duiven
The Netherlands
Tel.: (EU)+31 (0) 26.319.3210
Fax: (EU)+31 (0) 26.319.3211
www.xante.com

3
SAFETY INFORMATION
• Place the Ilumina Digital Envelope
Press (DEP) in a well ventilated area.
Allow enough room around the DEP for
adequate ventilation and easy access to
the paper trays. If the DEP is placed in an
enclosure, ensure it is properly ventilated.
• Do not use the DEP near water. Do not
spill any type of liquid into it.
• Be certain that your power source
matches the rating listed on the back of
the DEP. If you are unsure, contact your
dealer or local power company.
• Place the Ilumina near the socket-outlet
for easy access if needed.
• Do not insert anything into the ventilation
slots on the DEP. Electrical shock or
electrical arcing could occur, which could
cause a fi re.
• Aside from the routine maintenance
described in the documentation, do not try
to service the DEP yourself. Removing the
cover may expose you to shocks or other
electrical hazards.
• Proper installation of the conveyor tip
bracket must be performed to eliminate
hazardous conditions.
• Proper installation of the printers stabilizer
bracket to connect the Feeder to the printer
must be performed to eliminate hazardous
conditions.

4
Setup ........................................... 7
ORDERING SUPPLIES .............. 9
How to Order .................................. 9
Order Numbers ........................... 10
Toner Cartridges, Type C7 ........... 10
Image Drums, Type C7 ................ 11
Other Consumables ..................... 11
Changing Settings ........................ 12
MENU STRUCTURE ................. 12
Confi guration ................................ 12
Print Pages ................................... 12
Suspend Printing .......................... 12
Resume Printing ........................... 12
Print Secure Job ........................... 12
Menus .......................................... 13
Shut Down .................................... 13
Admin Setup ................................. 13
Calibration .................................... 13
SETTINGS ................................. 13
Settings by Media Weight ............. 13
Individual Print Jobs ..................... 14
All Print Jobs (Defaults) ................ 14
Reset to Factory Defaults ............. 14
Table of Contents
Settings by Paper Weight ............. 14
US Bond ....................................... 15
Index ............................................ 15
Paper Tray Settings ...................... 16
Envelope Feeder Settings ............ 16
Settings by Media Type ................ 17
Paper ............................................ 17
Envelopes .................................... 17
Control Panel ............................... 17
RECOMMENDED MEDIA ......... 18
Paper ............................................ 18
Sample Ream Label ..................... 18
Envelopes .................................... 19
Loading Paper .............................. 19
Loading Letterhead ...................... 19
EXIT PATHS .............................. 19
Face Down ................................... 19
Face Up ........................................ 20
SECURE PRINT ....................... 20
Storing Jobs to Hard Disk Drive .. 20
To Print the Document .................. 20
To Delete the Document ............... 21
CONTROL PANEL .................... 21
Ready Light .................................. 21
Attention Light .............................. 21

5
Power Save .................................. 22
Set the Time Interval .................... 22
CLEANING LED HEADS .......... 22
How to Clean ................................ 22
REPORTS ................................. 23
Printing Reports ........................... 23
TROUBLESHOOTING .............. 24
Using the Help Button .................. 24
Paper Jams .................................. 24
ETHERNET INTERFACE FOR
TCP/IP ...................................... 25
Install the Ferrite Core .................. 25
Assign an IP Address to the Ilumina
Digital Envelope Press ................ 26
USB INTERFACE ...................... 26
Connect the USB Cable ............... 26
PARALLEL INTERFACE .......... 27
Connect the Parallel Cable .......... 27
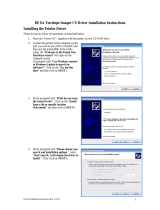
WINDOWS INSTALLATION ..... 27
Select a Printer Driver in Windows 27
PostScript Printer Driver ............... 27
PCL Printer Driver ........................ 27
Installing Optional Components ... 28
TCP/IP Driver Install ..................... 28
LPR Utility to Discover ................. 29
USB Driver Install ......................... 29
Enable the USB Port .................... 31
Print a Test Page .......................... 31
Parallel (LPT1) Driver Install ........ 31
Print a Test Page .......................... 32
MACINTOSH INSTALLATION .. 33
PostScript Printer Driver ............... 33
Installing Additional Utilities .......... 33
INSTALLATION FOR MAC OS9 .. 33
Ethernet and USB Driver Install ... 33
Ethernet Desktop Icon .................. 34
INSTALLATION FOR MAC OS X . 35
Ethernet and USB Driver Install ... 35
Adding the DEP using Ethernet .... 36
Adding the DEP using USB .......... 37
OPTIONAL HARDWARE .......... 37
Windows ....................................... 37
Mac OS 9 ..................................... 38
Mac OS X ..................................... 38
SETTING DEFAULT SOFTWARE
OPTIONS .................................. 38
Windows ....................................... 39
Mac OS 9 ..................................... 39
Mac OS X ..................................... 39

6
INSTALLING ADDITIONAL
UTILITIES .................................. 40
Windows ....................................... 40
Mac OS 9 ..................................... 40
Mac OS X ..................................... 40
PDF OR ON-LINE MANUALS .. 41
Requirements ............................... 41
View the Manuals ......................... 41
Service and Support................ 42

7
SETUP
Your Ilumina Digital Envelope Press
(DEP) set up will take about 30 minutes
once the parts are assembled.
1. Assemble the Ilumina Base, the
Envelope Feeder Assembly, and the
Conveyor Assembly as outlined in
the Assembly Guides.
2. Remove top packing pieces from the
Ilumina.
3. Open the protective plastic bag.
4. Confi rm package contents:
• DEP
• Light-shield bags
• Power Cord
• Toner Cartridges
• Ferrite Core for network models
• CDs
• Paper Catcher
• Docking Plate
• Conveyor
• Envelope Feeder
5. Select a location for your DEP.
6. Lift the DEP and place on the pre-
assembled base. Always use at least
two people to lift or move the DEP.

8
7. Align the envelope feeder to the
DEP.
8.Place the conveyor next to the DEP's
exit roller and connect the 9-pin
cable to the 9-pin connector on the
back of the printer.
9. Verify that the Conveyor tip bracket
is installed and positioned between
the printer
and printer
stand.
10. Lift the top cover of the DEP.
11. Lift operator panel, open front
cover, and remove all of the shipping
tape.
Caution! Do not expose drums to direct
sunlight Do not expose drums to light for more
than 5 minutes
12. Remove colored image drum
packing pieces. Remove tape
Remove protective sheet.
13. Shake toner cartridge from side

9
to side to distribute toner. Remove
locks and seals from the toner
cartridge. Remove sealing tape from
toner cartridge.
14. Lock toner cartridge with colored
lever. Install remaining toner
cartridges and gently close the top
cover.
15. Pull out the paper tray. Remove
packing piece.
16. Set guides (a,b) to paper size.
Load paper. Gently replace paper
tray.
17. Insert the power cord.
Do not connect this product to an
uninterruptible power supply (UPS).
Be sure to use the 16Amp/AC
power cord supplied with the
printer. Use of a power cord NOT
supplied with this printer, or an
extension cord, may result in
overheating, and could be a safety
hazard.
Power cords are not supplied for 220 volt
version. Check local regulations for correct
power cords.
ORDERING SUPPLIES
How to Order
Consult the vendor where you •
purchased your DEP

10
Consult an Authorized Xanté •
Sales or Service Vendor
Call Xanté Consumables direct at •
1-800-540-7091 (US and Canada)
Send Xanté an email from:•
www.xante.com/contact
Be sure to register your DEP at:•
www.xante.com/register
Order Numbers
Use only Type C7 Toner Cartridge and
Image Drums.
Toner Cartridges, Type C7
Color Part #
Cyan .......................... 200-100222
Magenta .................... 200-100223
Yellow ........................ 200-100224
Black ......................... 200-100225
4-Pack Assorted ........ 200-100226

11
Image Drums, Type C7
Color Part #
Cyan .......................... 200-100227
Magenta .................... 200-100228
Yellow ........................ 200-100229
Black ......................... 200-100230
4 Pack Assorted ........ 200-100231
Other Consumables
Consumable Part #
Transfer Belt (
1) ........ 200-100290
Fuser (
2)
110v........................ 200-100269
220v ....................... 200-100270
Toner Waste Bottle .... 200-100235

12
Changing Settings
Press [MENU]•
Use the • V key to scroll down to
the function you wish to change
Press [ENTER]•
Continue to use the • V and
[ENTER] keys to locate the desired
item
Press [ENTER] and an asterisk will •
appear next to the chosen setting
Press [ON LINE] to exit the Menu•
MENU STRUCTURE
Confi guration
Page Count and Consumable Life•
Supply Life•
Network Settings•
Paper Size in Tray•
System•
Print Pages
PS Test Pages•
Confi guration•
Job Logs•
Color Charts•
PS Font List•
PCL Font List•
E-mail Log•
Error Log•
ID Check Pattern•
Engine Status•
Suspend Printing
Resume Printing
Print Secure Job
Requires Password
Print out confi dential documents •
downloaded to the HDD

13
Menus
Set the size, weight and type of •
media for the various feed trays
Adjust system settings•
Shut Down
Restart Server•
Shut Down System•
Reboot System•
Admin Setup
Exit Setup•
Server Setup•
Network Setup•
Parallel Setup•
USB Setup•
Printer Setup•
PS Setup•
Job Log Setup•
Change Password•
Language•
Clear Server•
Factory Defaults•
Calibration
Exit Calibration•
Auto Density Mode•
Auto BG Adjust Mode•
Adjust Density•
Adjust Registration•
Set Up Calibration•
Calibrate•
Remove Calibration•
SETTINGS
Settings by Media Weight
The default media weight setting
for The Multi-Purpose (MP) Tray is
"plain paper". The default media weight
setting for Tray 1 is "Auto".

14
Individual Print Jobs
If you are using special media for
only one print job, you can adjust the
media settings in the driver.
Load the media in the appropriate
tray (usually the Envelope Feeder) and
adjust the media settings as needed.
All Print Jobs (Defaults)
• Press [MENU]
• Press V key to "Menus" and press
[ENTER]
• Highlight "Tray Confi guration" and
press [ENTER]
• Press V key to select the tray to
be confi gured and press [ENTER]
• Use the V and [ENTER] to make
your changes in the submenus
• Press [ON LINE] to exit the Menu
Reset to Factory Defaults
• Press [MENU]
• Use the V key to locate "Admin
Setup" and press [ENTER].
"Running Setup" will appear on the
screen
• Use the V key to locate "Factory
Defaults" and press [ENTER]
• Select "Yes" and press [ENTER]
• Press [ENTER] to execute. The
DEP will reset and return to the
Ready-to-Print state
Settings by Paper Weight
Select the appropriate settings in
either the front panel or in the DEP
driver.

15
Any setting changed in the DEP
driver overrides the front panel
settings.
To determine if a paper weight
is US Bond or Index, check the
metric equivalent.
Example:
35 lb. US Bond = 132 g/m
2
35 lb. Index = 64 g/m
2
For more information, go to
www.xante.com/paper
US Bond
Setting US Bond (metric)
Auto (Default) 20 to 57 lb.
(75 to 214 g/m
2
)
Light 20 lb. (75 g/m
2
)
Medium Light 20 to 21 lb.
(75 to 90 g/m
2
)
Medium 22 to 24 lb.
(90 to 105 g/m
2
)
Index
Settings Index (metric)
Auto (Default) 35 to 118.6 lb.
(64 to 216 g/m
2
)
Light 35 lb.
(64 g/m
2
)
Medium Light 37 to 40 lb.
(67 to 72 g/m
2
)
Medium 42 to 50 lb.
(76 to 90 g/m
2
)

16
Paper Tray Settings
Media Weight
(US Bond)
75 to 216 g/m
2
Duplexing:
75 to 188 g/m
2
*
Media Size Paper:
• Min. 4.1" x 5.8"
(105 x 148 mm)
• Max. 12.9" x 18"
(305 x 457 mm)
• Custom sizes must
be defi ned in driver
before printing.
Capacity 530 Sheets
75 g/m
2
paper
* Duplex printing is restricted to paper only
between 75 - 188 g/m
2
Envelope Feeder Settings
Media Weight
(US Bond)
75 to 216 g/m
2
Duplexing:
75 to 188 g/m
2
*
Media Size Paper:
• Min. 4.375" x 4.13"
(130 x 105 mm)
• Max. 13" x 15"
(330 x 381 mm)
• Custom sizes must
be defi ned in driver
before printing.
Capacity 1000 envelopes**
* Duplex printing is restricted to paper only
between 75 - 188 g/m
2
** Envelope size is 9.5" x 4.25" (241 x 108
mm)

17
Settings by Media Type
Paper
Size Feed Tray // Exit
Tray
Letter, Legal-13/
13.5/14,
Executive,
Tabloid, Tabloid
Extra, A3, A3
Wide, A3 Nobi,
A4, A5, B4, B5
All Trays
Face-Down
up to 176 g/m
2
Face-Up
up to 216 g/m
2
A6 Paper Tray
Face-Up only
Custom:
Min. 4.1" x 5.8",
Max. 12.9" x 18"
Paper Tray
Face-Up only
Envelopes
Media Size Type Feed Tray
//
Exit Tray
Env. Custom N.A. Envelope
Feeder
Face-Up
Control Panel
The DEP control panel provides a
variable fuser temperature, conveyor
speed, and feeder up/down control.
Fuser Temp - For most print jobs •
the fuser dial can be position
midway as shown
Conveyor Speed - Adjust the •
conveyor speed based on the
media type and media size.
Up/Down - Moves the feeder up •
and down.

18
RECOMMENDED MEDIA
Media Type Recommended
Paper Letter:
Hammermill Laser
Print Radiant White,
90.3 g/m
2
Xerox 4024, 75.2 g/m
2
Tabloid/Tabloid
Extra:Hammermill
Laser Print
Radiant White, 90.3
g/m
2
Paper
Do Not Use
Heavily Coated Paper•
Embossed or Textured Paper•
Paper with Cutouts, Perforations, •
or Excessive Paper Dust
Xanté highly recommends that all
printing be accomplished on
pre-converted papers.
Converted sheet types Xanté
is concerned with include, but are
not limited to: scored, perforated,
embossed, debossed, ragged edge,
textured, and foil papers. These
converted types of paper media
can cause diffi culties for the DEP.
Although printing on converted papers
is possible, doing so can limit the
printer’s performance.
Optimal ratings as quoted on the
DEP spec sheet will be impacted
anytime the user deviates from printing
with the standard pre-converted media.
Sample Ream Label
1 2 3 4
1. Media Size, US / Metric
2. Media Weight, US Bond / Metric
3. Number of Sheets in Package
4. Manufacturer Name for Media

19
Envelopes
Feed side fl ap envelopes with the
fl ap side down and fl ap in fi rst. Feed
end fl ap envelopes with the fl ap down
and fl ap in fi rst.
For the best print results,
use only the recommended
envelopes.
Never use envelopes with
metal clasps or snaps.
Loading Paper
Pull the cassette tray out. Adjust
the side guides and back stop to the
correct media size. Load the paper
print side down and slide the cassette
tray in.
Loading Letterhead
Long edge feed—
face down, top
toward the back
of the DEP.
Short edge
feed—face
down, top to
the right.
Load letterhead stationery with
the printed side down.
EXIT PATHS
Face Down
This tray is located on top of the
DEP and can hold up to 500 sheets of
75 g/m
2
paper.

20
Face Up
The Conveyor is located on the
opposite side of the Envelope Feeder
and MUST be used for special media
such as heavy papers. The face up exit
path provides a straight-through paper
feed path when printing envelopes,
labels, etc.
SECURE PRINT
Storing Jobs to Hard Disk Drive
The document must fi rst be
assigned a password and then
processed to print which allows it to be
saved to the HDD.
To Print the Document
You must go to the front panel and
enter the password.
• Press [MENU]
• Select [Print Secure Job]
• Use the U and V keys to enter
the fi rst digit of your password and
press [ENTER] to move to the next
digit. Repeat the process and press
[ENTER] again when complete
• Select [Print] and press [ENTER]
• Choose the [Set Collating Amount]
and press [ENTER]
Secure Print: The document prints
and it is deleted from the hard disk
drive
Store to HDD: The document prints
and it remains stored until deleted
/