SyncroIP Series Quick Setup Guide - English - R3
4
STEP
CONNECTING TO THE CAMERA OVER THE INTERNET USING SYNCRO-V
CONTD.
4
DDNS (Dynamic Domain Name System) Set-up:
6
Open your web browser (Internet Explorer by default) and enter
http://ddns.myddns-flir.com in the address bar.
http://ddns.myddns-flir.com
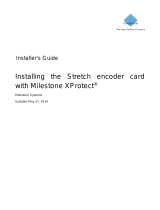
Create Account:
5
Click the “Create Account”
button.
1. Complete the Account
Information fields with
your personal information.
2. Complete the System
Information fields.
Product License: Select
your product model from the
Product License drop down
menu. (e.g. DND13TL2)
<Product Code> <MAC Address>: Enter the camera’s MAC
address you recorded earlier.
URL Request: Choose a URL for your DDNS connection (i.e.
your name, your company or business name, or anything of your
choice).
3. Once the information has been entered, click Create New
Account.
4. Your Account information will be sent to you at the email address
you used in Step 2.
Complete New Account Information
4
STEP
CONTD.
Enable DDNS on the Camera:
8
1. In Syncro-V, click Device Manager > Video Device
Management.
2. Click the camera you would like to configure and click
Network Service > DDNS.
3. Check Enable DDNS.
4. Configure the following:
• Provider: Select FLIRDDNS.
• Domain Name: Enter the Domain Name you received
from the confirmation email you received after you created
your DDNS account (e.g. tomsmith.myddns-flir.com).
• User Name: Enter the User Name you received
in the confirmation email.
• Password: Enter the Password you received in the
confirmation email.
5. Click Apply to save settings.
An automated REGISTRATION CONFIRMATION EMAIL will be
sent to your email. Print and save this confirmation. You will need this
information to access your system remotely.
Registration Email:
7
Domain Name: tomsmith.myddns-flir.com
User Name: tomsmith
Password: (your password)
EXAMPLE
Skill Level
Intermediate
easy
advanced
Time
under 30 minutesunder 15 minutes under 60 minutes
Hand Tools Hardware
Router
Hi Speed
over 60 minutes
Skill Level
Intermediate
easy
advanced
Time
under 30 minutesunder 15 minutes under 60 minutes
Hand Tools Hardware
Router
Hi Speed
over 60 minutes
REMOTE VIEWING INSTALLATION GUIDE
Time: 60 Minutes
Skills - AdvancedHardware PC/
Router
Skill Level
Intermediate
easy
advanced
Time
under 30 minutesunder 15 minutes under 60 minutes
Hand Tools Hardware
Router
Hi Speed
over 60 minutes
Skill Level
Intermediate
easy
advanced
Time
under 30 minutesunder 15 minutes under 60 minutes
Hand Tools Hardware
Router
Hi Speed
over 60 minutes
Skill Level
Intermediate
easy
advanced
Time
under 30 minutesunder 15 minutes under 60 minutes
Hand Tools Hardware
Router
Hi Speed
over 60 minutes
REMOTE VIEWING INSTALLATION GUIDE
Time: 60 Minutes
Skills - AdvancedHardware PC/
Router
Skill Level
Intermediate
easy
advanced
Time
under 30 minutesunder 15 minutes under 60 minutes
Hand Tools Hardware
Router
Hi Speed
over 60 minutes
Connect to the DDNS Address of the Camera over
the Internet Using Syncro-V:
9
1. Install Syncro-V on a remote PC.
2. Open Syncro-V and click Device Manager > Video Device
Manager.
3. Click Manager. The Device Maintenance window opens.
4. Under Device IP, enter the Domain Name from the
confirmation email (e.g. tomsmith.myddns-flir.com).
5. Under Control Port, enter the camera’s control port
(default: 30001).
6. (Optional) Under Device Name, enter a name for the
camera.
7. Click Add to add the camera to the Device List.
8. Click Save to save changes. Click OK.
9. Close all windows to return to the Live Video screen. The
newly added camera will appear in Device List.
NOTE: A icon is shown for all cameras outside of the LAN. This
does not affect your ability to connect to the camera remotely.
CONNECTING TO THE CAMERA OVER THE INTERNET USING SYNCRO-V
Skill Level
Intermediate
easy
advanced
Time
under 30 minutesunder 15 minutes under 60 minutes
Hand Tools Hardware
Router
Hi Speed
over 60 minutes
Skill Level
Intermediate
easy
advanced
Time
under 30 minutesunder 15 minutes under 60 minutes
Hand Tools Hardware
Router
Hi Speed
over 60 minutes
REMOTE VIEWING INSTALLATION GUIDE
Time: 60 Minutes
Skills - AdvancedHardware PC/
Router
Skill Level
Intermediate
easy
advanced
Time
under 30 minutesunder 15 minutes under 60 minutes
Hand Tools Hardware
Router
Hi Speed
over 60 minutes
4
STEP
CONTD.
CONNECTING TO THE CAMERA OVER THE INTERNET USING SYNCRO-V
10. Click on the camera in Device List to login. Enter the User Name
(default: admin) and Password (default: admin) and then click
Continue.
11. Click and drag the camera to a display grid screen to open it.
NOTE: It is recommended to select stream2 when remotely connecting
to cameras. Stream2 has a lower resolution that conserves bandwidth.
To select stream2: Click ( ), select stream2 under Stream and
click Apply then OK.
4
STEP
CONNECTING TO THE CAMERA OVER THE INTERNET USING SYNCRO-V
Skill Level
Intermediate
easy
advanced
Time
under 30 minutesunder 15 minutes under 60 minutes
Hand Tools Hardware
Router
Hi Speed
over 60 minutes
Skill Level
Intermediate
easy
advanced
Time
under 30 minutesunder 15 minutes under 60 minutes
Hand Tools Hardware
Router
Hi Speed
over 60 minutes
REMOTE VIEWING INSTALLATION GUIDE
Time: 60 Minutes
Skills - AdvancedHardware PC/
Router
Skill Level
Intermediate
easy
advanced
Time
under 30 minutesunder 15 minutes under 60 minutes
Hand Tools Hardware
Router
Hi Speed
over 60 minutes
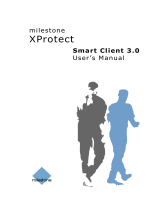
You need to enable port forwarding on your router to the camera’s
local IP address for the following ports:
• HTTP Port (default: 80)
• Control Port (default: 30001)
1
An example of a port forwarding screen is shown for illustration purposes.
HTTP 80 80 12
EXAMPLE
CONTROL
30001 30001
12
NOTE: If you are configuring multiple IP cameras for
individual remote access, you must change the ports for each
camera. Two cameras cannot use the same port number. For
information on changing camera ports, see the instruction
manual for your camera.
Locate your camera’s MAC address:
2
Port Forward your Router:
1. In Syncro-V, click Device Manager > Video Device
Management.
2. Click the IP address of the camera then click Device Info.
3. Write down the MAC address below.
Register for FLIR DDNS:
3
FLIR offers a free DDNS service for use with your IP camera. A DDNS
account allows you to set up a website address that points back to
your local network.
NOTE: You may use the same DDNS account for multiple IP cameras on
the same LAN, but you must change the control port to a different port
for each camera and port forward the new port number, see the
instruction manual for your camera.
MAC ADDRESS: _____:_____:_____:_____:_____:_____
Click and drag
NOTE: Your router must support UPnP to enable DDNS.