2 3 4
5 6 7 8
1
9
121110 13
22
11
20
21
12
2
13
14
15
16
17
18
19
9
10
1
3
4
5
6
7
8
IR Remote Control
No.
Name
Description
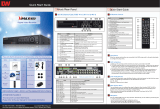
1
Video-In
2
Audio-In
Audio input device (with amplifier)
3 Audio-Out Audio output device (with amplifier)
4
5
Composite Monitor
6
Composite Spot Monitor
7
RS-232 input device
8
USB port (Ver2.0) for mouse operation, backup, or F/W update.
9
10
10/100 Ethernet connection terminal
11
12
Sensor input
13
Alarm output
PTZ camera or external keyboard
Video-Out
Spot-Out
RS-232 Port
USB Port
VGA Port VGA Monitor
LAN Port
Sensor Input
Alarm Output
RS-485 Port
Power Input
Power supply connection
(Default : 12 V, 3.33A/6.67A)
No.
Functions
1
Start Instant Emergency Record
2 Numeric Button
3
Auto-Sequence Button on Live Display Mode
4 Freeze button
5 Call Monitor button
6 Numeric Button
7
Instant (Emergency) Playback Button
8 Search Button
9 OK (Select) Button
10 Audio Mute Button
11
Playback Button on Search Mode
(Fast Backward/Playback/Stop/Fast Forward)
12 Exit Button
13
Display Mode Button
14 Zoom button
15 PIP Mode button
16 BookMark Button
17
Zoom In & out Button
18 Backup Button
19 PTZ Button
20
Direction Button (Up/Down/Right/Left)
21 Menu Button
22 ID Select Button
No. Buttons Functions
1 Menu / Exit Button
2 Fast Reverse Playback Button Fast rewind during playback
3
Forward & Backward Play
Pause Button
Forward play & Backward Play (Long Press)
Pause (Short Press)
4 Fast Forward Button Fast forward during playback
5
Search
Instant Play(Press and hold)
Go to search mode / Used to initiate Instant Reverse
Playback
6
Book-Mark
Call Mon(Press and hold)
Book-Mark / Used to display full screen video of all
installed cameras in sequence by spot out
7
PTZ
I-backup(Press and hold)
Bring up PTZ Camera control /
Used to initiate instant back up
8
Mode
Freeze(Press and hold)
Change screen mode / Used to initiate Freeze function
9 USB Port
USB port(Ver.
2.0)for mouse operation or backup or F/W update
10 LED Indicator
Indicates system status
Power, Record, HDD and Remote Controller
11 Instant Record Button Emergency Recording
12 Enter Button Select value or setting
13 Direction Button Move to the direction that user wants to select
Toggles On or Off Menu Setup Display
front panel of the DVR

8. You can configure the Live Stream (Resolution/FPS/Quality) setting independently
by clicking the [LIVE STREAM] button in RECORD SETUP tab.
2. Change the [Network Type] to [Static IP], if the DVR is assigned to a new IP address
from the DHCP server.
- Click [ACS SETUP] button and go to DVR REGISTRATION tab.
- Click [ADD] to add a site. Click [EDIT] to edit an existing site information.
Click [REMOVE] to delete a site.
Default Login for the ACS : administrator and password box is blank.
Default Login to a remote DVR : admin and password box is blank.
[DVR Name]. [DDNS Link]
Please enter the IP address in the address bar when using
Internet Explorer.
The user has to download Active-X Control from the DVR and
install it on the Client Workstation/PC before monitoring live video.
prioritize the Quick Setup configurations
and will follow the settings regardless of the configurations
set in other menus.
Users should not mark the [USE QUICK SETUP] checkbox,
marks [USE QUICK SETUP] checkbox
in other menus.
on
[HELP]
[HELP]
Default Port # : 80
Default Login to a remote DVR : admin and password box is blank.
Press [Menu] button on the front panel
of the DVRor the IR remote controller to
access the Menu Setup.
Dynamic IP
digitalwatchdog.dwddns.net
[dwddns.net] for the DDNS Server. (Recommended)
[START] button to check.
“DDNS Success”
"dyndns.com," go to http://dyndns.org and create an account.
1. Locate RECORD icon from the main menu and select it.
2. Select RECORD SETUP.
3. Choose the desired resolution, frame rate, quality, and recording type in the drop down list.
Individually configure the settings for each channel, or use the [COPY SETTINGS] button to
apply the same configurations to multiple cameras.
4. Select SCHEDULE tab to setup the record schedule.
1. Go to the SYSTEM INFO tab in System Menu.
1. Go to HDD tab in System Menu.
2. Click on the [HDD Clear] button.
[DATE/TIME FORMAT]
in the [DATE/TIME SETUP]
[TIME ZONE]
section.
NETWORK tab,
DDNS, information
5. For a more detailed record setup, mark the checkbox for [ADVANCED] in the RECORD SETUP tab.
6. When [ADVANCED] is marked, you can setup two record schedules: [Schedule 1] and [Schedule 2].
7. Go to SCHEDULE tab to setup [Schedule 1] and [Schedule 2].
*주의 : 인쇄시 레이어상의 빨간색 가이드 라인은 지우고 작업 바람.
/