Page is loading ...

DWH7016F
Before wiring your controller to the power supply, please check its voltage, printed on its label. You need to consider this
voltage on all parts of the manual too.
① Specification and size:
Product size: 75L x 34.5W x 85D (mm)
Mounting size: 71L x 29W (mm)
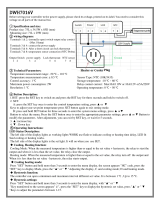
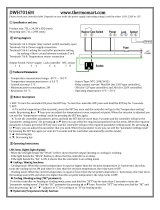
② wiring diagram:
Terminals 1 & 2: (normally open) switch output relay contact
(Max 10amp)
Terminals 3 & 4: connect the power supply
Terminals 5 & 6: After a short circuit can lock thermostat
Terminals 7 & 8: temperature sensor connection (NTC Probe)
Output switch power supply Lock thermostat NTC sensor Ground
1 2 3 4 5 6 7 8
③ Technical Parameters:
Temperature measurement range: -58 ºF ~ 230 ºF
Temperature measurement error: ± 1 ºF
Control accuracy: 1 ºF Sensor Type: NTC (10K/3435)
Maximum power consumption: 2W Relay contact current: Max 10A/110V ,10A/12V
Resolution: 1 ºF Operating temperature: 32ºF ~ 122 ºF
④ Button Description:
1. RST: press the RST key to switch on and press the RST key for three seconds and hold to switch off.
2. SET:
A: press the SET key once to enter the control temperature setting, press ▲ or ▼
Keys to adjust your set point temperature.Press SET button again to exit setting mode.
B: press and hold SET button for three seconds to enter the system menu settings, press ▲ or▼
Button to select the menu, Press the SET button once to enter the appropriate parameter settings, press ▲ or ▼ Button to
modify the parameters.
After adjustment, you can exit by RST key, or wait for 5 seconds.
3. ▲: increase key
4. ▼ : Down key
⑤ Operating Instructions:
LED Status Description:
The left side of the display lights as working lights WORK use flash to indicate cooling or heating time delay, LED lit
Said cooling or heating works.
The left side of the display lights is the set light. It will on when you use SET.
◆ Cooling, Heating function:
Cooling Mode: When the measured temperature is higher than or equal to the set value + hysteresis, the relay to start the
output and when it is less than the set value, the relay close the output.
Heating mode: When the measured temperature is higher than or equal to the set value, the relay turn off the output and
When it is less than the set value - hysteresis, the relay starts output.
◆ Cooling heating mode:
Press "SET" button and hold more than 3 seconds to enter the menu display, the screen appears "HC" code, press the
"SET" key to display Mode, press the "▲" or " ▼ "Adjusting the display, C said cooling mode; H said heating mode.
◆ Hysteresis function:
The controller can open a minimum and maximum interval different set value. It is between 1 ºF , Up to 30 ºF.
◆ Hysteresis settings:
Press "SET" button and hold more than 3 seconds to enter the menu display, with "▲" or " ▼

"Key transferred to the screen appears" d ", press the "SET" key to display the hysteresis set value, press "▲" or " ▼
"Keys to adjust the parameters between 1-15.
◆ Temperature correction:
You can calibrate your temperature with this function .Correction value can be positive, negative, and 0.
◆ Temperature calibration settings:
Press "SET" button and hold more than 3 seconds to enter the menu display, with "▲" or " ▼
"Key transferred to the screen appears" CA " Code, press the "SET" key to display the temperature correction settings,
press "▲" or " ▼ "Keys to adjust the parameters.
◆ Delay Protection:
In the cooling mode, you can use compressor delay protect status. So you can define the delay time for starting of your
cooling machine.
◆ Delay setting:
Press "SET" button and hold more than 3 seconds to enter the menu display, with "▲" or "▼" Key transferred to the
screen appears" PT " Code, press the "SET" key to display the time delay setting value, press "▲" or " ▼ "Keys to adjust
the parameters.
◆ Upper and lower functions:
HS and LS control setting are the temperature limit set point range. The factory default setting for LS is -58 ºF and for HS is 230 ºF
◆ Upper and lower limit settings:
Press "SET" button and hold more than 3 seconds to enter the menu display, with "▲" or "▼" Key transferred to the
screen appears" HS " Or "LS" code, press the "SET" button to display the upper or lower limit, press "▲" or " ▼
"Buttons to adjust Parameters.
◆ Menu code selection :
Symbol Details Setting range Factory settings Units
HC Heating / cooling H / C C
d Different set value 1 to 230 1 ºF
LS Set limits on the minimum -58 ~ HS -58 ºF
HS Set a limit on the maximum LS ~ 194 230 ºF
CA Temperature Calibration -15 To +15 0 ºF
PT Delay Protection time 0 ~ 10 1 Minutes
⑥ Fault tips :
1) When the sensor is disconnected, the display shows ---
2) When the sensor detects the temperature is below -58 ºF degrees, the display shows the LLL
3) When the sensor detects a temperature higher than 194 ºF degrees, the display shows HHH
⑦ Caution :
◆ Maximum cooling, heating load must not exceed the output relay contact capacity (7Amp) , it may damage and cause a fire .
◆ Check the wiring diagram before wiring .Wrong wiring will damage the controller.
◆ Turn off power supply when you are wiring relays, sensors, .. Otherwise it will damage the machine.
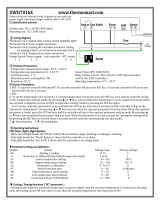
NTC Sensor
Measurement range: -58 to 230 °F
Cable length (L): 10 ft (3m)
Sensing tip material : stainless steel 304
Sensing tip length: 10mm
Thread width (S): 5/16" (M8)
Check the picture for more information
Sensor type: Water proof Negative Temperature Coefficient sensor
/