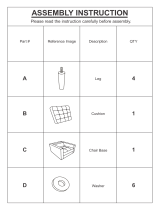
Quality Healthcare Seating Products
TM
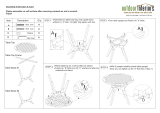
The Trendelenburg function should be operated by the caregiver. Your chair must
be purchased with the Trendelenburg option when it was ordered.
If your chair has this option, follow these directions for operation.
adjust to full
recline position
Before operating the
Trendelenburg function, you
must move the chair to the full-
recline position. Pull the side
lever to release the foot rest.
Then push the chair backrest
as far as it will go into the full-
recline position.
return to upriGHt position
To return the chair to upright position,
locate the Trendelenburg lever on the chair
back. Pull the lever all the way up
and hold as you lift the backrest
and return it to the fully-upright/TV
position (shown at bottom right). It
is recommended that this step be
done from the back of the chair.
place tHe
recliner in
tHe trendelenBurG
position
Locate the Trendelenburg lever
on the chair back (shown to the
right). Pull the lever all the way up
and hold as you push the backrest
down as far as it will go to the
Trendelenburg position (shown to the right bottom).
You may stop at any position going downward
by releasing the lever.
Please note: The caregiver is shown at the back
of the chair in these instructions for clarity. You may
also perform this function from the side of the chair.
1
2
3
Setting the
Trendelenburg Feature
raise to full
upriGHt position
Once the backrest is returned
to the fully-upright/TV position,
push the foot rest down until
you hear it click and lock in
place. To avoid damage to the
mechanism, the foot rest should
never be pushed down until the
backrest is returned to the fully-
upright/TV position.
4
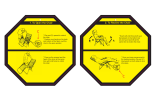
RELEASE FOOT REST TV POSITION FULL RECLINE POSITION
WITH SIDE LEVER
LOCATE BACK LEVER RAISE AND HOLD LEVER PUSH RECLINER BACK DOWN
LOCATE BACK LEVER RAISE AND HOLD LEVER LIFT RECLINER BACK UP
RAISE BACK OF RECLINER PRESS FOOT REST DOWN FINAL UPRIGHT POSITION
FULL TRENDELENBURG POSITION
www.championchair.com
© 2011 Champion Manufacturing, Inc. Litho in USA CM-108 02/11
CM-108 TrenPoster_Eng_FINAL.indd 1 2/23/11 9:24 AM