Page is loading ...

Operating Instructions
and Service Manual
“PASSAGE” RECLINER
Quality Healthcare Seating Products
1-800-998-5018
www.championchair.com

CONTENTS
ITEM PAGE
Contents 1
Warranty Confirmation Form 2
Special notes 3
Chair capacity information 4
Receiving new chairs 5-7
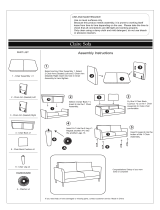
If assembly is required 5
New chair inspection 6
To report damage 6
Return authorization 7
Storage 7
In-service procedures 8
Operating instructions 9-12
Operation warnings and cautions 9
Safe operation and staff assistance 10
Operation assist 11
Swing arm operation 12
Optional features 13-17
Heated and heat/massage 13
Heated and heat/massage general information 13
Chair specifications 14
Receiving new chairs 14
Heater operation 15
Massage operation 16
Maintenance 17
Accessories 18-19
IV pole operation 19
General maintenance and care of chairs 20-22
General cleaning precautions/General cleaning- vinyl 21
General cleaning – plastic table tops 22
General infection control - vinyl 22
Warranty procedure 23
Service information 24
Serial number 24
Parts identification 24
Service Parts Form 25
Passage recliner schematics 26-28
Full explosion 26
Heat or Heat/Massage explosion 27
Passage recliner parts listing 28
Appendix I 29
Troubleshooting for heat or heat/massage 29
(1)
Passage Manual REV1 040715 cam

Warranty Confirmation Form
It is very important to Champion that our customers review all the materials in the In-Service
package they receive. In particular, we strongly advise that everyone using our products (medical
staff, patients, technicians, cleaning crew, etc.) review the In-Service DVD (approximately 12
minutes in length).
Please complete the following information, certifying that those individuals using the Champion
products understand their proper use, after reviewing the materials and watching the video.
Clinic or Company Name
Street Address
City/State/Zip
Signature/Print Name & Title
Date
By reviewing the In-Service materials provided, you increase the useful life of the products by
helping to prevent their improper use, which may lead to premature damage and wear. You are also
helping to validate your warranty, as warranties cover material and workmanship failures, not
misuse or abuse. Use these In-Service tools for new employees and as a “refresher” for current
employees.
Please fax this document to the Customer Service Department at 574-293-5760, and thank you for
your cooperation.
NOTE: Not all chair functions, options and/or accessories are covered in the CD.
AFFIX LABEL HERE
(2)
Passage Manual REV1 040715 cam

WELCOME!
Champion Manufacturing, Inc. would like to thank you for selecting our products. We take great
care in making certain that our products leave the factory in flawless condition. Our products are
properly packaged to arrive in that same condition. We look forward to your enjoying many years
of good service from these products.
SPECIAL NOTES
WARNING/ CAUTION These terms refer to actions that may result in injury to your
patient or staff member and/ or damage to your product. Damage caused by improper operation
of your chair is not covered by your warranty.
WARNING: Caregivers or others operating the product or moving the occupant
must be aware of the location of the patient’s hands and feet. Caregivers must
confirm that he occupant’s extremities are safely located before moving the chair from
position to position, adjusting the position of the chair or moving the patient from the
chair.
WARNING: Place chair in a fully upright position or a fully reclined position when
cleaning or maintaining your chair. Your recliner has moving parts that create pinch
points. This chair moves easily without a patient in the chair and may create pinch
points when not is these positions.
WARNING: This recliner is designed to meet the needs of a wide range of patients.
Some patients, due to their unique medical condition, may need assistance as they sit
down or rise from a seated position. It is the responsibility of the care provider to
assess these needs and provide assistance to frail, weak, or otherwise unsteady
patients. Failure to follow these instructions can result in patient falls with potentially
serious injury resulting.
CAUTION: This chair is NOT designed to transport patients.
NOTE: The information contained in this document is subject to change without notice.
(3)
Passage Manual REV1 040715 cam

CHAIR CAPACITY INFORMATION
PASSAGE RECLINERS:
PF Series: 300 lbs.
PS Series: 300 lbs.
(4)
Passage Manual REV1 040715 cam

RECEIVING NEW CHAIRS
CAUTION: New chair inspection must be done by someone who has watched the
in-service DVD and understands the instruction pages. Improper operation of the chair
may damage the chair and void your warranty.
It is important to realize that signing the Bill of Lading upon receipt of new product is confirmation
that it has been received in satisfactory condition. Once the Bill of Lading is signed there is
generally no recourse against the shipping agent for shipping damage. You have the right to
make the driver wait while you examine the product. Please take advantage of this right.
Carefully cut the plastic banding that secures the packaging; scissors can do this safely. Remove
the packaging from the chair, lift the top lid from the tube and remove the tube from the bottom
lid. Remove the plastic bag from the product. Cut straps that secure the casters, unlock the
casters and remove the chair from the packaging.
(5)
Passage Manual REV1 040715 cam

New chair inspection
1. Remove all packing material including foam wrap and poly bag. If desired, the bag may
be replaced after examination.
2. Examine chair surfaces for damage.
3. Operate all chair functions and options. This may include tables, casters and chair
positions. Do this immediately upon receipt of your chairs.
To report damage
1. If the freight carrier is still at your location (it is your right to hold the freight carrier
while you thoroughly inspect your delivery), note any damage on the bill of lading. Be
sure to keep shipping cartons, pallets and other shipping materials to prove damage to
the freight carrier. It is also important to save an undamaged carton and pallet in case
the chair must be returned to the factory.
2. Call Champion’s customer service immediately to report the damage: 800-998-5018.
3. All claims must be filed by the consignee and reported to Champion Manufacturing, Inc.
within 5 days of receipt of the shipment.
(6)
Passage Manual REV1 040715 cam

Return authorization
1. Champion customer service must authorize all returns. Champion customer service will
issue a return authorization number by fax or email. The customer does have the right
to refuse any damaged chair from the carrier at the time of delivery.
2. All returns must be sent prepaid by the sender with the exception of provable shipping
damage.
Storage
1. Cover chair and store in a dry area.
2. DO NOT place objects on top of the chair that may damage the vinyl.
(7)
Passage Manual REV1 040715 cam

IN-SERVICE PROCEDURES
Before chairs are put into service, all personnel should review this manual.
In the belief that an actual demonstration of the product is more effective than written
instructions, an on-site in-service by a Champion representative may be available depeding upon
the delivery circumstances.
WARNING: Place chair in a fully upright or a fully reclined position when cleaning
or maintaining your chair. Your chair has moving parts that create pinch points. This
chair moves easily without a patient in the chair and may create pinch points when not
in these positions.
WARNING: Never place your hands near or on a recliner mechanism when it is
in motion. Never clean or maintain a chair when an occupant is in the chair. The
occupant is able to control the chair’s position and may move the chair position
unexpectedly, creating pinch points.
WARNING: Keep hands, feet and legs clear of the recline mechanism.
WARNING: When closing the leg rest by hand, make sure your hand is placed on
the footboard. Your hand should be completely on the top surface of the upholstered
board. DO NOT wrap your fingers around any of the sides of the foot board. DO NOT
put your hand on the flip board as this product has moving parts that my create pinch
points. Keep all body parts clear of the recline mechanism, latches, and other moving
parts
CAUTION:
1. DO NOT overload chair. Observe the specified maximum weight limit for
the chair model that you have selected.
2. DO NOT attempt to force the chair into position; permanent damage may
result. The chair works with normal effort when operated properly.
(8)
Passage Manual REV1 040715 cam

OPERATING INSTRUCTIONS
WARNING: Caregivers or others operating the product or moving the occupant
must be aware of the location of the patient’s hands and feet. Caregivers must
confirm that the occupants extremities are safely located before moving the chair from
position to position, moving the chair from place to place, or moving the patient from
the chair.
WARNING: DO NOT overload chair. Observe the specified maximum weight limit
for the chair model that you have selected.
WARNING: Occupant should always enter and exit the chair in the upright
position. The patient should never exit the chair with the leg rest up. Occupants
should never “straddle” the extended leg rest of dangle their legs over the sides of the
extended leg rest.
WARNING: Always return the chair to full recline position after using
Trendelenburg.
WARNING: NEVER place your hands near or on the recline mechanism when it is in
motion. DO NOT put your hands where you cannot see.
WARNING: Verify the front casters are locked before the patient enters or exits the
recliner.
CAUTION: The push handle is not designed to be used to raise the front or rear
casters off the floor when there is an occupant in the chair; doing so may cause
damage to the chair.
CAUTION: The chair works with very little effort when operated correctly. DO NOT
use excessive force to move the recliner to any position. Doing so could result in
permanent damage to the recliner.
CAUTION: DO NOT attempt to close the chair’s leg rest while in the full recline
position. Doing so may damage the recline mechanism. Return the chair to the “TV”
position before closing the leg rest.
Note: The Passage recliner assumes three distinct recline positions: Upright position; leg
rest is down and the back is in its most vertical position, “TV” position; leg rest is up and
the back is somewhat reclined. Recline position; the leg rest is up and the back is
completely reclined.
(9)
Passage Manual REV1 040715 cam

OPERATING INSTRUCTIONS
For safe recliner operation:
1. Always lock all casters before allowing your patient to get in or out of the chair, if equipped
with casters. Release the caster brakes only when the chair is being relocated; and reset the
caster brakes upon arriving at your destination. Never assume that the caster brakes have
been set; check to ensure that the caster brakes are engaged before helping anyone in or out
of the recliner.
WARNING: DO NOT enter or exit the chair with the leg rest extended.
2. Occupant should always enter (or exit) the recliner with the chair in the upright position.
3. Once seated the occupant should sit fully back in the chair.
4. To recline to the “TV” position, the occupant should grip the top of the chair arms and apply
pressure to the chair arms and chair back to start the chair moving back. To move further to
the full recline position, continue to apply pressure backward. Note that it may be necessary
that the occupant reposition their grip on the arms, moving further back on the arm to move
to full recline position.
5. Once in the full recline position, staff may use the Trendelenburg feature by stepping on the
pedal on either side of the chair and pressing downward on the back of the recliner. The
Trendelenburg pedals are centered under the bottom of each arm. To return from
Trendelenburg, release pressure from the foot pedal and raise the back to the full recline
position. The Trendelenburg pedal will automatically lock once to in the full recline position.
This prevents the chair from going into Trendelenburg unexpectedly.
Staff assistance:
CAUTION: DO NOT “step” on the footrest to close the recliner. Doing so can
damage the recline mechanism.
WARNING: When closing the leg rest by hand, make sure your hand is placed on
the top upholstered surface of the footboard only, not under the edges or on the flip
board as this product has moving parts that my create pinch points. Keep all body
parts clear of the recline mechanism, latches, and other moving parts.
To assist a patient in reclining the chair, simply apply backward pressure to the front of the chair
back pillow. This will start the recline motion and can be stopped in either position; “TV” or full
recline position. To move the chair from a reclined position back to the upright position, apply
upward pressure to the back, from the rear, to start the chair moving upward.
CAUTION: This chair is NOT designed to transport patients.
(10)
Passage Manual REV1 040715 cam

OPERATION ASSIST
To assist the patient to a recline position, gently push the top
of the chairs back. To assist the patient in closing the leg rest,
place your open hand completely on the large upholstered leg
rest and push down. The smaller cushion to support the
patient’s heels will fold back into the chair.
DO NOT put your hand under bottom of the
leg rest.
DO NOT put your hand around the side of
the leg rest.
DO NOT put your hand under the front
edge of the seat assembly
(11)
Passage Manual REV1 040715 cam

OPERATING INSTRUCTIONS
Swing Arm Operation:
WARNING: Your recliner has moving parts that create pinch points. When the
swing arms are open, those points are fully exposed. Patients should NEVER be left in
a chair with the arms in the opened position. THE CHAIR SHOULD NOT BE LEFT
UNATTENDED, WITH THE ARMS UNLATCHED.
CAUTION: Be aware of the path the arm is taking. Swinging the arm into objects
may result in vinyl damage. It is recommended that opening the arm be done with the
chair in the fully upright position or the fully reclined position. If the arm on your
chair is equipped with a fold-down table, relocate the items on the table top and fold
the table top down prior to moving the arm.
Swing arms hinge at the back and may be opened. To do this, standing at the side of the chair,
grasp the release handle and pull down to release, and swing the arm open.
Once a patient transfer or maintenance is complete, the arm should be returned to the locked
position. To do this, swing the arm back toward the front of the chair until you hear the “click” of
the release handle being secured by the latch; pull outward on the arm to ensure the arm is
securely latched. It may be necessary to lift slightly to move the arm into position for the handle
to latch.
(12)
Passage Manual REV1 040715 cam

OPTIONAL FEATURES – Heated and Heat/Massage
HEATED RECLINER GENERAL INFORMATION
SPECIAL NOTES
WARNING: Do not operate this product without reviewing the in-service CD and
instructions along with any attachments that demonstrate proper operation of the
basic functions of your chair. If you do not have an in-service CD, call Customer
Service immediately to obtain one: 800-998-5018.
CAUTION: No items should be placed behind the patient’s back or beneath them.
Placing items (pillow, blanket, etc.) in the chair will expose the item to the heat
generated by the system. Unlike the patient’s body, certain item may not absorb and
dissipate the generated heat; this may expose the item to temperatures that are
higher than noted here through trapped heat. This may cause damage to the chair,
the item, and risk of contact with higher temperatures. Damage to the item or your
chair is not covered by your warranty.
Double-Insulated Products
In a double-insulated product, two systems of insulation are provided instead of grounding. No
grounding means is provided on a double-insulated product, nor is a means for grounding to be
added to the product. Servicing a double-insulated product requires extreme care and knowledge
of the system, and is to be done only by qualified service personnel. Replacement parts for a
double-insulated product must be identical to the parts they replace. A double-insulated product is
marked with the words “DOUBLE INSULATION” or “DOUBLE INSULATED”. The symbol ( ) is
also able to be used to identify a double insulated product.
WARNING: The operating range is 32-104
O
F, if the chairs have been recently
delivered or stored in conditions outside this temperature range, the chairs should be
allowed to warm up to ambient temperature prior to utilizing the heat function.
(13)
Passage Manual REV1 040715 cam

OPTIONAL FEATURES – Heated and Heat/Massage
CHAIR SPECIFICATIONS
Please reference previous chair specification pages for all load and dimensional specifications of
your heat chair. All heat chairs are built to properly handle the specified load for that model chair.
The heater option does not change the size or load capability of that model.
Power Requirements
Input: 100-240 VAC, 1.0 A max, 50-60 Hz
Output: 12 VDC, 3.5 A, 42 W
Average Measured Maximum Temperatures
HIGH
105
O
F
MEDIUM
102
O
F
LOW
98
O
F
CAUTION: No items should be placed behind the patient’s back or beneath them.
Placing items (pillow, blanket, etc.) in the chair will expose the item to the heat
generated by the system. Unlike the patient’s body, certain item may not absorb and
dissipate the generated heat; this may expose the item to temperatures that are
higher than noted here through trapped heat. This may cause damage to the chair,
the item, and risk of contact with higher temperatures. Damage to the item or your
chair is not covered by your warranty.
RECEIVING NEW CHAIRS
NEW HEAT AND HEAT/MASSAGE CHAIR INSPECTION:
Reference on earlier page on receiving new chairs, along with the following operation procedures.
WARNING: The heat or heat/massage chair must be plugged into a properly
grounded outlet and must not be modified in any way. If the three (3) blade plug does
not fit your outlet, have one installed that meets your local codes by an electrician.
Consult an electrician if you are unsure that the outlets are properly grounded. Do not
use a three (3) blade plug to a two (2) blade adapter.
(14)
Passage Manual REV1 040715 cam

OPTIONAL FEATURES – Heated and Heat/Massage
HEATER OPERATION
The Champion heated recliner continues to have the same patient controlled positioning with the
added benefit of heated pads in the seat and back. The heat/massage recliner has massage
motors built into the back cushion along with the heat system. This allows for additional patient
comfort at the push of a button.
CAUTION: Please make sure all staff involved in the use of the heat chair has
viewed the in-service instruction pages prior to operating the chair. Incorrect use can
damage the chair and void your warranty.
WARNING: Please keep hands and equipment away from moving parts that can
cause pinch points.
WARNING: NEVER service this chair without unplugging the cord from the wall. Do
not put your hands where you cannot see.
POSITIONING THE CHAIR
Please reference previous operation instruction information for all operating instructions for
positioning of the chair.
BUTTON DETAIL
OPERATING THE HEATER
Uncoil the power cord on the back of the chair and plug it into any properly grounded standard
wall outlet. You will find the heater power button on the inside arm of the chair. This will typically
be the right arm.
Pressing the button the first time will start the heater at high power and all three lights will come
on. At this setting it will take 5-10 minutes to come to full heat with a patient in the chair.
Pressing the button a second time will take the heater to medium power (two lights on) and a
third will take it to low (one light on). To turn the heater off, press the button a fourth time and
all of the lights will be out.
NOTE: The heat system is set to turn off one hour after the last button press. Repeat
the above process to continue use of the heat option.
NOTE: If the lights on the switch are flashing, unplug the chair from the outlet and
check all of the connectors of the heat system. If a connector is unhooked reconnect
it, plug in the power cord, and check the switch again. If all connections appear ok
and the lights still flash, unplug your chair and contact Champion’s customer service.
This does not affect the basic functions of the chair.
LIGHTS
BUTTON
(15)
Passage Manual REV1 040715 cam

OPTIONAL FEATURES – Heated and Heat/Massage
MASSAGE OPERATION
BUTTON DETAIL
OPERATING THE HEATER
Reference the previous page for instructions on how to operate the heater in the heat/massage
recliner.
OPERATING MASSAGE
Uncoil the power cord on the back of the chair and plug it into any standard wall outlet. You will
find the massage buttons on the inside arm of the chair. This will typically be the right arm (while
seated in the chair).
NOTE: The heat and massage options can be used independently of each other.
MASSAGE FUNCTION: The massage switch function is controlled by a repetitively
pressing the massage button. The first button push will turn on the massage light and it
will remain on through the button press cycle until the massage system is off.
BUTTON PRESS SEQUENCE
1. Lower Zone, Low Intensity
2. Lower Zone, High Intensity
3. Full Back, Low Intensity
4. Full Back, High Intensity
5. System Off
NOTE: The massage system is set to turn off fifteen (15) minutes after the last button
push. If the patient wishes to continue using the massage simply repeat the above steps.
NOTE: If the lights on the switch are flashing, unplug the chair from the outlet and
check all of the connectors of the heat system. If a connector is unhooked reconnect
it, plug in the power cord, and check the switch again. If all connections appear ok
and the lights still flash, unplug your chair and contact Champion’s customer service.
This does not affect the basic functions of the chair.
LIGHTS
MASSAGE
BUTTON
HEAT
BUTTON
(16)
Passage Manual REV1 040715 cam

OPTIONAL FEATURES – Heated and Heat/Massage
MAINTENANCE
CAUTION: Before performing any cleaning or maintenance to the heat or
heat/massage chair make sure that it is unplugged from the outlet. This will prevent a
shock hazard while working inside the chair.
Please reference the following pages on maintenance and cleaning instructions. Please wipe up all
spills as soon after they happen as possible. Use caution when cleaning around any of the cord
connections in the power components.
Make sure to wipe all moisture out of switch area after all cleaning.
CAUTION: DO NOT allow moisture to pool on top of the switch.
CAUTION: High pressure washing or “hosing down” chairs is not recommended.
CAUTION: Heat or heat/massage components are fixed to the inside of the removable
seat cushion. The seat cushion can be removed BUT must be flipped up and placed in
the chair. This allows the seat cushion to be moved for access to the inside of your
recliner without having to remove any components.
Note: Some components may have a different appearance as shown in the picture due to multiple
models of chairs. The serial number of the chair informs Customer Service of the proper
components for that chair.
SEAT
BACK
CABLE
(17)
Passage Manual REV1 040715 cam

ACCESSORIES
Accessories are items that may be ordered with your chair at the time of purchase or added by
your technician at any time. Instructions are provided as well as phone support. Discuss any
concerns you may have with the service team at the time you place your order.
WARNING: DO NOT use table as a seat.
CAUTION: Remove items and fold tables down prior to moving the chair.
Foldaway Side Tables
The foldaway side tables are mounted to the arms of the chair. There can be one on either side of the
chair. The side tables can also be ordered with cup holders.
IV Pole
Stainless construction, 1” diameter IV pole features two or four rams horn hooks, adjustable with infinite
positions; extended effective length 64”.
IV Pole Bracket
This bracket is used to mount IV pole on backside of either or both arms and accommodates a 1” diameter
pole.
IV Pole Base
The IV pole base accepts transfer of IV pole from chair bracket to IV pole base allowing patient to be mobile
and free of the chair.
Head Pillow/Lumbar Support
This removable cushion can be used for head or lumbar support. The pillow attaches around back of chair
with hook and loop fastener strap to allow placement of pillow at various positions to best suit the patient.
Arm Covers
Arm covers minimize the wear-and-tear on recliner arms. They fit snugly on the arm of the chair and are
easy to clean.
Over The Lap Tray
Slightly curved design with a drip channel on the top surface of the table to help contain spills. Cup holder
included. Black only.
NOTE: Chair, options and /or accessories covered in this manual may change without notice.
(18)
Passage Manual REV1 040715 cam

Note: Some components may have a different appearance as shown in the picture due to multiple
models of chairs. The serial number of the chair identifies the exact build of your chair assisting
Customer Service in the choice of the proper components for your chair.
(19)
Passage Manual REV1 040715 cam
/