Page is loading ...

Series 641RM Air Velocity Transmitter
Specifications - Installation and Operating Instructions
Bulletin E-66-RM
DWYER INSTRUMENTS, INC.
Phone: 219/879-8000 www.dwyer-inst.com
P.O. BOX 373 • MICHIGAN CITY, INDIANA 46361, U.S.A. Fax: 219/872-9057 e-mail: info@dwyer-inst.com
The Series 641RM Air Velocity Transmitter uses a heated
mass flow sensor technology. It has 8 user selectable
ranges from 250 FPM to 15000 FPM with corresponding
metric ranges of 1.25 MPS to 75 MPS. The Series 641RM
Air Velocity Transmitter provides an isolated 4-20 mA out-
put proportional to the velocity. With the optional 1/2˝ 4-1/2
digit LED display, the Series 641RM Air Velocity Transmitter
will provide a highly visible local readout of the velocity.
INSTALLATION
Location: Select a location where the temperature will be
within 32 to 140°F (0 to 60°C) to mount the enclosure. The
transmitter may be located any distance from the receiver
provided that the total loop resistance does not exceed 600
ohms. The probe should be located where conditions are
representative of the overall environment being monitored.
Avoid locations where turbulence, stagnation, or rapidly
fluctuating velocities or temperatures are present as these
conditions may affect the readings. The filter setting may be
used to average velocity readings in turbulent conditions.
Position: The transmitter is not position sensitive and may
be mounted in any orientation.
Probe Orientation: Dots on the probe indicate the direc-
tion of the calibrated airflow. Align these dots toward the
source of the process air.
Airflow: The Series 641RM Air Velocity Transmitter is
intended for use with clean dry air. Particulates in the air
may cause sensor damage. Dust accumulation may impair
the velocity measurement and will require probe cleaning.
SPECIFICATIONS
Service: Air and compatible, non-combustible gases.
Accuracy:
3% FS Process gas: 32 to 122°F (0 to 50°C).
4% FS Process gas: -40 to 32°F & 122 to 212°F
(-40 to 0°C & 50 to 100°C).
Response Time: Flow: 1.5 seconds to 95% of final value (out-
put filter set to minimum).
Temperature Limits: Process: -40 to 212°F (-40 to 100°C).
Ambient: 32 to 140°F (0 to 60°C).
Pressure Limit: 100 psi (6.89 bar) maximum.
Humidity Limit: Non-Condensing.
Power Requirements: 12–35 VDC, 10–16 VAC.
Output Signal: 4-20 mA, isolated 24V source, 3 or 4-wire
connection.
Output Filter: Selectable 0.5 –15 (seconds).
Loop Resistance: 600 ohms max.
Current Consumption: 300 mA max.
Electrical Connections: Screw terminal.
Mounting Orientation: Unit not position sensitive. Probe must
be aligned with airflow.
Weight: 13.2 oz (374.26 g).
Cable Length: 6 ft (1.82 m).
Probe Length: 12˝ (30.48 cm) standard.
Probe Diameter: 5/16˝ (0.79 cm).
OPTIONAL DISPLAY VERSION:
Display: 4-1/2 digit 1/2˝ Red LED.
Resolution: 1 FPM, 0.01 MPS
(10 FPM @ 10,000 and 15,000 FPM ranges).
Weight: 13.9 oz (394.16 g).
Agency Approvals: CE
The following standards were used for CE approval:
IEC 61000-4-2: 2001
IEC 61000-4-3: 2002
IEC 61000-4-4: 1995
IEC 61000-4-5: 2001
IEC 61000-4-6: 2003
IEC 55011: 1998
IEC 61326: 2002
89/336/EEC EMC Directive
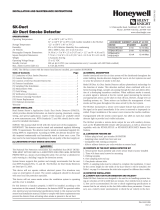
TO READ DISPLAY UNIT MUST BE MOUNTED HORIZONTALLY
AS SHOWN ABOVE. DISPLAY CAN BE TURNED 180° SO CON-
DUIT OPENING CAN BE POSITIONED TO THE RIGHT OR LEFT.
1/2 NPT
4-31/32
[126.21]
Ø5/16
[Ø7.94]
Ø13/64
[Ø5.16]
14-21/64
[53.07]
FOR A STANDARD 12˝ PROBE
1-5/8 [41.28] WITH LED
1-3/32 [27.78] WITHOUT LED
43/64
[17.07]
6 FT
[152.40]
31/64
[12.30]
1-25/32
[45.24]
1-39/64
[40.88]
641-RM bulletin 2/1/05 11:53 AM Page 1

NOTE: Where conduit connections are not made, a 1/2˝
NPT cable seal should be used to prevent contaminants
from entering the case. Where conduit connections are
made, make sure that any possible condensation within the
conduit will not flow into the transmitter housing.
ELECTRICAL CONNECTION
The Series 641RM Air Velocity Transmitter has been
designed for easy and flexible connection to power and
loop receivers. Electrical connection is made inside the
body of the device with a “Euro” style terminal block. The
device features a current loop that is fully isolated from the
power source. The current loop has an internal 24V isolat-
ed supply so no external loop power is required. With full
isolation, loop grounding is not a concern. The input power
requirements are also very flexible. The device may be pow-
ered from either an AC or DC power source.
3 or 4-Wire Connection
CAUTION: Do not exceed the specified supply voltage rat-
ing. Permanent damage not covered by the warranty may
result. Do not use an external power source on the current
loop connection.
Receiver-Transmitter Connection — The Series 641RM
Air Velocity Transmitter is designed as a three or four wire 4-
20 mA device. The current loop output is isolated from the
power supply input and provides an internal 24-volt loop
supply. With a DC power supply, a three or four-wire con-
nection may be used. Do not use a three-wire connection
with an AC power source. In a three-wire connection either
power supply wire may be used as the common. The total
loop resistance should not exceed 600 ohms.
CAUTION: Do not use a receiver with an internal power
supply or use an external supply in the current loop. The
current loop is powered from within the Series 641RM Air
Velocity Transmitter. Connecting an external supply to the
current loop may destroy the transmitter. Using an external
supply voids the warranty.
Power Supply Connection — The power supply may be
either AC or DC. The DC power may be from 12 to 35 volts.
The power connection is not polarity sensitive so the posi-
tive and negative connections may be made to either power
terminal. The AC connection may be from 10 to 16 VAC
RMS. Do not exceed 20 VAC. When selecting a transformer
please note that the specified output for transformers is at
some specified current. With a load current less than the
specified current transformer output may be significantly
higher than the specified voltage. Transformers with sec-
ondary voltages of 10 to 16 VAC are recommended.
CAUTION: Do not use transformers with a secondary volt-
age rating greater than 16 VAC RMS.
Wire Type and Length — The wire selection for an instal-
lation is often overlooked or neglected and may contribute
to improper or even intermittent operation. In all cases
ensure that the connection meets all applicable national
and local electrical codes. Although the 4-20 mA current
loop systems are relatively immune to wire or wiring related
problems, selection of the wire for some installations will be
an important factor in ensuring satisfactory system opera-
tion. Twisted conductors will usually be immune to most
stray electric and magnetic fields and to some extent elec-
tromagnetic fields, such as interference from RF transmit-
ters. With twisted pair wiring the current loop and the
power connections should be separate pairs. Avoid using
flat or ribbon cable that has no regular conductor twist.
Where interference is possible, it is recommended that
shielded wire be used. The shield must not be used as one
of the conductors and should be connected to ground at
only one end, generally at the power supply. Similarly, if the
installation uses conduit, the conduit should be connected
to protective ground as specified by the applicable code
and the signal wiring must not be connected to the conduit
at more than one point or as specified by the code.
The maximum length of wire connecting the transmitter
and receiver is a function of the wire resistance and receiv-
er resistance. The total loop resistance must not exceed
600 ohms, including the receiver resistance and wire resis-
tance. The power supply connection must be designed so
that the worst case voltage drop due to wire resistance will
not cause the power supply voltage at the transmitter to
drop below the specified value. Provided the power supply
voltage is maintained within the specified voltage range, the
Series 641RM Air Velocity Transmitter is not affected by
variations in power supply voltage.
TRANSMITTER SETUP
The Series 641RM Air Velocity Transmitter has been
designed for easy setup. It has five configuration parame-
ters that may be adjusted by the user. These parameters
are Output Filter, Range (in English or Metric), span, 4 mA
set-point and 20 mA set-point. All of these may be adjust-
ed at any time in the field. These adjustments may also be
easily returned to factory default.
A set of controls and indicators are provided within the unit
consisting of the select button, enter button, adjustment
control, and six LED indicators. When operating normally,
only the RUN LED indicator will be illuminated. During the
setup operation the LED indicators will indicate the para-
meter selected, when it is being adjusted, and status of the
adjustment process. If the unit is left in the setup mode for
several minutes without any activity it will return to the
normal operating mode.
Interior Label Diagram
POWER SUPPLY
AC OR DC
RECEIVER
4-WIRE
3-WIRE
RECEIVER NEGATIVE
COMMON
RECEIVER
DC SUPPLY
ONLY
(EITHER
POLARITY)
3-WIRE
RECEIVER POSITIVE
COMMON
RECEIVER
DC SUPPL
Y
ONLY
(EITHER
POLARITY)
Page 2
641-RM bulletin 2/1/05 11:53 AM Page 2

Two buttons and a potentiometer control the setup process.
The SELECT button is used to scroll between the setup
parameters.
The ENTER button allows access to each parameter for
adjustment.
The ADJUST potentiometer is used to change the value of
the parameters.
Holding the ENTER button for 2.5 seconds saves the new
parameter value.
Making Adjustments
The adjustment process has three steps: select the para-
meter, adjust the parameter, save the new value. These are
described in the following steps.
1. Select the parameter: Each time the SELECT but-
ton is pressed the LED indicator will advance to the next
parameter. When the last parameter, SPAN, is selected,
the next time the SELECT is pressed the unit will return
to RUN mode. Press the SELECT button until the LED
indicator illuminates the desired parameter. Press
ENTER. The selected indicator will begin to blink, show-
ing the parameter may now be adjusted. If the unit is left
in the setup mode, after several minutes it will reset to
the operate mode.
2. Adjust the parameter: Turn the ADJUST poten-
tiometer until the desired setting is made. This may be
adjusted using a small screwdriver or similar tool. Be
careful not to force the control past its stops or damage
will result.
3. Save the parameter: To save the new parameter
press and hold the ENTER button. The LED indicator will
begin to flash at a faster rate. After about 2.5 seconds
all of the LED indicators will flash when the parameter is
saved. If you do not want to save the parameter press
the SELECT button without entering the parameter. The
adjusted value will be discarded and next LED indicator
will be illuminated.
Adjusting the Output Filter
The output filter may be adjusted to smooth the readings
when measuring turbulent flow. The time constant may be
adjusted from 0.5 seconds to 15 seconds. To adjust the fil-
ter time constant, select the FILTER indicator. Press ENTER
to enable adjustment. Turn the ADJUST until the desired
amount of damping is achieved. To save the value press and
hold the ENTER button until the LED indicators all flash, indi-
cating the value was saved. To discard the adjustment press
SELECT before pressing the ENTER button.
Range Selection
The range selection allows you to select one of eight ranges
in either feet per minute (FPM) or meters per second (MPS).
Ranges:
FPM: 250, 500, 1000, 2000, 3000, 5000, 10000, 15000
MPS: 1.25, 2.5, 5, 10, 15, 25, 50, 75
Select the RANGE indicator by pressing ENTER when the
RANGE LED indicator is illuminated. The A,B,C LED indi-
cators will display which range setting is currently active.
Press ENTER to enable adjustment. Turn the ADJUST until
the desired range indication is achieved. If you want to dis-
card the adjustment press SELECT. If you want to save the
range press and hold ENTER. The RANGE LED will blink at
a faster rate for about 2.5 seconds then all of the LEDs will
flash indicating the value was saved.
The range setting is displayed with the LED indicators. The
function of these indicators is summarized on the control
label inside the unit. The following table summarizes the
indicator status for each range setting
1: Indicator on
0: Indicator off
% of Full Velocity
63%
90%
95%
99%
Min.
0.5
1.1
1.5
2.3
Mid.
7.5
17.3
22.5
34.5
Max.
15
34.5
44.9
69.0
Range/Units
250 FPM
500 FPM
1000 FPM
2000 FPM
3000 FPM
5000 FPM
10000 FPM
15000 FPM
1.25 MPS
2.5 MPS
5 MPS
10 MPS
15 MPS
25 MPS
50 MPS
75 MPS
Run
1
1
1
1
1
1
1
1
0
0
0
0
0
0
0
0
Filter
0
0
0
0
0
0
0
0
1
1
1
1
1
1
1
1
Range
1
1
1
1
1
1
1
1
1
1
1
1
1
1
1
1
Span
A
0
0
0
0
1
1
1
1
0
0
0
0
1
1
1
1
4 mA
B
0
0
1
1
0
0
1
1
0
0
1
1
0
0
1
1
20 mA
C
0
1
0
1
0
1
0
1
0
1
0
1
0
1
0
1
OUTPUT FILTER RESPONSE (values in seconds)
Page 3
Filter Setting on Adjust Dial
641-RM bulletin 2/1/05 11:53 AM Page 3

Span Setting
The Series 641RM Air Velocity Transmitter has been cali-
brated for standard sea level conditions. As a mass flow
device it will always read the air velocity for standard condi-
tions. Density changes due to barometric or absolute pres-
sure are not corrected automatically. The span setting
allows correction for altitude or other static pressure condi-
tions that affect the density of the process air. This parame-
ter allows for a ±50% adjustment in the span value.
To make the span adjustment you will need to know either
the absolute static pressure or the corrected velocity of the
process air. Set the air velocity to a known value, ideally
about 3/4 of the full-scale range value. Press SELECT until
the SPAN LED indicator is illuminated then press ENTER.
The SPAN LED will begin to blink. Adjust the control for the
desired velocity then press and hold the ENTER button until
all of the LED’s flash, indicating the new value was saved. If
you know the absolute static pressure you can compute the
corrected velocity using the following equation:
Where:
P0 is the standard pressure of 29.9 in. Hg. or 760 mm Hg
PA is the absolute pressure reading
Vrdg is the indicated velocity
Vcor is the corrected velocity
4 mA Setting
To make this setting you will need a milliammeter connect-
ed in the current loop. It is not required to use a known air
flow velocity to make this calibration setting. The calibration
settings of the velocity and mA outputs are independent of
each other. Press SELECT until the 4 mA LED indicator is
illuminated then press ENTER. The milliammeter will now
read approximately 4.0 mA. Adjust the control for a 4.0 mA
reading on the milliammeter. Press and hold ENTER to save
the new setting. Pressing SELECT before pressing ENTER
will restore the previous calibration value.
20 mA Setting
It is not required to use a known air flow velocity to make
this calibration setting. The calibration settings of the veloc-
ity and mA outputs are independent of each other. With the
milliammeter connected in the current loop, press SELECT
until the 20 mA LED indicator is illuminated. Press ENTER to
begin adjustment of the 20 mA set point. The 20 mA LED
will now be blinking. Adjust the control until the milliamme-
ter reads 20.0 mA. Press and hold ENTER to save the new
setting. Pressing SELECT before pressing ENTER will
restore the previous calibration value.
Restoring Factory Default Settings
The 4 mA, 20 mA, and Range settings override factory
default values. To restore these to the factory default set-
tings, start with the unit in the RUN mode. Press and hold
the ENTER button. The RUN LED indicator will begin to
blink. After about 2.5 seconds all LED indicators will flash
indicating the factory settings have been restored. Range
and Filter settings are not affected by this operation. If you
are unsure whether any have been altered, press the
SELECT button six times to sequence through all settings.
When you return to the RUN mode, the RUN LED indicator
will blink several times if either the 4 mA, 20 mA, or span
settings have been changed. The RUN LED will otherwise
remain on.
MAINTENANCE
In general the Series 641RM Air Velocity Transmitter should
require very little maintenance. In some installations dust
may accumulate on the sensor over time. This can be
removed by carefully brushing the probe with a small camel
hairbrush. If too much force is applied during cleaning, the
sensor of the Series 641RM Air Velocity Transmitter may be
damaged. Therefore, a trained technician should perform
the cleaning operation. A jet of air may also dislodge the
accumulated buildup. However, the sensor is delicate and
this operation should be done carefully with clean regulated
air. Using a shop air supply may exert enough force to dam-
age the sensor. Most air supplies of this sort will also con-
tain water or oil that could damage the sensor. Technical
grade denatured or isopropyl alcohol may be used where
the dust accumulation does not respond to brushing. Do
not use water. Always disconnect the power when perform-
ing a cleaning operation.
Aside from field calibrations for span, 4 mA and 20 mA set-
ting as described above, the Series 641RM Air Velocity
Transmitter cannot be fully factory calibrated in the field.
Because of specialized computer instrumentation required,
these units must be returned to Dwyer Instruments for fac-
tory calibration. Contact customer service to receive a
return goods authorization number before shipping.
©Copyright 2005 Dwyer Instruments, Inc. Printed in U.S.A. 1/05 FR# 443309-00 Rev. 1
Page 4
Po
PA
Vrdg
Vcor =
DWYER INSTRUMENTS, INC.
Phone: 219/879-8000 www.dwyer-inst.com
P.O. BOX 373 • MICHIGAN CITY, INDIANA 46361, U.S.A. Fax: 219/872-9057 e-mail: info@dwyer-inst.com
641-RM bulletin 2/1/05 11:53 AM Page 4
1/4