

2
Contents
Thanks for choosing TEAC. Read this manual carefully to get the
best performance from this unit.
Before Use .............................................................................................. 4
Discs ........................................................................................................ 6
Remote Control Unit ............................................................................ 12
Connection ........................................................................................... 14
Names of Each Control ....................................................................... 24
Playback ............................................................................................... 30
SACD Sound Mode ............................................................................. 34
Playback from a Specific Chapter/Track ........................................ 36
Slow-Motion Playback ....................................................................... 36
Single Stepping Playback .................................................................. 38
Direct Playback ................................................................................... 38
Title Select ............................................................................................ 40
Chapter Select ..................................................................................... 40
Time Select ........................................................................................... 42
Track or Time Select ........................................................................... 44
Picture Zoom ........................................................................................ 46
Select a Subtitle Language ................................................................ 46
Select an Audio Language ................................................................. 48
Change the Angle ................................................................................ 48
Repeat Playback .................................................................................. 50
Shuffle Playback .................................................................................. 52
Programmed Playback ....................................................................... 54
GUI ......................................................................................................... 58
Time Display.......................................................................................... 60
Settings ................................................................................................. 64
TV Display ...................................................................................... 66
TV Type ........................................................................................... 66
Video Output .................................................................................. 66
Picture Mode ................................................................................. 68
SLIDE SHOW MODE ..................................................................... 70
Angle Mark .................................................................................... 70
Captions ......................................................................................... 70
Digital Out ...................................................................................... 70
MPEG Out ........................................................................................72
96K LPCM Out ................................................................................ 72
Downmix ........................................................................................ 72
Audio DRC (Dynamic Range Compression) .............................. 74
Speaker Configuration ................................................................. 74
Speaker Distance ......................................................................... 74
Languages on DVD Movies ......................................................... 76
DVD-Audio Play Mode.................................................................. 76
Super Audio CD Play Mode ......................................................... 76
Selecting the Language for OSD (On Screen Display)............ 78
Parental Rating ............................................................................. 78
Password ....................................................................................... 80
Defaults .......................................................................................... 80
Setup Menu Mode ........................................................................ 80
Troubleshooting ................................................................................... 82
Specifications ...................................................................................... 88
Language Code List ............................................................................. 91
CAUTION
The product shall not be exposed to dripping or splashing and
that no object filled with liquids, such as vases, shall be placed
on the product.
Do not install this equipment in a confined space such as a
book case or similar unit.
ENGLISH
VARING: APPARATEN INNEHÅLLER LASER KOMPONENT MED
STRÅLNING ÖVERSTIGANDE KLASS 1.
“ADVARSEL: USYNLIG LASERSTRÅLING VED ÅBNING NAR
SIKKERHEDSAFBRYDERE ER UDE AF FUNKTION. UNDGÅ
UDSAETTELSE FOR STRÅLING”
“VAROITUS! SUOJAKOTELOA EI SAA AVATA. LAITE SISÄLTÄÄ
LASERDIODIN. JOKA LÄHETTÄ (NÄKYMÄTÖNTÄ) SILMILLE
VAARALLISTA LASERSÄTEILYÄ”.
ADVARSEL: USYNLIG LASERBESTRÅLING NÅR DENNE DELEN
ER ÅPEN OG SIKKERHETSSPERREN ER UTKOBLET UNNGÅ
UTSETTELSE FOR STRÅLING.
Downloaded From DvDPlayer-Manual.com TEAC Manuals
Page is loading ...

4
ENGLISH
Before Use
Conventions about This Manual
< This Owner's Manual largely describes how to control the
DV-20D from the provided remote control unit. The duplicate
buttons on the DV-20D provide the same functions.
< The types of functions and operations that can be used for a
particular disc vary depending on the features of that disc. In
some cases, these functions and operations may differ from
the descriptions given in this Owner's Manual. In this event,
follow the instructions given on the screen. This Owner's
Manual only covers basic disc operations.
< For some operations, the PROHIBIT icon “A” may appear on
the screen. This indicates that the operation described in this
Owner's Manual is not permitted for the current disc.
< The drawings about the TV screen and front panel display
used in this Owner's Manual are purely for the purposes of
explanation. The actual displays may differ slightly from what
are shown here.
Read this before operation
< As the unit may become warm during operation, always leave
sufficient space above the unit for ventilation.
< The voltage supplied to the unit should match the voltage as
printed on the rear panel. If you are in any doubt regarding this
matter, consult an electrician.
< Choose the installation location of your unit carefully. Avoid
placing it in direct sunlight or close to a source of heat. Also
avoid locations subject to vibrations and excessive dust, heat,
cold or moisture.
< Do not place the unit on the amplifier/receiver.
< Do not open the cabinet as this might result in damage to the
circuitry or electrical shock. If a foreign object should get into
the set, contact your dealer.
< When removing the power plug from the wall outlet, always
pull directly on the plug, never yank the cord.
< To keep the laser pickup clean, do not touch it, and do not
forget to close the disc tray.
< Do not attempt to clean the unit with chemical solvents as this
might damage the finish. Use a clean, dry cloth.
< Keep this manual in a safe place for future reference.
DO NOT MOVE THE UNIT DURING PLAYBACK
During playback, the disc rotates at high speed. Do NOT lift or
move the unit during playback. Doing so may damage the disc.
WHEN MOVING THIS UNIT
When changing places of installation or packing the unit for
moving, be sure to remove the disc and return the disc table to
its original position in the player. Then, press the power switch
to turn the power off, and disconnect the power cord. Moving
this unit with the disc loaded may result in damage to this unit.
“DTS” and “DTS Digital Surround” are registered trademarks
of Digital Theater Systems, Inc.
Manufactured under license from Dolby Laboratories. “Dolby”
and the double-D symbol are trademarks of Dolby Laboratories.
This product incorporates copyright protection technology that
is protected by method claims of certain U.S. patents and other
intellectual property rights owned by Macrovision Corporation
and other rights owners. Use of this copyright protection
technology must be authorized by Macrovision Corporation,
and is intended for home and other limited viewing uses only,
unless otherwise authorized by Macrovision Corporation.
Reverse engineering or disassembly is prohibited.
Kodak is a trademark of Eastman Kodak Company.
Windows Media and the Windows logo are trademarks, or
registered trademarks of Microsoft Corporation in the United
States and/or other countries.
“DTS” et “DTS Digital Surround” sont des marques déposées
de Digital Theater Systems, Inc.
Fabriquer sous license par Dolby Laboratories. “Dolby” et le
symbol double D sont des marques déposées de Dolby
Laboratories.
Ce produit fait appel à une technologie de protection des droits
d'auteur qui est protégée par des déclarations de méthodes
exprimées dans certains brevets des Etats-Unis et par d'autres
droits intellectuels appartenant à Macrovision Corporation et
d'autres détenteurs de droits. L'utilisation de cette technologie
de protection des droits d'auteur doit être autorisée par
Macrovision Corporation et est destinée uniquement à une
utilisation à la maison et à d'autres usages de visionnement
limité, sauf autorisation contraire de Macrovision Corporation.
L'ingénierie par inversion et le démontage sont interdits.
Kodak est une marque commerciale de Eastman Kodak
Company.
Windows Media et le logo Windows sont des marques, ou des
marques déposées, de la société Microsoft aux Etats-Unis
et/ou dans d’autres pays.
“DTS” y “DTS Digital Surround” son marcas comerciales
registradas de Digital Theater Systems, Inc.
Fabricado con licencia de Dolby Laboratories. “Dolby” y el
símbolo de la doble D son marcas registradas de Dolby
Laboratories.
Este producto incorpora una tecnología de protección de
derechos de autor que está protegida por los métodos de
ciertas patentes norteamericanas y otros derechos de
propiedad intelectual de Macrovision Corporation y otros
propietarios de derechos. El uso de este tecnología de
protección de derechos de autor debe estar autorizado por
Macrovision Corporation y está destinado al uso doméstico y
otras formas de visionado limitado exclusivamente, a menos
que así lo autorice Macrovision Corporation. Esta prohibido
intentar descompilar o utilizar partes del programa.
Kodak es una marca de Eastman Kodak Company.
Windows Media y el logotipo Windows son marcas registradas
o nombres comerciales de Microsoft Corporation en los
Estados Unidos y/o en otros países.
Downloaded From DvDPlayer-Manual.com TEAC Manuals
Page is loading ...

6
Discs
ENGLISH
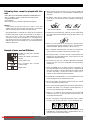
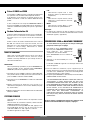
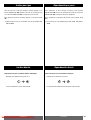
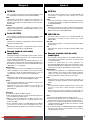
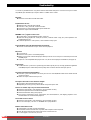
Region Number of DVD Video discs:
DVD players and discs are designed with region numbers that
dictate the regions in which a disc can be played. If the region
number on the disc you want to play does not match the region
number of your DVD player, you will not be able to play the disc.
In that case, an error message will appear on the screen.
The region number is printed on the rear panel of this unit.
Europe model Hong Kong model
Type of Discs That Can be Played on This
System
This player can playback discs bearing any of the following logos:
About DVD-RW
< DVD-RW discs that were recorded with copy-once only
permission cannot be played. The message, "COPY PROTECT
PROGRAM, UNPLAYABLE" appears in the display during these
parts of the disc.
< When playing a DVD-RW disc that was edited on a DVD
recorder, the screen may momentarily black out at the edited
point.
< When playing a DVD-RW disc that was edited on a DVD
recorder, you may see scenes from just before the edited
point.
< Up to 20 characters of a title name can be displayed.
About CD-R/CD-RW
CD-R/RW discs recorded in Audio CD format and finalized
correctly are playable. But depending on the quality of the disc
and/or the condition of the recording, some CD-R & CD-RW discs
may not be playable.
MP3/WMA/JPEG compatibility
This player is compatible with CD-R, CD-RW and CD-ROM (Kodak
picture CD, etc.) discs that contain MP3/WMA audio tracks or
JPEG files.
< File names of MP3/WMA/JPEG should be alphanumeric
characters. This unit cannot display symbols and full-size or 2
bytes-wide characters (such as Japanese, Chinese, etc.)
correctly. Also, be sure to use the file extension “.mp3”,
“.wma”, “.jpg” or “.jpeg”.
< Only the first 8 characters of folder and track names
(excluding the “.mp3”, “.wma”, “.jpg” or “.jpeg” extension) are
displayed.
< Use CD-R or CD-RW media for recording your MP3/WMA or
JPEG files. The disc must be finalized in order to play.
< The CD-ROM must be ISO 9660 compatible.
< This player is not compatible with multi-session discs.
< When more than 250 files or folders are recorded on the disc,
the unit might not be able to play it correctly.
< It may take time to display a progressive JPEG picture.
< Depending on the file size and compression rate, some JPEG
pictures cannot be displayed correctly.
< Mono or stereo MPEG-1 Audio Layer 3 format, 44.1 or 48kHz,
fixed bit-rate.
< Not compatible with variable bit-rate (VBR) files.
< Audio encoded at 128Kbps should sound close to regular audio
CD quality. Although this player will play lower bit-rate
MP3/WMA tracks, the sound quality becomes noticeably
worse at lower bit-rates.
Caution:
< If you record a disc using a personal computer or a DVD
recorder, even if it is recorded in a compatible format, there
are cases in which it may not play because of the settings of
the application software used to create the disc. (Check with
the software publisher for more detailed information.)
< Unfinalized DVD-R/RW discs cannot be played.
DVD Video:
• Single-sided or double-sided discs
• Single layer or dual layer discs
• Dolby Digital, DTS, MPEG or Linear PCM digital
audio
• MPEG-2 digital video
• This unit can play DVD-R/DVD-RW/DVD+R/
DVD+RW discs recorded in DVD video format.
Discs are generally divided into one or more titles.
Titles may be further subdivided into chapters.
DVD Audio:
• Single sided discs
• Single layer or dual layer discs
• Linear or packed PCM digital audio
• Some discs may contain MPEG-2 video, and
Dolby Digital, DTS or MPEG digital audio.
Discs are generally divided into one or more
groups. Groups may be further subdivided into
tracks.
Audio CD:
• 12 cm or 8 cm discs
• Linear PCM digital audio
Audio CDs are divided into tracks.
SACD (Super Audio CD):
• 12 cm discs
• Digital audio
Super Audio CDs are divided into tracks.
Video CD:
• 12 cm or 8 cm discs
• MPEG-1 digital audio
• MPEG-1 digital video
Video CDs are divided into tracks.
Picture CD:
Picture CD:
• 12 cm
• Digital video (JPEG)
Downloaded From DvDPlayer-Manual.com TEAC Manuals

7
ENGLISH
How to remove the disc How to hold the disc
< Always place the disc on the disc tray with the label side
uppermost. (Compact discs can be played or recorded only on
one side.)
< To remove a disc from its storage case, press down on the
center of the case and lift the disc out, holding it carefully by
the edges.
< Should the disc become dirty, wipe the surface radially (from
the center hole outward towards the outer edge) with a soft,
dry cloth:
< Never use such chemicals as record sprays, antistatic sprays
or fluid, benzine or thinner to clean the discs. Such chemicals
will do irreparable damage to the disc's plastic surface.
< Discs should be returned to their cases after use to avoid dust
and scratches that could cause the laser pickup to “skip.”
< Do not expose discs to direct sunlight or high humidity and
temperature for extended periods. Long exposure to high
temperatures will warp the disc.
< Do not play any disc that is warped, deformed or damaged.
Playing such discs may cause irreparable harm to the playing
mechanisms.
< CD-R and CD-RW discs are more sensitive to the effects of
heat and ultraviolet rays than ordinary CDs. It is important that
they are not stored in a location where direct sunlight will fall
on them, and which is away from sources of heat such as
radiators or heat-generating electrical devices.
< Printable CD-R and CD-RW discs aren't recommended, as the
label side might be sticky and damage the unit.
< Do not stick papers or protective sheets on the discs and do
not use any protective coating spray.
< Use a soft oil-based felt-tipped pen to write the information on
the label side. Never use a ball-point or hard-tipped pen, as
this may cause damage to the recorded side.
< Never use a stabilizer. Using commercially available CD
stabilizers with this unit will damage the mechanisms and
cause them to malfunction.
< Do not use irregular shape CDs (octagonal, heart shaped,
business card size, etc.). CDs of this sort can damage the unit:
< If you are in any doubt as to the care and handling of a CD-
R/CD-RW disc, read the precautions supplied with the disc, or
contact the disc manufacturer directly.
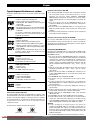
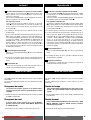
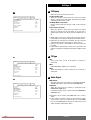
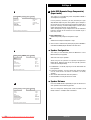
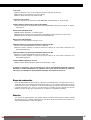
Number of audio tracks recorded
on the disc
Number of subtitles recorded on
the disc
Screen aspect ratio
Disc recorded with multiple
camera angles
Region code
Example of Icons used on DVD discs:
Following discs cannot be played with this
unit:
• CD-G, Data part of CD-EXTRA, DVD-RAM and DVD-ROM discs
• Discs recorded in a color system other than PAL or NTSC
• Illegally produced discs
• Cratched discs
• Discs that are dusty, soiled or marked with fingerprints
Warning:
If you attempt to play back such discs, there is a risk that
sudden loud noise can blast over the speakers at full volume
and cause damage to the speakers and your hearing.
Copy-protected discs and other discs which do not conform to
the CD standard may not play back correctly in this player. If
you use such discs in this unit, TEAC Corporation and its
subsidiaries cannot be responsible for any consequences or
guarantee the quality of reproduction. If you experience
problems with such non-standard discs, you should contact the
producers of the disc.
Downloaded From DvDPlayer-Manual.com TEAC Manuals
Page is loading ...
Page is loading ...
Page is loading ...
Page is loading ...

12
ENGLISH
Remote Control Unit
The provided Remote Control Unit allows the unit to be operated
from a distance.
When operating the remote control unit, point it towards the
remote sensor on the front panel of the unit.
< Even if the remote control unit is operated within the effective
range, remote control operation may be impossible if there are
any obstacles between the unit and the remote control.
< If the remote control unit is operated near other appliances
which generate infrared rays, or if other remote control
devices using infrared rays are used near the unit, it may
operate incorrectly. Conversely, the other appliances may
operate incorrectly.
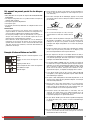
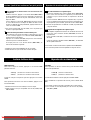
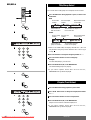
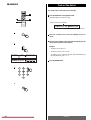
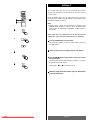
Battery Installation
Remove the battery compartment cover.
Insert two “AAA“ (R03, UM-4) dry batteries. Make sure that the
batteries are inserted with their positive “+“ and negative “_“
poles positioned correctly.
Close the cover.
Battery Replacement
If the distance required between the remote control unit and main
unit decreases, the batteries are exhausted. In this case replace
the batteries with new ones.
Precautions concerning batteries
< Be sure to insert the batteries with correct positive “+“ and
negative “_“ polarities.
< Use batteries of the same type. Never use different types of
batteries together.
< Rechargeable and non-rechargeable batteries can be used.
Refer to the precautions on their labels.
< When the remote control unit is not to be used for a long time
(more than a month), remove the batteries from the remote
control unit to prevent them from leaking. If they leak, wipe
away the liquid inside the battery compartment and replace the
batteries with new ones.
< Do not heat or disassemble batteries and never dispose of old
batteries by throwing them in a fire.
3
2
1
Downloaded From DvDPlayer-Manual.com TEAC Manuals
Page is loading ...

14
ENGLISH
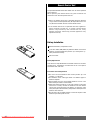
FRONT SURROUND CENTER
OPTICAL
A C
LRLR
SUBWOOFER
6CH IN
DIGITAL IN
Amplifier/Amplificateur/Amplificador
A B
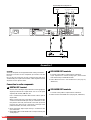
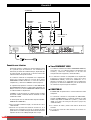
CAUTION:
Switch off the power to all equipment before making connections.
Read the instructions of each component you intend to use with
this unit.
Be sure to insert each plug securely. To prevent hum and noise,
avoid bundling the signal interconnection cables together with the
AC power cord or speaker cables.
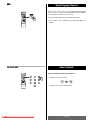
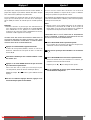
Connection to audio components
DIGITAL OUT terminal
Connect one of the digital output terminals to the appropriate
digital input terminal of a digital device such as an AV digital
amplifier, CD recorder, MD deck, etc.
Use a commercially-available RCA coaxial cable or optical
digital cable.
When inserting the plug of the optical cable, the protective
shutter of the terminal will open and you should hear it click
into position when fully inserted. Be careful that you do not
force the plug, because this could result in damage to the
protective shutter, the cable, or the unit itself.
< Select the proper digital output setting in accordance with
your connection.
< Some DVD-Audio and all SACD audio is output from only the
analog outputs.
A
Connection 1
6CH AUDIO OUT terminals
6 channel analog audio is output from these terminals.
If your amplifier has 6 channel analog inputs, connect them
with commercially-available RCA cables.
< Select Multi-Channel in the SETUP menu (see page 72,
“Downmix”).
2CH AUDIO OUT terminals
2 channel analog audio is output from these terminals.
< Select Stereo in the SETUP menu (see page 72, “Downmix”).
C
B
Downloaded From DvDPlayer-Manual.com TEAC Manuals
Page is loading ...

16
ENGLISH
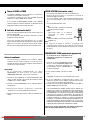
Connection 2
FED
G
VIDEO
INSCART
S-VIDEO
IN
COMPONENT
VIDEO IN
YPB PR
TV (MONITOR)
Connect one of
these cables
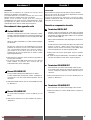
Connection to a TV
Connect the unit to your TV or monitor using one of the
following types of connectors. The connections are listed in
order of picture quality, beginning with the best possible.
Additional information on each connection type is provided
below.
If your TV or monitor is compatible with progressive scan,
connect the TV via the COMPONENT VIDEO jacks using a
component video cable, and select “PROG ON” (see page
17).
Connecting the RGB SCART output (AV CONNECTOR) using
an RGB-ready SCART cable, or connecting the
COMPONENT VIDEO jacks using a component video cable is
the next best choice.
S-VIDEO is your third choice. If your TV has an S-Video input
jack, connect the TV using a quality S-Video cable.
Composite video output (SCART-COMPOSITE or VIDEO OUT)
would be your final choice.
< For better picture quality, do not connect more than one
video cable.
< Connect this unit directly to the TV. If the TV is connected
through a video cassette recorder, you may experience
distorted picture quality during playback of a copy protected
DVD disc.
COMPONENT VIDEO jack
If your TV or monitor has COMPONENT VIDEO IN jacks,
connect them with a quality component video cable, and
select “Component” in the Setup menu (see page 66, “Video
Output”).
< If your TV or monitor is compatible with progressive scan,
connect the TV via the COMPONENT VIDEO jack and select
“PROG ON”. If your TV or monitor isn’t compatible with
progressive scan, do not select “PROG ON”, otherwise no
picture will be shown on the monitor.
AV CONNECTOR
The AV CONNECTOR can output RGB or composite video
signals.
If your TV or monitor is compatible with RGB SCART, connect
the AV CONNECTOR and your TV with a 21-pin RGB-ready
SCART cable, and select “RGB” in the Setup menu (see page
66, “Video Output”).
< Both audio and video signals are output from this socket.
< The audio signal output from this socket is stereo.
E
D
Downloaded From DvDPlayer-Manual.com TEAC Manuals

17
ENGLISH
S-VIDEO or VIDEO jacks
The S-VIDEO connection is your third choice, and is superior
to the standard composite video connection.
If the TV or monitor has an S-VIDEO jack, connect it with a
high quality S-VIDEO cable.
If neither COMPONENT VIDEO nor S-VIDEO are available,
connect the TV or monitor with a high quality RCA cable
designed for video applications.
AC power cord
Insert the supplied AC power cord in the DV-20D’s socket.
After all other connections are complete, connect the plug to
the wall socket.
To avoid fire, electric shock, etc., do not use any power
cords other than the one included with the DV-20D. If you are
not going to use the unit for some time, disconnect the power
cord from the wall socket.
G
F
COLOR SYSTEM
You have to select the color system to match your TV.
When all the connection has been done, turn the DVD player
and the connected TV on.
If your TV is MULTI or PAL, press the PAL/NTSC button
repeatedly until “MULTI” or “PAL” appears on the TV screen.
The default setting is PAL.
PAL:
Select PAL when a PAL TV (European
standard) is connected.
NTSC:
Select NTSC when a NTSC TV (American
standard) is connected.
MULTI:
Select Multi when a MULTI TV is
connected.
Note:
< This setting will be reset to the default when you turn the
power off. Be sure to set the desired mode in the SETUP menu
(see page 66, “TV Type”).
PROGRESSIVE SCAN
If your TV does not support progressive scan, do not use this
setting.
1. Connect the COMPONENT VIDEO OUT jacks
to your TV’s COMPONENT VIDEO IN jacks,
and select “Component” in the SETUP
menu.
(See “CAUTION” on the left column.)
2. Press the SETUP button, and then press the
GUI button.
“PROG ON” will light up in the front panel display.
< The default “PROG OFF” setting is for regular TVs that are not
capable of progressive scan (the technology called interlace
scan is used).
< When set to PROG ON, the RGB, S-VIDEO and VIDEO terminals
are disabled.
‘CONSUMERS SHOULD NOTE THAT NOT ALL HIGH
DEFINITION TELEVISION SETS ARE FULLY COMPATIBLE WITH
THIS PRODUCT AND MAY CAUSE ARTIFACTS TO BE
DISPLAYED IN THE PICTURE. IN CASE OF 525 OR 625
PROGRESSIVE SCAN PICTURE PROBLEMS, IT IS
RECOMMENDED THAT THE USER SWITCH THE CONNECTION
TO THE ‘STANDARD DEFINITION’ OUTPUT. IF THERE ARE
QUESTIONS REGRADING OUR TV SET COMPATIBILITY WITH
THIS MODEL 525p AND 625p DVD PLAYER, PLEASE CONTACT
OUR CUSTOMER SERVICE CENTER.’
There are additional settings you need to set before operating
the DV-20D. See the section, “Settings”.
PAL/
NTSC
GUI
SETUP
Before Going On
Once a connection with the TV or monitor has been made,
you need to set the following settings. Otherwise, distorted
images or no picture at all would appear on the TV screen.
CAUTION:
In the default setting, the COMPONENT jacks are not active.
If you want to use COMPONENT VIDEO OUT, perform the
following steps.
1. Connect the VIDEO jack with an RCA video cable. You can
use the provided yellow cable. (Or connect the S-VIDEO
jacks with an S-VIDEO cable.)
2. Connect the COMPONENT jacks with a component video
cable.
3. Turn the unit and TV on, and select “Component”
in the SETUP menu (see page 66, “Video Output”).
4. Turn the unit off and disconnect the RCA video cable (or the
S-VIDEO cable).
Downloaded From DvDPlayer-Manual.com TEAC Manuals
Page is loading ...
Page is loading ...
Page is loading ...
Page is loading ...

22
ENGLISH
Connection 3
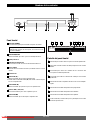
Positioning of the Speakers
The positioning of speakers differs according to the size and
acoustics of the listening room. While actually listening to a
program source, try various speaker positions to determine
which layout provides the best surround effect.
Place the speakers connected to “L” to your left, and “R” to
your right.
Front speakers
Use magnetic shielded speakers, if you are using them near
your TV.
Place the front speakers in front of the listening position, to the
left and right of a TV.
Center speaker
Use a magnetic shielded speaker, if you are using it near your
TV. Place a center speaker between the front speakers, on or
below the TV. This speaker stabilize the sound image.
Surround speakers
Install these speakers above the level of the listener's ears, to
the left and right.
Do not install the surround speakers too far behind the
listening position. It might be effective to direct the rear
speakers towards a wall or ceiling to further disperse the
sound.
Subwoofer
Reproduces powerful and deep bass sounds.
Subwoofers are most effective when placed on or near the
floor and in a corner of the room. Refer to the instructions that
came with your sub-woofer for placement suggestions.
D
C
B
A
CENTER
FRONT
(LEFT)
SURROUND
(LEFT)
SURROUND
(RIGHT)
FRONT
(RIGHT)
SUBWOOFER
Downloaded From DvDPlayer-Manual.com TEAC Manuals
Page is loading ...

24
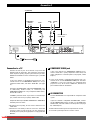
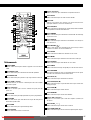
Front Panel
POWER switch
Press this switch to turn the unit on or standby.
OPEN/CLOSE button
Use this button to open and close the disc tray.
Disc tray
Power indicator
Lights up when the power is on.
Remote sensor
When operating the remote control unit, point it towards the
Remote sensor.
Display
PLAY button (y)
Use this button to start playback.
< The PLAY button (y) of the remote control unit can be used to
start playback.
PAUSE button (J)
Use this button to pause playback.
SKIP buttons (.//)
Press these buttons to skip chapters or tracks.
STOP button (H)
Use this button to stop playback.
J
I
H
G
F
E
D
C
B
The equipment draws nominal non-operating power from
the AC outlet with its POWER switch in the STANDBY
position.
A
ENGLISH
Names of Each Control
D FE JB CA
HG
I
VCD
MP3
DVD
SACD
ROM
JPEG
AUDIO
MULTI
P.SCAN TITLE GROUP CHP/TRK PPCM PROG. RANDOM ALL ABD
1 2 3 4 5 6 7 8
9
Front Panel Display
Lights to indicate the currently playing disc.
Lights when progressive video signals are being output.
Lights to indicate the names of sections of the disc being
played.
Lights to indicate the currently playing audio format.
Lights during playback of multiple angle disc.
Lights in the programmed play mode.
Lights in the random play mode.
Lights in the repeat play mode.
Displays the title, track number and elapsed time during
playback.
9
8
7
6
5
4
3
2
1
Downloaded From DvDPlayer-Manual.com TEAC Manuals

25
ENGLISH
Direction buttons
Use these buttons to select items in a menu.
SETUP button
Use this button to access the SETUP menu.
GUI button
Use this button to display a GUI (Graphical User Interface) bar on
the TV screen.
PAL/NTSC button
Use this button to select PAL, NTSC or MULTI, to match your TV
standard.
DIMMER button
Use this button to select the brightness of the unit's front panel
display.
DISPLAY button
Use this button to display information about the currently playing
disc.
RETURN button (
)
Use this button to cancel the menu when a top menu is displayed
on the TV screen.
ENTER button
Use this button to confirm your selection or entry.
MENU button
Use this button to display the disc's title menu.
SUBTITLE button
Use this button to select subtitles.
ANGLE button
Use this button to change camera angles.
PROGRAM button
This button is used to program the tracks on a CD for playback in
the desired order.
PLAY button (G)
Use this button to start playback.
PAUSE/STEP button (J)
Use this button to pause playback or to playback images frame-by-
frame.
STOP button (H)
Use this button to stop playback.
RANDOM button
Use this button for shuffle playback.
SKIP buttons (.//)
Press these buttons to skip chapters or tracks.
SLOW button ( / )
Use this button for slow-motion playback.
OPEN/CLOSE button (L)
Use this button to open and close the disc tray.
b
a
Z
Y
X
W
V
U
T
S
R
Q
P
O
N
M
L
K
J
Remote Control Unit
POWER button
Use this button to turn the unit on and standby.
REPEAT 1/ALL button
Use this button to select repeat modes.
REPEAT A-B button
Use this button to specify a section and play it repeatedly.
SCAN buttons (m/,)
During playback, these buttons are used for fast forward and fast
reverse.
Numeric buttons
Use these buttons to key in track numbers, passwords, etc.
CLEAR button
Use this button to clear programmed tracks.
AUDIO button
Use this button to select the desired language for audio playback.
ZOOM button
Use this button to enlarge the video image.
TITLE/PBCbutton
Use this button to return to title menu.
I
H
G
F
E
D
C
B
A
Downloaded From DvDPlayer-Manual.com TEAC Manuals
Page is loading ...
Page is loading ...
Page is loading ...
Page is loading ...

30
DVD/DVD-A/CD/SACD/VCD/MP3/WMA/JPEG
ENGLISH
Playback 1
< Turn the TV on and set its input to the correct position for DVD
viewing.
< When this unit is connected to a stereo system, turn the
system on.
Press the POWER switch to turn the unit on.
Press the OPEN/CLOSE button (L).
Place a disc on the tray with the printed label face up.
Never place more than one disc on the tray.
Press the OPEN/CLOSE button (L) to close the tray.
DVD
When a DVD is loaded, the playback may start automatically.
If a title menu appears on the screen, select an item by
pressing the
5
/
b
/
g
/
t
buttons and then press the ENTER
button.
< Depending on the disc, you can use the numeric buttons to
select an item.
< “Title menu” may simply be called “menu” or “title” in the
instructions supplied with the disc.
< If you press the MENU button or the TITLE button during
playback, title menu will appear on the screen. (In some cases,
the playback might restart from the beginning of the disc.)
CD/SACD
Press the PLAY button (
y) to start playback.
Video CDs with PBC
Press the PLAY button (
y).
When a Video CD (Version 2.0) with Playback Control
functions(PBC) is loaded, a menu will appear on the screen.
Select an item by pressing the numeric buttons to start
playback.
< Press the / button to advance to the next page. Press the
.button to return to the previous page.
< If you press the RETURN button during playback, the menu will
appear on the screen.
< Following buttons does not work during PBC playback.
REPEAT, PROGRAM, RANDOM
< Press the PBC button to turn the PBC function on or off.
If you press the PBC button during playback, playback will
stop.
When the PBC function is off:
If you press the PLAY button (y) in the stop mode, playback
will start from the first track.
When the PBC function is on:
If you press the PLAY button (y) in the stop mode, a menu will
appear on the screen.
Select an item by pressing the numeric buttons to start
playback.
< If you press the numeric buttons in the stop mode, the PBC
function will be turned off, and the playback will start from the
selected track.
4
3
2
1
1
2
3
4
1 2 4 3
Downloaded From DvDPlayer-Manual.com TEAC Manuals
Page is loading ...

32
ENGLISH
Playback 2
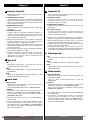
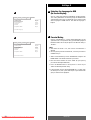
MP3/WMA
When an MP3/WMA disc is loaded, directories will be shown
on the screen.
Select a directory by pressing the
5
/
b
/
g
/
t
buttons and
press the ENTER button.
Track numbers and titles(file names) will appear on the screen.
Select a track and press the PLAY button (
y). Playback will
start from the selected track.
< During playback, elapsed time of the current file is displayed on
the front panel display.
< To change the play mode, press the REPEAT 1/ALL button until
the desired mode is displayed on the TV screen.
< To play another track, select the track in the stop mode, and
press the PLAY button (
y).
JPEG CD
When a JPEG disc is loaded, directories will be shown on the
screen.
Select a directory by pressing the
5
/
b
/
g
/
t
buttons and
press the PLAY button (
y).
File names will appear on the screen. Select a file and press
the PLAY button (
y). Slide show will start from the selected
file.
< During playback, you can press the SKIP buttons (.//)
to select another picture. You can also use the (
5
/
b5
/
b
)
buttons to rotate/flip the image on the TV.
< Some files on the JPEG disc may be distorted during playback
due to the configuration or characteristics of the disc.
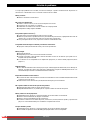
Directory’s
name
File name
File number
Play mode
d
c
b
a
Nom du répertoire
Nom du fichier
Numéro du fichier
Mode de lecture
d
c
b
a
Nombre del directorio
Nombre de archivo
Número de archivo
Modo de
reproducción
d
c
b
a
DVD/DVD-A/CD/SACD/MP3/WMA/JPEG
C
B
A
A
B
C
To start playback
In the stop mode, press the PLAY button (y).
To suspend playback temporarily (pause mode)
Press the PAUSE/STEP button (J) during playback.
The image stills with DVD discs, or music is interrupted with
MP3/WMA or CDs.
To resume playback, press the PLAY button (y).
To stop playback of a CD, SACD, VCD, MP3 or WMA
Press the STOP button (H).
C
B
A
Downloaded From DvDPlayer-Manual.com TEAC Manuals
Page is loading ...

34
DVD/DVD-A/CD/SACD/VCD/MP3/WMA
ENGLISH
Playback 3
To stop and resume playback of a DVD
If you press the STOP button (H) during DVD playback, the unit
runs in RESUME mode, as the display indicates.
If you want to cancel the RESUME mode and stop playback
completely, press the STOP button (H) again.
To resume playback
When you stop playback of DVD by pressing the STOP button
(H), the interrupted point is kept in memory and playback
starts from that point when you press the PLAY button (y).
< The memory is cleared if you disconnect the power cord.
< If you open the disc tray during playback of a DVD, “OPEN” is
displayed on the TV screen. If you close the disc tray with the
DVD still on it, “CLOSE”, ”DISC LOADING” and “PRESS PLAY
TO RESUME PLAY” are displayed on the TV screen and
playback starts from the beginning of the disc, not the point
where playback was stopped. If you press the PLAY button
(y) before that message has gone out, playback starts from
the interrupted point.
To open the disc tray
Press the OPEN/CLOSE button (L) to open the disc tray.
< When the tray is left openingfor about 1.5 minutes, the tray will
close automatically.
Power Off Function
When the unit is left in the stop mode for about 8 minutes, the
unit enters power standby mode.
F
E
D
E
E
D
D
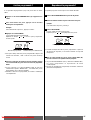
Hybrid SACDs have two layers, the CD and SACD layers.
The SACD layer may contain Stereo area and Multi-channel area.
Layer Changing
Press the TITLE button repeatedly to choose the CD layer or
the SACD layer when playback is stopped.
< You cannot switch between the CD and SACD layers during
playback.
Channel Changing
Press the AUDIO button repeatedly to choose ”SACD MULTI”
(Multi-channel) or ”SACD” (Stereo) when playback is
stopped.
< The sound mode will appear on the front panel.
SACD Sound Mode
SACD
Downloaded From DvDPlayer-Manual.com TEAC Manuals
Page is loading ...

ENGLISH
36
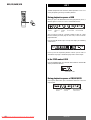
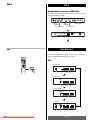
Playback from a specific Chapter/Track
To skip to a specific chapter/track.
During playback, press the SKIP button (. or/ )
repeatedly until the desired chapter or track is found. The
selected chapter/track will be played from the beginning.
When the . button is pressed during playback, the track
being played will be played from the beginning. To return to
the beginning of the previous track, press the . button
twice.
< During PBC playback of a VCD, you cannot return to the
previous track.
Search for a part of a chapter/track
To quickly search the disc in the forward or reverse direction,
press the SCAN button (mor,) during playback.
Press the PLAY button (y) when the part you want to listen to
is found.
Each time the SCAN button (mor,) is pressed, the
Search speed is incremented.
< The sound is muted during playback of DVD/VCD.
< This function may not work with some discs.
B
A
B A
A
B
DVD/DVD-A/CD/SACD/VCD/MP3/WMA
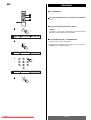
Slow-Motion Playback
DVD only
To play a disc in slow-motion, press the SLOW button during
playback.
SLOW ( ): slow forward playback
SLOW ( ): slow reverse playback
Each time the SLOW button is pressed, the speed is changed.
To resume normal playback, press the PLAY button (y).
< The sound is muted during slow-motion playback.
< This function is not available for CD, SACD, VCD, MP3 and
WMA.
DVD
Downloaded From DvDPlayer-Manual.com TEAC Manuals
Page is loading ...

38
ENGLISH
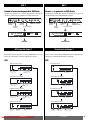
Single Stepping Playback
To play a disc step by step, press the PAUSE/STEP button (J)
during playback. Each time the PAUSE/STEP button (J ) is
pressed, the picture advances by one frame.
To resume normal playback, press the PLAY button (y).
< This function is not available for CD, SACD, VCD, MP3 and
WMA.
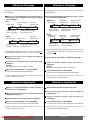
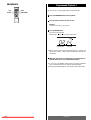
Direct Playback
Select a track by pressing the numeric buttons.
Example: To select track No.18
Playback starts from the selected track.
CD/SACD/VCD
DVDDVD
Downloaded From DvDPlayer-Manual.com TEAC Manuals
Page is loading ...

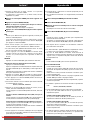
40
ENGLISH
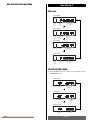
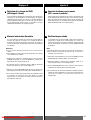
Title/Group Select
Chapter/Track Select
DVD/DVD-A
You cannot select a title/group and a chapter/track at one time.
Press the GUI button during playback or pause, or when in the
STOP mode.
DVD
DVD-A
< When in the STOP mode, the display will look like “--/02” and
only the title or the group can be selected. If this is the case, go
to step .
Press the
t
button to change the title/group number to “--”.
Press the numeric buttons to select a title/group.
Example:
To select Title/Group 2, press 0 and 2.
Press the PLAY button (y) or the ENTER button.
The selected title/group starts playing.
< If you select numbers which don't exist on the disc,
PROHIBITED icon A will be displayed.
4
3
2
3
1
01/02 01/11
00:03:42
4
1
3
2
1
1
2
3
4
2
3
4
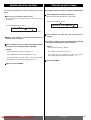
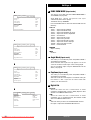
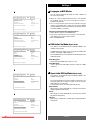
Press the GUI button during playback or pause mode.
Press the t button twice to change the chapter/track number
to “---”.
Press the numeric buttons to select a chapter/track.
Press the PLAY button (y) or the ENTER button.
Playback starts from the selected chapter/track.
< If you select numbers which don't exist on the disc,
PROHIBITED icon A will be displayed.
4
3
2
1
Current title
number
Total number of
titles on the disc
Total number of chapters in
the current title
Current chapter
number
Elapsed time of the
current title
Current group
number
Total number of
groups on the disc
Total number of tracks
in the current group
Current track
number
Elapsed time of the
current track
01/02 003/020
00:03:42
Downloaded From DvDPlayer-Manual.com TEAC Manuals
Page is loading ...

42
ENGLISH
Time Select
DVD
Press the GUI button.
Press the
t
button three times to change the time indication
to “--:--:--”.
Input the time by pressing the numeric buttons.
Example:
To select a scene 2 hours 30 minutes 10 seconds from the
beginning of the selected title, press 023010.
Press the PLAY button (y) or the ENTER button.
Playback starts from the selected part.
< If you select the numbers which doesn't exist on the disc,
PROHIBIT icon A will be displayed.
4
3
2
1
01/02 003/020
00:00:00
03/02 003/020
--:--:--
01/02 003/020
02:30:10
4
1
3
2
1
2
3
4
Downloaded From DvDPlayer-Manual.com TEAC Manuals
Page is loading ...

44
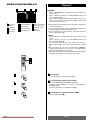
ENGLISH
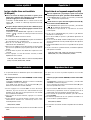
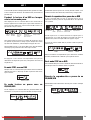
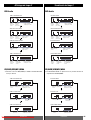
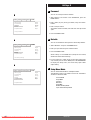
Track or Time Select
CD/SACD/VCD
1
2
3
4
00:02:35
TRACK 01/10
TRACK
--
/10
1
4
3
2
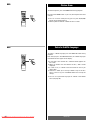
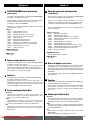
You cannot select a track and a time at one time.
Press the GUI button in the playback mode.
A GUI bar appears on the TV screen.
1
Press the
t
button once or twice to highlight “Track” or
“Time”.
Input the track number or the time from the beginning of the
current track using the numeric buttons.
Example:
To select Track 5, press 5.
To select Track 12, press 1 and 2.
To select a part 1 minute 10 seconds from the beginning of
the selected track, press 1, 1, 0.
Press the ENTER button.
4
3
2
TRACK 01/10 00:02:35
Track (current track number)
Time (elapsed time of current track)
Downloaded From DvDPlayer-Manual.com TEAC Manuals
Page is loading ...
Page is loading ...
Page is loading ...
Page is loading ...
Page is loading ...
Page is loading ...
Page is loading ...
Page is loading ...
Page is loading ...
Page is loading ...
Page is loading ...
Page is loading ...
Page is loading ...
Page is loading ...
Page is loading ...
Page is loading ...
Page is loading ...
Page is loading ...
Page is loading ...
Page is loading ...
Page is loading ...
Page is loading ...
Page is loading ...
Page is loading ...
Page is loading ...
Page is loading ...
Page is loading ...
Page is loading ...
Page is loading ...
Page is loading ...
Page is loading ...
Page is loading ...
Page is loading ...
Page is loading ...
Page is loading ...
Page is loading ...
Page is loading ...
Page is loading ...
Page is loading ...
Page is loading ...
Page is loading ...
Page is loading ...
Page is loading ...
Page is loading ...
Page is loading ...
Page is loading ...
Page is loading ...
Page is loading ...
-
 1
1
-
 2
2
-
 3
3
-
 4
4
-
 5
5
-
 6
6
-
 7
7
-
 8
8
-
 9
9
-
 10
10
-
 11
11
-
 12
12
-
 13
13
-
 14
14
-
 15
15
-
 16
16
-
 17
17
-
 18
18
-
 19
19
-
 20
20
-
 21
21
-
 22
22
-
 23
23
-
 24
24
-
 25
25
-
 26
26
-
 27
27
-
 28
28
-
 29
29
-
 30
30
-
 31
31
-
 32
32
-
 33
33
-
 34
34
-
 35
35
-
 36
36
-
 37
37
-
 38
38
-
 39
39
-
 40
40
-
 41
41
-
 42
42
-
 43
43
-
 44
44
-
 45
45
-
 46
46
-
 47
47
-
 48
48
-
 49
49
-
 50
50
-
 51
51
-
 52
52
-
 53
53
-
 54
54
-
 55
55
-
 56
56
-
 57
57
-
 58
58
-
 59
59
-
 60
60
-
 61
61
-
 62
62
-
 63
63
-
 64
64
-
 65
65
-
 66
66
-
 67
67
-
 68
68
-
 69
69
-
 70
70
-
 71
71
-
 72
72
-
 73
73
-
 74
74
-
 75
75
-
 76
76
-
 77
77
-
 78
78
-
 79
79
-
 80
80
-
 81
81
-
 82
82
-
 83
83
-
 84
84
-
 85
85
-
 86
86
-
 87
87
-
 88
88
-
 89
89
-
 90
90
-
 91
91
-
 92
92


Ask a question and I''ll find the answer in the document
Finding information in a document is now easier with AI
in other languages
- français: TEAC DV-20D Le manuel du propriétaire
- español: TEAC DV-20D El manual del propietario