
P/N: 1802001043317
*1802001043317*
CA Series for PC/104 and
CB Series for PC/104-Plus
Quick Installation Guide
Version 1.3, January 2021
Technical Support Contact Information
www.moxa.com/support
2021 Moxa Inc. All rights reserved.

- 2 -
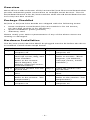
Overview
Moxa offers a wide selection of PC/104 and PC/104-Plus serial boards that
provide industrial-grade connections to multiple serial devices. The CA
Serial Board Series is for PC/104 modules while the CB Serial Board series
is for PC/104-Plus module.
Package Checklist
PC/104 or PC/104-Plus boards are shipped with the following items:
• Moxa multiport serial board (PC/104 module is for CA Series;
PC/104-Plus module is for CB Series)
• Quick installation guide (printed)
• Warranty card
Please notify your sales representative if any of the above items are
missing or damaged.
Hardware Installation
The PC/104 or PC/104-Plus MUST be plugged into the PC before the driver
is installed. Follow these steps below.
CA Series
CB Series
Step 1: Turn the embedded
computer off
Step 1: Turn the embedded
computer off
Step 2:
Set the I/O address,
Interrupt vector, IRQ, and
serial interface
(Refer to the section:
"Block Diagram, I/O
Address, Interrupt Vector,
Serial Interface")
Step 2:
Set interface
(Refer to section: "Block
Diagram, I/O Address,
Interrupt Vector, Serial
Interface")
Step 3:
Insert the module into the
PC/104 slot
Step 3:
Insert the module into
PC/104 slot.
Step 4:
Screw the control board in
place
Step 4:
Screw the control board in
place.
Step 5: Connect the cables
(Refer to the section: "Pin
Assignments")
Step 5: Connect the cables.
(Refer to the section: "Pin
Assignments")
Step 6:
Turn the embedded
computer on
Step 6:
Turn the embedded
computer on.

- 3 -
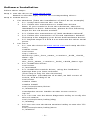
Software Installation
Follow these steps:
Step 1
:
Get the driver at
www.moxa.com.
Based on the OS type, choose the corresponding driver.
Step 2:
Install Driver
•
For Windows (Take the installation of Win7 as an example)
2.1. Unzip and execute the .exe file
2.2. Follow the instructions to install the drivers
Note: If your model is from the CB Series, then the
installation is done. Otherwise, please do the following
steps for the CA Series models.
2.3. Follow the instructions of “Add Hardware Wizard”
2.4. Follow the instruction of “Found Hardware Wizard”.
This step is for mapping your driver and hardware device.
2.5. Repeat steps 2.3 and
2.4 to activate the other serial
ports.
• For Linux
2.1. Get the driver at www.moxa.com and u
nzip the file:
#cd /
#mkdir moxa
#cd moxa
#cp /<driver
directory>/driv_linux_smart_<version>_build_<build_
date>.tgz
#tar-zxvf
driv_linux_smart_<version>_build_<build_date>.tgz
2.2. Install the driver:
#cd mxser
#./mxinstall
2.3. Install the module driver, using the hardware
settings that you have selected
(This step is only for the CA Series)
For example: I/O address of 0x180, an INT vector of
0x1C0, and an IRQ of 10
#cd mxser
#make clean
#make install
#cd /moxa/mxser/driver
#./msmknod
#modprobe mxser ioaddr=0x180 iovect=0x1C0
irq=10
2.4. You can use the Moxa diagnostic utility to verify the
driver’s status:
#cd /moxa/mxser/utility/diag
#./msdiag
2.5 You can use the Moxa
terminal utility to test the TTY
ports:
#cd /moxa/mxser/utility/term
#./msterm

- 4 -
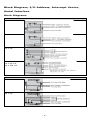
Block Diagram, I/O Address, Interrupt Vector,
Serial Interface
Block Diagrams
CA Series
CA-108
CA-104 V2
CA-114
CA-134I,
CA-132 V2,
CA-132I V2
CB Series
CB-108
CB-114

- 5 -
CB Series
CB-134I
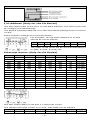
I/O Address (Only for the CA Series)
Use DIP switch SW1 to set port 1’s I/O base address. The other ports will
be configured automatically.
The default I/O base address is 0×180 and allows settings from 0×000 to
0×3FF.
Some popular settings are provided below:
For example, an I/O base address of 0×180
should be set as follows:
A3
A4
A5
A6
A7
A8
A9
Hex
ON
ON
ON
ON
OFF
OFF
ON
0x180
The other serial ports will be set automatically to
0×188, 0×190, 0×198, etc.
Interrupt Vector (Only for CA Series)
A3
A4
A5
A6
A7
A8
A9
8
1
2
4
8
1
2
Hex
ON
ON
ON
ON
ON
ON
ON
0×000
ON
ON
ON
ON
ON
ON
off
0×200
ON
ON
ON
ON
ON
off
off
0×300
ON
ON
ON
ON
off
off
off
0×380
ON
ON
ON
off
off
off
off
0×3C0
ON
ON
off
off
off
off
off
0×3E0
ON
off
off
off
off
off
off
0×3F0
off
off
off
off
off
off
off
0×3F8
off
ON
ON
ON
ON
ON
ON
0×008
off
off
ON
ON
ON
ON
ON
0×018
off
off
off
ON
ON
ON
ON
0×038
off
off
off
off
ON
ON
ON
0×078
off
off
off
off
off
ON
ON
0×0F8
off
off
off
off
off
ON
off
0×2F8
Use DIP switch SW2 to set port 1’s interrupt vector.
The default interrupt vector is 0×1C0, with SW2 set as follows
:
A3
A4
A5
A6
A7
A8
A9
Hex
ON
ON
ON
ON
OFF
OFF
ON
0x1C0

- 6 -
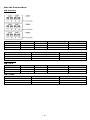
Serial Interface
CA Series
CA-114
Interface
RS-232
RS-422
RS-485 (4w)
RS-485 (2w)
SW1
–
–
ON
OFF
SW2
–
ON
OFF
OFF
SW3
ON
OFF
OFF
OFF
CA-134I, CA-132 V2, and CA-132I V2
Interface
2-wire/4-wire
RS-422/RS-485
RS-422
–
OFF
4-wire RS-485
OFF
ON
2-wire RS-485
ON
ON
CB Series
CB-114
Interface
RS-232
RS-422
RS-485 (4w)
RS-485 (2w)
SW1
–
–
ON
OFF
SW2
–
ON
OFF
OFF
SW3
ON
OFF
OFF
OFF
CB-134I
Interface
2-wire/4-wire
RS-422/RS-485
RS-422
–
OFF
4-wire RS-485
OFF
ON
2-wire RS-485
ON
ON

- 7 -
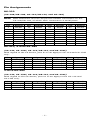
Pin Assignments
RS-232
(CA-108/CB-108, CA-114/CB-114, and CA-104)
NOTE
Note that there are two 40-pin box header connectors on the
CA-108/CB-108, of which each connects to 4 serial ports.
Pin
Signal
Pin
Signal
Pin
Signal
Pin
Signal
1
DCD0
11
DCD1
21
DCD2
31
DCD3
2
DSR0
12
DSR1
22
DSR2
32
DSR3
3
RxD0
13
RxD1
23
RxD2
33
RxD3
4
RTS0
14
RTS1
24
RTS2
34
RTS3
5
TxD0
15
TxD1
25
TxD2
35
TxD3
6
CTS0
16
CTS1
26
CTS2
36
CTS3
7
DTR0
17
DTR1
27
DTR2
37
DTR3
8
–
18
–
28
–
38
–
9
GND0
19
GND1
29
GND2
39
GND3
RS-422, 4-wire RS-485
(CA-132, CA-132I, CA-114/CB-114, and CA-134I)
With regard to the CA Series, pins 21 to 40 apply to CA-114 and CA-134I
only.
Pin
Signal
Pin
Signal
Pin*
Signal*
Pin*
Signal*
1
TxD0-(A)
11
TxD1-(A)
21
TxD2-(A)
31
TxD3-(A)
3
TxD0+(B)
13
TxD1+(B)
23
TxD2+(B)
33
TxD3+(B)
5
RxD0+(B)
15
RxD1+(B)
25
RxD2+(B)
35
RxD3+(B)
7
RxD0-(A)
17
RxD1-(A)
27
RxD2-(A)
37
RxD3-(A)
9
GND0
19
GND1
29
GND2
39
GND3
2-wire RS-485
(CA-132, CA-132I, CA-114/CB-114, and CA-134I)
With regard to the CA Series, pins 21 to 40 apply to the CA-114 and
CA-134I only.
Pin
Signal
Pin
Signal
Pin*
Signal*
Pin*
Signal*
5
Data0+(B)
15
Data1+(B)
25
Data2+(B)
35
Data3+(B)
7
Data0-(A)
17
Data1-(A)
27
Data2-(A)
37
Data3-(A)
9
GND0
19
GND1
29
GND2
39
GND3
-
 1
1
-
 2
2
-
 3
3
-
 4
4
-
 5
5
-
 6
6
-
 7
7


Moxa CB-134I Series Quick setup guide
- Type
- Quick setup guide
- This manual is also suitable for
Ask a question and I''ll find the answer in the document
Finding information in a document is now easier with AI
Related papers
-
Moxa CA-114 Series Quick setup guide
-
-
-
-
Moxa CP-102U/102UL Series User manual
-
Moxa CP-134EL-A-I Series User manual
-
-
Moxa CP-134EL-A-I User manual
-
-
Other documents
-
 Moxa Technologies C168P User manual
-
 Moxa Technologies RS-422 User manual
-
 Moxa Technologies CP-132U User manual
-
 Moxa Technologies CP-132U Series User manual
-
 Moxa Technologies CP-118U User manual
-
 Moxa Technologies CP-102U/UL User manual
-
 Moxa Technologies CP-114 Series User manual
-
 Moxa Technologies Smartio CP-104UL User manual
-
 Moxa Technologies Computer Hardware C168P User manual
-
 Moxa Technologies CA-132/132I User manual


