Page is loading ...

4
1
Quick Start Guide
INDIA SUPPORT INFORMATION
WARR A NTY
Amkette Flash TV is backed by 1 Years performance warranty against any manufacturing defects in
material or workmanship from the date of original purchase. This warranty entitles the
purchaser to get the product repaired or replaced* .
For General Inquiries:
Customer hotline No: 1800-11-9090 (Toll Free) E-mail: info@amkette.com
For Technical support
Ph.: +91-931-2691448 E-mail: [email protected]
tv
Amkette
* Conditions apply
Setting up your Flash TV is as easy as 1 2 3...
TROUBLESHOOTING
or or
,

2
3
Blue
Red
Red
White
Green
YUV Connection
1. YUV connection: If you have a LCD or Plasma TV we
recommend using the supplied YUV cable for better picture
quality.
• Connect the supplied YUV cable to the video section of the
Component/YPbPr/YUV input on your TV as illustrated.
• Connect the Red & White plugs on the A/V cable to the
audio section of the component input on your TV as
illustrated.
• Set the TV’s input to Component/YPbPr/YUV mode.
FlashTV’s “TV System” setting: HD Mode
*For a list of supported media, file types and codes, please refer to the Detailed Specification on page 14 of the Manual.
Advanced Features
The 3 easy steps to expand your digital entertainment options
STEP: 2
Powering Up your device
Yellow
Red
White
AV Connection
A/V Connection for ALL standard TV’s
• Connect the supplied A/V cable to the AV IN
section of your TV. Color of the connector should
match the color of the slots on the TV.
• Connect the A/V cable to the A/V slot on FlashTV.
• Set you TV’s input mode to A/V
FlashTV’s “TV System” setting: PAL Composite
STEP: 1
Connecting Flash TV to your TV.
2. Digital Co-axial : If you have an amplifier that supports Digital Co-axial input, and have the
corresponding cable, then you can enjoy a 5.1 Surround Sound experience.
3. Background Music for Photo Slideshow : To turn on background music during your photo
slideshow, press the Combo button on the remote.
4. Sharing/Deleting your Files: With FlashTV, now it is really simple to share your photos and other
media without the need of a computer.
On the Home screen, select the device where the files are (e.g. your camera’s SD Card). Next
Select the Files option. Once you are in the correct directory, hit the Right Cursor key on each of the
files that you want copied. Once done, hit the Menu button and choose the Copy option (you can
also delete your files from here). Now choose your destination device and location and the copying
will begin.
Things to remember
•
ventilation holes at the bottom. Covering the holes might heat up your device.
• When connecting the cables, always match the color of the plug with corresponding
color on the input of your TV.
• Please remove the Protective Plastic Strip from the battery tray.
• Please do not use cables and adapters other than specified/provided.
Do not put the FlashTV on surfaces like sofas, carpets etc. This can cover the
What is in the BOX?
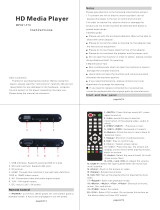
FlashTV, Remote, 5V Power Adapter, A/V Cable (Yellow, Red, White), Component/YUV Cable (Red,
Green, Blue), Manual, Quick Start Guide
Transfer your media files* to your External
Hard Drive, Flash Drive, or SD/ MMC card.
Plug in your USB device or SD card in to
FlashTV. Use the remote to navigate the
intuitive on-screen options to transform your
TV.
Connect your media and Play!
STEP: 3
• Connect the power adapter to the electrical
supply and connect the other end to
FlashTV’s DC input.
• A blue LED will light up on the FlashTV
indicating a successful power-up.
/