HP DESKJET 1125C PRINTER Quick start guide
- Category
- Inkjet printers
- Type
- Quick start guide

HP DeskJet 1125C
Professional Series
12
Accessing Information
Getting Started
Guide
Read ME
First!

Acknowledgements
Microsoft is a U.S. registered trademark of Microsoft Corporation.
Windows is a trademark of Microsoft Corporation.
Novell and Netware are registered trademarks of Novell Corporation.
Notice
The information contained in this document is subject to change without notice.
Hewlett-Packard makes no warranty of any kind with respect to this material, including, but not limited to, the
implied warranties of merchantability and fitness for a particular purpose.
Hewlett-Packard shall not be liable for errors contained herein or for incidental or consequential damages in
connection with the furnishing, performance, or use of this material.
No part of this document may be photocopied, reproduced, or translated to another language without the prior
written consent of Hewlett-Packard Company.
07/2000

1
Section
• Using this Guide
• Accessing Information
Section
• USB Installation
• USB Uninstallation
Section
• Setting Up Your Printer on a Macintosh Computer
Section
• Setting Up Your Printer in Windows 2000
• Sharing Your Printer in Windows 2000
• Connecting to an External Print Server
Section
• Bi-Directional Communication
• Customer Support
• Language Abbreviations
Contents
Introduction
2
2
3
4
5
5
6
7
8
8
9
USB2
Macintosh3
1
Windows 2000
4
More Information
5
English

2
Welcome to the
HP DeskJet 1125C Getting Started Guide
. The HP DeskJet 1125C is the latest printer in the
HP DeskJet 1120C series of color printers. Read this guide for new information on your HP DeskJet 1125C printer.
For printer setup, printing basics and troubleshooting, refer to the
HP DeskJet 1120C User’s Guide
.
This guide contains the following sections:
• USB–Describes how to connect the USB cable to your printer, and how to install and uninstall the USB port
connection (Windows 98 and Windows 2000 only).
• Macintosh–Describes how to install the printer software on a Macintosh computer.
• Windows 2000–Describes how to install and uninstall the printer software, and how to use your printer on a
network in Windows 2000.
• More Information–Shows how to enable bi-directional communication in your printer, and how to access HP
Customer Support by telephone and through the World Wide Web, and language abbreviations.
Note: All information in the
HP DeskJet 1120C User’s Guide
applies to the HP DeskJet 1125C printer
unless otherwise noted in this guide.
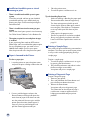
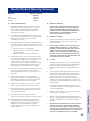
If the following resources are not sufficient to help maintain your printer and solve printing problems, you can
obtain assistance from the HP Customer Care Center (see “More Information” on page 8).
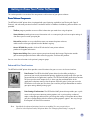
Getting Started The first place to look for new information on your HP DeskJet 1125C printer.
Guide
User’s Guide Includes information on printer setup, selecting and using paper, printing using
special features, replacing print cartridges, troubleshooting, and ordering HP supplies.
Note: The Print Kit, installation floppy disks, HP Premium InkJet Rapid-Dry Transparencies,
and C1823G color print cartridge are no longer available.
Toolbox Provides “how-to” and troubleshooting instructions, as well as access to printer maintenance
functions and HP information.
Starter CD Includes the Windows and Macintosh printer software on separate CDs, and an electronic
(Windows; Mac) copy of the user documentation.
Web Site http://www.hp.com/go/dj1125 or http://www.hp.com provides a link to the HP web site for the
latest printer software, operating system, product, and support information.
Using this Guide
Accessing Information
Section 1 - IntroductionSection 1 - Introduction

3
USB Installation
Use the USB cable only if your computer is running Windows 98 or Windows 2000 and has a USB port.
If your computer is not properly configured to use USB, use a parallel cable to connect your computer to the
printer.
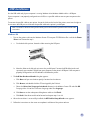
To connect the parallel cable to your printer, locate the slider on the back of the printer, move it to the right so
that it covers the USB port, and connect the parallel cable to the printer’s parallel port.
Note: The slider on the back of the printer allows you to choose either a parallel cable or USB cable
connection.
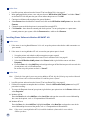
Windows 98
1 Turn on the printer and insert the Windows Starter CD into your CD-ROM drive. Do
not
click the Printer
Driver icon. Proceed to step 2.
2 a On the back of the printer, locate the slider covering the USB port.
A
B
b Move the slider to the left so that it covers the parallel port. Connect the USB cable (purchased
separately; part number C6518A) from your computer to the printer’s USB port. If the computer is
properly configured to use USB, Windows will detect the printer.
3 The Add New Hardware Wizard
dialog box appears.
a Click Next
until you are asked to specify a location for the software.
b Click Browse, and double-click the CD icon (typically the D: drive).
c Select the \driver\win\
<language>
\win98usb directory in the Windows Starter CD and click OK.
See page 9 for a list of the 3-character language codes for
<language>
.
d Click Next to see the subsequent dialog boxes and then click Finish.
e Click Back if the driver could not be located and repeat steps 3a to 3d.
4 When the new driver is successfully installed, the HP DeskJet Setup Wizard screen appears.
5 Follow the instructions on the screen to complete installation of the printer software.
Section 2 - USB

4
Windows 2000
1 Turn on the printer and insert the Windows Starter CD into your CD-ROM drive. Do
not
click the Printer
Driver icon. Proceed to step 2.
2 a On the back of the printer, locate the slider covering the USB port.
b Move the slider to the left so that it covers the parallel port. Connect the USB cable (purchased
separately; part number C6518A) from your computer to the printer’s USB port. If the computer is
properly configured to use USB, Windows will detect the printer.
3 The Found New Hardware Wizard
dialog box appears.
a Click Next
until you are asked to specify a location for the software.
b Click Browse and select the .INF file from the \driver\winnt\
<language>
\disk1 directory in the
Windows Starter CD. See page 9 for a list of the 3-character language codes for
<language>
.
c Click OK followed by Finish to install the driver.
Windows 98
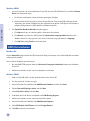
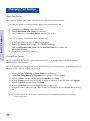
Use the Uninstaller program from the HP DeskJet 1125C Program Group to uninstall the USB port connection
and the printer software.
To uninstall the USB port connection only:
1 Run the UNINST.EXE program from the \driver\win\
<language>
\win98usb directory in the Windows
Starter CD.
2 Follow the instructions on the screen to complete uninstallation.
Windows 2000
1 Make sure the USB cable is firmly attached to the printer and the PC.
2 Turn the printer off and then on again.
3 From the Control Panel, double-click Add/Remove Hardware and then click Next.
4 Choose Uninstall/Unplug a device and click Next.
5 Select Uninstall a device and click Next.
6 Scroll down the list of devices and double-click USB Printing Support.
7 Follow the instructions on the screen to uninstall the device.
8 From the Control Panel, double-click Add/Remove Programs.
9 Select HP DeskJet 1125C Printer and click Change/Remove.
10 Click OK to confirm uninstallation.
USB Uninstallation
Section 2 - USB

5
You can connect the printer to the latest models of Macintosh computers (Mac OS 8.1 or later) through the USB
port. To connect older models without a USB port, you can either connect the Macintosh to a HP JetDirect print
server (JetDirect 300x), or visit Apple’s web site (http://www.apple.com) for USB solutions.
Configuration Requirements
Before connecting your printer to the computer, ensure that your configuration meets these requirements:
• Your computer must support USB
• You need a USB-compliant interface cable
• Your computer must be running Mac OS 8.1 or later
Installing the Printer Software
1 Connect the USB cable (purchased separately; part number C6518A). For instructions on how to connect
the USB cable to your printer, see step 2 of “USB Installation” on page 3.
2 Insert the Macintosh Starter CD into your CD-ROM drive. Double-click the Installer icon.
3 Follow the instructions on the screen to complete the installation.
4 Select Chooser from the Apple menu.
5 Click the printer’s icon from the left side of the Chooser window. Then, click HP DeskJet 1125C from the
right side of the Chooser window. Close the Chooser.
Note: This section shows you how to set up your printer in Windows 2000 using a parallel cable
connection. For USB connection in Windows 2000, see “USB Installation” on page 4.
Information pertaining to Windows NT 4.0 in the
HP DeskJet 1120C User’s Guide
and on-line help
applies to Windows 2000 unless stated otherwise below.
Configuration Requirements
Before installing the printer software in Windows 2000, ensure your computer has at least 64 MB of RAM
available.
Installing the Printer Software
1 Start Microsoft Windows and ensure that no other application is running.
2 Insert the Windows Starter CD into the CD-ROM drive. The installation program runs automatically.
3 Select the Printer Driver option on the CD menu to install your printer software.
Setting Up Your Printer in Windows 2000
Setting Up Your Printer on a Macintosh Computer
Section 4 - Windows 2000
Section 3 - Macintosh

6
If the installation program does not run automatically:
1 Select Start and then Run.
2 At the Command line box, type the letter of your computer’s CD-ROM drive, followed by
:\INSTALL (for example, D:\INSTALL).
3 Follow the instructions on the screen to complete the installation.
Uninstalling the Printer Software
Uninstalling from the HP DeskJet 1125C Program Group
1 Select Start and then Programs.
2 Click the HP DeskJet 1125C Printer program group, and then run the Uninstaller program.
3 Click OK to confirm uninstallation.
Uninstalling from the Control Panel
1 Select Start, and then Settings, followed by Control Panel.
2 Double-click Add/Remove Programs.
3 Select HP DeskJet 1125C Printer and click Change/Remove.
4 Click OK to confirm uninstallation.
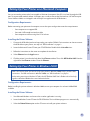
You can share your printer in a network environment using the Windows printer sharing method, or by connecting
it directly to the network via an optional HP JetDirect external print server.
At the Server:
I. If the server is running Novell Netware 3.12, 4.11 or 5.0:
Refer to the Novell installation manual to set up the printer and establish the cable connections to your
network.
II. If the server is running Windows NT 4.0/2000:
1 Set up the printer and establish the cable connections to your network.
2 Install the printer software from the Windows Starter CD. See “Installing the Printer Software” on page 5.
3 Select HP DeskJet 1125C Printer in the Printers folder and right-click Properties.
4 On the Sharing tab, click Shared as and then type a name for the shared printer.
5 On the Ports tab, click Add Port.
Sharing Your Printer in Windows 2000
Section 4 - Windows 2000

7
At the Client:
I. If both the client and server are running Windows NT 4.0/2000:
Use the “Point-and-Print” method to install the printer software. Drag the printer icon from the Printers folder
on the print server and drop it into the client’s Printers folder. The printer software will be automatically
installed.
II. If the client is running Windows NT 4.0/2000 and the server is running another operating system:
1 Install the printer software from the Windows Starter CD.
2 When installing, select the HP DeskJet 1125C Printer and any LPT port.
3 Go to the Printers folder, right-click your printer icon and select Properties.
4 On the Ports tab, click Add Port, highlight Local Port, and then select New Port. Type in the name of the
printer server followed by the shared name of the printer, such as \\printserver_name\share_name
.
If you have already installed the printer software and you want to connect to a JetDirect port in Windows 2000:
1 Insert the HP JetDirect CD-ROM (available with purchase of the HP JetDirect print server) into your
CD-ROM drive. If the installation program does not run automatically, launch Explorer and locate
the file.
2 Select the option to install the JetAdmin software (version 3.0 or later) and follow the instructions on the
screen.
Note: If you encounter a setup error (Error 401) during installation, click OK to proceed
with the installation. The error does not affect the performance of the JetAdmin software.
3 After completing the JetAdmin installation, restart your computer.
4 Go to the Printers folder, right-click HP DeskJet 1125C Printer and select Properties.
5 Select the Ports tab, and click Add Port. Select a new JetDirect port and assign it to the printer.
6 Click OK.
Connecting to an External Print Server
Section 4 - Windows 2000

8
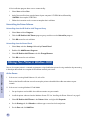
Bi-directional communication allows the printer driver to obtain more information regarding the printer’s state.
For the HP DeskJet 1125C printer, bi-directional communication is disabled by default. To assess the feasibility of
enabling bi-directional communication in your printer, see the Readme file in the Toolbox.
Accessing Readme from the HP DeskJet 1125C Program Group
1 Select Start and then Programs.
2 Click the HP DeskJet 1125C Printer program group and select DJ1125C Toolbox.
3 Click the Readme button.
Internet
Visit our World Wide Web for the latest printer software, product, operating system, and support information:
http://www.hp.com/go/dj1125 or http://www.hp.com/cposupport
HP Telephone Support
During the warranty period, you may obtain assistance from the HP Customer Care Center.
North America:
During Warranty: US: 208 323 2551 Monday through Friday 6 am to 6 pm (MST)
Canada: 905 206 4663 Monday through Friday 8 am to 8 pm (EST)
Post Warranty: US: 900 555 1500 ($2.50 per minute, maximum of $25.00) or 800 999 1148 ($25.00
per call will be charged to your Visa or MasterCard) Monday through Friday 7 am to
6 pm (MST)
Canada: Toll free 877 621 4722 (Visa, MasterCard, or American Express) Monday
through Friday 8 am to 8 pm (EST)
Outside of North America:
Africa/Middle East +41 22/780 71 11 Czech Republic 42 (2) 471 7327
Argentina 541 781 4061/69 Denmark 3929 4099
Australia 613 8877 8000 Finland 0203 47 288
Austria 0660 6386 France 01 43 62 34 34
Belgium (Dutch) 02 6268806 Germany 0180 52 58 143
Belgium (French) 02 6268807 Greece 01 68 96 4 11
Brazil 55 11 709 1444 Hong Kong 800 96 7729
Chile 800 360 999 Hungary 36 (1) 252 4505
China 010 6564 5959 India 9111 682 6035
Customer Support
Bi-Directional Communication
Section 5 - More Information

9
Indonesia 21 350 3408 Singapore 272 5300
Ireland 01 662 5525 Spain 902 321 123
Italy 02 264 10350 Sweden 08 619 2170
Korea 822 3270 0700 Switzerland 0848 80 11 11
Malaysia 03 295 2566 Taiwan 886 2 27170055
Mexico D.F. 01 800 2214700, Thailand 02 661 4011
01 800 9052900
New Zealand 09 356 6640 The Netherlands 020 606 8751
Philippines 2 867 3551 Turkey 90 1 224 59 25
Poland 022 37 5065, United Kingdom 0171 512 5202
48 22 37 5065
Portugal 01 441 7 199 Vietnam 8 823 4530
Russia 7095 923 50 01 Venezuela 582 239 5664
Chinese (Simplified) CHS
Chinese (Traditional) CHT
Czech CZE
Danish DAN
Dutch DUT
English (US, UK) ENU
Finnish FIN
French (Euro) FRE
German GER
Italian ITA
Japanese JAP
Korean KOR
Norwegian NOR
Polish POL
Portuguese (Euro) POR
Russian RUS
Spanish (Euro) SPA
Swedish SWE
Language Abbreviations
Section 5 - More Information

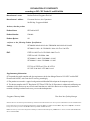
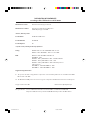
DECLARATION OF CONFORMITY
according to ISO / IEC Guide 22 and EN 45014
Manufacturer's name: Hewlett-Packard Singapore (Pte) Ltd
Manufacturer's address: Consumer Business, Asia Operations
20 Gul Way, Singapore 629196
declares, that the product
Product Name: HP DeskJet 1125C
Product Number: C8099A
Product Options: All
conforms to the following Product Specifications:
Safety: IEC 60950: 1991+A1+A2+A3+A4 / EN 60950: 1992+A1+A2+A3+A4+A11
IEC 60825-1: 1993 + A1 / EN 60825-1: 1994 + A11 Class I for LEDs
EMC: CISPR 22: 1997 Class B / EN 55022: 1998 Class B
CISPR 24: 1997 / EN 55024: 1998
IEC 61000-3-2: 1995 / EN 61000-3-2: 1995
IEC 61000-3-3: 1994 / EN 61000-3-3: 1995
FCC Title 47 CFR, Part 15 Class B / VCCI-2
AZ / NZS 3548: 1995 / ICES-003, Issue 2
Supplementary Information:
(1) The product herewith complies with the requirements of the Low Voltage Directive 73/23/EEC and the EMC
Directive 89/336/EEC, and carries the CE marking accordingly.
(2) The product was tested in a typical configuration with Hewlett Packard personal computer systems.
(3) This device complies with FCC Regulation (FCC Title 47 CFR, Part 15). Operation is subject to the following two
conditions: (i) this device may not cause harmful interference, and (ii) this device must accept any interference
received, including interference that may cause undesired operation.
Singapore, February 2000 Chan Kum Yew, Quality Manager
Australia Contact: Product Regulations Manager, Hewlett Packard Australia Ltd, 31-41 Joseph Street, Blackburn, Victoria 3130, Australia.
European Contact: Your Local Hewlett-Packard Sales and Service Office or Hewlett-Packard Gmbh, Department HQ-TRE / Standards
Europe, Herrenberger Strasse 130, D-71034 Boblingen (FAX: +49-7031-14-3143).
USA Contact: Corporate Product Regulations Manager, Hewlett Packard Company, 3000 Hanover Street, Palo Alto, CA 94304, USA
(Phone: 415-857-1501).

© Copyright 2000
Hewlett-Packard Company
Printed in Thailand
Manual Part No. C8099-90009
http://www.hp.com/go/dj1125
C8099-90009

HP DeskJet 1120C
Professional Series
Accessing Information
User’s Guide
HP DeskJet 1125C Users: Read the HP DeskJet 1125C Getting Started Guide first.

Acknowledgements
HP ColorSmart II, HP PhotoREt II and HP ZoomSmart
Scaling Technology are trademarks of Hewlett-Packard
Company.
Microsoft is a U.S. registered trademark of Microsoft
Corporation.
Windows is a trademark of Microsoft Corporation.
Notice
The information contained in this document is subject to
change without notice.
Hewlett-Packard makes no warranty of any kind with regard
to this material, including, but not limited to, the implied
warranties of merchantability and fitness for a particular
purpose.
Hewlett-Packard shall not be liable for errors contained
herein or for incidental or consequential damages in
connection with the furnishing, performance, or use of this
material.
No part of this document may be photocopied, reproduced,
or translated to another language without the prior written
consent of Hewlett-Packard Company.

1
Section
• Understanding the Printer's Parts and Functions
• Setting Up
• Accessing Information
Section
• Loading Paper
• Replacing and Maintaining Print Cartridges
• Getting to Know Your Printer Software
• Changing Print Settings
• Printing with Special Features
• Using Your Printer on a Network
• Printing from DOS Software Programs
Section
• Troubleshooting
• Customer Support
• HP Supplies
Section
• Printer Specifications
• Regulatory Notice
• Hewlett-Packard Warranty Statement
Contents
1
Getting Started
Printing Basics
Specifications
2
4
7
8
10
11
12
13
15
17
18
21
23
2
4
Support3
25
26
27
English

2
9
8
1
2
3
7
4
6
4
5
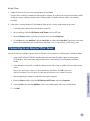
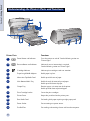
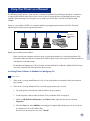
Understanding the Printer's Parts and Functions
Printer Parts Functions
Power Button and Indicator Turns the printer on and off. See the following section on
"Printer Lights".
Resume Button and Indicator Indicates that user intervention is required.
See the following section on "Printer Lights".
Cartridge Indicator Indicates print cartridges need user attention.
Paper Length/Width Adjuster Holds paper in place.
Alternative Top Media Feed Holds up to 10 sheets of paper.
Main Bottom Media Tray Holds the stack of commonly used paper.
Holds up to 150 sheets of paper.
Output Tray Receives paper as it comes out of the printer.
Holds up to 50 sheets of printed paper.
Print Cartridge Latches Secure the print cartridges.
Printer Cover Keeps dust particles from the printer parts.
Rear Media Feed For feeding thick paper requiring straight paper path.
Power Socket For connecting to a power source.
Parallel Port For sending and receiving data to and from the computer.
Section 1 - Getting Started
1
2
3
4
5
6
7
8
9
11
12
10
6
12
10
11

3
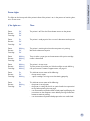
The lights on the front panel of the printer indicate if the printer is on, in the process of receiving data,
or in an error state.
If the lights are... Then...
Power Off The printer is off. Press the Power button to turn on the printer.
Resume Off
Cartridge Off
Power On The printer is ready to print. You can send a document to the printer.
Resume Off
Cartridge Off
Power Blinking The printer is receiving data from the computer or is printing.
Resume Off Wait for the document to print.
Cartridge Off
Power Blinking There is either a paper jam or the movement of the print cartridge
Resume Blinking cradle is obstructed.
Cartridge Off
Power Blinking The printer is in error state.
Resume Blinking Turn the printer off and then on. If the three lights remain blinking,
Cartridge Blinking call your nearest Customer Support center, see page 21.
Power On This indicates one or more of the following:
Resume Off • the top cover is open;
Cartridge Blinking • a print cartridge is missing or not functioning properly.
Power On This indicates one or more of the following:
Resume Blinking • the printer is out of paper;
Cartridge Off • the printer is waiting for the ink on special media (transparencies)
to dry, before printing the next page;
• user intervention required to load or feed paper by following the
instructions on the computer screen before pressing the Resume
button to continue printing;
• user intervention required to feed paper to the rear media feed.
Printer Lights
Section 1 - Getting Started

4
Section 1 - Getting Started
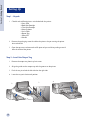
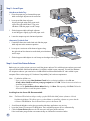
Step 1 - Unpack
1 Check that the following items are included with the printer:
• Power Cord
• Black Print Cartridge
• Color Print Cartridge
• Printer Software
• User’s Guide
• Output Tray
• Starter CD
• Print Kit
2 Remove the packaging material and the four pieces of tape securing the printer
(one at the back).
3 Open the top cover and remove the fifth piece of tape and white packing material
from the inside of the printer.
Step 2 - Install the Output Tray
1 Remove the output tray from its plastic cover.
2 Align the guides on the output tray with the grooves on the printer.
3 Push the tray in to lock the left side then the right side.
4 Lower the tray to its horizontal position.
Setting Up
2
3
4

5
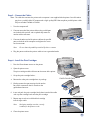
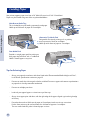
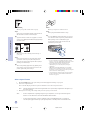
Step 3 - Connect the Cables
Note: The cable that connects the printer to the computer is not supplied with the printer. You will need to
purchase a parallel cable. HP recommends a high-quality IEEE-1284 compliant parallel printer cable
(HP part number C2950A or C2951A).
1 Turn the computer off.
2 Connect one end of the printer cable to the parallel port
on the back of the printer and snap both clips onto the
notches of the connector.
3 Connect the other end of the printer cable to the parallel
port on the back of the computer and tighten the screws
on the connector.
Note: Do not share the parallel port with a Zip drive or scanner.
4 Plug the power cord into the printer and then into a grounded outlet.
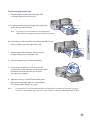
Step 4 - Install the Print Cartridges
1 Press the Power button to turn on the printer.
2 Open the printer cover.
The print cartridge cradles will move to the center of the printer.
3 Lift up the print cartridge latches.
4 Remove the color print cartridge from its package.
5 Gently remove the tape covering the ink nozzles.
Be careful not to touch the ink nozzles or the
gold-colored contacts.
6 Insert and push the print cartridge firmly down into the left cradle
and snap the cartridge latch onto the print cartridge.
7 Repeat steps 4 to 6 to install the black cartridge
into the right cradle.
Note: Both print cartridges must be correctly
installed for the printer to work.
8 Close the printer cover.
Section 1 - Getting Started
C1823D/C1823G/C1823T
51645A/51645G
Page is loading ...
Page is loading ...
Page is loading ...
Page is loading ...
Page is loading ...
Page is loading ...
Page is loading ...
Page is loading ...
Page is loading ...
Page is loading ...
Page is loading ...
Page is loading ...
Page is loading ...
Page is loading ...
Page is loading ...
Page is loading ...
Page is loading ...
Page is loading ...
Page is loading ...
Page is loading ...
Page is loading ...
Page is loading ...
Page is loading ...
Page is loading ...
-
 1
1
-
 2
2
-
 3
3
-
 4
4
-
 5
5
-
 6
6
-
 7
7
-
 8
8
-
 9
9
-
 10
10
-
 11
11
-
 12
12
-
 13
13
-
 14
14
-
 15
15
-
 16
16
-
 17
17
-
 18
18
-
 19
19
-
 20
20
-
 21
21
-
 22
22
-
 23
23
-
 24
24
-
 25
25
-
 26
26
-
 27
27
-
 28
28
-
 29
29
-
 30
30
-
 31
31
-
 32
32
-
 33
33
-
 34
34
-
 35
35
-
 36
36
-
 37
37
-
 38
38
-
 39
39
-
 40
40
-
 41
41
-
 42
42
-
 43
43
-
 44
44


HP DESKJET 1125C PRINTER Quick start guide
- Category
- Inkjet printers
- Type
- Quick start guide
Ask a question and I''ll find the answer in the document
Finding information in a document is now easier with AI
Related papers
-
Compaq E20 User manual
-
HP DeskJet 400 User manual
-
HP Deskjet 9300 Printer series Owner's manual
-
HEWLETT PACKARD Hewlett Packard DeskJet 930C Inkjet Printer User manual
-
HP DESKJET 1125C PRINTER Quick start guide
-
-
-
HP Deskjet 950/952c Printer series User manual
-
-
HP BUSINESS INKJET 1000 PRINTER User manual
Other documents
-
HP (Hewlett-Packard) Desk-Jet Printer User manual
-
Primera Signature Pro User manual
-
Toshiba e-studio 15 User manual
-
-
-
-
Lexmark Color Jetprinter Z53 User manual
-
 EPoX Computer BT-PA02A User manual
-
MFJ 5427 User manual
-
