Page is loading ...

Comfort 7 Towel Warmer
User Manual
&
Installation Instructions
IMPORTANT SAFETY INSTRUCTIONS
Carefully read the important information
regarding installation, safety and maintenance.
Keep these instructions for future reference.
MAAN5334-01
2020-01-08

— 2 —
Required Tools
Electrical requirements: 120V, 112W, 60Hz, 0.93A. MUST HAVE A GROUND CONNECTION.
Should be protected by a 15 amp GFI circuit breaker or equal.
READ ALL INSTRUCTIONS IN THE MANUAL BEFORE INSTALLING THIS TOWEL
WARMER.
Before You Begin
Unpack the towel warmer carefully to avoid any damage or loss of any part. When opening the box, care should be taken to
not discard packet of mounting screws. It is your responsibility to immediately inspect for any damage. Shipping damage
should be reported immediately to your place of purchase.
Follow instructions to make sure your towel warmer is properly installed. FAILURE TO FOLLOW THESE STEPS COULD
RESULT IN HAZARDOUS CONDITIONS.
To avoid possible re hazard, the Towel Warmer must be mounted as intended. MOUNT THIS UNIT AS SHOWN IN THESE
INSTRUCTIONS.
The towel warmer must be used in accordance with any prevailing code and relevant electrical wiring rules and regulations, in
particular regulations that cover the use of products and accessories in damp situations such as showers, laundries and other
areas with xed water containers.
•
•
•
Towel Warmer must be mounted vertical with cord in position as shown. No other position is safe or recommended.
To provide continued protection against the risk of electrical shock, connect to properly grounded outlet only.
Towel Warmer must be securely mounted to the wall. When possible, the Towel Warmer should be attached to adequate
blocking or framing. Installations where blocking or framing is not available, must use appropriate wall anchors for mounting
directly to sheetrock.
CAUTION:
1. Approved for domestic use only. Do not use
outdoors.
2. Install in accordance with national and local codes.
3. Do not install in the shower, sauna or any wet
locations.
4. Make sure towel warmer is properly secured to the
wall before use.
•
•
•
Failure to follow the installation instructions may lead to overheating and malfunction.
Any repairs that involve opening the Towel Warmer must be carried out by manufacturer or their
representative.
Please contact your supplier in the event of any problem or if repair is needed.
FLAT HEAD SCREWDRIVERSSTARHEAD SCREWDRIVERS
PENCIL
DRILL & BIT
LEVEL
MEASURING TAPE
5/16” Diameter
24 in.
Shower/Tub
Zone
Do not locate the
towel warmer within
the shower/tub zone
For illustrative purposes only
0.6 m

Product Dimensions
Parts for Hardwire Wall Mount Installation
Screw
4 + 1 pcs
Metal Wall Leg
4 pcs
Set Screw
4 + 1 pcs
Plate
1 pc
Small Allen Key
1 pc
Large Allen Key
1 pc
4 + 1 pcs
Ø 8 mm
4 pcs
Large Screw
4 + 1 pcs
4 pcs
Wall Plate Screws
2 + 1 pcs
Wall Post
Plastic plug
Plastic insert
Ensure all parts for mounting installation were supplied with your towel warmer (See Fig. 1).
If any are missing, please contact us.
Step 1: Verifying installation parts (Fig. 1)
Hardwire Installation
— 3 —
Fig. 2
Locate the following parts:
Position parts correctly:
Install Metal Wall Leg d:
) 2 .giF( sgel llaw latem gnillatsnI :2 petS
a
b
c
d
e
f
g
h
i
j
k
Fig. 1
o d: Metal Wall Leg.
o e: Large Screw to set post in main body (this part may already be installed inside the Metal Wall Leg).
o f: Plastic Insert (this part may already be installed inside the Metal Wall Leg).
o g: Set Screw (this part may already be installed inside the Metal Wall Leg) (See Fig. 6).
o Plastic Insert f is positioned inside Metal Wall Leg d.
o Large Screw e is positioned inside the Plastic Insert f.
o Set Screw g is inserted in Metal Wall Leg d (See Fig. 6).
o If the Metal Post b is inserted into the Metal Wall Leg d, remove it.
o Position Metal Wall Leg d onto the towel warmer where the Large Screws e can be inserted.
o Insert Large Screw e and screw Metal Wall Leg d into main body using appropriate sized Allen key.
o Repeat for all four (4) Metal Wall Legs.
55 cm (21.6 in.)
80 cm (31.5 in.)
51,8 cm
(20.4 in.)
7 cm
(2.75 in.)
3.2 cm
(1.25 in.)
2.3 cm
(0.9 in.)
11 cm
(4.3 in.)
55 cm
(21.6 in.)
12 cm (4.75 in.)
10.5 cm
(4.1 in.)
15 cm
(5.9 in.)
1.3 cm (3.3 in.)

Hardwire Installation
Step 3: Marking holes for wall mount posts (Fig. 3)
Step 4: Installing wall posts (Fig. 4)
h
— 4 —
- Take towel warmer with four (4) Metal Wall Legs mounted, as per Step 2.
- Position against the wall where you will want to install the towel warmer.
- Ensure the Hard Wire Leg is also turned in at 90 degrees so you can also mark this leg.
- Use light pencil to mark legs on the wall (you may want to erase the pencil mark following installation completion, so make
sure you mark lightly).
Fig. 3 Fig. 4 Fig. 5 Fig. 6
If installing on dry wall with no rear beam support (e.g. wood studs):
o Drill a hole in the center of each of the four (4) circles marked on the wall as per Step 3.
o Ensure the drilled hole is large enough to insert the Plastic Plug provided a.
o Insert/screw the Plastic Plug into each of the four (4) holes.
o Position Wall Post b on top of Plastic Plug and put in Screw c to set in place.
If installing on surface with rear support, e.g. wood studs (no need for Plastic Plug a):
o Pre-drill small hole in the center of each circle as per step 3.
o Position Wall Post b on top of pre-drilled hole and put in Screw c to set in place.
Step 5: Installing hard wire leg (Fig. 5)
- Create a hole in the wall to let the Hard Wire Leg go through (approx. 2 in. x 3 ¾ in.).
- The leg will be covered by Plate h so the hole should be large enough to allow space for electrical connection and leg to go
through but not too large so that the plate can cover it fully.
- Electrical wiring must be done by qualied professionals and in accordance with all applicable codes and standards, including
re-rated constructions (refer to Electrical Requirements on Page 2).
Step 6: Mounting main body onto wall (Fig. 6)
- Take main body and position each of the four (4) legs on top of the Wall Posts b.
- Once inserted use appropriate sized Allen key to tighten each Set Screw g.
- The installation should now be complete.
Step 7: Test the towel warmer
- Remove protective white caps, they are located at the end of each of the vertical bars.
- Turn the switch on to start towel warmer; the On-Off switch is located at the end of one of the posts.
- The towel warmer should reach its pre-set temperature in approximately 15 minutes.
- This towel warmer is designed to operate continuously and can be left on all the times. To save electricity it can be turned off
when not in use.

— 5 —
Operation and Maintenance Instructions
•
•
•
•
After installation, connect the electric power and turn on the switch. The indicator light will show red and the towel warmer
will start to work.
Turn off the switch when the towel warmer is not in use. The indicator light will turn dark and the towel warmer will stop
working.
When cold, clean the towel warmer with a soft dry towel. Do not clean with abrasive cleaning powder.
Unplug the unit if not in use for a long period of time.
CAUTION - Overlapping towels may increase
towel warmer temperatures.
•
PROPERLY HANG TOWELS.
•
DO NOT OVERLAP TOWELS.
HIGH OPERATING TEMPERATURE!
•
•
•
•
•
•
•
•
•
Towel warmers are designed for heating towels and bathrobes and should not be used for other purposes.
The manufacturer or reseller assumes no liability if the device is used in combination with equipment or
accessories not sold by the manufacturer.
This towel warmer is to be only used with fabrics that are water washable. Towels which contain soap or
detergent residue may appear to have scorch marks; however, this is simply discoloration of the residue in
Never stand, sit or climb on the unit.
This towel warmer operates at high temperatures that can cause burns. Do not touch surfaces of the towel
warmer while the warmer is in operation. The unit is designed to warm up towel and may become very hot.
Do not allow unsupervised children in the vicinity of the towel warmer; and warn children of hot surfaces.
An adult must supervise when the device is used by or near children.
Unplug the unit with a dry hand and ensure that the electrical circuit breaker is off the main panel before
wiring, carrying out a repair or servicing your heated towel warmer.
Do not place your towel warmer inside a shower, sauna or plunge into the water.
To ensure continued protection against risk of electric shock, plug the unit into a properly grounded outlet.
Approved for domestic use only. Do not use outdoors.
Information: [email protected] or 1-800-350-4562
NOTE:
There is no limit to how long a towel warmer can stay on. However, in order to conserve the life expectancy of our Ancona
towel warmer, we recommend that the unit be on consecutively no more than two to three hours at a time.
•
•
•
•
According to the National Electrical Code, all electrical work must be carried out by authorized licensed
professionals. For your safety, please ensure you adhere to these regulations.
Please ensure the power cord does not come in contact with the rail during operation.
The power code is the means of disconnecting the unit from the main power outlet.
The Towel Warmer will be hot. Please exercise caution if the Towel Warmer is accessible to children or the
elderly. Please ensure that children are supervised at all times in the vicinity of the Towel Warmer and warn
them that it is a hot surface that can cause burns.

— 6 —
Please register your product warranty by visiting the Ancona Home website.
Canada & USA
Phone: 1-800-350-4562
Fax: 800-350-8563
Email: [email protected]
Website: www.anconahome.com
MAAN5334-01
© 2020

NOTE: Neutral wire is required for this timer to function. This timer
is not compatible for 3-wire switches.
1 In-wall countdown timer
A
E
E
D
E
B
F
F
C
Rating: 120V/15A/1800W Resistive (Appliance)
120V/8.3A/1000W Tungsten (Incandescent)
1/4HP, Motor: 1000VA, Ballast
Wire connectors Mounting screws
120VAC 60Hz, 15A General Purpose
Electronic Ballast: 500 VA
Cover
OFF
HOUR
8
4
2
1
HOUR
HOUR
HOUR
Contents
In-Wall Auto Shut-Off Electronic Timer
MAPATIM02-01
2019-05-13
Safety Information
WARNING
•
•
TO AVOID FIRE, SHOCK, OR DEATH, TURN OFF POWER AT CIRCUIT BREAKER AND TEST THAT POWER IS
OFF BEFORE WIRING.
TO AVOID OVERHEATING, USE ONLY 14 AWG, 600V, 105ºC WIRE TO CONNECT THIS TIMER.
CAUTION
•
Wattage of lamps or appliances controlled must NOT exceed rated capacity. FOR INDOOR USE ONLY.
Instructions
Timer Setting
To set timer, press button sequentially to select one of the four timed delay shut-off settings:
1 hour / 2 hours / 4 hours / 8 hours.
The illuminated LED display indicates which time delay shut-off setting is selected.
Timer starts counting down until desired time setting is reached, and shuts off automatically. “OFF” LED display is illuminated.
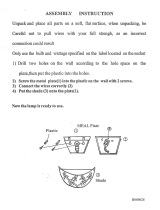
Turn power OFF at the circuit breaker or remove the fuse.
Remove existing wall plate and switch, if applicable. Take note of supply
(“hot” (usually black or red)) and neutral wires for future reference.
Ensure neutral (white) wire is present in the junction box. If this wire is
not present, additional wiring arrangements will be needed before
installation can be completed. Consult a qualied electrician.
Strip 3/8 in. of insulation from each wire required for installation.
Connect the green wire (F) from the junction box to the green wire
from the timer.
Connect the white wire (E) from the timer to the white wire(s) in the
junction box. Secure connection using the wire connector (orange)
included in the package.
Connect the black wire (D) from the timer to the HOT wire (previously
connected to the switch) and connect the red wire (B) from the timer
to the second wire (previously connected to the switch).
Carefully shift all wires to provide room for timer in the junction box.
Secure timer to box with included screws, and install cover plate.
Reconnect your electrical power.
Test the timer.
1.
2.
3.
4.
5.
6.
7.
8.
9.
10.
11.
NOTE: If not sure which wire is Hot, connect black wire (D) from the
timer to one of the black wires, previously connected, and the red
wire (B) from timer to the second black wire (previously connected
to the switch). Secure connections with wire connectors.
A. Wire from xture
B. Red
C. Hot
D. Black
E. White (Neutral)
F. Green
To turn timer OFF manually, press button repeatedly until “OFF” LED display is illuminated.
*Works with CFL bulbs.
This timer has been tested to work with standard compact
uorescent (CFL) bulbs. However, it will not control a CFL bulb that
specically states "not to be used with timer controls." If in doubt,
please consult the bulb manufacturer.
SAVE THESE INSTRUCTIONS!
•
•
•
Operation
Manual Shut-Off
•
NOTE: If the timer is not functioning, interchange two black wires
previously connected to switch (see point 7 above).
1-888-686-0778
/