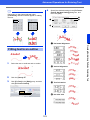
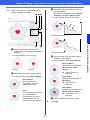
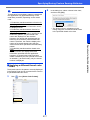
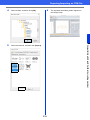
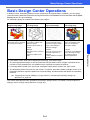
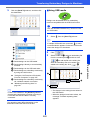
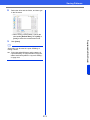
Brother PE-DESIGN 11 User manual
- Category
- Sequencer
- Type
- User manual

Instruction Manual
PERSONAL EMBROIDERY & SEWING DIGITIZING SOFTWARE
Be sure to read this document before using the software.

1
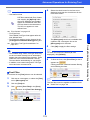
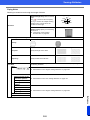
Congratulations on choosing our product!
Thank you very much for purchasing our product. To obtain the best performance from this device
and to ensure safe and correct operation, please read this Instruction Manual carefully, and then
keep it in a safe place together with your warranty.
Please read before using this product
For designing beautiful embroidery designs
• This system allows you to create a wide variety of embroidery designs and supports a wider
range of sewing attribute settings (thread density, sewing pitch, etc.). However, the final result
will depend on your particular sewing machine model. We recommend that you make a trial
sewing sample with your sewing data before sewing on the final material.
For safe operation
• Do not save any files on the "PE-DESIGN Software Key" for transferring or storage.
• Do not plug the "PE-DESIGN Software Key" into your sewing machine.
For a longer service life
• When storing the "PE-DESIGN Software Key", avoid direct sunlight and high humidity
locations. Do not store the "PE-DESIGN Software Key" close to a heater, iron or other hot
objects.
• Do not spill water or other liquids on the "PE-DESIGN Software Key".
• Do not drop or hit the "PE-DESIGN Software Key".
For repairs or adjustments
• In the event that a malfunction occurs or adjustment is required, please consult your nearest
service center.
Notice
• Since this "PE-DESIGN Software Key" device is required to run the software, its replacement
value is the retail price of the software. Please keep in a safe place when not in use.
• Neither this Instruction Manual nor the Reference Guide explains how to use your computer
under Windows. Please refer to the Windows manuals.
Copyright acknowledgment
Any trade names and product names of companies appearing on Brother products, related
documents and any other materials are all trademarks or registered trademarks of those respective
companies.
Caution
The software included with this product is protected by copyright laws. This software can be used
or copied only in accordance with the copyright laws.
For additional product information and updates, visit our website at:
www.brother.com or http://s.brother/cppab/
SAVE THESE INSTRUCTIONS
This product is intended for household use.

2
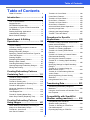
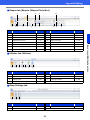
Table of Contents
Table of Contents
Table of Contents............................................. 2
Introduction.................................... 4
How To Use Manuals....................................... 5
Support/Service ............................................... 7
PE-DESIGN Software Key............................... 9
Comparison of Types of Data Created With
PE-DESIGN 11 .............................................. 10
Starting Up/Exiting Applications..................... 11
Understanding Windows................................ 13
Basic Software Settings................................. 16
Basic Layout & Editing
Operations.................................... 23
Layout & Editing............................................. 24
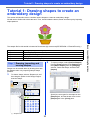
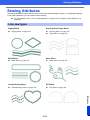
Tutorial 1: Drawing shapes to create an
embroidery design ......................................... 30
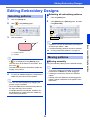
Editing Embroidery Designs........................... 39
Specifying Thread Colors and Sew Types for
Lines and Regions ......................................... 54
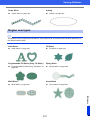
Drawing Shapes............................................. 70
Reshaping Embroidery Patterns .................... 76
Editing a Stitch Pattern .................................. 81
Checking Embroidery Patterns ...................... 87
Opening/Importing Embroidery Designs ...... 101
Saving and Printing...................................... 107
Creating Embroidery Patterns
Containing Text.......................... 111
Tutorial 2: Using Templates ......................... 112
Template Feature......................................... 115
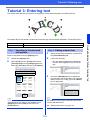
Tutorial 3: Entering text................................ 116
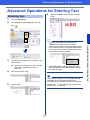
Advanced Operations for Entering Text....... 117
Tutorial 4: Monograms................................. 131
Advanced Operations for Entering
Monograms.................................................. 134
User-Mapped Text ....................................... 135
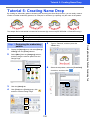
Tutorial 5: Creating Name Drop................... 136
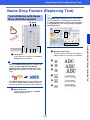
Name Drop Feature (Replacing Text).......... 139
Creating Embroidery Patterns
Using Images ............................. 141
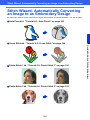
Stitch Wizard: Automatically Converting an
Image to an Embroidery Design .................. 142
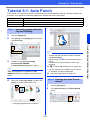
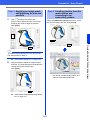
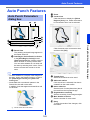
Tutorial 6-1: Auto Punch .............................. 143
Auto Punch Features ................................... 145
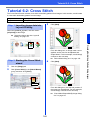
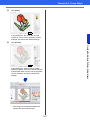
Tutorial 6-2: Cross Stitch.............................. 146
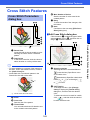
Cross Stitch Features................................... 148
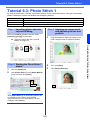
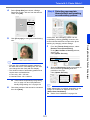
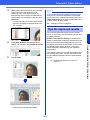
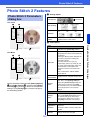
Tutorial 6-3: Photo Stitch 1........................... 150
Photo Stitch 1 Features................................ 153
Tutorial 6-4: Photo Stitch 2........................... 155
Photo Stitch 2 Features................................ 157
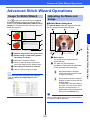
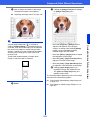
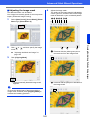
Advanced Stitch Wizard Operations ............ 158
Importing Image Data................................... 163
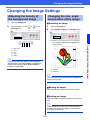
Changing the Image Settings....................... 165
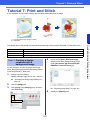
Tutorial 7: Print and Stitch............................ 167
Operations for Specific
Applications ............................... 172
Tutorial 8: Filling a specified area around a
pattern with embroidery................................ 173
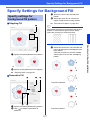
Specify Settings for Background Fill ............ 177
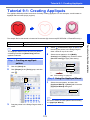
Tutorial 9-1: Creating Appliqués................... 179
Tutorial 9-2: Creating Embroidered
Patches ........................................................ 184
Tutorial 9-3: Creating a Cutwork Pattern
Filled with Net Stitching................................ 187
On Using the Cutwork Functions ................. 191
Tutorial 10-1: Creating Split Embroidery
Designs ........................................................ 195
Specifying Settings for Split Embroidery
Designs ........................................................ 201
Tutorial 10-2: Creating Design for
Multi-Position Hoops .................................... 204
Tutorial 10-3: Embroidering With the
Jumbo Frame ............................................... 209
Specifying/Saving Custom Sewing
Attributes...................................................... 213
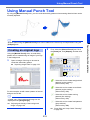
Using Manual Punch Tool ............................ 218
Transferring Data....................... 221
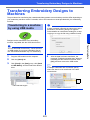
Transferring Embroidery Designs to
Machines...................................................... 222
Using the Link Function to Embroider From
the Computer ............................................... 227
Compatibility with ScanNCut
(Brother cutting machine)......... 232
Compatibility with ScanNCut
(Brother cutting machine)............................. 233
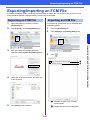
Tutorial 11:Sending an FCM File to
CanvasWorkspace....................................... 234
Exporting/Importing an FCM File ................. 238

3
Table of Contents
Design Center ............................ 240
Design Center .............................................. 241
Basic Design Center Operations.................. 244
Design Center Window ................................ 254
Original Image Stage ................................... 255
Line Image Stage......................................... 257
Figure Handle Stage.................................... 259
Sew Setting Stage ....................................... 264
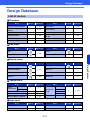
Design Database........................ 272
Design Database ......................................... 273
Design Database Window............................ 274
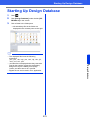
Starting Up Design Database ...................... 275
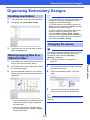
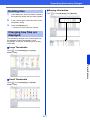
Organizing Embroidery Designs .................. 276
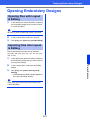
Opening Embroidery Designs ...................... 278
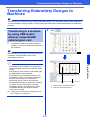
Transferring Embroidery Designs to
Machines...................................................... 279
Searching for an Embroidery Design ........... 285
Converting Embroidery Design Files to
Different Formats ......................................... 286
Checking Embroidery Designs..................... 287
Outputting a Catalog of Embroidery
Designs........................................................ 289
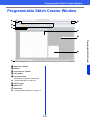
Programmable Stitch Creator... 291
Programmable Stitch Creator ...................... 292
Basic Programmable Stitch Creator
Operations ................................................... 294
Creating Fill/Stamp Stitch Pattern................ 296
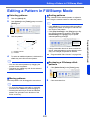
Editing a Pattern in Fill/Stamp Mode............ 300
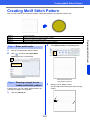
Creating Motif Stitch Pattern........................ 302
Editing a Pattern in Motif Mode.................... 305
Creating a Decorative Fill Pattern................ 306
Programmable Stitch Creator Window......... 309
Opening a Template .................................... 310
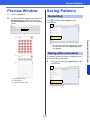
Preview Window .......................................... 312
Saving Patterns............................................ 312
Changing the Display Settings..................... 314
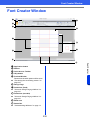
Font Creator ............................... 315
Font Creator................................................. 316
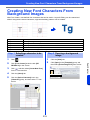
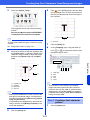
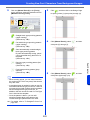
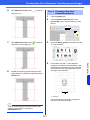
Creating New Font Characters From
Background Images ..................................... 318
Registering Embroidery Data as a Font....... 325
Font Creator Window ................................... 330
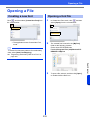
Opening a File.............................................. 332
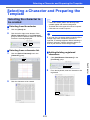
Selecting a Character and Preparing the
Template ...................................................... 333
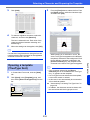
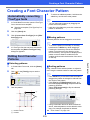
Creating a Font Character Pattern............... 335
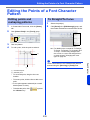
Editing the Points of a Font Character
Pattern.......................................................... 336
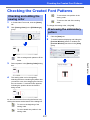
Checking the Created Font Patterns............ 337
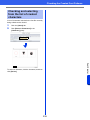
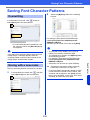
Saving Font Character Patterns................... 339
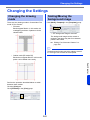
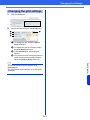
Changing the Settings.................................. 340
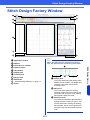
Stitch Design Factory................ 342
Stitch Design Factory................................... 343
Basic Stitch Design Factory Operations....... 345
Editing Sewing Stitch Patterns ..................... 348
Changing the Format of Files to be
Exported....................................................... 351
Stitch Design Factory Window ..................... 353
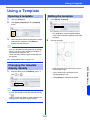
Using a Template ......................................... 354
Other Settings .............................................. 355
Supplement ................................ 357
For Basic Operations ................................... 358
On Settings .................................................. 360
Changing Various Settings........................... 361
For Making an Effective Use of This
Application.................................................... 366
Reference ................................... 368
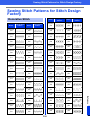
Sewing Attributes ......................................... 369
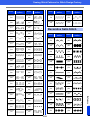
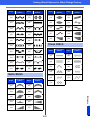
Font List ....................................................... 394
Sewing Stitch Patterns for Stitch Design
Factory ......................................................... 398
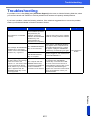
Troubleshooting ........................................... 401
Index ............................................................ 403

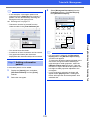
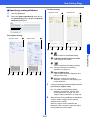
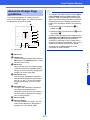
Introduction
This section provides a general understanding of
the basic software applications as well as support
information.

5
Introduction
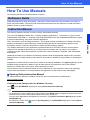
How To Use Manuals
How To Use Manuals
The following manuals are included with this software.
Read this guide before using the software. This guide contains instructions and precautions necessary to
begin using the software. The second half is filled with tutorials that use key features to create embroidery
patterns as well as project examples.
This manual contains instruction on how to use the PE-DESIGN software.
First, read “PE-DESIGN Software Key”, “Starting Up/Exiting Applications”, “Comparison of Types of Data
Created With PE-DESIGN 11”, “Example of Importing Embroidery Data” and “Understanding Windows” to gain
a general understanding of the basic software applications.
Next, read “Basic Layout & Editing Operations”. This chapter provides procedures for creating embroidery
patterns as examples for performing basic Layout & Editing operations and transferring patterns to the
embroidery machine. Follow the procedures to create actual embroidery patterns.
The chapters dedicated to each application provide descriptions of the useful functions and the various
settings. Each descriptive title allows you to easily find the information that you need. In the chapters
containing tutorials, follow the procedures to practice the various operations. Afterward, read the detailed
descriptions.
Additional information is provided in the following chapters. Read the appropriate chapter when necessary.
Support/Service: Provides warranty information for this product in addition to the procedure for updating the
software.
Supplement: Provides function introductions, details on the settings available in the [Options] dialog box and
troubleshooting procedures in addition to tips and precautions to maximize the use of this software.
Reference: Provides lists of sew types, sewing attributes and fonts.
The procedures in this manual are written for use in Windows 10. If this software is used on an operating
system other than Windows 10, the procedures and appearance of the windows may differ slightly.
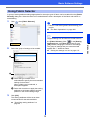
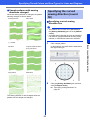
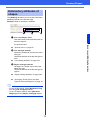
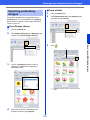
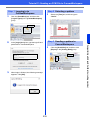
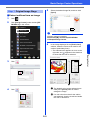
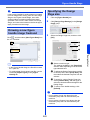
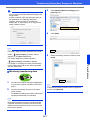
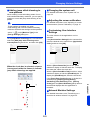
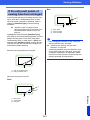
■ Opening Online Instruction Manual
An online Instruction Manual is available, which can also be accessed from a mobile device.
http://s.brother/cmpaa/
Viewing from the [Start] screen (for Windows 10 users)
Click . Click [PE-DESIGN 11] and then select [Online Instruction Manual].
Reference Guide
Instruction Manual
b
• For Windows 8.1 users: Position the mouse pointer in the [Start] screen to display the down arrow in the
lower-left corner of the screen (below and left of the tiles), and click it.
From the list of applications that appears in the screen, click [Online Instruction Manual] under the title
[PE-DESIGN 11].
• For Windows 7 users: Click and then [All Programs]. Click [PE-DESIGN 11] and then select [Online
Instruction Manual].

6
Introduction
How To Use Manuals
Viewing from the application
Click [Help] in the window of each application. In [Design Database], [Help] is in the menu bar at the top of
the window.
In other applications, it is located in the upper-right corner of the window.
b
• A PDF version of the Instruction Manual is also available, which can be accessed even when the computer
is offline. Access the PDF version of the Instruction Manual as described below.
Windows 10 users: Click . Click [PE-DESIGN 11] and then select [Instruction Manual].
For Windows 8.1 users: Position the mouse pointer in the [Start] screen to display the down arrow in the
lower-left corner of the screen (below and left of the tiles), and click it.
From the list of applications that appears in the screen, click [Instruction Manual] under the title [PE-
DESIGN 11].
For Windows 7 users: Click
and then [All Programs]. Click [PE-DESIGN 11] and click [PDF] and
then select [Instruction Manual].
• Adobe
®
Reader
®
is required for viewing and printing the PDF version of the Instruction Manual.
• If Adobe
®
Reader
®
is not on your computer, it must be installed. It can be downloaded from the Adobe
Systems Incorporated Web site (https://www.adobe.com/
).

7
Introduction
Support/Service
Support/Service
Contact Technical Support if you have a problem. Please check the company web site
(www.brother.com
) to find the Technical Support in your area. To view the FAQ and information for software
updates, visit the Brother Solutions Center at (http://s.brother/cppab/
).
If you wish to be contacted about upgrades and provided with important information such as future product
developments and improvements, you can register your product online by following a simple registration
procedure.
Click [Help] in Layout & Editing, then [Online Registration] to start up the installed Web browser and open
the online registration page on our Web site.
The online registration page on the Web site appears when the following address is entered in the address bar
of the Web browser.
http://s.brother/pedesignonlinereg/
Technical Support
a
• Have the information ready before contacting Technical Support.
Make sure your computer's operating system is current with all updates.
Have the make and model of your computer and Windows Operating System. (Refer to the Reference
Guide for system requirements.)
Information on error messages that appear. This information will help expedite your questions more
quickly.
Make sure PE-DESIGN 11 is current with any updates.
Online Registration (Except for European region countries)
b
Online registration may not be available in some areas.

8
Introduction
Support/Service
Click [Help] in Layout & Editing, then [Check for Updates].
The software is checked to determine whether or not it is the latest version.
If the message shown below appears, the latest version of the software is being used.
If the message shown below appears, the latest version of the software is not being used. Click [Yes], and
then download the latest version of the software from the Web site.
Checking for the Latest Version of the Program
b
If the [Always check for most recent version at startup] check box is selected, the software is checked
at startup to determine whether or not it is the latest version.

9
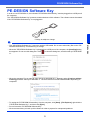
PE-DESIGN Software Key
Introduction
PE-DESIGN Software Key
In order to use PE-DESIGN 11, the included "PE-DESIGN Software Key" must be plugged into a USB port of
the computer.
The "PE-DESIGN Software Key" prevents unauthorized use of this software. The software cannot be started
if the "PE-DESIGN Software Key" is not plugged in.
* Design is subject to change.
a
• The "PE-DESIGN Software Key" cannot be used as USB media. Do not save embroidery files on the "PE-
DESIGN Software Key" for transferring or storage.
• When the "PE-DESIGN Software Key" is plugged into a USB port of the computer, the [AutoPlay] dialog
box appears. Do not use this dialog box. Click to close the dialog box, and then start up PE-DESIGN
11.
• When the message "Do you want to scan and fix PE-DESIGN (E:)?" appears, select [Continue without
scanning] and then start up PE-DESIGN 11. The drive name for the PE-DESIGN differs depending on
computers.
• To unplug the "PE-DESIGN Software Key" from the computer, click [Start] - [File Explorer], right-click the
"PE-DESIGN Software Key", and then click [Eject].
• Do not format the "PE-DESIGN Software Key".
• We recommend that you back up this software in order to prepare for unexpected problems.

10
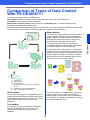
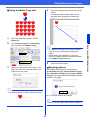
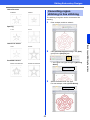
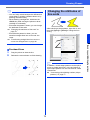
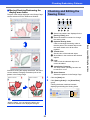
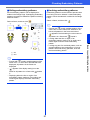
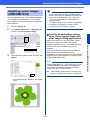
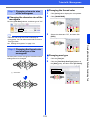
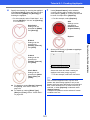
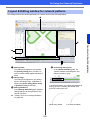
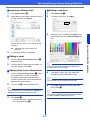
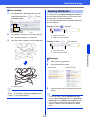
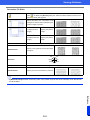
Comparison of Types of Data Created With PE-DESIGN 11
Introduction
Comparison of Types of Data Created
With PE-DESIGN 11
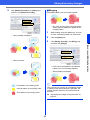
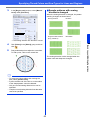
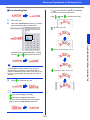
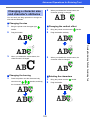
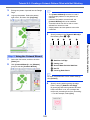
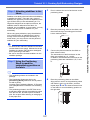
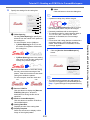
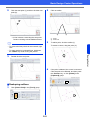
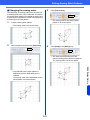
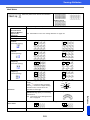
Three types of data are used in PE-DESIGN 11.
Stitch pattern: Built-in embroidery data (created through a conversion in PE-DESIGN 11)
Text pattern: Data created with the [Text] tools
Shape pattern (Outline pattern): Data created with the [Shapes] tools. A uniform/multiple sewing
direction(s) are applied to the entire region.
Each data can be converted to another type as shown below. The arrows indicate the directions in which data
can be converted. The methods of editing the data differ depending on the data type.
1 Text pattern
2 Stitch pattern
3 Shape pattern
4 Change the shape by editing needle drop
points.
5 Change the shape by editing paths.
6 Edit the text or change the font.
Stitch pattern
You can edit (reshaping by moving/deleting points
or splitting/connecting lines at points) points (needle
drop points) and split stitches; however, you cannot
specify region and line sew types or sewing
attributes.
Text pattern
You can edit text by entering/deleting characters,
specify text attributes (such as the font or the
transformation shape) and specify sewing
attributes.
Shape pattern
You can specify region and line sew types as well as
sewing attributes, edit paths (by moving/deleting
points, reshaping through handle movements or by
splitting/connecting lines at points), change the
sewing direction, input/edit stamps, apply
embossing/engraving effects, remove/merge
overlapping regions, set hole sewing, split outlines
and create offset lines and floral patterns.
For example, when a stitch pattern is converted to
shapes, the sew types and sewing attributes can be
changed, and the shapes can easily be edited and
resized. When text pattern is converted to shapes,
the sewing direction and character shapes can be
edited and offset lines can be created.
Functions that are not available with one data type
may be performed if the data is converted to a
different type. Convert data to the type that allows
you to perform the operations necessary for creating
the desired embroidery data.
4
2
31
6
5

11
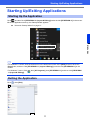
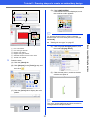
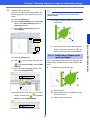
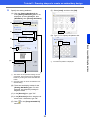
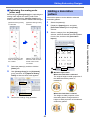
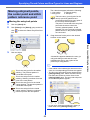
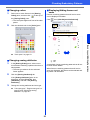
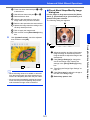
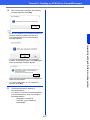
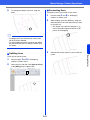
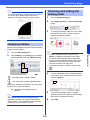
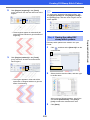
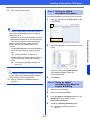
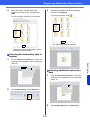
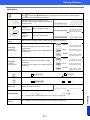
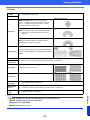
Starting Up/Exiting Applications
Introduction
Starting Up/Exiting Applications
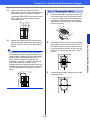
Click , and then Click [PE-DESIGN 11 (Layout & Editing)] under the title [PE-DESIGN 11] in the screen.
When the application starts up, the Startup Wizard appears.
cc "About the Startup Wizard" on page 12
Click , then [Exit].
Starting Up the Application
b
For Windows 8.1 users: Click the down arrow in the bottom-left corner of the [Start] screen to show the
[Apps] view, and then Click [PE-DESIGN 11 (Layout & Editing)] under the title [PE-DESIGN 11] in the
screen.
For Windows 7 users: Click , then [All Programs], then [PE-DESIGN 11], and then click [PE-DESIGN
11 (Layout & Editing)].
Exiting the Application

12
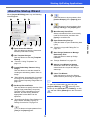
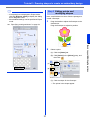
Starting Up/Exiting Applications
Introduction
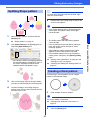
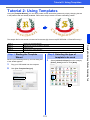
When [Layout & Editing] starts up, the following
wizard appears.
a Open Instruction Manual
Click this button to open the Instruction
Manual (HTML/PDF format).
b Use Template Designs
Click this button to start the [Template
Wizard].
cc "Tutorial 2: Using Templates" on
page 112
c Create Embroidery Patterns Using
Images
Click this button to start the wizard for
creating an embroidery pattern from an
image.
cc "Stitch Wizard: Automatically Converting
an Image to an Embroidery Design" on
page 142 and "Importing Image Data" on
page 163
d Set Hoop Size and Fabric
Click this button to specify the size of the
Design Page (embroidery hoop size).
The fabric to be embroidered can be
selected, and the sewing attributes
appropriate for that fabric can be
specified.
cc "Specifying the Design Page Settings" on
page 16 and "Recalling a group of
settings from the list" on page 213
e
Click this button to import patterns from
[Text] of the [Import] pane.
f
Click this button to import patterns from
[Outline Shapes] of the [Import] pane.
g
Click this button to import patterns from
[Design Library] of the [Import] pane.
h Most Recently Used Files
Select a thumbnail of the most recently
used file from the list, and then click
[Open] to recall the file.
i Open Embroidery Design
Click this button to open embroidery data
(.pes).
cc "Opening a Layout & Editing file" on
page 101
j Start Design Database to Manage
Embroidery Files
Click this button to start up Design
Database.
cc "Design Database" on page 272
k Always show Wizard at Startup
Select this check box to start up the
wizard each time Layout & Editing is
started up.
l Close This Wizard
Click this button to close the Startup
Wizard without performing an operation.
About the Startup Wizard
abch
efg l k ji
d
b
To open the wizard while you are using the
[Layout & Editing], click at the top of the
window (in the [Quick Access Toolbar]), or click
and then select [Wizard] from the command
menu.

13
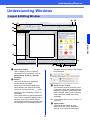
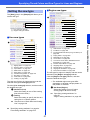
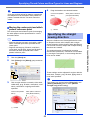
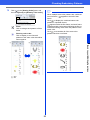
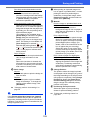
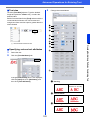
Understanding Windows
Introduction
Understanding Windows
a Application button
Click to display a menu containing
commands for file operations, such as
[New], [Save], [Print] and [Design
Settings].
b Ribbon
Click a tab at the top to display the
corresponding commands.
Refer to the name below each group
when selecting the desired command.
Clicking a command with the mark
displays a menu containing a choice of
commands.
Some other tabs may appear depending
on the tool or embroidery pattern that is
selected. These tabs contain various
commands for performing operations with
the selected tool or embroidery pattern.
Example: When the Shapes (Rectangle)
tool is selected
c Quick Access Toolbar
This contains the most frequently used
commands. Since this toolbar is always
displayed, regardless of the Ribbon tab
that is selected, adding your most often
used commands makes them easily
accessible.
cc "Customizing Quick Access Toolbar" on
page 363
d Option button
Click this button to start up other
applications and specify application
settings, such as user thread charts.
Layout & Editing Window
n
o
l
a
g
h
i
m
b
f
k
de
j
c

14
Understanding Windows
Introduction
e Help button
Click this button to display the Instruction
Manual and view information about the
software.
f Sewing Order pane
This pane shows the sewing order. Click
the buttons at the top of the pane to
change the sewing order or thread color.
g Import/Color/Sewing Attributes/Text
Attributes panes
This pane combines tabs for importing
embroidery patterns as well as for
specifying thread colors, sewing attributes
and text attributes. Click a tab to display
the available parameters.
h Stitch Simulator pane
The Stitch Simulator shows how the
pattern will be sewn by the machine and
how the stitching will appear.
i Design Page
The actual part of the work area that can
be saved and sewn.
j Work area
k Status Bar
This displays the size of the embroidery
data, the number of stitches or a
description of the selected command.
l View mode buttons
Click a button to change the View mode.
m Show grid button
Click to switch between displaying and
hiding the grid.
n Design Property button
Click to display a dialog box containing
sewing information for the embroidery
data.
o Zoom slider
This displays the current magnification
ratio. Click to specify a value for the
magnification ratio.
Drag the slider to change the
magnification ratio.
b
• Panes 6, 7 and 8 can be displayed or hidden
from the [Show/Hide] group in the [View] tab. In
addition, these panes can be displayed as
separate dialog boxes (Floating) or attached to
the main window (Docking).
• Position the pointer over a command to display
a ScreenTip, which provides a description of the
command and indicates its shortcut key.

15
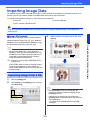
Understanding Windows
Introduction
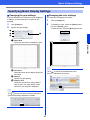
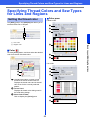
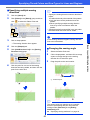
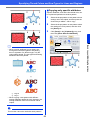
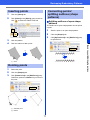
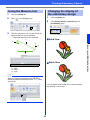
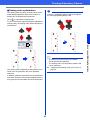
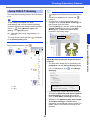
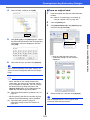
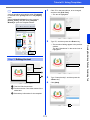
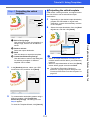
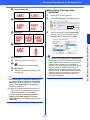
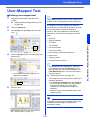
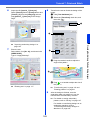
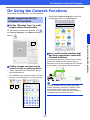
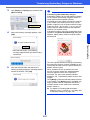
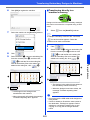
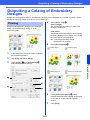
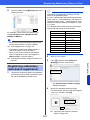
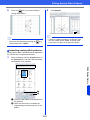
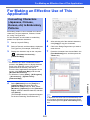
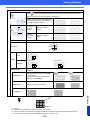
■ Using the Import pane
Embroidery data can be imported by using the
[Import] pane.
a From
Select a pattern location.
b Category
Select a pattern category.
The categories in the pattern location
selected in the [From] selector are listed.
c The patterns in the category selected in
the [Category] selector appear in the list.
Pointing to a pattern and holding down the
left mouse button displays a dotted box in
the Design Page. This allows you to
check the size of the pattern.
d Import
Click this button to import the selected
pattern.
■ Using Import commands
1 Click the [Home] tab.
2 Click [Import Patterns] in the [Import] group,
and then click [from Design Library], [from
File], [from Card] or [Decorative Pattern]
from the [Import] menu.
The [Import] pane appears on the right
side of the screen.
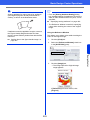
Example of Importing Embroidery Data
b
• The pattern can also be imported by double-
clicking it in the list or by dragging it to the
Design Page.
• Multiple files cannot be selected to be imported
at the same time.
cc "From a folder" on page 102 and "From an
original card" on page 103
a
b
c
d
b
The [Import] pane can also be displayed by
selecting the [Import Pane] check box in the
[View] tab.
When the [Color] pane, [Sewing Attributes]
pane or [Text Attributes] pane is displayed, click
the [Import] tab to display the [Import] pane.

16
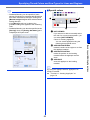
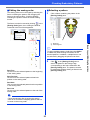
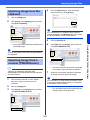
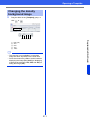
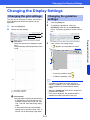
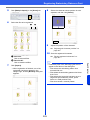
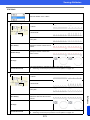
Basic Software Settings
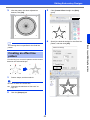
Introduction
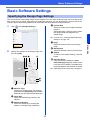
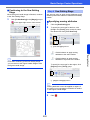
Basic Software Settings
The color and size of the Design Page can be changed. You can select a Design Page size according to the
size of hoop that you will be using with your embroidery machine. You can also specify a custom size for the
Design Page for embroidery patterns that will be split and embroidered in multiple sections.
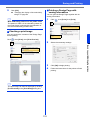
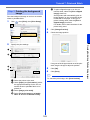
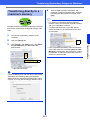
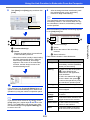
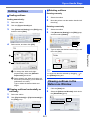
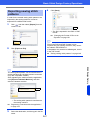
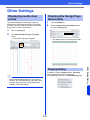
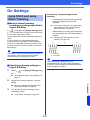
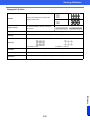
1 Click , then [Design Settings].
2 Specify the settings for the Design Page, and
then click [OK].
a Machine Type
Select your machine type. The settings
available in the [Page Size] selector differ
depending on the selected machine type.
b Hoop Size
Select the desired hoop size from the
selector.
c Rotate 90 Degrees
Select this check box to arrange the
pattern in a Design Page rotated 90°.
d Custom Size
Specify a custom size for split embroidery
patterns.
Select this option, and then type or select
the desired width and height for the
Design Page.
cc "Tutorial 10-1: Creating Split Embroidery
Designs" on page 195
e Page
Select the desired color for the Design
Page.
f Background
Select the desired color for the work area.
g Default
To return to the default settings, click this
button.
h Edit User Hoop
Click this button to display the [User
Hoop Settings] dialog box, where a user
hoop size can be added. The added user
hoop size appears at the bottom of the list.
cc "Specifying a user hoop size" on page 17
Specifying the Design Page Settings
cba h
gd
e
f

17
Basic Software Settings
Introduction
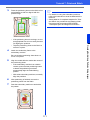
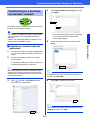
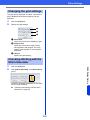
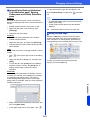
■ Specifying a user hoop size
a User Hoop List
The added hoop size appears in the list.
Select a hoop size in this list to change the
display order or to delete it.
b Width, Height
Type in the size of the hoop to be added.
c Comment
If text was entered in this box, that text
appears beside the size.
d Up, Down
Click these buttons to move the selected
hoop size up or down in the display order.
e Delete Hoop
Click this button to delete the selected
hoop size.
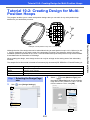
f Add Hoop
Click this button to add the hoop size.
a
• The Design Page sizes 130 × 300 mm, 100 ×
172 mm indicated by the "*", are used to
embroider multi-position designs using a special
embroidery hoop attached to the embroidery
machine at three installation positions.
cc "Tutorial 10-2: Creating Design for Multi-
Position Hoops" on page 204
• Do not select a hoop size larger than the
embroidery hoop that can be used with your
machine.
• When Cap Frame, Cylinder Frame or Round
Frame has been selected, the Design Page
cannot be rotated 90°.
a
• A User Hoop cannot rotate 90°.
• A User Hoop cannot be added to the Section
Size (for Hoop Size) selector under Custom
Size.
• Do not create a Custom Hoop larger than the
embroidery hoop that can be used with your
machine.
• Embroidery data created in a user hoop size
cannot be saved in a format for a previous
version.
a
b
c
d
e
f

18
Basic Software Settings
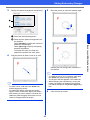
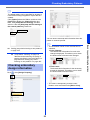
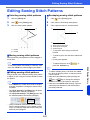
Introduction
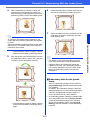
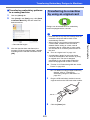
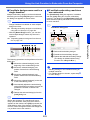
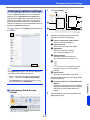
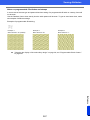
■ Specifying the sewing area
The pattern drawn in the Design Page is sewn
differently depending on the sewing area setting.
1 Click [Output] tab.
2 Select the desired sewing area ([Design
Page area] or [Use existing design area]).
Design Page area
The patterns will be sewn so that the needle
position when you start sewing is aligned with
the center of your Design Page. The
dimension of the pattern matches the size of
the Design Page, therefore reducing the ability
to move a pattern around the layout screen of
your embroidering machine.
Use existing design area
The patterns will be sewn so that the needle
position when you start sewing is aligned with
the center of the actual patterns. The actual
pattern size is maintained, therefore allowing
greater mobility when using the layout
functions of your embroidering machine.
■ Optimize hoop change
This setting can be selected if a multi-position hoop
(100 × 172 mm or 130 × 300 mm) has been selected
as the Design Page size.
Select the check box to optimize the sewing order/
order of hoop position changes so that the number
of times that the hoop position is changed is
reduced to the minimum.
This reduces the risk of misalignment in the
embroidery pattern or uneven stitching from
changing the hoop position too often.
■ Jump Stitch Trimming
These settings are applied only when embroidering
with our multi-needle embroidery machines. Before
these settings can be specified, select under
[Machine Type] in the [Design Settings] dialog
box.
Specify the minimum jump stitch length for thread
trimming.
cc "Jump Stitch Trimming" on page 98,
"Specifying trimming settings in Layout &
Editing" on page 360 and "Adding jump
stitch trimming to new patterns" on
page 365
Design Page (on
your screen)
Sewing area =
Design Page area
Design Page (on
your screen)
Sewing area = Use
existing design area
a
These settings are not applied with any other
embroidery machine. For details, refer to the
instruction manual provided with your machine.

19
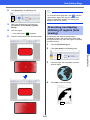
Basic Software Settings
Introduction
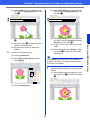
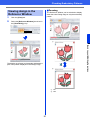
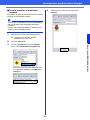
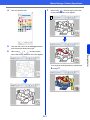
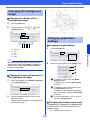
A group of sewing attribute settings appropriate for the major types of fabric can be recalled from the [Fabric
Selector] dialog box. Select the fabric to be embroidered to view a description of the fabric and advice on
embroidering.
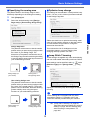
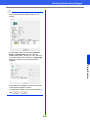
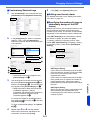
1 Click , then [Fabric Selector].
2 Select the group of settings to be recalled.
a Select the type of fabric to be
embroidered to specify the recommended
settings for that fabric.
When a fabric type is selected, a
description appears.
b Select this check box to apply the sewing
attributes to all shape patterns and text
patterns in the current Design Page.
3 Click [OK].
The sewing attributes will be set to those
recommended for the selected fabric.
cc "Specifying sewing attributes" on
page 64
Using Fabric Selector
a
b
a
• Perform a trial sewing before embroidering your
project.
cc "For Basic Operations" on page 358
b
Original settings can be saved to be later used in
the [Fabric Selector]. Click in the [Sewing
Attributes] tab, click [Save As], and then click
[OK] without changing the name for the settings.
The group of settings that you have saved will
appear with “*” beside its name.
cc "Saving the settings in a list" on page 213
Page is loading ...
Page is loading ...
Page is loading ...
Page is loading ...
Page is loading ...
Page is loading ...
Page is loading ...
Page is loading ...
Page is loading ...
Page is loading ...
Page is loading ...
Page is loading ...
Page is loading ...
Page is loading ...
Page is loading ...
Page is loading ...
Page is loading ...
Page is loading ...
Page is loading ...
Page is loading ...
Page is loading ...
Page is loading ...
Page is loading ...
Page is loading ...
Page is loading ...
Page is loading ...
Page is loading ...
Page is loading ...
Page is loading ...
Page is loading ...
Page is loading ...
Page is loading ...
Page is loading ...
Page is loading ...
Page is loading ...
Page is loading ...
Page is loading ...
Page is loading ...
Page is loading ...
Page is loading ...
Page is loading ...
Page is loading ...
Page is loading ...
Page is loading ...
Page is loading ...
Page is loading ...
Page is loading ...
Page is loading ...
Page is loading ...
Page is loading ...
Page is loading ...
Page is loading ...
Page is loading ...
Page is loading ...
Page is loading ...
Page is loading ...
Page is loading ...
Page is loading ...
Page is loading ...
Page is loading ...
Page is loading ...
Page is loading ...
Page is loading ...
Page is loading ...
Page is loading ...
Page is loading ...
Page is loading ...
Page is loading ...
Page is loading ...
Page is loading ...
Page is loading ...
Page is loading ...
Page is loading ...
Page is loading ...
Page is loading ...
Page is loading ...
Page is loading ...
Page is loading ...
Page is loading ...
Page is loading ...
Page is loading ...
Page is loading ...
Page is loading ...
Page is loading ...
Page is loading ...
Page is loading ...
Page is loading ...
Page is loading ...
Page is loading ...
Page is loading ...
Page is loading ...
Page is loading ...
Page is loading ...
Page is loading ...
Page is loading ...
Page is loading ...
Page is loading ...
Page is loading ...
Page is loading ...
Page is loading ...
Page is loading ...
Page is loading ...
Page is loading ...
Page is loading ...
Page is loading ...
Page is loading ...
Page is loading ...
Page is loading ...
Page is loading ...
Page is loading ...
Page is loading ...
Page is loading ...
Page is loading ...
Page is loading ...
Page is loading ...
Page is loading ...
Page is loading ...
Page is loading ...
Page is loading ...
Page is loading ...
Page is loading ...
Page is loading ...
Page is loading ...
Page is loading ...
Page is loading ...
Page is loading ...
Page is loading ...
Page is loading ...
Page is loading ...
Page is loading ...
Page is loading ...
Page is loading ...
Page is loading ...
Page is loading ...
Page is loading ...
Page is loading ...
Page is loading ...
Page is loading ...
Page is loading ...
Page is loading ...
Page is loading ...
Page is loading ...
Page is loading ...
Page is loading ...
Page is loading ...
Page is loading ...
Page is loading ...
Page is loading ...
Page is loading ...
Page is loading ...
Page is loading ...
Page is loading ...
Page is loading ...
Page is loading ...
Page is loading ...
Page is loading ...
Page is loading ...
Page is loading ...
Page is loading ...
Page is loading ...
Page is loading ...
Page is loading ...
Page is loading ...
Page is loading ...
Page is loading ...
Page is loading ...
Page is loading ...
Page is loading ...
Page is loading ...
Page is loading ...
Page is loading ...
Page is loading ...
Page is loading ...
Page is loading ...
Page is loading ...
Page is loading ...
Page is loading ...
Page is loading ...
Page is loading ...
Page is loading ...
Page is loading ...
Page is loading ...
Page is loading ...
Page is loading ...
Page is loading ...
Page is loading ...
Page is loading ...
Page is loading ...
Page is loading ...
Page is loading ...
Page is loading ...
Page is loading ...
Page is loading ...
Page is loading ...
Page is loading ...
Page is loading ...
Page is loading ...
Page is loading ...
Page is loading ...
Page is loading ...
Page is loading ...
Page is loading ...
Page is loading ...
Page is loading ...
Page is loading ...
Page is loading ...
Page is loading ...
Page is loading ...
Page is loading ...
Page is loading ...
Page is loading ...
Page is loading ...
Page is loading ...
Page is loading ...
Page is loading ...
Page is loading ...
Page is loading ...
Page is loading ...
Page is loading ...
Page is loading ...
Page is loading ...
Page is loading ...
Page is loading ...
Page is loading ...
Page is loading ...
Page is loading ...
Page is loading ...
Page is loading ...
Page is loading ...
Page is loading ...
Page is loading ...
Page is loading ...
Page is loading ...
Page is loading ...
Page is loading ...
Page is loading ...
Page is loading ...
Page is loading ...
Page is loading ...
Page is loading ...
Page is loading ...
Page is loading ...
Page is loading ...
Page is loading ...
Page is loading ...
Page is loading ...
Page is loading ...
Page is loading ...
Page is loading ...
Page is loading ...
Page is loading ...
Page is loading ...
Page is loading ...
Page is loading ...
Page is loading ...
Page is loading ...
Page is loading ...
Page is loading ...
Page is loading ...
Page is loading ...
Page is loading ...
Page is loading ...
Page is loading ...
Page is loading ...
Page is loading ...
Page is loading ...
Page is loading ...
Page is loading ...
Page is loading ...
Page is loading ...
Page is loading ...
Page is loading ...
Page is loading ...
Page is loading ...
Page is loading ...
Page is loading ...
Page is loading ...
Page is loading ...
Page is loading ...
Page is loading ...
Page is loading ...
Page is loading ...
Page is loading ...
Page is loading ...
Page is loading ...
Page is loading ...
Page is loading ...
Page is loading ...
Page is loading ...
Page is loading ...
Page is loading ...
Page is loading ...
Page is loading ...
Page is loading ...
Page is loading ...
Page is loading ...
Page is loading ...
Page is loading ...
Page is loading ...
Page is loading ...
Page is loading ...
Page is loading ...
Page is loading ...
Page is loading ...
Page is loading ...
Page is loading ...
Page is loading ...
Page is loading ...
Page is loading ...
Page is loading ...
Page is loading ...
Page is loading ...
Page is loading ...
Page is loading ...
Page is loading ...
Page is loading ...
Page is loading ...
Page is loading ...
Page is loading ...
Page is loading ...
Page is loading ...
Page is loading ...
Page is loading ...
Page is loading ...
Page is loading ...
Page is loading ...
Page is loading ...
Page is loading ...
Page is loading ...
Page is loading ...
Page is loading ...
Page is loading ...
Page is loading ...
Page is loading ...
Page is loading ...
Page is loading ...
Page is loading ...
Page is loading ...
Page is loading ...
Page is loading ...
Page is loading ...
Page is loading ...
Page is loading ...
Page is loading ...
Page is loading ...
Page is loading ...
Page is loading ...
Page is loading ...
Page is loading ...
Page is loading ...
Page is loading ...
Page is loading ...
Page is loading ...
Page is loading ...
Page is loading ...
Page is loading ...
Page is loading ...
Page is loading ...
Page is loading ...
Page is loading ...
Page is loading ...
Page is loading ...
Page is loading ...
Page is loading ...
Page is loading ...
Page is loading ...
Page is loading ...
Page is loading ...
Page is loading ...
Page is loading ...
Page is loading ...
Page is loading ...
Page is loading ...
Page is loading ...
Page is loading ...
Page is loading ...
Page is loading ...
Page is loading ...
Page is loading ...
Page is loading ...
Page is loading ...
Page is loading ...
Page is loading ...
Page is loading ...
Page is loading ...
Page is loading ...
Page is loading ...
Page is loading ...
Page is loading ...
-
 1
1
-
 2
2
-
 3
3
-
 4
4
-
 5
5
-
 6
6
-
 7
7
-
 8
8
-
 9
9
-
 10
10
-
 11
11
-
 12
12
-
 13
13
-
 14
14
-
 15
15
-
 16
16
-
 17
17
-
 18
18
-
 19
19
-
 20
20
-
 21
21
-
 22
22
-
 23
23
-
 24
24
-
 25
25
-
 26
26
-
 27
27
-
 28
28
-
 29
29
-
 30
30
-
 31
31
-
 32
32
-
 33
33
-
 34
34
-
 35
35
-
 36
36
-
 37
37
-
 38
38
-
 39
39
-
 40
40
-
 41
41
-
 42
42
-
 43
43
-
 44
44
-
 45
45
-
 46
46
-
 47
47
-
 48
48
-
 49
49
-
 50
50
-
 51
51
-
 52
52
-
 53
53
-
 54
54
-
 55
55
-
 56
56
-
 57
57
-
 58
58
-
 59
59
-
 60
60
-
 61
61
-
 62
62
-
 63
63
-
 64
64
-
 65
65
-
 66
66
-
 67
67
-
 68
68
-
 69
69
-
 70
70
-
 71
71
-
 72
72
-
 73
73
-
 74
74
-
 75
75
-
 76
76
-
 77
77
-
 78
78
-
 79
79
-
 80
80
-
 81
81
-
 82
82
-
 83
83
-
 84
84
-
 85
85
-
 86
86
-
 87
87
-
 88
88
-
 89
89
-
 90
90
-
 91
91
-
 92
92
-
 93
93
-
 94
94
-
 95
95
-
 96
96
-
 97
97
-
 98
98
-
 99
99
-
 100
100
-
 101
101
-
 102
102
-
 103
103
-
 104
104
-
 105
105
-
 106
106
-
 107
107
-
 108
108
-
 109
109
-
 110
110
-
 111
111
-
 112
112
-
 113
113
-
 114
114
-
 115
115
-
 116
116
-
 117
117
-
 118
118
-
 119
119
-
 120
120
-
 121
121
-
 122
122
-
 123
123
-
 124
124
-
 125
125
-
 126
126
-
 127
127
-
 128
128
-
 129
129
-
 130
130
-
 131
131
-
 132
132
-
 133
133
-
 134
134
-
 135
135
-
 136
136
-
 137
137
-
 138
138
-
 139
139
-
 140
140
-
 141
141
-
 142
142
-
 143
143
-
 144
144
-
 145
145
-
 146
146
-
 147
147
-
 148
148
-
 149
149
-
 150
150
-
 151
151
-
 152
152
-
 153
153
-
 154
154
-
 155
155
-
 156
156
-
 157
157
-
 158
158
-
 159
159
-
 160
160
-
 161
161
-
 162
162
-
 163
163
-
 164
164
-
 165
165
-
 166
166
-
 167
167
-
 168
168
-
 169
169
-
 170
170
-
 171
171
-
 172
172
-
 173
173
-
 174
174
-
 175
175
-
 176
176
-
 177
177
-
 178
178
-
 179
179
-
 180
180
-
 181
181
-
 182
182
-
 183
183
-
 184
184
-
 185
185
-
 186
186
-
 187
187
-
 188
188
-
 189
189
-
 190
190
-
 191
191
-
 192
192
-
 193
193
-
 194
194
-
 195
195
-
 196
196
-
 197
197
-
 198
198
-
 199
199
-
 200
200
-
 201
201
-
 202
202
-
 203
203
-
 204
204
-
 205
205
-
 206
206
-
 207
207
-
 208
208
-
 209
209
-
 210
210
-
 211
211
-
 212
212
-
 213
213
-
 214
214
-
 215
215
-
 216
216
-
 217
217
-
 218
218
-
 219
219
-
 220
220
-
 221
221
-
 222
222
-
 223
223
-
 224
224
-
 225
225
-
 226
226
-
 227
227
-
 228
228
-
 229
229
-
 230
230
-
 231
231
-
 232
232
-
 233
233
-
 234
234
-
 235
235
-
 236
236
-
 237
237
-
 238
238
-
 239
239
-
 240
240
-
 241
241
-
 242
242
-
 243
243
-
 244
244
-
 245
245
-
 246
246
-
 247
247
-
 248
248
-
 249
249
-
 250
250
-
 251
251
-
 252
252
-
 253
253
-
 254
254
-
 255
255
-
 256
256
-
 257
257
-
 258
258
-
 259
259
-
 260
260
-
 261
261
-
 262
262
-
 263
263
-
 264
264
-
 265
265
-
 266
266
-
 267
267
-
 268
268
-
 269
269
-
 270
270
-
 271
271
-
 272
272
-
 273
273
-
 274
274
-
 275
275
-
 276
276
-
 277
277
-
 278
278
-
 279
279
-
 280
280
-
 281
281
-
 282
282
-
 283
283
-
 284
284
-
 285
285
-
 286
286
-
 287
287
-
 288
288
-
 289
289
-
 290
290
-
 291
291
-
 292
292
-
 293
293
-
 294
294
-
 295
295
-
 296
296
-
 297
297
-
 298
298
-
 299
299
-
 300
300
-
 301
301
-
 302
302
-
 303
303
-
 304
304
-
 305
305
-
 306
306
-
 307
307
-
 308
308
-
 309
309
-
 310
310
-
 311
311
-
 312
312
-
 313
313
-
 314
314
-
 315
315
-
 316
316
-
 317
317
-
 318
318
-
 319
319
-
 320
320
-
 321
321
-
 322
322
-
 323
323
-
 324
324
-
 325
325
-
 326
326
-
 327
327
-
 328
328
-
 329
329
-
 330
330
-
 331
331
-
 332
332
-
 333
333
-
 334
334
-
 335
335
-
 336
336
-
 337
337
-
 338
338
-
 339
339
-
 340
340
-
 341
341
-
 342
342
-
 343
343
-
 344
344
-
 345
345
-
 346
346
-
 347
347
-
 348
348
-
 349
349
-
 350
350
-
 351
351
-
 352
352
-
 353
353
-
 354
354
-
 355
355
-
 356
356
-
 357
357
-
 358
358
-
 359
359
-
 360
360
-
 361
361
-
 362
362
-
 363
363
-
 364
364
-
 365
365
-
 366
366
-
 367
367
-
 368
368
-
 369
369
-
 370
370
-
 371
371
-
 372
372
-
 373
373
-
 374
374
-
 375
375
-
 376
376
-
 377
377
-
 378
378
-
 379
379
-
 380
380
-
 381
381
-
 382
382
-
 383
383
-
 384
384
-
 385
385
-
 386
386
-
 387
387
-
 388
388
-
 389
389
-
 390
390
-
 391
391
-
 392
392
-
 393
393
-
 394
394
-
 395
395
-
 396
396
-
 397
397
-
 398
398
-
 399
399
-
 400
400
-
 401
401
-
 402
402
-
 403
403
-
 404
404
-
 405
405
-
 406
406
-
 407
407
-
 408
408
-
 409
409


Brother PE-DESIGN 11 User manual
- Category
- Sequencer
- Type
- User manual
Ask a question and I''ll find the answer in the document
Finding information in a document is now easier with AI
Related papers
-
Brother PE-DESIGN 11 User manual
-
-
-
-
-
-
Brother PE-DESIGN Ver.7 User manual
-
-
Brother Innov-is 6700D User manual
-

