MadiXtreme. Hi-speed MADI I/O
Multichannel Digital Audio Interface for PC and Macintosh based Digital Audio Workstations
Reference Guide
MadiXtreme. This is SSL.
www.solid-state-logic.com


Table of Contents
1. Introduction 1
H
ow to use this manual
1
Reading conventions 1
Key commands, key combinations and key sequences 1
Screenshots 1
Safety and Installation Considerations 2
D
isclaimer
2
Trademarks 2
Website 2
2. MadiXtreme Overview 3
Hardware 3
Software Drivers 3
PC 3
Macintosh 3
MADI 3
3. Package Contents 4
4a. Installation (PC) 5
Hardware and Software Installation Overview (PC) 5
Preparing Windows Plug and Play (Windows XP and Vista) 6
Hardware installation (Windows XP and Vista) 7
Installing the SSL Soundscape Device Driver (Windows XP) 7
Installing the WDM/KS Driver (Windows XP) 9
Installing the SSL Drivers (Windows Vista) 10
Device Manager (Windows XP and Vista) 11
4b. Installation (Macintosh) 12
Hardware Installation (Macintosh) 12
Software Installation (Macintosh) 13
5. Audio and Clock Connections 14
Audio Connections 14
Clock Connections 15
6. Audio and Clock Settings (PC) 16
Accessing the Audio and Clock Settings (PC) 16
Clock Settings 17
Master and Slave option boxes 17
Clock Source Selectors 17
Sample Rate Selection Menu 18
Format Settings 18
MADI Standard SMUX 18
MADI 56-Channel Mode 18
Test Mode Selection (may not be present) 18
Status 18
Page i

7. Audio and Clock Settings (Macintosh) 19
Accessing the Audio and Clock Settings (Macintosh) 19
M
adiXtreme Preferences Pane (Macintosh)
2
0
Clock Master 20
Sample Rate Selection 20
M
ADI Channel Count
2
0
MADI Frame Format 20
8. Driver Settings (PC) 21
Using the WDM/KS Drivers (Windows XP) 21
Using the Multimedia (MME) Drivers (Windows XP) 22
Using the WDM/KS drivers (Windows Vista) 23
Using the SSL Soundscape ASIO-2 Driver (Windows XP and Vista) 24
Multiple SSL Audio Cards and ASIO-2 26
9. Driver Settings (Macintosh) 27
10. Driver Updates and Uninstalling Older Driver Versions 28
Windows XP and Windows Vista 28
Removing the SSL Soundscape Device Driver (PC) 28
Macintosh 28
11. Firmware Updates 29
Windows XP and Windows Vista 29
Macintosh 30
12. Working With Your Audio Applications 31
Windows Applications 31
Macintosh Applications 31
I/O Latency 31
Steinberg Nuendo 32
Selecting the Driver 32
Audio Connections and Clock Settings 32
Overview 33
Input Channel Strips 34
Output Channel Strips 34
Audio Channel Strips 35
An Example Configuration for Recording 35
Monitoring the Signal 35
Recording 35
Cakewalk Sonar 36
Selecting the Driver 36
Audio Connections and Clock Settings 36
Overview 37
Selecting an Input for the Track/Channel Strip 38
Selecting an Output for the Track/Channel Strip 38
Monitoring the Signal 38
Recording 38
Page ii

Magix Samplitude 39
Selecting the Driver 39
A
udio Connections and Clock Settings
3
9
Overview 40
Selecting an Input for the Track/Channel Strip 41
S
electing an Output for the Track/Channel Strip
4
1
Monitoring the Signal 41
Recording 41
Apple Logic Pro 42
Selecting the Driver 42
Audio Connections and Clock Settings 42
Creating a Logic Project 43
Mixer Overview 43
Selecting an Input or Output 44
Monitoring the Signal 44
Recording 44
13. Technical Specifications 45
Page iii

Document History
October 2008 Rev 0A Initial Release
December 2008 Rev 0A Addition of latency figures & minor corrections
November 2014 Rev 0B Addition of new information regarding drvsetup.exe
Page iv

1. Introduction
Congratulations on your purchase of an SSL MadiXtreme PCIe audio card.
Please be assured that the SSL MadiXtreme will provide you with many years of reliable service and, in conjunction with
the SSL XLogic Alpha-Link converter series, the pristine audio quality you expect from any SSL product. Should you ever
need assistance in setting up or using your MadiXtreme, Solid State Logic’s worldwide customer support team is easy to
contact via the Support section of the SSL website and is always happy to help.
Please register your SSL MadiXtreme audio card on our website. This will ensure that you receive notifications of
future software upgrades and other important information, and that your guarantee is registered. Registration will
also make you eligible for technical support. The Solid State Logic home page is at: www.solid-state-logic.com
Solid State Logic is committed to the development and marketing of top-class solutions for native PC and Mac based
digital audio recording systems.
The SSL MadiXtreme PCIe card, used in combination with our XLogic Alpha-Link audio converter products, provides a
flexible, top quality, high channel count audio solution for PC and Macintosh-based audio recording and editing systems.
How to use this manual
The aim of this Reference Guide is to describe the MadiXtreme installation procedure as well as its advanced features,
functionalities and setup options. Specific setup and recording examples are provided for a selection of popular DAW
applications.
The SSL range of workstation partner products has been designed to make your recording life easy. As such, installing
the MadiXtreme is simple and straightforward. If you are familiar with the computer environment, installing PCIe cards
and the basics of recording and playing back digital audio, you can probably set your system up and feel comfortable
running a session within minutes. However, reading this Reference Guide is highly recommended to make the most of
the MadiXtreme’s capabilities.
Initially, please make sure you understand the Master Clock and Sample Rate concepts, and that you also understand
the routing possibilities and functionalities of the Alpha-Link (or other device connected to the MadiXtreme). It is also a
good idea, after installation, to have the system switched on while you read this Reference Guide, so that you can
experiment with the features you read about. We trust that you will soon feel comfortable using your system. However,
should you need further help, the comprehensive Table of Contents and Index (located respectively at the beginning and
end of the manual) will provide convenient ways to check specific information whenever you need it.
Reading conventions
Key commands, key combinations and key sequences
Software functionalities may be accessed through the use of computer keyboard keys or key combinations or sequences,
as well as by using a mouse or other input device. In this manual computer keys will be shown in a different font. For
example, the key for the letter ‘A’ will be written:
A
. Key combinations will be written using ‘+’ signs. For example,
pressing the ‘A’ key while holding the ‘Control’ key will be written as
Ctrl
+
A
. Successive key presses will be written as
a succession of key names. For example, pressing the ‘3’ key and then pressing the ‘*’ key will be written as
3*
.
Screenshots
The appearance of the SSL and other software on your computer screen may be different from the screenshots in this
manual. This could be because your SSL Soundscape hardware configuration is different, because you are using a different
version of the operating system, or because you are using different display settings. The screenshots themselves were
not always made using the software’s default settings.
Page 1

Safety and Installation Considerations
This section contains definitions, warnings, and practical information to ensure a safe working environment.
Please take time to read this section before installing or using this unit. Please do not dispose of these instructions.
Disclaimer
This manual has been written with great care and attention to detail, and we have attempted to cover every operational
aspect of the SSL MadiXtreme. However, it is not a contractual document. Solid State Logic and/or the writer(s) of this
manual cannot be held responsible for any loss or damage arising directly or indirectly from any error or omission in this
manual.
Trademarks
All trademarks are the property of their respective owners and are hereby acknowledged.
Website
The URL for the Solid State Logic website is: www.solid-state-logic.com
General Safety
•
Read these instructions.
• Keep these instructions.
• Heed all warnings.
•
Follow all instructions.
• Do not use this apparatus near water.
• Do not expose this apparatus to rain or moisture.
• Do not block any ventilation openings. Install in
accordance with the manufacturer’s instructions.
• Do not install near any heat sources such as radiators,
heat registers, stoves or other apparatus (including
amplifiers) that produce heat.
• There are no user-adjustments, or user-serviceable items,
on this apparatus.
• Adjustments or alterations to this apparatus may affect
the performance such that safety and/or international
compliance standards may no longer be met.
Caution
•
To reduce the risk of electric shock, do not perform any
s
ervicing other than that contained in these Installation
I
nstructions unless you are qualified to do so. Refer all
s
ervicing to qualified service personnel.
Installation Notes
• When installing this apparatus, place the host system
into which it is to be installed on a secure level surface.
• To prevent damage from static electricity when installing
this apparatus, either to the host system or to this
apparatus, always take proper anti-static precautions.
Always use an anti-static wristband. If in doubt, please
refer to qualified service personnel.
• Take care of rough or sharp edges when accessing the
inside of the host system.
• Never install or remove this apparatus whilst the host
system is powered. Always remove the power cord from
the host system prior to accessing this apparatus.
• If in doubt about installing this apparatus, please refer to
qualified service personnel.
Page 2

2. MadiXtreme Overview
Hardware
The MadiXtreme is available in two versions; MadiXtreme 64 and MadiXtreme 128.
• MadiXtreme 64 features one MADI input and one MADI output, providing 56 or 64 simultaneous inputs and outputs
at up to 48kHz, 28 or 32 simultaneous inputs and outputs at up to 96kHz, or 14 or 16 simultaneous inputs and outputs
at up to 192kHz.
•
MadiXtreme 128 features two MADI inputs and two MADI outputs, providing 112 or 128 simultaneous inputs and outputs
a
t up to 48kHz, 56 or 64 simultaneous inputs and outputs at up to 96kHz, or 28 or 32 simultaneous inputs and
outputs at up to 192kHz.
Software Drivers
The SSL MadiXtreme PCIe cards and associated software are compatible with the following operating systems and driver
protocols:
PC
The SSL MadiXtreme comes with Low-latency MME drivers, WDM drivers, ASIO-2 drivers, DWave drivers and GSIF drivers
for Windows XP and Vista. It can be used with any PC based MIDI & Audio sequencer, recording and editing software or
other audio applications. The Soundscape drivers are truly multiclient, allowing you to share your SSL audio hardware
between several applications that use different driver models.
Macintosh
The MadiXtreme Macintosh driver is compliant with the Core Audio architecture.
MADI
As world leader in large format analogue and digital mixing consoles, it was natural for SSL to be among the companies
that initiated the development of MADI (Multichannel Audio Digital Interface).
The MADI standard was finalized by the AES as AES10, first published in 1991 and revised in 1993. A PDF copy of the
specification can be obtained from the AES website.
With outstanding digital audio workstation systems and innovative DSP-powered multichannel audio cards, the
Soundscape product line has always been at the cutting edge of professional studio technology in terms of sonic
performance, processing power and multiple inputs/outputs.
Featuring SSL’s revolutionary PCIe-Core Audio Pipeline technology and supported by the legendary Soundscape drivers,
MadiXtreme builds on this heritage as one of the first audio devices to take full advantage of the high speeds and
incredible bandwidth offered by the PCIe bus on modern computers.
Platform Operating System Driver Protocols
PC
Windows XP SP2 or later
(32bit only)
ASIO 2, WDM, MME, GSIF2, DWave
Windows Vista SP1 or later
(32bit only)
Macintosh
OS X ‘Tiger’ Version 10.4.11 or greater
Core Audio
OS X ‘Leopard’ Version 10.5.4 or greater
Page 3

3. Package Contents
Your MadiXtreme box should contain:
•
The MadiXtreme card (
M
adiXtreme 128 version shown here
)
• The MadiXtreme CD
• Printed Installation Guide
Page 4
MadiXtreme. Hi-speed MADI I/O
Installation Guide
Installations-Handbuch
Guide d’Installation
Guia de Instalación
Guida di Installazione
MadiXtreme. This is SSL.
EN
DE
FR
ES
IT
JP

4a. Installation (PC)
Hardware and Software Installation Overview (PC)
Before proceeding with the hardware installation, please read and understand the Safety and Installation
Considerations on page 2 of this manual. In addition to this, please ensure that the host computer meets the
minimum system requirements listed in the Technical Specifications section before you begin.
For easy installation please follow these steps in the order indicated:
1. Make sure you have the SSL Soundscape Driver ready. The driver is available on the installation CD supplied with
your MadiXtreme. However, if you have an internet connection, please download and use the most recent version,
available from the SSL website.
2. Preinstall the SSL Soundscape Driver to prepare Windows Plug and Play to identify the card automatically after it has
been physically installed in the computer.
3. Shut down the computer and install the MadiXtreme hardware. Connect the Alpha-Link unit(s) (or other MADI hardware)
to the MadiXtreme via the MADI ports. At this point you can also connect the WordClock.
4. Start the computer again. In Windows XP, install the drivers when prompted by Windows Plug and Play (main driver
files, then WDM/KS driver). In Windows Vista, this will happen automatically.
Multiple SSL MadiXtremes can be installed at the same time during step 3. If several MadiXtremes are installed in
this way, the driver installation (step 4) will need to be repeated for each card. Windows XP will prompt you for that.
Windows Vista will handle it automatically (assuming that you have pre-installed the driver in step 2).
All the steps above are described in greater detail on the following pages.
Page 5

Preparing Windows Plug and Play (Windows 32 bit only)
WARNING: DO NOT launch thedrvsetup.exeprogram on a Windows 64 system, as this could make it impossible for
the card to be detected unless Windows is reinstalled. Just clickingdrvsetup.exe once can cause this, even though
the Driver Setup dialogue will not open. On a 64 bit Windows system, physically install the card first, then restart
the computer, and let Windows plug and play detect the card and install the driver. When prompted by the plug
and play system, browse to the driver download folder, where the plug and play system will find the ssdev.inf file
that it needs to read.
I
n order to make driver installation as easy as possible, we recommend that you prepare the Windows Plug and Play
s
ystem to recognize your SSL hardware automatically.
To do this, run the SSL Soundscape Driver Setup application (DrvSetup.exe) before physically installing the card in the
computer. This application can be found on the Installation CD that came with your card but, if possible, please use the
latest version that can be downloaded from our website.
The description below shows the procedure in Windows XP. In Vista the procedure is similar but more warnings are
displayed. The first one appears as soon as you launch the DrvSetup application. Subsequent warnings may look
different from the ones shown in XP. Always click the option that allows the procedure to continue.
• In the application window, press the Update button to copy the
driver data to your Windows installation.
• Windows will display a security warning: click Run…
…followed by a warning regarding Windows Logo testing;
click Continue Anyway.
Page 6

• At the end of the process you will see SSL Soundscape Driver
Setup – Completed in the title bar. Click Done, shut down the
computer and move on to installing the hardware.
Page 7

Hardware installation (Windows XP and Vista)
The guidelines below are general and apply in most cases. However, since all PCs are different it is advisable to check
your computer’s instruction manual for specific information. For example, on some PC cases the front panel needs
to be removed first in order the access the cover mounting screws.
1. Turn off all power to your computer, unplug it from the mains and disconnect all peripheral devices.
2. Remove the computer cover.
3
. Position the computer so that you can easily see and access its motherboard.
4. Locate a free PCIe expansion slot and remove the corresponding expansion slot cover from the back of the computer.
This may involve removing a screw, which will be used later to secure the card into place.
5. With the MADI connectors facing towards the rear panel of the computer, offer up the card to the chosen socket. Gently
push the card into the slot until it fits into place – do not use excessive force but ensure that the card is fully inserted
into the slot before proceeding to the next step.
6. If applicable, use the screw which held the expansion slot cover to secure the card.
7. Replace the computer cover.
8. Reconnect your peripheral devices, connect the computer to the mains, and switch it on.
Installing the SSL Soundscape Device Driver (Windows XP)
• The SSL MadiXtreme card is ‘plug and play’, and is automatically detected by Windows when the computer is started.
A series of dialog boxes will be displayed. The first one allows you to choose whether to allow Windows to connect
to Windows Update to search for software. Select No, not this time, and click Next:
Page 8

• Windows will then invite you to insert the
installation CD for your hardware and let you
choose an automatic or manual installation.
Having pre-installed the driver as described
earlier, just make sure that Install the software
automatically (Recommended) is selected, and
click Next.
• Further windows will be displayed while
Windows copies the driver files. Depending on
the specification of your system, this could take
a few seconds or a few minutes.
• Eventually, the dialog box below will confirm
that the installation has been completed. Clicking
Finish closes the Wizard:
Page 9

Installing the WDM/KS Driver (Windows XP)
I
mmediately after installing the main driver files, the Found New Hardware Wizard will start again. This time the WDM/KS
d
river will be installed. The series of dialogue boxes is almost identical to the one displayed for the main driver files,
w
ith the exception of a warning regarding Windows Logo testing.
• In the first dialogue box, select No, not this time, and click Next.
• In the second dialogue box, ensure that Install the software automatically (Recommended) is selected, and click Next.
Page 10

• Further windows will be displayed while Windows copies the WDM/KS driver files. At one point, Windows will display
a warning regarding Windows Logo testing. Click Continue Anyway:
• Eventually, a dialog box confirms that the installation has been completed. Clicking Finish closes the Wizard.
Installing the SSL Drivers (Windows Vista)
If you have run the DrvSetup.exe application as described in the Preparing Windows Plug and Play section, then Windows
Vista will install the drivers automatically when you restart the computer after physically installing the MadiXtreme. This
will happen in the background and you will not need to take any further action.
Page 11

Device Manager (Windows XP and Vista)
A
fter a successful installation, the SSL MadiXtreme appears in the SSL Soundscape Devices category in the Windows
D
evice Manager. The SSL Soundscape WDM/KS Device is listed under Sound, video and game controllers.
Page 12

4b. Installation (Macintosh)
Hardware Installation (Macintosh)
Before proceeding with the hardware installation, please read and understand the Safety and Installation
Considerations on page 2 of this manual. In addition to this, please ensure that the host computer meets the
minimum system requirements listed in the Technical Specifications section before you begin. The following
instructions are general and provided for guidance only.
1. Turn off all power to your computer, unplug it from the mains and disconnect all peripheral devices.
2. Remove the side panel to gain access to the motherboard.
3. Position the computer so that you can easily see and access its motherboard.
4. Locate a free PCIe expansion slot and remove the corresponding expansion slot cover from the back of the computer.
This may involve removing a screw, which will be used later to secure the card into place.
MadiExtreme is a x1 PCIe card which will fit in any available PCIe slot, irrespective of the length of slot.
5. With the MADI connectors facing towards the rear panel of the computer, offer up the card to the chosen socket. Gently
push the card into the slot until it fits into place – do not use excessive force but ensure that the card is fully inserted
into the slot before proceeding to the next step.
6. If applicable, use the screw which held the expansion slot cover to secure the card.
7. Replace the side panel.
8. Reconnect your peripheral devices, connect the computer to the mains, and switch it on again to proceed to the next
step: installing the drivers.
Page 13

Software Installation (Macintosh)
L
ocate and run the MadiXtreme Macintosh Driver Installer. This application can be found on the Installation CD that came
w
ith your card but, if possible, please use the latest version that can be downloaded from our website.
Click Continue or Install as necessary to continue the procedure, and enter your log-in password if prompted. Eventually
a summary screen should confirm that the installation was successful. Click Close.
Page 14
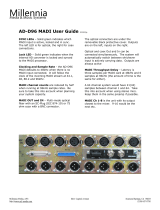
Protective Plug Output Input
MADI B Input & Output
(Channels 65 to 128)
MADI A Input & Output
(Channels 1 to 64)
Word Clock
(BNC connector)
Page is loading ...
Page is loading ...
Page is loading ...
Page is loading ...
Page is loading ...
Page is loading ...
Page is loading ...
Page is loading ...
Page is loading ...
Page is loading ...
Page is loading ...
Page is loading ...
Page is loading ...
Page is loading ...
Page is loading ...
Page is loading ...
Page is loading ...
Page is loading ...
Page is loading ...
Page is loading ...
Page is loading ...
Page is loading ...
Page is loading ...
Page is loading ...
Page is loading ...
Page is loading ...
Page is loading ...
Page is loading ...
Page is loading ...
Page is loading ...
Page is loading ...
Page is loading ...
/