Overland Storage SnapServer DX2 Quick start guide

Category
Networking
Type
Quick start guide

Overland Storage SnapServer DX2 is a powerful 2U storage appliance designed to provide reliable and scalable storage solutions for businesses of all sizes. With its dual Ethernet ports, USB 2.0 ports, and SAS card port, the DX2 offers flexible connectivity options for a variety of applications. The device supports up to 12 disk drives, allowing for a maximum storage capacity of 96TB. Additionally, the DX2 features hot-swappable drive bays for easy maintenance and expansion.

Overland Storage SnapServer DX2 is a powerful 2U storage appliance designed to provide reliable and scalable storage solutions for businesses of all sizes. With its dual Ethernet ports, USB 2.0 ports, and SAS card port, the DX2 offers flexible connectivity options for a variety of applications. The device supports up to 12 disk drives, allowing for a maximum storage capacity of 96TB. Additionally, the DX2 features hot-swappable drive bays for easy maintenance and expansion.

Quick Start Guide
–1– –2– –3–
SnapServer
®
DX2
2U Storage Appliance
Step 1
It is essential that you activate your warranty. Technical and warranty support are
not available until the warranty is active:
1. Go to http://www.overlandstorage.com/
and select
Service & Support > My Products.
2. At the Site Login
, enter your e-mail address and
password, and click
GO.
3. Click
Register New Product.
4. Fill in the information (including serial number)
and click
Submit.
Your warranty certificate will be emailed to you. Follow the instructions included in
the email to complete the registration process.
Step 2
WARNING: This device has more than one power cord. Disconnect ALL power supply
cords before servicing.
AVERTISSEMENT: Cet appareil a plus d’une cordon d’alimentation. Débranchez TOUTES les
cordons d’alimentation avant l’entretien.
Any optional internal components, such as expansion cards and extra memory, need to
be installed before continuing. Refer to the installation instructions and warnings that
are packaged with the components.
Step 3
The SnapServer DX2 comes with a sliding rail rack kit for easy installation into a
19-inch (EIA-310) rack.
IMPORTANT: Two-post telco-style or other racks less than 29 inches in depth will NOT
support this unit.
Attach the Inner Rail to the DX2
1. Select a rail assembly and slide the inner rail out until it stops.
2. Press the release latch and remove the inner rail.
Enter
Enter
3. Repeat Steps 1–2 for the other rail assembly.
4. Place an inner rail against the server’s right side with the holes aligned.
5. Using three supplied screws, secure the rail to the server.
6. Repeat Steps 4–
5 for the left side.
Size the Outer Rails to Rack
WARNING: It is recommended that a mechanical lifter (or at least two people) be used
to raise and align the unit to prevent injury during installation. Use care when inserting
or removing a unit into or out of a rack to prevent the accidental tipping of the rack, causing
damage or personal injury.
AVERTISSEMENT: Afin d’éviter des blessures pendant l’installation, il est recommande
d’utiliser un monte-charge (ou au moins deux personnes) pour élever ou aligner l’appareil.
Faites attention lorsque vous insérez ou retirez l’appareil d’un support, pour empêcher le
déversement accidentel de la crémaillère causant des dommages et des blessures.
1. Measure the distance between the inside
edges of the front and rear vertical rails on
the rack.
2. Check that the outside distance between the
slide rail front and rear flanges is slightly
less than the rack internal dimensions.
3. If necessary, remove the four bolts holding
the outer rail rear component, slide it out
the needed distance, and loosely reinstall the nuts and bolts.
NOTE: For some racks, only two bolts can be used with the rear component due to the
location of the slots. This does not impact the stability of the rails.
4. Repeat Step 3
for the other rail.
5. Install the clip nuts on the slide rail flanges:
a. At the front flange, slide three clip nuts
over the first, third, and fourth holes.
b. At the rear flange, slide two clip nuts
over the top and bottom holes.
c. Repeat Steps a–b for the other slide rail.
Attach Outer Rails
NOTE: The appliance comes with two types of screws. For threaded-holed racks, use either
the 10-24 screws or 10-32 screws.
Square-holed Racks
1. At the front, determine the 2U area where
the DX2 is to be mounted, and mark the
second and four holes from the top.
2. Position the left-side slide rail between
the left front and rear rack rails with the rail
kit flanges on the inside of the rack rails.
3. At the front, use two 10-32 screws in the
marked holes to loosely secure the slide rail
to the rack.
NOTE: The bottom hole is used by the captive screw on the unit to secure the DX2.
4. At the rear, use two screws in the top and bottom flange holes to loosely secure
the rear slide rail to the rack.
5. For the right-side rail, repeat Steps 2–
4.
Continue with
Install the Unit.”
Nuts & Bolts
Rear
Component
Rail Flange
Clip Nuts
(with nut inside)
DX2
2U
Mark
Mark
Threaded-holed Racks
1. At the front, determine the 2U area where
the DX2 is to be mounted, and mark the
second and fourth holes from the top.
2. Screw two screws into the marked holes in
the front until their tips are flush with the
inside edge of the rack rail.
NOTE: The bottom hole is used by the captive
screw on the unit to secure the DX2.
3. Position the left-side slide rail between the left front and rear rack rails with
the rail kit flanges on the inside of the rack rails.
4. Continue screwing in the front screws until they loosely secure the front flange.
5. At the rear, use two screws in the top and bottom rail flange holes to loosely
secure the rear slide rail to the rack like the front.
6. For the right-side rail, repeat Steps 2–
5.
Install the Unit
1. Slide out the middle slide rails on both sides.
2. Using the mechanical lifter, position the
server in front of the rack.
3. Insert the server inner rails into the middle
rails and slide the server into the rack.
4. Slide the server back and forth to set the
rails, then tighten all the rear screws, and
finally, pulling the unit out a few inches, tighten all the front screws.
5. Push the server in and secure it to the rack with the captive screws.
Step 4
The DX2 comes with only blank drive carriers installed (drives are sold separately). Up
to 12 disk drives can be installed with blank drive carriers filling in the empty slots.
IMPORTANT: To maintain proper airflow and cooling, a drive assembly or a blank drive
carrier must be installed in every slot. No empty slots are allowed.
Install Drives
NOTE: Do not remove the disk drives from their carriers. Doing so voids the drive warranty.
Once the SnapServer is in the rack, install the drives as follows:
1. Remove blank drive carriers from all the slots being used for drives.
2. Positioning the drive assembly in front of the
appropriate bay, slide it in until the latch
clicks, locking the assembly in the bay.
3. Repeat Step 2
for each remaining drive
assembly.
Attach the Bezel
1. Position the bezel with the top and bottom tabs aligned with the inside edges of
the chassis front.
2. Move the bezel toward the unit until the magnets engage.
3. Verify that the bezel is aligned properly with all the LEDs visible and the Power
Panel on the right side in line with the hole on the bezel flange.
DX2
2U
Mark
Mark
*10400347002*
10400347-002
–4– –5– –6–
http://support.overlandstorage.com
You can get additional technical support on the Internet at the Overland Storage Support web page, or
by contacting Overland Storage using the information found on the Contact Us page on our web site.
OD11003 ©2011-12 Overland Storage, Inc.
Step 5
Cable Attachment
IMPORTANT: The speed/duplex setting of the Ethernet ports on a DX2 defaults to
autonegotiate. The networking switch or hub to which the DX2 is connected must also be
configured to autonegotiate; otherwise, network throughput or connectivity to the DX2 may be
seriously impacted.
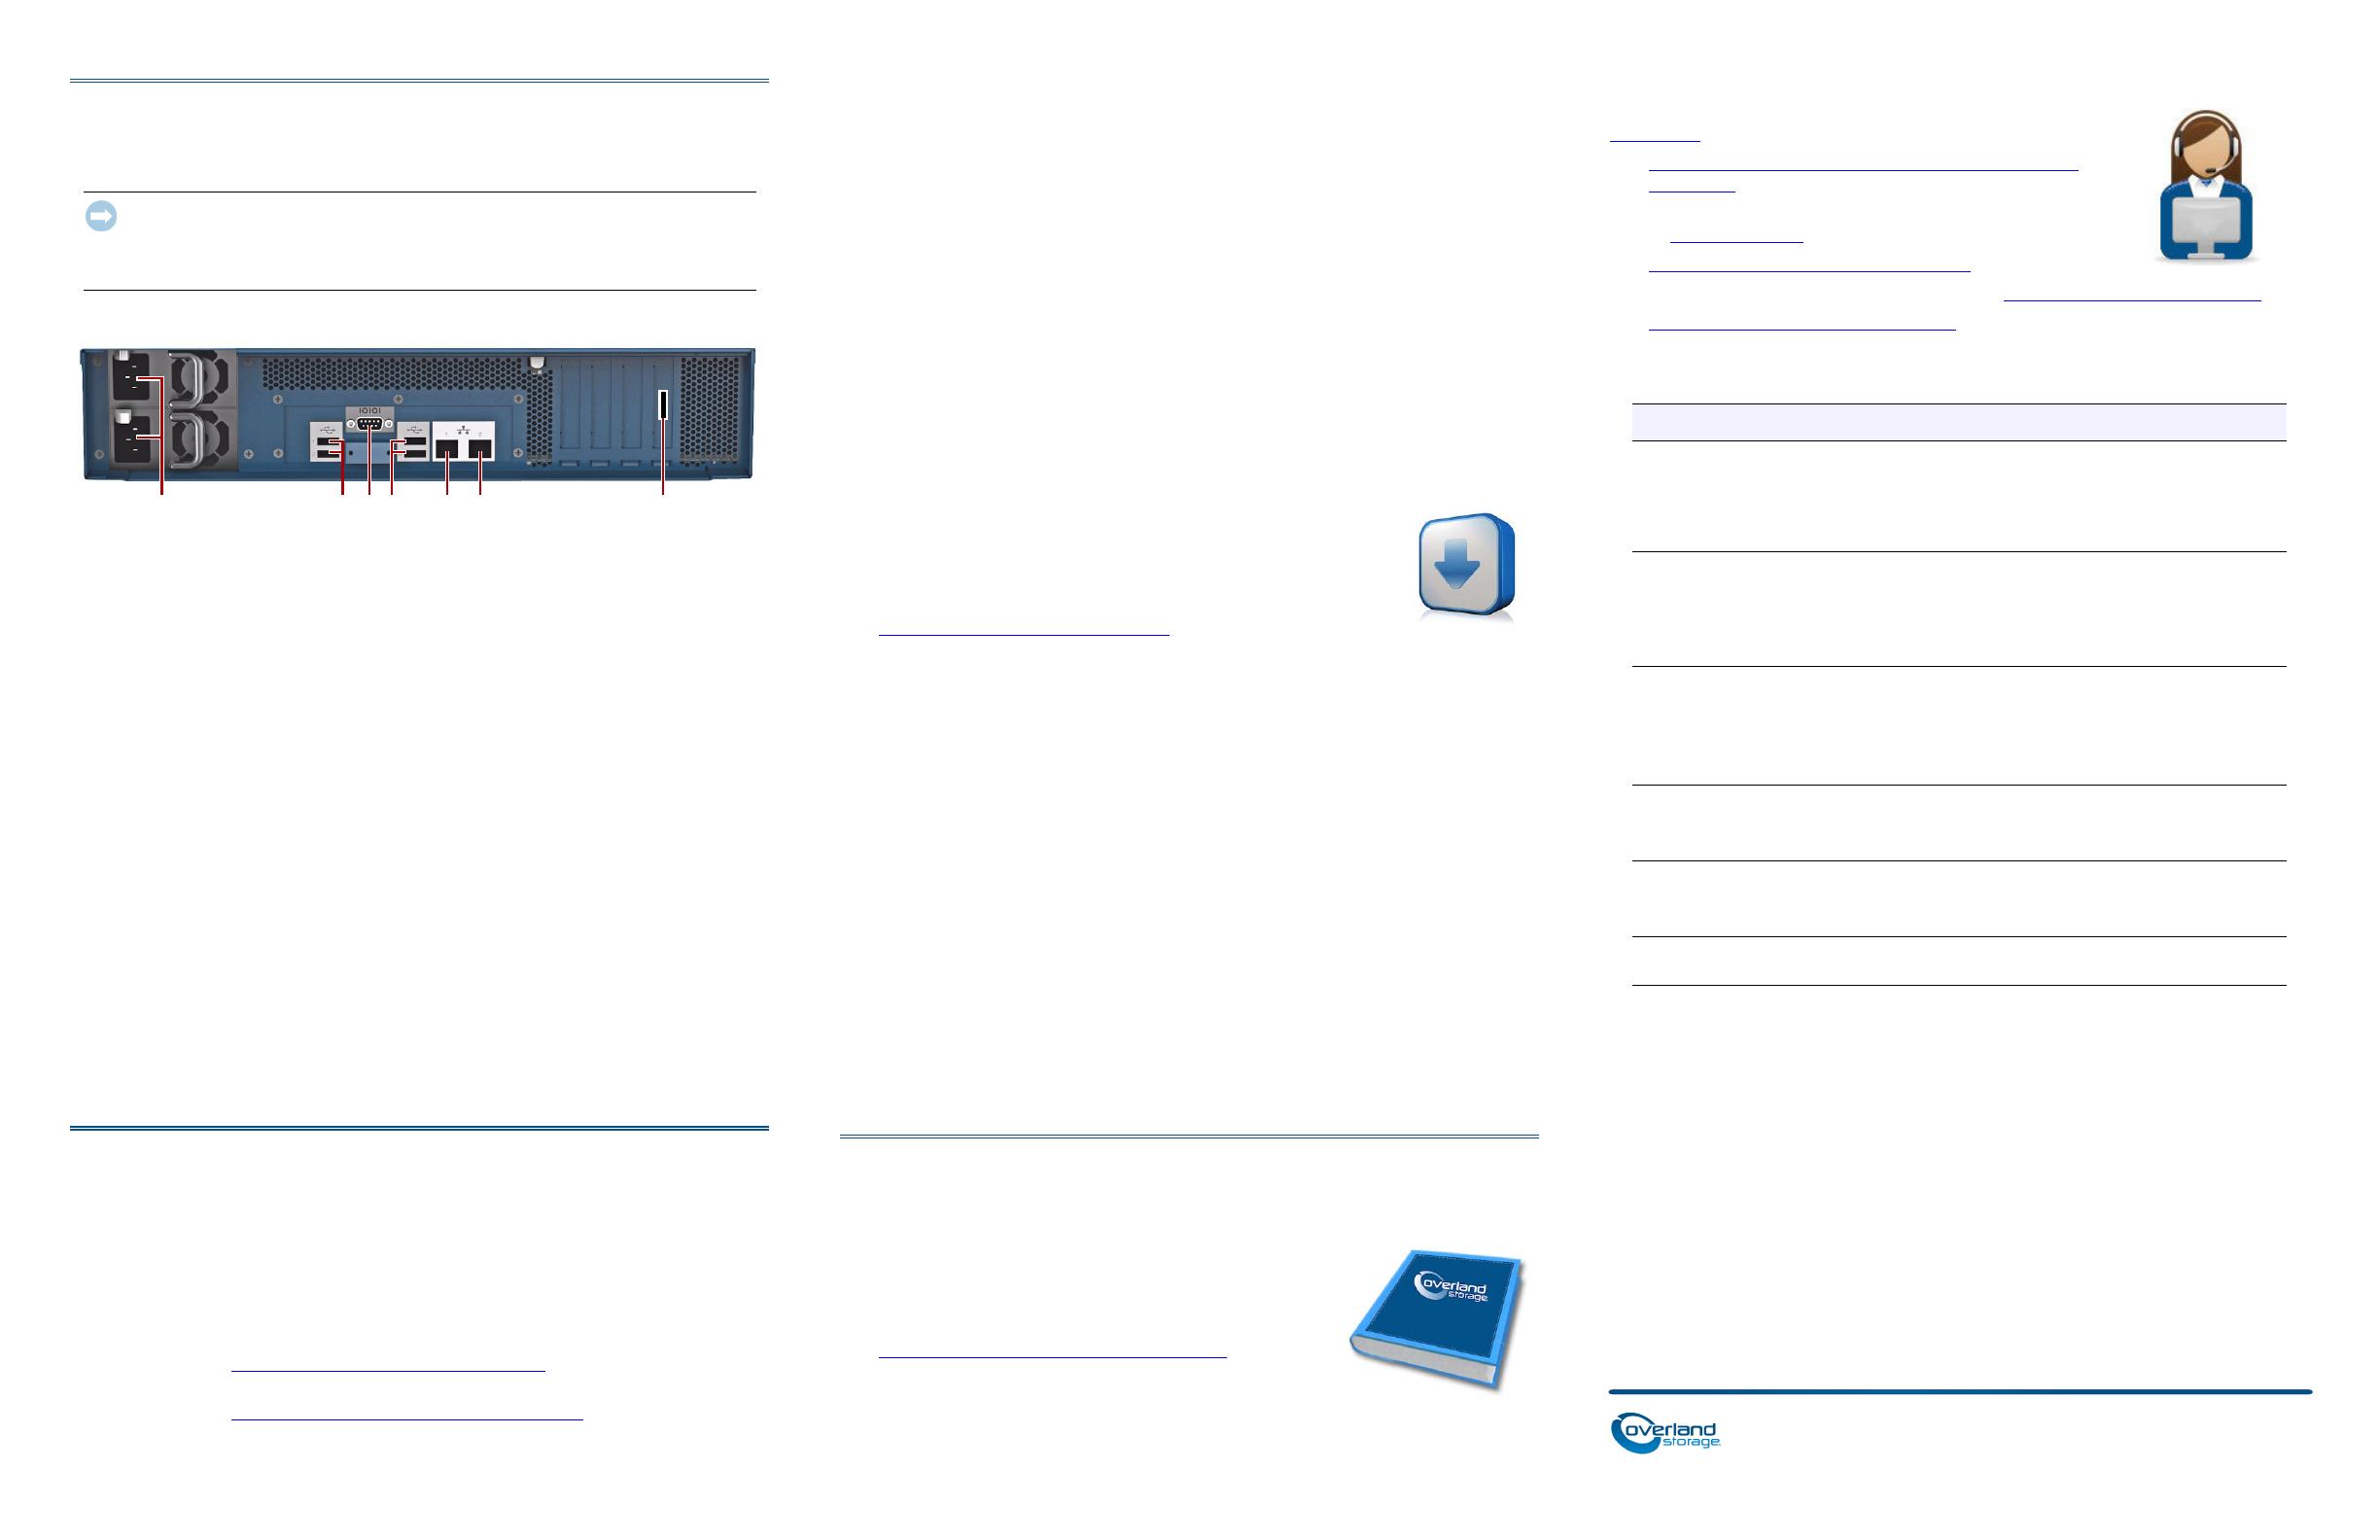
All cabling, power connections, and cooling are located on the DX2 rear panel.
1. Connect Ethernet 1 to a network.
Using a Category 5e (or better) cable, connect Ethernet 1 on the appliance to a
Gigabit Ethernet switch on the same LAN as the host system used to manage the
SnapServer DX2.
2. If desired, plug a second network cable into Ethernet 2.
NOTE: To take advantage of network bonding (load balancing or failover), both data ports
(Ethernet 1 and 2) must be physically connected to the network. For load balancing,
connect them to the same switch on the same subnet with the switch set to autonegotiate.
For failover, connect them to different switches on the same subnet.
3. Attach both power cords to the AC power sockets on the server.
4. Plug the power cords into a UPS appliance or a properly grounded AC power
source.
5. If using an APC-brand UPS appliance, plug the USB cord from the UPS into the
USB port on the rear of the SnapServer.
NOTE: SnapServer systems are designed to work with APC-brand USB or network-based
UPS devices to automatically shut down cleanly in the event of a power failure. You must
configure the APC unit both in the SnapServer’s Web Management Interface and in the
APC user interface.
6. Briefly press the front power switch to power on the unit.
Step 6
Connect for the First Time
NOTE: SnapServers are configured to acquire an IP address from a DHCP server. If no DHCP
server is found on the network, the SnapServer defaults to an IP address in the range of
169.254.xxx.xxx. You may not be able to see the appliance on your network until you discover
and optionally assign an IP address using SnapServer Manager (SSM).
If you are installing your SnapServer DX2 on a network with a DHCP server,
continue with “Connecting Using the Appliance Name.”
If your network does not have a DHCP server or name resolution services,
continue with” Connecting Using the SnapServer Manager
.”
1 - AC Power Sockets
2 - USB 2.0 Ports (4)
3 - Serial Port*
4 - Ethernet 1 Port
5 - Ethernet 2 Port
6 - SAS Card Port
1235 62
* For use by Technical Support only.
4
Connecting Using the Appliance Name
This procedure requires that name resolution services (via DNS or an equivalent
service) be operational.
1. Find the server name.
The default DX2 name is “SNAPnnnnnnn,” where nnnnnnn is the appliance
number. The server number is a unique, numeric-only string that appears on a
label affixed to the bottom of the server.
2. In a web browser, enter the server URL.
For example, enter “http://SNAPnnnnnnn” (using the default DX2 name).
3. Press
Enter to connect to the Web Management Interface.
4. In the login dialog box, enter admin as the user name and admin as the
password, then click
OK.
5. Complete the Initial Setup Wizard.
Your DX2 is ready to be configured for your specific environment and needs.
Connecting Using the SnapServer Manager
SnapServer Manager (SSM) is an administrative application that
is Java-based, platform-independent, and runs on all major
platforms. SSM provides administrators a single interface from
which they can discover any SnapServer on the network. You can
download and install SSM from:
http://docs.overlandstorage.com/ssm
Be sure to install SSM on a computer residing on the same network segment as your
SnapServer.
SnapServer Manager Procedure
1. Launch SSM.
SSM discovers all SnapServers on its local network segment and displays their
names, IP addresses, and other status information in the main console. If you do
not have a DHCP server, there might be a delay before the appliance appears on
the network.
NOTE: To distinguish multiple SnapServers, you may need to find their default appliance
names as explained in the previous procedure.
2. In SSM, right-click the appliance name and select Launch Web
Administration.
3. Log into the Web Management Interface.
In the login dialog box, enter admin as the user name and admin as the
password, then click
OK.
4. Complete the Initial Setup Wizard.
Your DX2 is ready to be configured for your specific environment and needs.
Step 7
User Guides
For detailed information on configuring your SnapServer
DX2, refer to the SnapServer Administrator’s Guide for
GuardianOS or the GuardianOS Release Notes.
They are available online at:
http://docs.overlandstorage.com/snapserver
Translated versions of this Quick Start Guide are also
available on the web page.
Warranty and Technical Support
For warranty and technical support information, see our
Contact Us
web page:
http://www.overlandstorage.com/company/contact-us/
index.aspx
To information on contacting Overland Technical Support,
set our Contact Support web page:
http://docs.overlandstorage.com/support
To search for more service information, visit our Expert Knowledge Base System:
http://support.overlandstorage.com/kb
Specifications
Feature Specification
Network
Connections
Auto-sensing 10/100/1000Base-T, dual RJ-45 network
connectors, with support for standalone, load-balancing,
and failover.
Optional four-port Gigabit Ethernet card with auto-sensing
10/100/1000BASE-T.
Dimensions Width: 17.17 in (436 mm)
Depth: 26.32 in (668.5 mm)
Height: 3.36 in (85.3 mm), 2U
Weight, Empty: 38.5 lbs (17.5 kg)
Weight with 12 Disk Drives: 50 lbs (22.7 kg)
Power Power Rating: 500W, 100-240 VAC, 50-60 Hz.
Input Current: 2.5A (RMS) for 100 VAC, 1.4A (RMS) for 240VAC,
auto-sensing.
Power Consumption: 280W (steady state)
Heat Dissipation: 956 BTUs/hr.
Operating
Environment
50° F to 104° F (10° C to 40° C)
20% to 80% humidity (noncondensing)
Altitude: -1000 ft. to 10,000 ft. (-305m to 3,048m)
Non-Operating
Environment
14° F to 149° F (-10° C to 65° C)
5% to 95% humidity (noncondensing)
Altitude: -1000 ft. to 35,000 ft. (-305m to 10,668m)
Regulatory
Certifications
cTUVus, CE (EMEA), FCC Class A, and VCCI
  • Page 1 1
  • Page 2 2

Overland Storage SnapServer DX2 Quick start guide

Category
Networking
Type
Quick start guide

Overland Storage SnapServer DX2 is a powerful 2U storage appliance designed to provide reliable and scalable storage solutions for businesses of all sizes. With its dual Ethernet ports, USB 2.0 ports, and SAS card port, the DX2 offers flexible connectivity options for a variety of applications. The device supports up to 12 disk drives, allowing for a maximum storage capacity of 96TB. Additionally, the DX2 features hot-swappable drive bays for easy maintenance and expansion.

Ask a question and I''ll find the answer in the document

Finding information in a document is now easier with AI