Page is loading ...

Digital Chemistry Reader
Meter for Swimming Pools and Spas:
· Free Chlorine
· pH
· Salinity
· TDS
· ORP
· Temperature
WARNING!
This package contains pH calibration chemicals that may be
harmful if misused. Please read instructions carefully. Not to be
used by children except under adult supervision.
INTRODUCTION
SA FE- DI P ™ is a sw imm in g p ool w ate r t es ter o f
Cl/pH/Salt/TDS/ORP (Free Chlorine/pH/Salinity/TDS/ ORP). The
SAFE-DIP™ is an easy to use, accurate, and economical
measurement device that offers free chlorine level indication and
direct reading of pH, salinity, TDS and ORP with one device. It is a
device that covers almost all of the most important pool water
chemistry in order to maintain the water at its optimal condition for
bathers' safety and comfort as well.
Introduction & Safety Information
Specifications / Features
SAFE-DIP™ Meter Includes:
pH 7.0 Buffer Packet (for calibration)
PARTS & ACCESSORIES
pH Replacement Electrode
pH 7.0 Buffer Packet
Operating range: 5~50°C, 0~12pH, 0 ~ 999mV (ORP),
1~80mS (Conductivity)
Replaceable pH sensor. Resolution: 0.1 pH
1 point pH calibration using 7.00pH standard buffer
Automatic temperature compensation for pH and conductivity
Temperature sensor. Resolution: 1°C; Accuracy: ±5% (~±1°C),
Selectable °C/°F system
ORP sensor. Resolution: 1mV; Accuracy: ±20mV
(500~800mV)
TDS and SALT. Resolution: 100ppm; Accuracy: ±20%
(200~5000ppm)
Important:
Please refer to www.safedip.com for a more detailed operator
instruction. The detailed instruction includes digital images in full
color as well as an online calculator which tells you exactly what to
add to your water based on the data retrieved from the Safedip
digital reader.
Go to www.safedip.com for more detailed instructions.
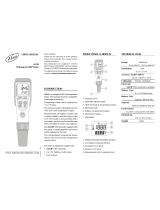
Front Panel Description
1. Battery compartment cap
2. LCD Display
3. ON/OFF button
4. START button – start a new measurement
5. CAL button – calibration of pH probe
o o
6. C/ F button – toggle between Celsius and
Fahrenheit
7. Sample Cup and
Electrode Compartment (inside)
8. Probe Electrode
9. Sleeve holding area (when meter is in use)
10. Probe Sleeve
Cl
pH
Salt
TDS
ORP
:
:
:
:
:
Good Low High
ppm
ppm
mV
88.
8800
8800
888
88
C
F
1
2
3
4
5
6
7
8
9
10
11
12
8
1
2
3
5
4
6
7
9
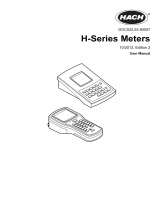
SAFE-DIP™ Display
1. Main display
2. Cl (free chlorine) indication Display Row
3. pH measurement Display Row
4. Salt (salinity) measurement Display Row
5. TDS measurement Display Row
6. ORP measurement Display Row
7. Hourglass: measurement in progress indicator
8. Battery indicator
9. Check mark: measurement done indicator
10. Disk icon: readings from memory
11. Tools icon: error warning
12. Temperature display
Meter Description
Go to www.safedip.com for more detailed instructions.
Getting Started
Setting up the meter
1. Place batteries (included) into the device. Refer to Battery
Replacement section of this manual.
2. Remove the sample cup in order to access the probes.
3. Remove the sleeve which protects the probes.
4. Calibrate the probe prior to first use and every month by referring to
the Calibration section of this manual.
Measurement
1. Fill the bottom 1/3 of the sample cup with the water sample. Make
sure to collect the water at least 1.5” from the surface. The other
option is to submerse the probes directly into the water sample.
2. Press the button.
The most recent measurement will always appear along with the
icon.
3. Remove the sleeve and attach it to holding area. Immerse the
Safedip probe in the water sample. Make sure the probes are
completely submersed.
4. Press the START button to begin a new measurement.
5. During the new measurement, the will blink before all stabilized
parameters are achieved.
6. When measurement is finished, a beep will be heard and newest
data will be displayed. The data will be saved in the memory until the
next measurement. Only the latest measurement is stored and all
prior measurements are discarded.
7. In order to view the latest readings at anytime, press .
8. If a new measurement is desired, repeat steps 3-6.
9. When finished using the meter, press the once to turn the
device off. If you forget to do so, the meter will turn off automatically
after 1 minute.
10. Always rinse the probes with fresh tap water after use. Replace
the sleeve in order to keep the probes wet. Failure to keep probes wet
will void the warranty.
___
Basic Operation
1) Power ON/OFF:
The SAFE-DIP™ uses two AAA batteries. If the batteries are weak,
the icon indicator will appear on the display. Press the ON/OFF
button to turn the SAFE-DIP™ on or off. The auto power off feature
will turn off the SAFE-DIP™ automatically after 1 minute of non-
use if no buttons are pressed.
____
o o
2) Toggle C/ F:
To change the displayed temperature units between °C or °F:
o o
With the SAFE-DIP™ ON, press C/ F button .
3) New Measurement:
When the meter is powered on, the LCD display will display the
readings from the very last measurement. The icon will also be
displayed. Press START button to start a new measurement. During
the new measurement, the icon will blink before all stabilized data
are achieved. (Please see detailed explanation in the Measurement
Procedure section.)
Go to www.safedip.com for more detailed instructions.

This instrument is guaranteed to be free from defects
in material and workmanship for a period of one year
from the date of original purchase. The probes are
guaranteed to be free from defects in material and
workmanship for a period of six months from the date
of original purchase. Damages brought on by abuse,
operator negligence, accident, misapplication,
mishandling, or acts of God will void this warranty.
This warranty is limited to the repair or replacement
of the product at the discretion of the manufacturer
and will not include transportation costs. This
warranty does not cover batteries.
This product cannot be returned without a return
authorization number from Solaxx. For warranty
support or a Return Authorization number, log onto
www.solaxx.com and click on support or email:
WARRANTY
Icon
Description
Range
Actions
Temperature out of range
TDS or SALT out of range
ORP out of range
pH out of range
pH offset out of range
Low Battery
o
5 ~ 50 C
200 ~ 8000ppm
0 ~ 999mV
0 ~ 12pH
-20 ~ 20mV
Bring solution to the temperature within range
Use other solution
Use other solution
Use other solution or replace pH probe
Recalibrate or use new buffer to calibrate or replace pH probe
Replace batteries
N/A
Meter will not calibrate in pH
Meter will not turn on
Clogged or contaminated reference junction
Damaged or worn sensing membrane
Contaminated pH buffers
Batteries low or dead
Wrong battery polarity
Clean junction
Replace probe
Use fresh buffers
Replace batteries
Replace batteries with correct polarity
PROBLEM POSSIBLE CAUSE SOLUTION
Go to www.safedip.com for more detailed instructions.
Troubleshooting
Go to www.safedip.com for more detailed instructions.
Calibration Procedure
Calibration should be performed once a month. In order to calibrate,
a buffer solution is used. This solution is easily made using the buffer
packets provided with the original purchase. The buffer solution
insures the accuracy of the Safedip digital reader.
To create a buffer solution, follow these steps:
1.Empty entire contents of 1 buffer packet into a cup with 8 oz tap
water.
2.Stir the solution using a spoon for 20 seconds or until powder is
completely dissolved.
To calibrate, follow these steps:
1. Turn ON the Safedip.
2. Immerse the probes completely into the cup with buffer solution.
3. Gently swirl the probes to remove possible gas bubbles on the
probe tip.
4. With the probe in the solution, press and hold the CAL button for
more than 3 seconds and the 7.0 value will be displayed.
Release the button and the 7.0 value will blink. Press CAL button
again and the will then be displayed until calibration is
finished.
5. After the calibration is completed, the will be displayed along
with the calibration value of 7.0. While the 7.0 value is blinking,
press at anytime to abort.
Maintenance
Probe Care and Storage
1. Rinse the probe in distilled or tap water.
2. Store the Safedip with the probe sleeve over the
electrode. Always keep the sponge in the cap soaked with
tap water or pH 7 buffer solution.
3. Always rinse the probes in distilled or tap water between
measurements to avoid cross contamination. Double rinsing
is recommended when high accuracy is required.
4. Do not touch the probes. Touching the surface of the
probes may damage and reduce the life of the probes.
pH Probe Replacement
1. Unscrew and remove the pH probe collar. Twist collar
counter-clockwise.
2. Gently pull the probe away from the meter until it
disconnects from the probe socket.
3. To attach a new probe, align the slots and carefully twist
the probe clockwise into the meter socket.
4. Firmly tighten the probe collar to create a seal with the
rubber gasket between the probe and the meter.
Probe Cleaning Recommendations
Do not soak the probe in any cleaning solution. To do so may
cause a reference potential shift which will cause
degradation in performance. When cleaning the probe, use
tap water and be careful not to scratch or damage the glass
sensing surface.
Battery Replacement
1. Use a coin to twist off the battery compartment cap.
2. Replace the two AAA batteries. Observe polarity.
3. Replace the battery compartment cap and make sure it is
tightly secured to avoid water intrusion.
Digital Chemistry Reader
/