Page is loading ...

Installation Manual: for ’07- Current Jeep Wrangler JK
#13117.0101 and #13117.0201
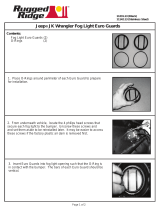
PARTS LIST:
Driver Side Taillight Euro-Guard - QTY 1
Passenger Taillight Euro-Guard - QTY 1
Euro-Guard Spacers - QTY 8
Small 2” Phillips Head Screw - QTY 4
Large 2” Phillips Head Screw - QTY 4
REQUIRED TOOLS:
Safety Glasses
Phillips Head Screwdriver
1
2
4
3
READ ALL SAFETY MESSAGES AND UNDERSTAND ALL
INSTRUCTIONS BEFORE ATTEMPTING TO INSTALL THIS
PRODUCT. ALWAYS WEAR SAFETY GLASSES DURING INSTALL.
Passenger
Driver Side
Complete Euro Guard Installation:
If you plan on installing our complete
set of front Euro Guards (Headlights,
Turn Signals, Fog Lamps and Side
Markers) all at once, we recommend
doing it in the following order:
1. Headlight Guards
2. Turn Signal Guards
3. Fog Lamp Guards
4. Side Marker Light Guards
Each item will come with instructions.
T
ACTIK®Factory
Taillight Euro-Guards
TTK_EUROGRD_TAILLIGHT.qxp_Layout 1 1/6/16 11:20 AM Page 1

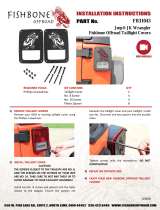
Step One: Remove Original Screws
Put on safety glasses. Starting on the
Passenger side Taillight, Carefully re-
move the four (4) taillight mounting
screws with a Phillips head screw driver
(Fig 1). Upon removal, notice the width
difference when removed. The larger
screws (thicker) go on the outside of the
Taillight housing where the smaller
screws go on the inside (Fig 2). Set aside
the original screws, as they will not be
used with Euro-Guards.
2
Taillight Euro-Guard Installation
Step Two: Begin Installation
Locate the Large Replacement Screw
and one Lens/Euro-Guard Spacer.
Place the large screw through the outer
top hole of the Passenger side Euro-
Guard. Place the black spacer over the
screw on the inside of the Euro-Guard
(Fig 3). Install the larger screw into the
outer top screw hole on the light hous-
ing itself and tighten only slightly.
DO NOT Tighten all the way at this
time. Next, move to the upper inside
Figure 1 Figure 2
Figure 3 Figure 4
TTK_EUROGRD_TAILLIGHT.qxp_Layout 1 1/6/16 11:20 AM Page 2

hole of the taillight and repeat the pro-
cedure this time using the smaller screw
and a Lens/Euro-Guard Spacer (Fig 4).
Again, loosely tighten this screw into
place leaving room to install the lower
Screws into the taillight/Euro-Guard
(Fig 5).
Follow this same procedure for the
lower outer screw mounts (Large Screw
and spacer) and the lower inner screw
mounts (Small Screw and Spacer).
Step Three: Tighten Mounting Screws
With the Euro-Guard and all new
screws are in place, gently tighten all
four screws starting at the top and
working clock wise around the taillight.
Tighten all screws evenly as to make
sure the taillight is secured Evenly.
Do not over tighten!
Step Four: Install Opposite Side
Repeat steps 1-3 shown above on the
Driver side Taillight assembly.
Remember to start on the outer holes
(large Screws) and then proceed to
the inner section (smaller screws).
3
Taillight Euro-Guard Installation
Figure 5 Figure 6
IT IS EXTREMELY IMPORTANT NOT TO OVER-TIGHTEN THE
SCREWS ON THE TAILLIGHT EURO-GUARDS. OVER-TIGHTENING
CAN CAUSE THE TAILLIGHT LENS TO CRACK.
TTK_EUROGRD_TAILLIGHT.qxp_Layout 1 1/6/16 11:20 AM Page 3

4
ALWAYS CHECK TURN SIGNAL AND LIGHTS FUNCTION BEFORE
DRIVING AFTER EURO - GUARD INSTALLATION.
Care and Maintenance:
Your Euro-Guards have been designed
and manufactured to provide years of
use. However, like any product general
maintenance is required to keep them
looking new. Since the Euro-Guard is
located on the exterior of the vehicle, it
is subject to potential rock chips and
other debris potentially causing portions
of the paint to chip off.
For Textured Finish Euro-Guards:
We recommend using a textured spray
paint sprayed on a piece of cardboard
and Q-Tip to gently fill in these chips.
This will prevent any rust from forming.
For Bright Finish Euro-Guards:
To protect your bright finish
Euro-Guards we recommend using a
car wax on the parts on a regular basis.
This will protect the finish and keep
your Euro-Guards looking like new.
TACTIK®Exclusive Three Year
Limited Warranty:
Please see separate Warranty Card
insert for full details regarding the
TACTIK®Exclusive Three Year
Limited Warranty.
© TACTIK®2016. All Rights Reserved.
1.5.16 LTR Version
Instruction Booklet #12999.3014
TTK_EUROGRD_TAILLIGHT.qxp_Layout 1 1/6/16 11:20 AM Page 4

TACTIK®Exclusive
Three Year Limited Warranty
Your TACTIK®branded accessories are
covered by the following Limited Warranty
provided exclusively by the TACTIK®Division of
Quadratec, Inc. 1028 Saunders Lane,
West Chester PA 19380.
This Limited Warranty is the only warranty
made in connection with your purchase.
TACTIK ®neither assumes nor authorizes
any vendor, retailer or other person or entity
to assume for it any other obligation or liability
in connection with this product or Limited
Warranty.
What is Covered: Subject to the terms, exclu-
sions and limitations herein and with respect
only to TACTIK®branded accessories first sold
in the United States, TACTIK®warrants to the
initial retail purchaser only that your TACTIK®
accessory shall be free of defects in material
and workmanship: for a period of three (3)
years from date of retail purchase.
This Limited Warranty is not assignable and
shall terminate upon sale of the vehicle upon
which the TACTIK®accessory is installed
or other transfer third persons.
All other warranties are hereby disclaimed,
except to the extent prohibited by applicable
law in which case any implied warranty of
merchantability or fitness for a particular pur-
pose on this product is limited to 3 year from
date of initial retail sale. TACTIK®reserves the
rights to: (a.) require invoice or other proof your
accessory is within the terms of this
Limited Warranty as a condition of warranty
service and, (b.) make future revisions to this
product and Limited Warranty without prior
notice or obligation to upgrade your product.
What is Not Covered:
Your TACTIK ™Limited Warranty does not
cover products or parts TACTIK®determines
to have been damaged by or subjected to:
(a.) installation damage, alteration, modifica-
tion, combination with other parts, failure to
maintain or improper repair or service, (b.) nor-
mal wear & tear, cosmetic damage or damage
from moisture or water immersion, (c.) Acts of
God, accidents, misuse, negligence, inadequate
mounting or impact with vehicle(s), obstacles
or other aspects of the environment, (d.) theft,
vandalism or other intentional damage.
Remedy Limited to Repair/Replacement:
The exclusive remedy provided hereunder
shall, upon TACTIK®inspection and at
TACTIK’s option, be either repair or replace-
ment of product or parts (new or refurbished)
covered under this Limited Warranty.
Customers requesting warranty consideration
should first contact TACTIK®to obtain a RGA
number (610-701-3336). All labor, removal,
shipping and installation costs are customer’s
responsibility.
Other Limitations - Exclusion of Damages -
Your Rights Under State Law:
In consideration of the purchase price paid,
neither TACTIK®nor any independent
TACTIK ®distributor/licensee are responsible for
any time loss, rental costs, or for any incidental,
consequential, punitive or other damages you
may have or incur in connection with any part
or product purchased. Your exclusive remedy
hereunder for covered parts is repair/replace-
ment as described above.
This Limited Warranty gives you specific rights.
You may also have other rights that vary from
state to state. For example, some states do not
allow limitations of how long an implied war-
ranty lasts and /or do not allow the exclusion
or limitation of incidental or consequential
damages, so the limitations and exclusions
herein may not apply to you.
© TACTIK®2016. All Rights Reserved.
LTR Version
TACTIK_3YR_WAR_LTR.qxp_QLIFT 1/5/16 1:26 PM Page 1
01052016132654
/