Page is loading ...

Date Issued: 07/07/16 IS-42500LED-US
We’re here to help 866-558-5706
Hrs: M-F 9am to 5pm EST
CAUTION – RISK OF SHOCK –
Disconnect Power at the main circuit breaker panel or main fuse
box before starting and during the installation.
WARNING:
• This fixture is intended for installation in accordance with
the National Electric Code (NEC) and all local code
specifications. If you are not familiar with code
requirements, installation by a certified electrician is
recommended.
• This lighting fixture is suitable for indoor or outdoor use,
dry, damp or wet locations.
• The LED light output is strong enough to injure human
eyes. Precautions must be taken to prevent looking
directly at the LED’s with unaided eyes for more than a
few seconds.
DIMMING:
This LED fixture is compatible with most standard incan-
descent dimmers, LED dimmers, and electronic low voltage
dimmers. For optimal performance, an electronic low volt-
age dimmer should be used.
CLEANING:
Always be certain that electric current is turned off before
cleaning.
• Only a soft damp cloth should be used. Harsh cleaning
products may damage the finish.
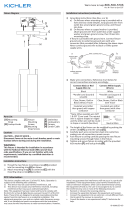
1) Attach mounting plate to outlet box with the mounting plate
screws provided. The fixture must be mounted vertically.
2) Attach the grounding conductor to the mounting plate.
Secure by tightening the green ground screw. Never connect
black or white power supply wires to the grounding screw.
3) Grounding instructions: (See Illus. A or B)
A) On fixtures where mounting strap is provided with a
hole and two raise dimples, wrap ground wire from out
let box around green ground screw, and thread into
hole.
B) On fixtures where a cupped washer is provided. Put
ground wire from outlet box under cupped washer and
green ground screw and thread screw into hole in
mounting strap.
If fixture is provided with ground wire. Connect fixture
ground wire to outlet box ground wire with wire connector,
after following the above steps. Never connect ground wire
to black or white power supply wires.
4) Make wire connections. Reference chart below for correct
connections and wire accordingly.
5) Carefully push wire connections back into outlet box making
sure all connections remain secure.
6) Carefully push fixture to wall over mounting plate. Secure
fixture to mounting plate by using fixture mounting screws.
7) Attach glass to fixture with the thumb screws and nylon
washers provided.
This device complies with part 15 of the FCC Rules. Operation is
subject to the following two conditions: (1) This device may not
cause harmful interference, and (2) this device must accept any
interference received, including interference that may cause un-
desired operation.
Note: This equipment has been tested and found to comply with
the limits for a Class B digital device, pursuant to part 15 of the
FCC Rules. These limits are designed to provide reasonable pro-
tection against harmful interference in a residential installation.
This equipment generates, uses and can radiate radio frequency
energy and, if not installed and used in accordance with the in-
structions, may cause harmful interference to radio communica-
tions. However, there is no guarantee that interference will not
occur in a particular installation. If this equipment does cause
harmful interference to radio or television reception, which can
be determined by turning the equipment off and on, the user is
encouraged to try to correct the interference by one or more of
the following measures:
• Reorient or relocate the receiving antenna.
• Increase the separation between the equipment and receiver.
• Connect the equipment into an outlet on a circuit different from
that to which the receiver is connected.
• Consult the dealer or an experienced radio/TV technician for
help.
GREEN GROUND
SCREW
CUPPED
WASHER
OUTLET BOX
GROUND
FIXTURE
GROUND
DIMPLES
WIRE CONNECTOR
OUTLET BOX
GROUND
GREEN GROUND
SCREW
FIXTURE
GROUND
A
B
Connect Black or
Red Supply Wire to:
Connect
White Supply Wire to:
Black White
*Parallel cord (round & smooth) *Parallel cord (square & ridged)
Clear, Brown, Gold or Black
without tracer
Clear, Brown, Gold or Black
with tracer
Insulated wire (other than green)
with copper conductor
Insulated wire (other than green)
with silver conductor
*Note: When parallel wires (SPT I & SPT II)
are used. The neutral wire is square shaped
or ridged and the other wire will be round in
shape or smooth (see illus.)
Neutral Wire
THUMB
SCREW
NYLON
WASHER
GLASS
FIXTURE
MOUNTING
SCREWS
FIXTURE
MOUNTING
PLATE
SCREWS
MOUNTING
PLATE
OUTLET
BOX
/