Printek FormsPro4300 Quick Reference Manual
- Category
- Dot matrix printers
- Type
- Quick Reference Manual
This manual is also suitable for

Set-Up Guide
for
FormsPro
4300
4500
4503
Printers
FormsPro
4300
4500
4503
guide
®
®

1
Before You Setup Printer...
Setup of your Printek®FormsPro Series printer is quick and
easy. By following this guide, you will be able to set
parameters for up to ten unique form configurations and for
successful printer/computer communication.
All FormsPro printers come with Factory Default settings
already stored in memory (indicated by an asterisk). This
guide shows you how to change the parameter settings if
you need to customize your forms.
The following pages provide complete listings of all functions
under the Setup: FORMS, Setup: INTERFACE, and Setup: OPTIONS
menus, along with a brief description of each function and
possible values.
This guide has been provided as a quick reference tool to help
you setup your FormsPro printer. Please refer to your
Operator’s Manual for more complete instructions and
function descriptions.
To Access the Forms, Interface and Options Menus:
11..If your printer is online, take your printer offline by pressing
the Online button once.
22..Enter one of the three SETUP menus by pressing and
holding the SETUP button:
a.Hold for one beep for the SETUP: FORMS menu.
b.Hold for two beeps for the SETUP: INTERFACE menu.
c. Hold for three beeps for the SETUP: OPTIONS menu.
(Hint: by starting with the Options menu, you are able to change both
the Forms and Interface menu without exiting SETUP each time.)
3.Once in the desired menu, you can access its various
functions using the FUNCTION arrow keys.
4.Whenever you select a function, its current value will be
displayed. Use the VALUE arrow keys to change the value
or setting. The value displayed when you leave a function
will become the default value until you change it again.
5.Push SETUP button or the ONLINE button to store values
and exit SETUP menu.
READ ME FIRST
Printer
Control
Panel
setup

2
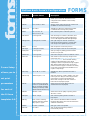
Defines Each Form’s Configuration
Forms Setup
allows you to
set print
parameters
for each of
the 10 form
templates 0-9.
*Factory Default Setting
F# (F0 - F9) = indicates which form is being configured
FORMS
forms
Form #: 0 through 9 Allows you to select the desired form to be
configured. Printer defaults to the currently
selected form.
F# Path: Front, Center, or Rear Assigns tractor path to be used for current form
(
Available on FormsPro 4503 only
).
F# Auto Cut: Yes or No* Available only when the
optional
FormsCutter
is installed. Will cut every form printed.
F# CPI: 10*, 12, 13.3, 15, Sets character pitch in characters-per-inch.
16.74, 17.14, or 20
F# Left Mar: 0* through 134 Sets left margin in columns (characters) from
left-most print position. Column width based
on CPI. Left margin must be less than right margin.
F# Right Mar: 1 through 255, or MAX* Sets right margin in columns (characters)
from left-most print position. A value of MAX
sets margin to the rightmost print position.
F# LPI: 6* or 8 Sets line pitch to 6 or 8 lines-per-inch.
F# Length: 1 through 227 (66*) Sets form length in lines at current line pitch.
F# Top Mar: 0* through 255 Sets top margin by adding specified number
of lines to top of form.
F# Btm Mar: 0* through 255 Sets bottom margin in lines from bottom of form.
F# Scroll+: 0* through 127 Sets distance in lines from top margin to first
print line of form (
Note: does not add lines to form
as top margin does
). Use Scroll with existing
software to take advantage of zero-waste
capability. If first line is printed too high on paper
after aligning edge with tear bar, use Scroll to
position it lower on page. Scroll does not modify
top of form position Not recommended for use.
in place of Top Margin.
F# Cut Adj: -85 to +84, 0*, or Auto Available only when
optional
FormsCutter is
installed.
F# Print Adj: -128 through 0*, or 0 Sets print position in 72nds (.01388”) of an inch
from top of form. May be used to align vertical
print position to match a preprinted form
which does not begin at an even number of
lines from the top edge of paper.
F# Font: FX FD, FX DF, FX LQ PC FD, Selects font to be used. (
Note: Fonts not
PC DF, PC LQ EB FD, EB DF,
installed will not be displayed
).
EB LQ, LA120FD, LA120DF,
LA120LQ, OCRA OQ, OCRB
OQ PCL2 FD, PCL2 DF PCL2 LQ
F# Draft: Normal* or Fast Selects the mode or quality of printing, either
“Normal” or “Fast”.
F# Impact: Norm* or High Sets character printing mode to normal or
high impact.
F# Lang: USA*, France, Germany, Sets character substitution table for alternate
England, Denmark, Sweden, language (
Note: Epson font must be selected for
Italy, Spain, or Japan
character substitution).
F# Zero: Normal* or Slashed Sets type of zero to be printed.
F# Unidir: Yes or No* Sets uni-directional printing instead of
bi-directional printing.
Functions Possible Values Description

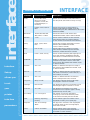
23
Interface
Set-up
allows you
to set
your
printer
interface
parameters.
*Factory Default Setting
INTERFACE
Defines I/O Interface
Functions Possible Values Description
Mode:
n=
Test, ANSI X3.64, Selects current emulation mode, barbermode, or
Epson*, Bar Codes, hex dump mode
(Test mode for factory use only)
.
Proprinter, LA-120, TTY,
Printek, Barberpole, or
Hex Dump
I/O: Parallel*, Serial, CX/TX or Selects active I/O port. If CX/TX interface is
IPDS (CX/TX & IPDS optional) installed, CX/TX also
selects Parallel port
(Not available when RS-422 or IPDS
interface is installed)
.
Baud Rate: 150, 300, 600, 1200, 2400, Selects baud rate for serial interface
(Not
4800, 9600*, or 19200
available when Parallel, CX/TX or IPDS is selected)
.
Data Bits: 7 or 8* Selects number of data bits in Serial character
frame and the number of significant data bits
in each character received via all other interfaces.
Parity: None*, Ignore, Odd or Selects parity checking requirements for Serial
Even data bits
(Not available when Parallel,
CX/TX, or IPDS is selected).
Busy: Low* or High Selects polarity of busy signal (pin 11 of RS-
232C interface). Available only when RS-232C
interface is installed and Serial is selected.
DTR: Power*, Online, or Busy Selects condition reflected by DTR signal (pin 20
of RS-232C interface). Available only when RS-
232C interface is installed and Serial is selected.
XON/XOFF: Off* or On Enables or disables transmission of XON and XOFF
characters from printer to host to control data
flow to printer
(Not available when Parallel, CX/TX
or IPDS is selected).
ETX/ACK: Off* or On Enables or disables ACK response to receipt of
ETX character
(Not available when Parallel, CX/TX
or IPDS is selected).
Auto CR: Off* or On Enables or disables automatic Carriage Returns
(CR) when a Line Feed (LF), Vertical Tab (VT), or
Form Feed (FF) is received.
Auto LF: Off* or On Enables or disables automatic Line Feed (LF)
when a Carriage Return (CR) is received.
Long Line: Wrap* or Trunk Sets whether characters beyond right margin
are wrapped to next line or truncated.
Left Edge: Fixed or Float* Sets whether left edge of line is printed 1/2” from
detected paper edge or is fixed at “0” on ruler.
FF at TOF: Yes* or No Sets whether Form Feed (FF) occurs when
received from host computer if paper is already
positioned at top of form (TOF).
Scroll Delay: 0, 1*, 2 through 15 Sets number of seconds to delay before
scrolling top of form to tear bar when printer
is idle and form boundary has been reached.
Fault: Break Pg*, Reprint Pg, Selects whether a paper-out condition causes
Finish Pg Page Break or allows you to reprint page.
Page Size: 256* or 512 through Sets page size in characters, when Page Reprint
28160 is selected. When you don’t use Page Reprint,
leave value set to 256.
Chars: Control* or Printable Selects whether certain control character
symbols are printed (emulation dependent) or
are treated as control characters.
interface

34
Functions Possible Values Description
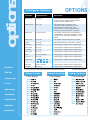
Options
Set-Up
allows you
to set
operating
variables
and install
optional
products.
*Factory Default Setting
OPTIONS
Configures Options
^~!?
;‘|\
*
Setup: Forms Setup: Interface Setup: Options
(One Beep) (Two Beeps) (Three Beeps)
Max Form #: 0 through 9 Sets the last form number to be displayed by
operator selection with FORM SELECT button
or while in “Setup: FORMS” menu.
Ribbon Check: On* or Off Sets whether ribbon checking is active.
Turning off may limit the warranty on print
head. For more information, see “Using
Special Features” in User Manual and refer to
warranty in “Printer Specifications” appendix.
Ribbon Life: 23*, 5 through 30 Sets number of characters to be printed before
“Change Ribbon” message is displayed. For more
information, see “Using Special Features” in User
Manual.
Paper Cutter: Yes or No* Sets whether optional FormsCutter is installed.
Imager: Yes or No* Sets whether Imager or Imager Plus is installed.
Translation: Off* or On If Imager option is installed, refer to Imager Manual.
Free Format: Off* or On If Imager option is installed, refer to Imager Manual.
Terminator: LF* or CR If Imager option is installed, refer to Imager Manual.
Ignore Char: Off* or On If Imager option is installed, refer to Imager Manual.
Zero: Normal or Slashed* If Imager option is installed, refer to Imager Manual.
Ignore Col. 1: Yes or No* If Imager option is installed, refer to Imager Manual.
Control Char: If Imager option is installed, refer to Imager Manual.
Bar Codes: Hi-Res*, Med-Res, If Imager option is installed, refer to Imager Manual.
Line Reg: Off or On* If Imager option is installed, refer to Imager Manual.
To access these menus, take printer offline and hold down the Set-Up button.
options

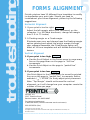
Printek printers have 10 different form templates to modify
to standardize your print jobs. Should you need to
troubleshoot your forms alignment, please try the following
suggestions:
Horizontal Alignment
1. If your print is too far right:
Adjust the left margin within your document, on the
computer. (i.e. MS Word document, change left margin
from 1.0 to .75 inches)
2. A Floating margin vs. a Fixed margin.
Eliminate user error and always keep the floating margin
option selected and adjust the printer margin through
your software Remember, the Fixed Margin option will
affect all 10 form templates and will disable the Auto-Align
feature.
Vertical Alignment
1.If your print is too high:
a. Use the Scroll Adjust in the Forms menu to move every
line on the page down on the page in “full line”
increments.
b.Use the Print Adjust on the page in “partial line”
increments.
2.If your print is too low:
Use Print Adjust in the Forms menu to move the printed
line up on the page in “partial line” increments. Add or
subtract 1/72'' (.01388'') to finely adjust print placement.
Note: “Top Margin” should not be used for vertical
alignment, as it will change how your computer counts the
number of lines per page.
5
Printek, Inc.
1517 Townline Road
Benton Harbor, MI 49022-9697
For technical assistance:
1.800.368.4636 (choose customer service at menu)
616.925.8539 (Fax)
Copyright © 1997, Printek, Inc.
All rights reserved. Printek and the Printek logo are trademarks of Printek, Inc.
Printed in U.S.A.
FORMS ALIGNMENT
troubleshooting
-
 1
1
-
 2
2
-
 3
3
-
 4
4
-
 5
5
-
 6
6


Printek FormsPro4300 Quick Reference Manual
- Category
- Dot matrix printers
- Type
- Quick Reference Manual
- This manual is also suitable for
Ask a question and I''ll find the answer in the document
Finding information in a document is now easier with AI
Related papers
-
Printek 8000 User manual
-
-
-
-
-
-
-
-
-
Other documents
-
Zebra Technologies MtP400 User manual
-
 Psion Teklogix MLP 3040 Series User manual
-
Xerox DocuColor 2060 with NPS/IPS Installation guide
-
 Psion Teklogix PrintAbout MP2000 Series User manual
-
CognitiveTPG B780 ColorPOS User manual
-
Printronix P7000 H-Series User manual
-
 InfoPrint 6500-v10 User manual
-
IBM 4247 Model 003 User manual
-
-


