Page is loading ...

by someone on the ground.
Wooden Pole/Wall Mount Clamp
Revision K • January 2010 • Page 1 of 2
Bulletin 095265-000
Installation Instructions
The DB365W mounting clamp is used to mount
omni style antennas or mounting pipes (1 1/4” to
3 1/2” O.D.) to a wooden pole or masonry wall.
Two 5/8” (15.88 mm) diameter mounting holes
will be needed in the mounting structure to
accommodate the DB365W clamp. The diameter
of the pole or the wall thickness must not exceed
10” (254 mm).
The DB365-WS kit is the same as the DB365W,
Do not install near power lines. Wear shoes with rubber soles and heels.
Wear protective clothing including a long-
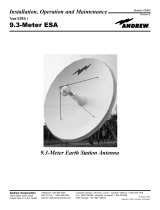
Figure 1. DB365W Mounting Clamp Parts.
DB365W.
WS is to be mounted on the opposing side of a
nuts (Item 7) and washers (Item 8), The DB365-
but does not contain the long bolt (Item 6), or the
any wire or line can electrocute you.
guy wires look the same. Assume
Power lines, telephone lines, and
Do not use metal ladder.
when lightning or thunder is in the area.
Do not install on a wet or windy day or
sleeved shirt and rubber gloves.
GENERAL INFORMATION HOISTING PROCEDURE
Pre-assemble as much of the mounting
hardware as possible to the antenna while on
the ground. (Carefully, read the installation
instructions before proceeding.) If hoisting the
antenna to the top of the tower or structure,
attach a rope to the mounting hardware at the
bottom of the antenna and then make a slip
knot loop of the rope at the top of the antenna.
The slip knot loop will keep the antenna
vertical when hoisting the antenna. For safety,
an additional rope can be attached to the
bottom of the antenna to be used as a guide
DB365W & DB365-WS

3. Assemble the remaining hardware for the
Bulletin 095265-000 • Revision K • January 2010 • Page 2 of 2
Andrew Corporation
DB800TREEKIT dB TripleTree™ Mounting Kit
NOTICE
Richardson, TX U.S.A. 75082
2601 Telecom Parkway
Base Station Antennas
Internet: www.andrew.com
FAX (U.S.A.): 1-800-229-4706
Telephone: 1-800-676-5342
Other Europe: +44 1592 782612
U.K.: 0800 250055
Copyright . 2004 by Andrew Corporation
Printed in U.S.A.
Customer Service, 24 Hour: U.S.A. • Canada • Mexico: 1-800-255-1479
Andrew Corporation
The installation, maintenance, or removal of an antenna
to 3 1/2” (88.9 mm) O.D. max.
nnas measuring 1 1/4” (31.8 mm) min.
location. The clamp will fit omni ante-
where specifically marked for a clamp
Clamp the jaws on the omni antenna
requires qualified, experienced personnel. Andrew inst-
allation instructions are written for such installation per-
sonnel. Antenna systems should be inspected once a
year by qualified personnel to verify proper installation,
maintenance, and condition of equipment.
Andrew disclaims any liability or responsibility for the
results of improper or unsafe installation practices.
clamps.
5. Repeat steps 2 through 4 for additional
mounting clamp as shown in Figure 1. For
a torque of 45 ft-lbs.
All hex nuts (Item 5) should be tightened to
should be tightened to a torque of 55 ft-lbs.
4. The square nut (Item 7) on the threaded rod
threaded rod (Item 6) will allow.
(Item 9) as the nut on the end of the
alled as close to the modified bracket
stability, the clamp (Item 1) should be inst-
INSTALLATION INSTRUCTIONS
1. Determine the location where the clamps
will be attached to the mounting structure.
(Antennas are marked to show location to
place mounting clamp.) Carefully drill two
5/8” (15.88mm) holes in the mounting str-
ucture (one for the upper clamp and
another for the lower clamp).
2. Insert the threaded rod (Item 6) through the
modified bracket (Item 9). Install the subas-
sembly onto the pole or wall using the
square nut and washer (Items 7 and 8).
/