Page is loading ...

THE FUTURE OF HOME ENTERTAINMENT
HIGH DEFINITION SET TOP BOX – PVR READY
INSTRUCTION MANUAL MODEL NUMBER: DG-HD0810
BC80048
After Sales Support
TEL : 1800 189 941

After Sales Support TEL:1800 189 941 1
WARRANTY
High Definition Set Top Box – PVR Ready
What your 1 year warranty means
Great care has gone into the manufacture of this product and it should therefore
provide you with years of good service when used properly. In the event of product
failure within its intended use over the course of the first 1 year after the date of
purchase, we will remedy the problem as quickly as possible once it has been brought
to our attention. In the unlikely event of such an occurrence, or if you require any
information about the product please contact us via our after sales support services,
details of which can be found in this manual and on the product itself.

After Sales Support TEL:1800 189 941 2
WELCOME SECTION
High Definition Set Top Box – PVR Ready
Congratulations on choosing to buy a DGTEC™ product.
Our products are manufactured to the highest standards of performance and safety,
and are backed by our comprehensive 1 Year Warranty.
We hope you will enjoy using your DGTEC™ product for many years to come.

After Sales Support TEL:1800 189 941 3
INDEX
WARRANTY .................................................................................................................. 1
WELCOME SECTION ................................................................................................... 2
INDEX ............................................................................................................................ 3
GENERAL INFORMATION AND SAFETY INSTRUCTIONS ....................................... 4
ASSEMBLY AND PARTS LIST ..................................................................................... 5
1.1 PARTS LIST ............................................................................................................. 5
1.2 FRONT PANEL ........................................................................................................ 6
1.3 REAR PANEL .......................................................................................................... 7
1.4 REMOTE CONTROL UNIT ...................................................................................... 8
1.5 INSTALLING THE BATTERIES IN THE REMOTE CONTROL ................................ 9
1.6 CONNECTING TO EQUIPMENT .......................................................................... 10
GETTING STARTED ................................................................................................... 12
INSTRUCTIONS .......................................................................................................... 14
2.1 INSTRUCTIONS .................................................................................................... 14
2.2 PROGRAM ............................................................................................................ 14
2.3 PICTURE ............................................................................................................... 16
2.4 CHANNEL SEARCH .............................................................................................. 17
2.5 TIME ...................................................................................................................... 18
2.6 OPTION ................................................................................................................. 19
2.7 SYSTEM ................................................................................................................ 19
2.8 USB ........................................................................................................................ 21
2.9 REC QUICK START GUIDE .................................................................................. 23
FAQ .............................................................................................................................. 25
TROUBLE SHOOTING ............................................................................................... 26
SPECIFICATION ......................................................................................................... 27
MEMO .......................................................................................................................... 28

After Sales Support TEL:1800 189 941 4
GENERAL INFORMATION AND SAFETY
INSTRUCTIONS
SAFETY
.Never place the unit in hot, humid or excessively dusty places.
.Do not install the unit where it may be exposed to mechanical vibrations.
.This product should be operated only from the type of power source indicated on the
rear of the unit.
.Do not touch the power cord with a wet hand or continue to use a damaged power
cord. It may cause an electric shock.
.Never open the cover. High voltage in the unit may result in electrocution.
.Disconnect the power cord to the unit before connecting any cables.
CAUTION
.To prevent fire or electrical shock do not expose the appliance to water.
.Ensure that objects filled with liquids, such as vases, are not placed on the
apparatus.
.If an object or liquid gets into the unit, disconnect the plug and ask an approved
technician to check the unit.
.Never place the unit in a confined space such as a bookcase or built-in cabinet
unless proper ventilation is provided. Leave a 10cm gap around the unit.
.The recommended operating temperature is from 0 ~ 40℃℃ and humidity should be
under 95%.
.For your own safety, do not touch any part of the unit, power lead or aerial
lead during a lightning storm.
.Use a damp cloth to clean the unit.
.Do not use liquid cleaners, solvent or abrasive products, etc.
This symbol indicates that high voltage is present inside. It is dangerous to
make contact with any part inside the case.
This symbol alerts you of important information concerning operation and
maintenance of this product.
Never allow children to play with electrical equipment.

After Sales Support TEL:1800 189 941 5
ASSEMBLY AND PARTS LIST
1.1 Parts List
Please make sure the following accessories are supplied with the STB.
① High Definition Digital Set Top Box
② Remote Control
③ RCA Composite Video/Audio Cable
④ Batteries (AAA Size)
⑤ User Manual
⑥ Quick Start Guide

After Sales Support TEL:1800 189 941 6
ASSEMBLY AND PARTS LIST
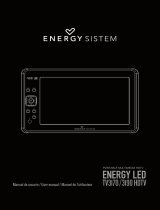
1.2 Front Panel
1. Front Panel Display
Front panel window displays information concerning current operation such as CH
number. The green LED lights up when the channel is locked in. A hidden sensor
senses infrared signal from the remote control.
2. Volume -/+ Button
Moves the cursor left/right when menu is selected, or adjusts the volume level in
operational mode.
3. CH -/+ Button
Moves the cursor down/up when in the menu or changes the current program to the
next/previous channel in operational mode.
4. Standby Button
Press to switch between operation and standby modes.

After Sales Support TEL:1800 189 941 7
ASSEMBLY AND PARTS LIST
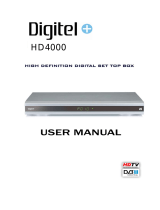
1.3 Rear Panel
1. ANT OUT
Used to loop to an extra analogue or digital device.
2. ANT IN
Used to connect an antenna.
3. YPbPr
Connects component video to HD Monitors (YPbPr Type).
4. VIDEO (Yellow Connector)
Connect to a TV with video input.
5. AUDIO L/R (White / Red RCA)
Connects to a TV audio input, HD Monitors audio input or an External Audio
Amplifier.
6. DIGITAL AUDIO (S/PDIF / Optical)
Connects to an External Audio Amplifier with S/PDIF / Optical Digital Audio
(optional).
7. HDMI Connector
Connects
High-Definition Multimedia output to HD Monitors (HDMI Type).
8. USB
USB port is used for viewing external files (MP3 audio files and JPEG or BMP
images), recording contents to an external USB memory device, playback of
contents recorded by this device and for software upgrades. (Software upgrades
only when advised by service technician.)
9. POWER CABLE
This is used to connect to your main power supply.

After Sales Support TEL:1800 189 941 8
ASSEMBLY AND PARTS LIST
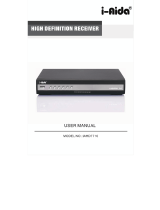
1.4 Remote Control Unit
All STB features can be operated with the remote control.
1.
POWER: Press to switch between
operation and standby mode.
2. USB: Press to enter the USB menu. You
can playback the recording files.
3. NUMERIC KEYS: Press to input
Channel Numbers, Passwords or Letters.
4. TV/RADIO:
Switch between TV or
RADIO mode.
5. MUTE: Press to mute the sound.
6. EPG:
Displays the Electronic Program
Guide. You can book a recording.
7. EXIT: Press to return to the previous
menu or to exit from the current mode.
8. ASPECT RATIO: Press to select aspect
ratio mode.
9. FAV: Press to display Favorite Channel
List.
10. Up▲/ Down▼: Changes the channel
or moves the cursor in the menu.
11. Left◄/ Right►: Adjusts volume or
moves the cursor in the menu.
12. MENU: Press to display the Main
Menu.
13. PAGE +/ PAGE–: Press to page
up/down in the channel list.
14. OK: Press to select the item in the
menu or to list the TV/Radio channels.
15. INFO: Displays the information of the
current program.
16. TIMER: Enter the schedule menu. You can book a timer event.
17. AUDIO: Selects the audio mode.
18. RECALL: Press to return the previous channel.
19. FREEZE: Freezes the video output of the STB.
20. SCAN: Auto scan.
21. GOTO: Go to the designated point in a media file.
22. SUBTITLE: Press to view subtitles (Closed Captioning).
23. SPECIAL FUNCTION KEYS: Special keys designated for playing MP3s on a
USB drive, or for recording/playing programs to a USB drive.

After Sales Support TEL:1800 189 941 9
ASSEMBLY AND PARTS LIST
1.5 Installing the batteries in the remote control
1. Press down on the retaining catch on the lid of the battery recess on the remote
control and slide downward to remove the lid.
2. Insert two AAA batteries into the recess.
3. Replace the lid over the recess and gently push down on the lid and slide upward
until it snaps firmly into place.
Caution
1. Keep batteries out of the reach of children.
2. Do not attempt to recharge, short-circuit, disassemble, heat or throw the batteries
into a fire.
3. Always replace both batteries at the same time. Never mix new and old batteries
or batteries of a different type.
4. If you don’t intend to use the remote control for an extended period, remove the
batteries to prevent possible leakage and corrosion.
5. Do not drop, apply shock or step on the remote control.
6. Do not spill water on the remote control.
Note: If the STB does not respond when operating the remote control from a
close range, you will need to replace the batteries.
Using the Remote Control
1. To use the remote control, point it towards the front of the STB.
2. The remote control has a range of up to 7 metres from the STB at an angle of up
to 60 degrees.
3. The remote control will not operate if its path to the sensor on the front panel of the
STB is blocked.

After Sales Support TEL:1800 189 941 10
ASSEMBLY AND PARTS LIST
1.6 Connecting to Equipment
i. Connect your TV antenna cable to the “ANT IN” jack on the back of the STB using
coaxial RF cable.
CONNECTING TO A HIGH DEFINITION TELEVISION (HDTV)
OPTION 1- HDMI connection
ii. Connect the HDMI Out on the STB to HDMI In on the HDTV using a HDMI cable
(not provided).
OPTION 2- High Definition connection using YPbPr cables (not supplied )
iii. Connect the YPbPr connectors and AUDIO L/R connectors on the back of the
STB to the COMPONENT IN on your television using RED, GREEN & BLUE
RCA-type YPbPr cables. (Note: RED, GREEN & BLUE Component cables carry
video signal only, you will need to connect other cables for audio connection as
well.)

After Sales Support TEL:1800 189 941 11
ASSEMBLY AND PARTS LIST
CONNECTING TO A STANDARD DEFINITION TELEVISION
iv. Using the provided Composite cables connect the yellow plug to the
corresponding yellow socket on the STB and TV. Connect the AUDIO L/R
(WHITE and RED) lead to the corresponding white and red sockets on the STB
and the AV in sockets at the rear of the TV. Optional: Connect Optical S/PDIF
out connector on the STB to the Audio-Amplifier using optical cable. (Instead of
using L/R (WHITE and RED) RCA leads. )
Note: Please ensure that your TV is set to the correct input channel depending
on your connection type e.g. AV1, AV2, Component , Scart1 ,HDMI etc.
Use the TV remote control to select the TV input channel connected to the Set
Top Box. Refer to your TV user guide or technical helpline if unable to select
the input channel.

After Sales Support TEL:1800 189 941 12
GETTING STARTED
First Time Installation
If you are using the STB for the first time or the unit is restored to factory default, a
First Time Installation Guide menu will be displayed.
In the Installation Guide menu you can set the language (the default is English), and
activate Auto Channel Search.
When scanning is complete, all active channels found will be stored automatically.
(If you want to stop scanning, press the EXIT key to stop. The channels already
found will be stored).
Now you are ready to watch digital TV channels and radio broadcasts.
If you skip the Installation Guide screen, you can press MENU key to display the
main menu then use the ◄/► keys to navigate to the Channel Search sub menu,
use the ▲/▼ keys to navigate to and highlight Auto Search. Press OK to
commence Auto Search.
Switching programs
1. Press the NUMERIC keys (0~9) on the remote control to select the channel
number you want.
2. Alternatively press the ▲/▼ keys on the remote control or the front panel to
change the available channels upward/downward.
3. Press the RECALL key to view the previous channel selected.
4. Press OK to activate the channel list.
Volume control
Press the ◄/► keys on the remote control or front panel to adjust the volume.
Mute
1. Press the MUTE key to temporarily stop the sound.
2. To cancel mute, press the MUTE key again.

After Sales Support TEL:1800 189 941 13
GETTING STARTED
Freezing picture (This is not Timeshift)
1. Press FREEZE key to pause current program and the pause icon will appear on
screen.
2. To cancel pause and continue to play, press the FREEZE key again and the
pause icon will disappear and the video will skip forward to the current time.
Change screen aspect
Press ASPECT RATIO key to switch screen aspect mode (16:9
Widescreen/16:9Pillar Box/16:9 Pan& Scan/AUTO/4:3 Full/4:3 Pan&Scan/4:3
Letterbox).
Change TV/RADIO mode
Press TV/RADIO key to change the program list between TV and Radio.
View program info
1. Press INFO key to view the basic information for NOW & NEXT programs.
2. Press INFO again to display extended information for the NOW Program
3. To view extended information for the NEXT program use the ▼ key to highlight
the NEXT program. Extended information will be displayed.
4. Press INFO/EXIT to exit view.
Subtitle – Closed Captions (CC)
Press SUBTITLE key to switch CC on/off.
NOTE: Closed captions are not available for all programs.
Teletext service
1. Press TEXT key to open teletext page (if teletext is transmitted).
2. Press TEXT key again or press EXIT key to close teletext.
EPG (Electric Program Guide)
1. Press EPG key to view the EPG information provided by the broadcasters.
2. Use the ◄/► keys on the remote control to navigate through the available
channels.
3. Press ▲/▼ keys on the remote control to highlight any program in the list, detailed
information for that program will be displayed in the right hand pane. Press
RED/GREEN key to navigate Page down / Page up in the Program List.
4. Press OK to go to book an event for a highlighted program.
5. Press the INFO key to view the List of Scheduled Bookings.
6. Press EXIT key to exit the menu.

After Sales Support TEL:1800 189 941 14
INSTRUCTIONS
2.1 INSTRUCTIONS
< Starting up for the First Time >
1. Once the STB has been correctly set
up and channel scan is complete you
will need to make a few selections
from the menu to customise your set
up.
2. Press the MENU key on the remote
control to display the menu featured
below, use the ◄/► keys to navigate
between menu items.
< Menu Information >
2.2 Program
In this menu you can edit stored channels, view the EPG and set channel selection
parameters.
< Channel Edit >
In this menu, you can use the ◄/► keys
to change the settings, ▲/▼ to select
the item or press EXIT to cancel. (The
default password is 000000.)
Red Key: You can move a channel’s
position. First press the ▲/▼ keys to
highlight the channel. Press the RED
key to mark the channel to be moved.
Use the ▲/▼ keys to move the channel to the position you want and press the OK
key to drop the channel.
Green Key: Use the ▲/▼ keys on the remote control to highlight the channel to be
skipped then press the GREEN key. The SKIP symbol will be displayed alongside
the channel, press EXIT to leave the menu and save the SKIP setting. That channel
will be skipped when navigating through channels.
Yellow Key: Lock/unlock a channel. This means the locked channel will require a
password to access when this channel is selected. Use the ▲/▼ keys on the remote
control to highlight the channel to be locked then press the YELLOW key, A lock
symbol will be displayed alongside the channel.

After Sales Support TEL:1800 189 941 15
INSTRUCTIONS
Blue Key: You can delete selected channels. Be aware that this function can
completely delete the saved channel. When you delete a channel in the menu, the
channel is also deleted from the Favorite List. Use the ▲/▼ keys on the remote
control to highlight the channel to be deleted then press the BLUE key. A dialogue
box will be displayed asking if you want to delete the channel. Press OK to confirm
the deletion.
FAV: You can add Favorite channels. Move cursor to the required channel with
▲/▼ keys, and then press OK key on the remote control to add the channel to the
favorites list.
RECALL: Rename the channels. Move cursor to the required channel with ▲/▼
keys, and then press RECALL key to rename it. Use the ▲/▼/◄/► keys to navigate
the keyboard.
You can enter into the favorite list if you press the FAV key while you are watching
TV in normal status.
< EPG >
EPG shows the event information on the current and all channels. The event is
displayed only for the channels that have EPG information. If you press the EPG key
on the remote control, the following screen will appear.
Press the ◄/► keys to select channels.
Press the ▲/▼ keys to view EPG of a
particular channel on a daily basis.
Press GREEN/RED keys to page
up/down to view the EPG information,
the detailed program information will be
displayed on the right of the screen.
If you press the OK key on a highlighted
program you can book to record the program. The booking menu will be displayed.
You can set the parameters of the event, such as Channel Type, Channel No., Start
Time, End Time, frequency of the event (Once, Daily or Weekly) and the type of
event you want to book (Record, View).

After Sales Support TEL:1800 189 941 16
INSTRUCTIONS
Press ◄/► keys or numerical keys to
change settings.
Press OK to confirm your settings.
In the EPG menu, press INFO key to
enter the book list menu. In this menu
you can view and edit all booking
events.
Press the RED key to add a new
booking, the Green key to edit the
highlighted booking and the BLUE key
to delete a highlighted booking.
Press the EXIT key to close the EPG menu.
< Sort >
In this sub menu environment use the ◄/► keys to select the Sort mode (By
LCN/By ONID/By Service Name/By Service ID). The default setting is Logical
channel Numbering (LCN). These are the actual numbers sent out by the
broadcaster as their channel descriptor, for example, ABC- 2, 21, 22, 23, 24 and 7
Network – 7, 70, 71, 72, 73.
< LCN >
In this menu use ◄/► keys to select LCN (ON/OFF).
2.3 Picture
Press the ► key on the remote control to select Picture in the main menu, then
press the OK key. The following screen will appear. In this menu you can set the
parameters for your display.

After Sales Support TEL:1800 189 941 17
INSTRUCTIONS
Aspect Ratio: Press the▲/▼ keys on
the remote control to highlight the
Aspect Ratio selection. Use the ◄/►
keys to select the aspect ratio setting to
suit your screen (16:9
Widescreen/16:9Pillar Box/16:9 Pan&
Scan/AUTO/4:3 Full/4:3 Pan&Scan/4:3
Letterbox).
Resolution: Press the▲/▼ keys on the remote control to highlight the Resolution
selection. Use the ◄/► keys to select the resolution setting to suit your screen and
connection method (1080i/576i/576p/720p).
TV Format: Press the▲/▼ keys on the remote control to highlight the TV Format
selection. Use the ◄/► keys to select the TV Format setting to suit your screen
(PAL [default for Australia] and NTSC).
2.4 Channel Search
Press the ► key on the remote control
to select Channel Search from the Main
Menu options to display the Channel
Search sub menu.
< Auto Search >
Press the▲/▼ keys on the remote
control to highlight the Auto Search
then press OK to activate Auto search
for digital channels in your region.
Press the EXIT key stop Auto Search at
any time.

After Sales Support TEL:1800 189 941 18
INSTRUCTIONS
< Manual Search >
Press the▲/▼ keys on the remote
control to highlight the Manual Search
then press OK to activate the manual
search sub menu.
Use the ◄/► keys to navigate through
the Frequency channels, the Frequency
in the row below will change accordingly.
Repeat the process to manually scan all channels in your region.
< Country >
Press the▲/▼ keys on the remote control to highlight the Country option. Use the
◄/► keys to navigate through the available selections, in this case there are two
settings for Australia – Australia 7M (this is the default setting and the correct
setting for you set top box) and Australia 8M (this is for future use only)
< Antenna Power >
Press the▲/▼ keys on the remote control to highlight the Antenna Power option.
Use the ◄/► keys to navigate through the available selections - ON/OFF.
2.5 Time
Press the ► key on the remote control
to select Time from the Main Menu
options to display the Time sub menu. In
this menu, use the ◄/► keys to change
the Local Time and the settings, ▲/▼
keys to select an item or press EXIT to
cancel.
Syn Mode: Use ◄/► keys to navigate between available settings. In Time Offset
Table (TOT) mode the time is detected from the broadcasters transport stream, you
will still need to select your state.
Region: Use ◄/► keys to change the region setting.
Time Zone: Use ◄/► keys to set the time using GMT Time Zone setting.
Summer Time: Use ◄/► keys to select between ON/OFF.

After Sales Support TEL:1800 189 941 19
INSTRUCTIONS
Schedule: Enter the book list (Schedule) menu. In this menu you can add a timer
event booking or edit a booked event.
2.6 Option
Press the ► key on the remote control
to select Option from the Main Menu
options to display the option sub menu.
In this menu, you use the ◄/► keys to
change language settings, such as OSD
language, Subtitle language, Audio
language and Digital Audio output
preferences.
Press ▲/▼ keys to select the item or
press EXIT to cancel.
< OSD language >
Press the▲/▼ keys on the remote control to highlight the OSD language option
then use the ◄/► keys to navigate through the language options available for your
On Screen Display (OSD)
< Subtitle language >
Press the▲/▼ keys on the remote control to highlight the Subtitle language option
then use the ◄/► keys to navigate through the language options available. Please
note this will depend on the subtitle options transmitted by the broadcaster.
< Audio language >
Press the▲/▼ keys on the remote control to highlight the Audio language option
then use the ◄/► keys to navigate through the language options available. Please
note this will depend on the language options transmitted by the broadcaster
< Digital Audio >
Press the▲/▼ keys on the remote control to highlight the Digital Audio option then
use the ◄/► keys to navigate through the options available (PCM, AC-3 and OFF)
2.7 System
Press the ► key on the remote control to select System from the Main Menu options
to display the System sub menu. In this menu you can set the parameters for the
system and find system information.
Press ▲/▼ keys to select the item, press OK to enter or EXIT to cancel.
/