
Pub No. 31-1131-1
Printed in the United States
01-05 JR
Template/Rear Bracket
Reference Guide
Pub. No. 4-A019-8
CAUTION:
• Before you begin—Read these instructions, Owner’s Manual and Important Safety Instructions
completely and carefully.
• Do not alter or modify any part of this kit or the oven.
• Do not block vents or openings.
• Observe all governing codes and ordinances.
• Oven must be plugged into a properly grounded 3-hole, 120 volt receptacle
as required by the National Electrical Code.
• Unplug the microwave oven before attempting installation of this kit.
• Save these instructions (for Local Inspectors and Future Reference).
This kit provides all the hardware and instructions needed to mount 0.6, 0.7 and
1.0 cu. ft. General Electric, Hotpoint and Monogram microwave ovens that are approved
for mounting under kitchen cabinets.
The accessory kit includes an instruction book, 4 mounting templates and a set of mounting
hardware. Select one mounting template and one set of rear brackets for the specific model
to be installed.
Refer to the Installation Instructions book and the table below to determine which template
and hardware (rear brackets) you should use for your particular model. Check the Electrical
Rating plate located inside the oven for your model number.
Model Template Rear Brackets
Part No. Pub. No. (See P. 2)
JEM25BF/WF 245B1790P032 31-1132 4B
JEM31BF/CF/WF/SF 245B1790P032 31-1132 4B
ZEM200SF/BF/WF 245B1790P032 31-1132 4B
JE740WH/BH 245B1790P073 31-1170 4A
JE740WK/BK -------------------- 49-40442 4C
REM25SJ 245B1790P032 31-1132 4B
JE620BF/WF 205C1059P190 49-40286 4C

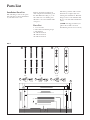
Installation Parts List
The following is a list of the parts
that you may need for installation
of your microwave oven.
Remove all parts from the box
and compare them with the parts
list and illustration (Fig. 1) to be
sure that none are missing. Use
this time to become familiar with
each piece.
Parts List
1. 3 sets of bolts
2. 2 In-cabinet mounting straps
3. 4 Templates
4A. 2 Rear brackets
4B. 2 Rear brackets
4C. 2 Rear brackets
Check the parts list and read all
instructions completely before
starting the installation. This will
help you to become familiar with
the process and make installation
easier.
(NOTE: It is suggested that you
gather all needed tools and
installation parts in one location.)
Parts List
FIG. 1
(A)
(B)
9/16"
1/2" 1 1/4"
1
2
4A
4B 4C
3
-
 1
1
-
 2
2


Ask a question and I''ll find the answer in the document
Finding information in a document is now easier with AI
Related papers
-
GE ZEM200WY Installation guide
-
GE Monogram ZEM200 Series Installation Instructions Manual
-
GE JX1827BB Installation guide
-
-
-
-
GE Profile PVM9179EK2ES Installation guide
-
-
GE JSP40WWWW Installation guide
-
Other documents
-
Maytag cme9010cae Installation Instructions Manual
-
Air Lift 57552 Installation guide
-
Hotpoint 6665 User manual
-
 Lincoln Manufacturing 1133-000-A User manual
-
Sharp R1405 User manual
-
LG MK2030NST Installation guide
-
Whirlpool MH6141XKB2 Installation guide
-
Smeg OTR111SU User manual
-
Frigidaire FMT148GPB1 Installation guide
-
Sharp R1872T User manual
