Page is loading ...

Instructions - Parts
Level Detection Module
and Drum Feed Kit
3A2806C
EN
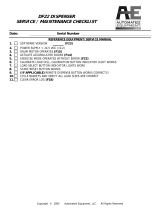
Installation kit to provide low level sensors in both chemical sides of an HFRL or HFRS
plural-component proportioner being fed from 55 gallon (208 liter) drums. Not for use with
standard configured HFR units. For professional use only.
Not approved for use in explosive atmospheres or hazardous locations.
See page 3 for model information.
125 psi (0.86 MPa, 8.6 bar) Maximum Fluid Working Pressure
125 psi (0.86 MPa, 8.6 bar) Maximum Air Input Pressure
Important Safety Instructions
Read all warnings and instructions in the HFRL and HFRS
Setup-Operations manual. Save all instructions.
ti19596a

2 3A2806C
Contents
Related Manuals . . . . . . . . . . . . . . . . . . . . . . . . . . . 3
Models . . . . . . . . . . . . . . . . . . . . . . . . . . . . . . . . . . . 3
Component Identification . . . . . . . . . . . . . . . . . . . . 4
Complete Feed System . . . . . . . . . . . . . . . . . . . . 4
Electrical Panel Components . . . . . . . . . . . . . . . 5
Fluid Control Module (FCM) . . . . . . . . . . . . . . . . 6
Light Tower . . . . . . . . . . . . . . . . . . . . . . . . . . . . . 7
Grounding . . . . . . . . . . . . . . . . . . . . . . . . . . . . . . . . 8
Flush Pumps Before Using . . . . . . . . . . . . . . . . . . . 8
Installation . . . . . . . . . . . . . . . . . . . . . . . . . . . . . . . . 9
Install 4 Drum Rack (Optional) . . . . . . . . . . . . . . 9
Refer to 4 Drum Rack, 01/0955/25 (Optional) on
page 30 for visual clarity. . . . . . . . . . . . . . . . 9
Position Drums . . . . . . . . . . . . . . . . . . . . . . . . . . 9
Install Drum Feed Kit . . . . . . . . . . . . . . . . . . . . . . 9
Connect Feed Pump . . . . . . . . . . . . . . . . . . . . . . 9
Install Electrical Panel . . . . . . . . . . . . . . . . . . . . 10
Install Level Sensors . . . . . . . . . . . . . . . . . . . . . 12
Install Light Tower . . . . . . . . . . . . . . . . . . . . . . . 13
Setup . . . . . . . . . . . . . . . . . . . . . . . . . . . . . . . . . . . . 14
Calibrate Barrel Style Level Sensors . . . . . . . . . 14
Set the ADM to Recognize the Feed System Kit 14
Set the ADM to Recognize which Level Sensors are
to Operate . . . . . . . . . . . . . . . . . . . . . . . . . . 15
Set the Level Sensors Output Function . . . . . . 15
Startup . . . . . . . . . . . . . . . . . . . . . . . . . . . . . . . . . . 16
Shutdown . . . . . . . . . . . . . . . . . . . . . . . . . . . . . . . . 16
Pressure Relief Procedure . . . . . . . . . . . . . . . . . . 16
Maintenance . . . . . . . . . . . . . . . . . . . . . . . . . . . . . . 16
Drum Feed Kit - Air Dryer . . . . . . . . . . . . . . . . . 16
Drum Feed Kit, Pump . . . . . . . . . . . . . . . . . . . . 17
Drum Feed Kit, Changing Top Drums . . . . . . . . 17
Install Upgrade Tokens . . . . . . . . . . . . . . . . . . . 18
Troubleshooting . . . . . . . . . . . . . . . . . . . . . . . . . . . 19
Repair . . . . . . . . . . . . . . . . . . . . . . . . . . . . . . . . . . . 20
Level Sensor and Well . . . . . . . . . . . . . . . . . . . . 20
Electrical Schematics . . . . . . . . . . . . . . . . . . . . . . 21
Parts . . . . . . . . . . . . . . . . . . . . . . . . . . . . . . . . . . . . 22
Drum Feed System, 24N816 . . . . . . . . . . . . . . . 22
Drum Feed Kit, 24N767 . . . . . . . . . . . . . . . . . . . 24
Electric Panel, 24N804 . . . . . . . . . . . . . . . . . . . 26
4 Drum Rack, 01/0955/25 (Optional) . . . . . . . . . 30
Appendix A - ADM Setup Screens Overview . . . . 32
Appendix B - ADM Run Screens Overview . . . . . 35
Technical Data . . . . . . . . . . . . . . . . . . . . . . . . . . . . 37
Graco Standard Warranty . . . . . . . . . . . . . . . . . . . 38

Related Manuals
3A2806C 3
Related Manuals
Component manuals in English. Manuals are available
at www.graco.com.
Models
NOTE: Not for use with standard HFR units.
Manual No. Description
3A2175 HFRL and HFRS, Setup-Operations
3A2176 HFRL and HFRS, Repair-Parts
312877 Husky 1050 Air-Operated Diaphragm Pump, Operation
3A0235 Feed Supply Kits, Instructions-Parts
406987 GCA CAN Cables, Reference (Extension Cables)
Part
Description
24N816
KIT, low level, stack light, HFRL (Required):
- (2) low level sensors - (1) sensor per chemical side
- (1) control panel for level sensors
- (1) indicator stack light
24N767
Carbon steel drum feed kit with Husky pump (Optional):
- Kit is to add a drum feed to (1) chemical side
01/0955/25 4 Drum rack (Optional)

Component Identification
4 3A2806C
Component Identification
Complete Feed System
Key:
A Auxiliary Control Panel (Mounted in Machine Base)
Refer to F
IG. 2
B Level Sensor - Low Level Indication
C Level Sensor - Empty Indication
D Indicator Stack Light
E Drum Feed / Pump Kit for One Chemical (Optional)
F 4 Drum Rack (Optional)
G Upper to Lower Drum Feed Hose
H Drum to Pump Feed Hose, 6 ft (1.8 m)
J Husky Pump
K HFR Supply Hose
FIG. 1: Component Identification - Feed System
D
ti19596a
G
F
A
KJ H
C
B
E
Figure Shown With:
(1) Level Kit
(2) Drum Feed Kit Options
(1) 4 Drum Rack Option

Component Identification
3A2806C 5
Electrical Panel Components
The electrical panel will be located on the inside of the
HFRL stand enclosure, and includes two fluid control
modules.
Software is loaded on Fluid Control Modules (FCM).
Program token 16G584 is also provided.
Key:
AA Fluid Control Module - A (Red) Tank
AB Fluid Control Module - B (Blue) Tank
AC Ground Cable
AD CAN Cable
AE Flanged Hex Nuts (3x)
AF Wire Tie Anchor
FIG. 2: Component Identification - Electrical Panel
AA
AD
AC
AB
r_24n804
AE
AF

Component Identification
6 3A2806C
Fluid Control Module (FCM)
Key:
BA Fluid Control Module (FCM)
BB Base
BC Module Connection Screws
BD Access Cover
BE Module Status LEDs
BF CAN Connectors
BG Level Sensor Input
BH Fill Solenoid Signal
Adjust Rotary Switch
The rotary switch setting indicates which zone the fluid
control module will control in the system. The FCM uses
a 16-position rotary switch to make selections.
Set the rotary switch to the specific selection according
to the settings listed in the following table.
FIG. 3: Component Identification - FCM
ti12336a
BA
BB
BC
BD
ti12337a
BG
BE
BH
BF
FIG. 4: Adjust Rotary Switch
Rotary Switch
ti12361a
Setting Zone
0 through 2 Not Used
3 B (Blue) Tank Level
4 A (Red) Tank Level
5 through F Not Used

Component Identification
3A2806C 7
Light Tower
Errors include advisories, deviations, or alarms, so
green will only be on when none of these occur. A yellow
light can be on at the same time as red (flashing or solid
on) when an advisory exists at the same time as a devi-
ation or alarm.
Messaging will be viewable on the ADM to determine
the specific error code.
FIG. 5: Component Identification - Light Tower
Signal Description
Green on only System is powered up and there are no error con-
ditions present
Yellow on An advisory exists
Yellow flashing Material is at a low level condition
Red flashing A deviation exists
Red on The system is shut down due to an alarm occur-
ring.
tower

Grounding
8 3A2806C
Grounding
The equipment must be grounded. Grounding reduces
the risk of static and electric shock by providing an
escape wire for the electrical current due to static build
up or in the event of a short circuit.
Pump: follow instructions in separate feed pump man-
ual, supplied.
HFR: see operation manual.
Fluid supply container: follow local code.
Solvent pails used when flushing: follow local code.
Use only conductive metal pails, placed on a grounded
surface. Do not place the pail on a nonconductive sur-
face, such as paper or cardboard, which interrupts
grounding continuity.
To maintain grounding continuity when flushing or
relieving pressure: hold metal part of the spray gun or
dispense valve firmly to the side of a grounded metal
pail, then trigger the gun or valve.
Flush Pumps Before
Using
Flush equipment only in a well-ventilated area. Do
not spray flammable fluids.
NOTICE
Diaphragm pumps are factory tested with water.
Thoroughly flush pumps before using to prevent
moisture contamination when pumping moisture
sensitive materials.

Installation
3A2806C 9
Installation
Install 4 Drum Rack (Optional)
Refer to 4 Drum Rack, 01/0955/25 (Optional) on
page 30 for visual clarity.
Position Drums
Place component A (red) and component B (blue)
drums as desired. Air hose connecting feed pumps is
15 ft (4.57 m) long.
Fluid hose connecting feed pumps to systems are
10 ft (3.05 m) long.
Install Drum Feed Kit
1. Complete Setup instructions in the pump manual
before installing in drum feed kit.
2. If applicable, locate drum rack to allow access for
top drum change.
3. Dry fit all hose and fitting components to ensure
components are located properly and will reach the
HFRL. Refer to F
IG. 1, page 4.
NOTE: Drum to pump feed hose length can be reduced
if necessary. Refer to F
IG. 1, page 4, item H.
4. Tighten all connections.
Connect Feed Pump
1. Supply clean, dry, filtered air to feed pumps.
NOTE: Air supply components are not included.
2. Refer to Husky 1050 Air-Operated Diaphragm
Pump, Operation manual for instructions.
NOTICE
To avoid machine damage or personal injury,
anchor the rack to the floor with (4) 1/2” bolts (pro-
vided by customer) and verify all bolt assemblies
are tightened before loading the drums onto the
rack.
NOTICE
To avoid machine damage or personal injury, do not
supply pressure to drums.
NOTICE
To avoid improper operation, the diaphragm pump
must be floor mounted.

Installation
10 3A2806C
Install Electrical Panel
1. Perform HFR shutdown procedure. See HFRL oper-
ation manual for detailed instructions.
2. Disconnect the power supply to the machine.
3. Turn the disconnect switch on the rear base cover of
the machine to the “OFF” position
4. Remove the cover to allow access into the base
cube.
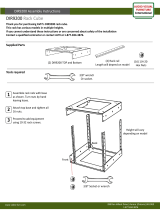
5. Install the pre-assembled panel on the left side of
the cube, directly opposite of the main control panel.
Note the locations of the 3 studs; One in each top
corner, and one in the bottom center.
a. Orient the panel so the mounting holes match
the stud locations of the cube.
b. Insert the panel into the base cube.
c. Orient the top of the panel such that the studs in
the cube wall extend through the holes in the
top corners of the panel.
d. Fasten the panel to the studs with the (3)
flanged hex nuts provided. Tighten the nuts.
6. Connect the cable (labeled 121002) extending from
the panel to the yellow cable splitter located on the
lower left side of the main machine control panel.
a. Remove the two screws to free the splitter from
the panel.
b. Insert the cable end into the open port on the
splitter and tighten. Note that the plug is keyed
and only fits in the splitter in one orientation.
c. Reattach the splitter to the panel.
7. If there is no available connection on the splitter, an
alternate CAN connection will need to be used. The
alternate location may require a different gendered
cord (122487 is provided for this purpose). Consult
the system manual in finding an alternate connec-
tion location.
8. Remove one of the hole plugs located on the top of
the base cube directly over the disconnect panel
that was just removed.
NOTE: There are three holes on the top edge of the
base cube. The plug can be easily pushed out from
inside the cube.
9. Replace the removed plug with the provided plastic
edge bushing
a. The bushing will snap into place by aligning the
smaller diameter end of the bushing on top of
the hole and pressing the bushing down through
the hole from outside the cube.
10. Insert the male ends of the sensor cords labeled
FCM1A and FCM2B through the bushing and into
the base cube.
11. Connect the cord labeled FCM1A to port “1” (Refer
to F
IG. 2, page 5) on the FCM labeled FCM1.
12. Connect the cord labeled FCM2B to port “1” (Refer
to F
IG. 2, page 5) on the FCM labeled FCM2.
13. Attached the wire anchor to the inside face of the
base by inserting the provided screw through the
anchor and the weld nut indicated in F
IG. 6. Secure
in place by tightening the hex nut on the screw from
the outside of the base.
14. Secure the cords to the panel and the base cube by
using wire ties (not provided) and the installed plas-
tic anchors.

Installation
3A2806C 11
FIG. 6: Install Electrical Panel
r_24n804
Panel Install
Step 5
Step 5
Step 8,
Step 9
Step 6
Panel view is shown rotated 180°
from the installed position.
Step 13
Step 6
NOTE: Mounting location for panel is
only available on HFRL and HFRS
models. This location is used for
other control components on stan-
dard HFR models.

Installation
12 3A2806C
Install Level Sensors
NOTE: Lower drum hardware must be installed in an
empty drum and then installed on the lower drum rack.
The drum can then be filled from the cascade feed hose
from a full upper drum.
NOTE: There are two possible locations for the low level
sensor, depending on desired function. Install both sen-
sors in the same location on each chemical side.
• Low Level Indication: Located in the upper to
lower drum feed hose
• Empty Indication: Located in the drum to pump
feed hose.
1. Turn main power off.
2. Drain drums below the lowest level sensor well.
NOTE: For proper level sensor function, the tip of
the level sensor well must protrude at least 1/8 in.
into the tank.
3. Route the level sensor wire through the correspond-
ing well nut (CC). See F
IG. 7 for level sensor assem-
bly view.
4. Measure the length of the level sensor well housing,
and then measure the depth of the hole in the fitting
where the well is inserted. Note these measure-
ments as they will be need later.
5. Being careful to not cross-threads, thread assem-
bled level sensor (CB) into well housing until it bot-
toms out against the bottom of the well. The bottom
of the level sensor will be slightly visible through the
bottom of the well.
NOTE: In the following step, do not allow PTFE
paste or tape to cover the tip of the level sensor
well. If paste comes in contact with the tip of the
level sensor well, thoroughly wipe it clean.
6. Apply PTFE paste and PTFE tape to the male
threads of the level sensor well housing.
7. Being careful to not cross-threads, thread the level
sensor well (CA) into the corresponding drum feed
port and lightly tighten with a crescent wrench.
8. The protrusion length must be at least 1/8 in.
(3.2 mm). If not, remove the level sensor well and
restart at step 4.
9. Rotate level sensor such that the cord is pointing
vertical and the sensing face is pointing down.
10. Plug the sensor connector (CD) into the level sen-
sors.
a. Route the sensor wires from the control panel
through the bushing that was installed with the
level sensor panel (steps 8 and 9).
11. Plug the sensor connector into the connector on the
FCM.
12. Calibrate the sensor. See Calibrate Barrel Style
Level Sensors, page 14.
NOTICE
Do avoid machine damage, install one sensor on
each chemical side only.
FIG. 7: Level Sensor Assembly
r_24b969_3A0395a_7a-2
CA
CB
CC
CD
Wire
NOTICE
Do not pressurize tank with level sensor removed
from sensor well. Doing so will rupture the level sen-
sor well.

Installation
3A2806C 13
Install Light Tower
NOTE: Install the light tower in a suitable location for
clear viewing.
1. Create the hole pattern below to match the light
tower base.
2. Use the provided screws to attach the light tower to
the mounting bracket.
3. Route the light tower cord as needed towards the
ADM.
4. Connect the cable to the port labeled “1” on the
base of the ADM. Refer to F
IG. 1, page 4.
NOTE: A 5 m (16 ft) cable is provided with the level con-
trol kit. If extension cables are necessary, refer to GCA
CAN Cables - Reference manual.
NOTICE
To prevent damage to the cord, ensure it will not be
pinched during normal machine operation after
routing.
Ø 0.90
Ø 1.57
Bolt Circle
3x 8-32 UNC 2B
Equally Spaced
Mount Pattern

Setup
14 3A2806C
Setup
Calibrate Barrel Style Level
Sensors
1. Locate the calibration button on the sensor (11)
closest to the electrical connector through one of
the four holes of the sensor well housing (CA).
2. If the calibration button cannot be seen through one
of the four holes in the sensor well, rotate the sen-
sor.
a. Loosen the sensor well nut (CC).
b. Rotate sensor until the calibration button can be
seen through one of the four holes in the sensor
well housing.
c. Tighten sensor well nut.
d. Press and hold the button down with the ball
end of an allen wrench for two seconds. The
light will flash slowly and then go out.
3. Test for proper sensor function.
a. Loosen the sensor well nut.
b. Back the sensor out of the well. The sensor
should sense the housing wall.
Set the ADM to Recognize the
Feed System Kit
1. Navigate to the ADM Supply Screen.
2. Press .
3. For the appropriate chemical side, select “Monitor”
within the Refill Setting selection box.
NOTE: Select “Disabled” if the level system is not being
used.

Setup
3A2806C 15
Set the ADM to Recognize which
Level Sensors are to Operate
NOTE: Two sensors must be selected for each material
with a level sensor, regardless if there is only one low
level sensor installed.
1. Remain within the ADM Refill Screen.
2. For the appropriate chemical side, select and check
the middle sensor.
3. For the appropriate chemical side, select and check
the bottom sensor.
4. Press .
Set the Level Sensors Output
Function
1. Navigate to the ADM Advanced Screen 4.
2. Press .
3. If it is desired to stop dispensing when a low level is
sensed, select and check “Low Material Disables
Dispense”.
NOTE: Setting this option initiates a deviation condition
and disables the machine from operation when there is
a low level condition. When a low level is sensed, the
machine will not cycle until the sensor see material. A
pop-up screen on the ADM alerts the operator of the
specific level condition.
4. If it is not desired to stop dispense, verify Low Mate-
rial Disables Dispense” is unchecked.
NOTE: This option is the default setting of the system
and is set as a deviation condition. When a deviation is
issued, the machine will continue to cycle and will not be
affected by the deviation.
NOTE: A low level condition generates a pop-up mes-
sage on the ADM that can only be cleared by the opera-
tor. If the “Low Material Disables Dispense” option is
selected, dispensing can resume with a remote start
signal when material is replenished and the sensor sees
material. It is not necessary to clear the ADM to initiate a
start unless the ADM is used as the start device.
5. Press .

Startup
16 3A2806C
Startup
1. See Load fluid with feed pumps in HFR operation
manual.
2. Open feed pump air regulator.
3. Open feed pump bleed-type master air valve.
4. Adjust air to feed pump with needle valve.
NOTE:
• Cold, viscous material may be difficult to prime.
Use needle valve to reduce air flow to motor.
• Do not plug or shut off pump fluid outlet when
priming. Fluid must be free to flow through
pump to prime.
• To increase pump flow rate and reduce icing,
remove pump muffler. This will increase exhaust
noise.
5. Never let pump run when drum is empty. A dry
pump can accelerate and damage itself. If pump is
running too fast, stop it immediately. Check and refill
fluid supply, or flush with compatible solvent. Always
prime entire system to remove any air. Do not let
material harden in pump.
Shutdown
See Shutdown in system operation manual. Close feed
pump bleed-type master air valve.
Pressure Relief
Procedure
1. If the optional drum feed kit is being used, remove
the air pressure from the Husky pump.
2. See Pressure Relief Procedure in system opera-
tion manual.
Maintenance
Drum Feed Kit - Air Dryer
Replace silica gel units when the desiccant color or
moisture indicator has changed color from Blue (mean-
ing dry) to Pink (meaning wet).
There is a sight window on the side of the canister to
allow viewing of the desiccant color.
1. Loosen the clamp ring and remove the desiccant
canister from the rubber housing.
2. Apply tape over the both ends of the canister.
3. Discard used canister.
4. Remove sticky tabs from the ends of the new canis-
ter to allow airflow.
5. Install canister into the rubber housing to allow view-
ing of the sight window.
NOTE: Make sure the arrows found on the canister point
into the rubber housing.
6. Tighten the clamp ring.

Maintenance
3A2806C 17
Drum Feed Kit, Pump
NOTE: See supplied pump manual for maintenance,
repair, and parts information.
Tighten pump clamps and external fasteners periodi-
cally. See pump manual.
Drum Feed Kit, Changing Top
Drums
1. See Shutdown, page 16.
2. Close ball valves on top drum outlet assembly.
3. Place a container underneath the CAM lock fitting to
catch chemicals.
4. Disconnect the CAM lock fitting from the system.
5. Remove the empty drum from the rack (if applica-
ble) and place it vertically on the floor.
6. Remove the air dryer assembly ball valve assembly
from the empty drum.
7. Inspect and clean the threads of the full drum and
removed fitting assemblies.
8. Apply thread sealant to threads of the removed
assemblies.
9. Install the ball valve assembly.
10. Install dryer assembly.
NOTE: To prevent contamination of the desiccant in the
dryer canister caused by sloshing material, it is recom-
mended that the tape is temporarily placed over the air
inlet on the dryer canister. The tape should be removed
after the drum is installed.
11. Place drum on top rack and orient it so that the air
dryer assembly is on top and outlet is on the bottom.
12. Perform Drum Feed Kit - Air Dryer, page 16, as
required.
13. Connect CAM lock fittings from lower drum securely
to ball valve assembly on upper drum and lock in
place.
NOTE: CAM levers on either side of female CAM recep-
tacle should be perpendicular to the receptacle to mate
and parallel to body to lock.
14. Open both ball valves on top drum outlet assembly
to fill bottom the drum.
See Load fluid with feed pumps in GMS operation
manual.
NOTICE
To prevent cross-contamination of fluid when
changing drums, complete changing one compo-
nent before changing second component.
closed_ballvalves
ti19596a

Maintenance
18 3A2806C
Install Upgrade Tokens
NOTE: The Motor Control Module, Fluid Control Mod-
ule, and Temperature Control Module connection to the
system is temporarily disabled during the installation of
upgrade tokens.
To install software upgrades:
1. Use correct software token stated in the table. See
Graco Control Architecture
™
Module Programming
manual for instructions.
NOTE: Upgrade all modules in the system to the
software version on the token, even if you are
replacing only one or two modules. Different soft-
ware versions may not be compatible.
All data in the module (System Settings, USB Logs,
Recipes, Maintenance Counters) may be reset to
factory default settings. Download all settings and
user preferences to a USB before the upgrade, for
ease of restoring them following the upgrade.
See manuals for locations of specific GCA compo-
nents.
The software version history for each system can be
viewed in the technical support section at
www.graco.com.
Token Application
16H821 HFR:
- Advanced Display Module
- Motor Control Module
- High Power Temperature Control Module
- Fluid Control Module (AC Power Pack)
- Discrete Gateway Module
- Communication Gateway Module
16G584 Tank Stand:
- Fluid Control Module
- Low Power Temperature Control Module
16G407 Ratio Monitoring (Flow Meters):
- Fluid Control Module
FIG. 8: Remove Access Cover
r_257396_3b9905_04b
ti12334a1
ti12358a1
ti12354a1

Troubleshooting
3A2806C 19
Troubleshooting
Problem Cause Solution
Level sensor is not sensing
material when material is
present.
Level sensors out of calibration. Calibrate level sensor.
Replace level sensor.
Intermittent electrical connections. Ensure the system main power is ON.
Ensure all electrical connections to the level
sensor are secure. See electrical schematic
in either the HFR or VRM Repair-Parts man-
ual.
FCM errors. Check FCM. A red LED indicates a problem
with the module. See electrical schematic in
either the HFR or VRM Repair-Parts man-
ual.
Replace FCM.
Level sensor is sensing
material when material is
not present.
Level sensors out of calibration. Calibrate level sensor.
Replace level sensor.
Level sensors blocked inside reser-
voir.
Check inside reservoir to ensure there is
nothing blocking the level sensor.
Intermittent electrical connections. Ensure the system main power is ON.
Ensure all electrical connections to the level
sensor are secure. See electrical schematic
in either the HFR Repair-Parts manual.
FCM errors. Check FCM circuit breaker in base cube to
see if it has tripped. See electrical sche-
matic in either the HFR or VRM
Repair-Parts manual.
Check FCM. A red LED indicates a problem
with the module. See electrical schematic in
either the HFR or VRM Repair-Parts man-
ual.
Replace FCM.

Repair
20 3A2806C
Repair
Level Sensor and Well
NOTE: For proper level sensor function, the tip of
the level sensor well must protrude at least 1/8 in.
into the reservoir.
1. Turn main power off.
2. Close ball valves on the drum outlets.
3. Drain drums to below level sensor well.
4. Unscrew level sensor harness cable (CD) from level
sensor well housing (CA).
5. Use a crescent wrench to remove level sensor
well housing from tank (C).
6. Remove the old level sensor (CB) from well housing.
7. Measure the length of the level sensor well housing,
and then measure the depth of the hole in the fitting
where the well is inserted. Note these measure-
ments as they will be needed later.
8. Being careful to not cross-threads, thread assem-
bled level sensor (CB) into well housing until it bot-
toms out against the bottom of the well. The bottom
of the level sensor will be slightly visible through the
bottom of the well.
NOTE: In the following step, do not allow PTFE
paste or tape to cover the tip of the level sensor
well. If paste comes in contact with the tip of the
level sensor well, thoroughly wipe it clean.
9. Apply PTFE paste and PTFE tape to the male
threads of the level sensor well housing.
10. Being careful to not cross-threads, thread the level
sensor well into the tank (C) and lightly tighten with
a crescent wrench.
11. Measure the amount of the level sensor well hous-
ing that is visible beyond the day tank hole, then
perform the following equation:
12. The protrusion length must be at least 1/8 in.
(3.2 mm). If not, remove the level sensor well and
restart at step 7.
FIG. 9: Level Sensor Assembly
r_24b969_3A0395a_7a-2
CA
CB
CC
CD
NOTICE
Level sensor must be oriented with the sensing face
pointing down. Alternate orientations could result in
material pooling on the sensor face, resulting in a
false reading.
P = L1 - (L2 + L3)
P = Protrusion length (inside of day tank)
L1 = Length of level sensor well (A10)
L2 = Visible length of level sensor well
L3 = Length of well threads in fitting
/