Page is loading ...

1
INSTRUCTION MANUAL
CHANDELIER FIXTURE
Brushed Nickel Finish
Chrome Finish
Home Depot SKU 518-132 (UPC 008938601863)
Home Depot SKU 526-920 (UPC 008938601962)

2
Thank you for purchasing this Hampton Bay interior chandelier fixture. This product has been
manufactured with the highest standards of safety and quality.
FEATURES:
1. Uses 120 volt, 60 Watt MAX each, standard (A19) incandescent or candelabra (B10.5) light bulb(s)
(not included).
2. Standard 96 in wire and 72 in chain for open entry-way, dining room, and cathedral ceiling installations.
3. Can be used with any standard, 120 volt, incandescent style dimmer switch.
QUESTIONS, PROBLEMS, MISSING PARTS:
Before returning to your local Home Depot, please call our Customer Service Team at 1-877-527-0313 or
visit www.homedepot.com. Please reference SKU 518-132, UPC 008938601863 or SKU 526-920, UPC
008938601962.
IMPORTANT SAFETY INSTRUCTIONS
INSTALLATION INSTRUCTIONS PERTAINING TO RISK OF FIRE OR INJURY TO PERSONS
1. Read all instructions.
2. Do not install this lighting system in wet locations.
3. CAUTION - When the light is on, the lamp is HOT!
4. CAUTION - Hot surface. Keep away from curtains and other combustible materials.
5. Turn off/unplug and allow to cool before replacing bulb (lamp).
6. All electrical connections must be in accordance with local codes and the National Electrical Code. If
you are unfamiliar with methods of installing electrical wiring, secure the services of a qualified
licensed electrician.
7. This fixture is intended to be mounted to a 4in. square x 2-1/8in. deep metal octagon outlet box. The
box must be directly supported by the building structure.
8. Before starting the installation, disconnect the power by turning off the circuit breaker or by removing
the appropriate fuse at the fuse box. Turning the power off using the light switch is not sufficient to
prevent electrical shock.
SAVE THESE INSTRUCTIONS
TOOLS REQUIRED FOR ASSEMBLY & INSTALLATION (not included):
Bulb Safety Goggles Ladder Gloves Wire Strippers Flathead Phillips
Electrical tape
Screwdriver Screwdriver
PARTS INCLUDED FOR ASSEMBLY (parts are not to scale):
(2)Outlet Box (3)Wire Mounting Ceiling Canopy Loop ring Fabric shade Socket ring
Screws Connectors bracket assembly canopy loop
FIXTURE BODY ASSEMBLY INSTRUCTIONS
1. Carefully unpack the fixture and lay out all of the parts on a clean surface.
2. First distribute the bent tubes from fixture to three or five parts equal separately.
3. Secure the column into the coupler and tighten in place.
4. Install the fabric shade on to the socket and tighten with the socket ring (preassembly on to the socket).
CEILING ASSEMBLY INSTRUCTIONS
1. Make sure the electrical is power off, pull leads down out of junction box.
2. Adjust the length of the chain according to the desired height by removing unnecessary links.
3. Thread the fixture wire and the ground (bare) wire through the chain, feeding it through alternating
links, then through the canopy loop. Loosen the loop ring on the canopy loop and allow ring to slide
down over the chain.
4. Slide the canopy over the canopy loop and the chain (leave ring and canopy loose on chain at this time).
5. Insert and secure the threaded nipple into the canopy loop.
6. Attach the mounting strap to the outlet box using the two outlet box screws provided.
7. Raise the assembled fixture to allow for installation to junction box (it is highly recommended to use a

3
second person to help support the weight of the fixture from below while the wiring connections are
being made). Feed the wire and ground wire through the hole in the center of the mounting strap and
rotate the threaded nipple, canopy loop and preassembled fixture clockwise until the threaded nipple is
secure in the mounting strap. Make sure the fixture cable and ground wires are not twisted during this
process.
8. Wrap the ground wire under and around the ground screw which is marked “GND”, and fasten the
ground screw to make sure the ground wire is securely connected.
9. Make the ELECTRICAL CONNECTIONS (Required Supply Circuit: 120V, 60Hz):
a. Connect the negative (raised ribs without writing) wire from the fixture to the negative wire from
the Outlet Box.
b. Connect the positive (smooth with writing) wire from the fixture to the positive wire from the
Outlet Box.
c. Connect the ground (bare) wire from the fixture to the ground wire from the Outlet Box.
d. Secure the connections using the wire connectors. Wrap the wire connections with electrical
tape to secure the connections.
e. Position the wires back inside the outlet box.
Note: If you have electrical questions, consult your local electrical code for approved grounding methods
or obtain the services of a qualified, licensed electrician.
10. Slide the canopy back over the canopy loop and tighten to ceiling using the loop ring (Adjust the
length of the threaded nipple if necessary).
11. Check to make sure the canopy is held firmly against the ceiling.
12. Screw the bulb (not included) into the lamp-socket.
Caution: Refer to the re-lamping label near the lamp holder for recommended wattage.
13. Installation is complete. Turn on the power at the circuit breaker or fuse box.
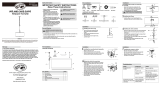
ASSEMBLY DIAGRAM:
1.
Outlet Box
2. Wire connector
3. Ground (Bare) Wire
4. Mounting strap
5. Ground screw
6. Negative wire
7. Positive wire
8. Hex nut
9. Threaded nipple
10. Outlet Box Screw
11. Canopy
12. Canopy loop
13. Ring
14. Chain
15. Fixture loop
16. Column
17. Coupler
18. Bent tube
19. Socket
20. Fabric shade
21. Socket ring
22. Bulb
1
2
3
4
6
10
11
8
9
7

4
TROUBLE SHOOTING:
PRODUCT MAINTENANCE:
1. To clean the outside of the fixture, use a dry or slightly dampened clean cloth (use clean water,
never a solvent) to wipe the shade and surface of the fixture.
2. To clean the inside of the fixture, first disconnect power to the fixture by turning off the circuit
breaker or by removing the fuse at the fuse box. Use a dry or slightly dampened clean cloth (use
clean water, never use a solvent) to wipe the inside glass and interior surface of the fixture.
CAUTION: Do not use any cleaners with chemicals, solvents or harsh abrasives as damage to components
or finish may occur.
LIMITED WARRANTY
The manufacturer warrants this lighting fixture to be free from defects in materials and workmanship for a
period of five (5) years from date of purchase. This warranty applies only to the original consumer
purchaser and only to products used in normal use and service. If this product is found to be defective, the
manufacturer's only obligation, and your exclusive remedy, is the repair or replacement of the product at
the manufacturer's discretion, provided that the product has not been damaged through misuse, abuse,
accident, modifications, alterations, neglect or mishandling. This warranty shall not apply to any product
that is found to have been improperly installed, set-up, or used in any way not in accordance with the
instructions supplied with the product. This warranty shall not apply to a failure of the product as a result of
an accident, misuse, abuse, negligence, alteration, or faulty installation, or any other failure not relating to
faulty material or workmanship. This warranty shall not apply to the finish on any portion of the product,
such as surface and/or weathering, as this is considered normal wear and tear. The manufacturer does not
warrant and specially disclaims any warranty, whether express or implied, of fitness for a particular
purpose, other than the warranty contained herein. The manufacturer specifically disclaims any liability
and shall not be liable for any consequential or incidental loss or damage, including but not limited to any
labor / expense costs involved in the replacement or repair of said product.
Problem
Possible Cause
Corrective Action
1. Light bulb is burned out. 1. Replace light bulb.
2. Power is off. 2. Make sure power supply is on.
3. Faulty wire connection. 3. Check wiring.
Light bulb will not
illuminate.
4. Faulty switch. 4. Test or replace switch.
Fuse blows or circuit
breaker trips when light
bulb is illuminated.
Crossed wires or power wire is
grounding out.
Check wire connections.

5
ANUAL D'INSTRUCTIONS
UMINAIRE LUSTRE
Fini en nickel brossé
Fini chrome
Home Depot UGS 518-132 (CUP 008938601863)
Home Depot UGS 526-920 (CUP 008938601962)
/