Evenflo Winston & Sophie Walk Thru Hardware Mount User manual
- Type
- User manual

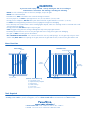
Walk-thru Hardware Mount Gate
Barrière de passage à montage par matériel
de fixation
Reja de acceso montada con tornillería
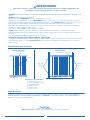
Fits openings between 30 in. (76 cm) and 48 in. (122 cm) wide.
Convient aux ouvertures de 76 à 122 cm (30 à 48 po) de largeur.
Para aberturas entre 76 cm (30 pulg.) y 122 cm (48 pulg.) de ancho.
Read all instructions BEFORE assembly and USE of product.
KEEP INSTRUCTIONS FOR FUTURE USE.
Lire les instructions AVANT l’assemblage et L’UTILISATION du produit.
CONSERVER CES INSTRUCTIONS POUR R
É
F
É
RENCE ULT
É
RIEURE.
Lea las instrucciones ANTES de armar y USAR el producto.
GUARDE ESTAS INSTRUCCIONES PARA REFERENCIA FUTURA.
25700851 03/13
©2013 EVENFLO COMPANY, INC.

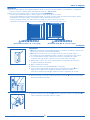
An electric drill with 1/8” drill bit, Phillips screwdriver, pencil, and adhesive tape. Use a handheld Phillips screwdriver when
installing screws. Note: If you are missing parts, visit us at www.evenflo.com or call ParentLink at 1-800-233-5921.
Contents of Hardware Bag
(8) Long Hinge Screws
(1) Paper Mounting Template
(2) Hinge Plates
(2) Latch Housings
(1) Swing Stop
(2) #10 x 1/2” Screws
Latch Mechanism
Gate Panels
Latch
Housings
Hinge
Brackets
WARNING
To prevent serious injury or death, securely install gate and use according to
manufacturer’s instructions and warnings, including the following:
Tools Required
Top Rail
Bottom Rail
Slats
Know Your Gate
etaG dellatsnIlenaP etaG
< NEVER use with a child able to climb over, dislodge, or open the gate.
< NEVER leave child unattended.
< Intended for use ONLY with children from 6 months through 24 months.
<!o ensure proper fit, use ONLY in openings between 30" (76 cm) and 48" (122 cm) wide.
<!o help prevent entrapment, DO NOT allow space between bottom of gate and floor to exceed 3” (7.62 cm).
<"se ONLY with locking/latching mechanism securely engaged to help prevent dislodging.
<"se in doorways with wooden frames. When installing against drywall, make sure mounting surface is reinforced with a wall
stud to help prevent damage.
<!o help prevent falls, DO NOT attempt to step over gate.
< STOP using gate if any parts are missing or damaged to help ensure proper gate function.
< Periodically check all fasteners to be sure they are tight and secure to help prevent gate from dislodging.
< !+,4gate will NOT necessarily prevent all accidents.
< PET STRANGULATION HAZARD – Pets can force themselves into very small openings. "4(this gate only with pets whose
head or body WILL NOT fit into openings in the gate, between the gate and the floor, or between the gate and the wall.
1///.&$''%1" ;!
<$0$'$<?9,&1
or pet

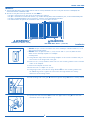
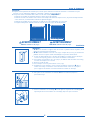
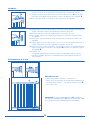
IMPORTANT:
s$O NOT attempt to mount the brackets into uneven molding or wall base board trim, as the
gate will not function properly.
s $/NOT mount the gate less than 2” (5 cm) or more than 3” (7.62 cm) above the floor.
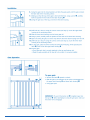
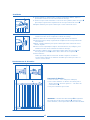
Make sure the mounting template is in a straight
vertical position.
1. Using adhesive tape, attach the mounting template on the solid wood surface that you
have chosen for the hinged side of the gate.
2. Drill four 1/8” (3 mm) diameter starter holes into the mounting surface at the crosshatch
marks on the template.
3. Remove the template from the wall.
4. Drill each hole to a depth of 2” (5 cm).
5. Using hinge screws, screw the two hinge brackets
A into the mounting surface with
the tabbed edge down. Tighten the screws until the hinge brackets are securely
fastened to the mounting surface.
A
A
D
C
B
WARNING
TOO low! Less than 2” (5 cm).
WARNING
TOO HIGH! More than 3” (7.62 cm).
IMPORTANT:
1. Inspect both gate panels to be certain that the slats are securely attached to the rails. If any slats are loose or damaged, call
Evenflo Parentlink at 1-800-233-5921.
2. You can use this gate at the top or bottom of stairs ONLY if:
s The gate is mounted over the floor at the top or bottom of a stairwell.
s The gate is mounted into a solid wood structure, e.g. wooden doorway jamb, solid wood banister post, or wall stud behind drywall.
s The gate is installed according to these instructions, using the screws and hardware provided.
s The stairwell allows the gate to be mounted less than 3” (7.62 cm) above the floor.
Before You Start
Installation
6. Slide the hinge side of the gate B down through both hinges A until it is securely seated.
7. Squeeze the latch mechanism
C and slide the upper latch housing D over the latch
mechanism until it snaps into place.
1
Page is loading ...

3
Answers. Advice. Affirmation.
™
- www.evenflo.com- USA:1 -800-233-5921 8 AM – 5 PM E.T.
- "-éxico: 01-800-706-12-00
3
Metal and plastic parts can be wiped clean with a soft damp cloth and dried with a soft cloth. DO NOT use abrasive cleaners or
solvents.
Care and Maintenance
Limited Warranty
For a period of 90 days from the original purchase of this Product, Evenflo warrants to the original end user ("Purchaser") this Product
(including any accessories) against defects in material or workmanship. Evenflo’s sole obligation under this express limited warranty
shall be, at Evenflo’s option, to repair or replace any Product that is determined to be defective by Evenflo and determined to be cov-
ered by this warranty.
Repair or replacement as provided under this warranty is the exclusive remedy of the Purchaser.Proof of purchase in the form of a
receipted invoice or bill of sale evidencing that the Product is within the warranty period must be presented to obtain warranty serv-
ice. This express limited warranty is extended by Evenflo ONLYto the original Purchaser of the Product and is not assignable or trans-
ferable to subsequent purchasers or end users of the Product. For warranty service, contact Evenflo’s ParentLink Consumer Resource
Center at (800) 233-5921 or www.evenflo.com.
EXCEPT TO THE EXTENT PROHIBITED BY APPLICABLE LAW, ANY IMPLIED WARRANTY OF MERCHANTABILITY OR FITNESS FOR A PAR-
TICULAR PURPOSE ON THIS PRODUCT IS HEREBY DISCLAIMED. EVENFLO SHALL NOT BE LIABLE FOR
ANY INCIDENTAL, CONSE-
QUENTIAL, SPECIAL OR PUNITIVE DAMAGES OF ANY KIND FOR BREACH OF THE EXPRESS LIMITED WARRANTY ON THIS PRODUCT,
OR ANY WARRANTY IMPLIED BY OPERATION OF LAW. OTHER THAN THE EXPRESS LIMITED WARRANTY SET FORTH ABOVE, THERE
ARE NO OTHER WARRANTIES THAT ACCOMPANY THIS PRODUCT AND ANY ORAL, WRITTEN OR ANY OTHER EXPRESS REPRESENTA-
TION OF ANY KIND IS HEREBY DISCLAIMED.
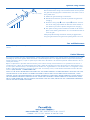
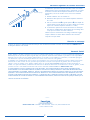
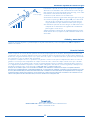
#10 x 1/2” Screws
The optional swing control mechanism provides extra security.
We recommend the swing control mechanism be used to prevent
the gate from swinging into a hazard such as over stairs or into a
heavy traffic area.
1. Mount the gate according to instructions.
2. Determine the direction you want to prevent the gate from
swinging.
3. Attach the swing stop
A
to the top rail
B
with the solid sur-
face of the swing stop toward the direction of the hazard, i.e.
the direction you want to prevent the gate from swinging.
4. The optional swing control mechanism should not be used in
place of the latching mechanisms. It is not intended to latch or
close the gate.
Always keep the latching mechanism securely engaged when
using the gate. Remove the gate from opening when not in use.
A
B
Optional Swing Control
Page is loading ...
Page is loading ...
Page is loading ...
Page is loading ...
Page is loading ...
Page is loading ...
Page is loading ...
Page is loading ...
Page is loading ...
Page is loading ...

Answers. Advice. Affirmation.
™
s www.evenflo.coms USA:1 -800-233-5921 8 AM–5 PM E.T.
s Canada: 1-937-773-3971 s- éxico: 01-800-706-12-00
Answers. Advice. Affirm
-
 1
1
-
 2
2
-
 3
3
-
 4
4
-
 5
5
-
 6
6
-
 7
7
-
 8
8
-
 9
9
-
 10
10
-
 11
11
-
 12
12
-
 13
13
-
 14
14
-
 15
15
-
 16
16


Evenflo Winston & Sophie Walk Thru Hardware Mount User manual
- Type
- User manual
Ask a question and I''ll find the answer in the document
Finding information in a document is now easier with AI
in other languages
Related papers
-
Evenflo Top of Stairs User manual
-
-
-
-
-
-
-
-
-


