Page is loading ...

Read all instruuctions BEFORE assembly and USE of product.
KEEP INSTRUCTIONS FOR FUTURE USE.
Lire les instructions AVANT l’assemblage et L’UTILISATION du produit.
CONSERVER CES INSTRUCTIONS POUR RÉFÉRENCE ULTÉRIEURE.
Lea las instrucciones ANTES de armar y USAR el producto.
GUARDE ESTAS INSTRUCCIONES PARA REFERENCIA FUTURA.
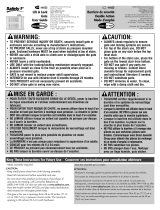
Fits openings between 30 in. (76 cm) and 48 inches (122 cm) wide.
Convient aux ouvertures de 76 à 122 cm (30 à 48 po) de largeur.
Para aberturas entre 76 cm (30 pulg) y 122 cm (48 pulg) de ancho.
25701226 12/13
©2013 EVENFLO COMPANY, INC.
Top-of-Stair PLUS Gate
Top-of-Stair XTRA-TALL Gate
TM
TM
and
Safety.
So Simple!
TM

1
IMPORTANT:
s$/./4 attempt to mount the brackets into uneven molding or wall base board trim, as the
gate will not function properly.
s$/./4mount the gate less than 2” (5 cm) or more than 3” (7.62 cm) above the floor.
Make sure the mounting template is in a straight
vertical position.
1. Using adhesive tape, attach the mounting template on the solid wood surface that you
have chosen for the hinged side of the gate.
2. Drill four 1/8” (3 mm) diameter starter holes into the mounting surface at the crosshatch
marks on the template.
3. Remove the template from the wall.
4. Drill each hole to a depth of 2” (5 cm).
5. Using hinge screws, screw the two hinge brackets A into the mounting surface with
the tabbed edge down. Tighten the screws until the hinge brackets are securely
fastened to the mounting surface.
An electric drill with 1/8” drill bit, Phillips screwdriver, pencil, and adhesive tape. Use a handheld Phillips screwdriver when
installing screws. Note: If you are missing parts, visit us at www.evenflo.com or call ParentLink at 1-800-233-5921.
#ONTENTSOF(ARDWARE"AG
(8) Long Hinge Screws
(1) Paper Mounting Template
(2) Hinge Plates
(2) Latch Housings
(1) Swing Stop
(2) #10 x 1/2” Screws
A
A
B
D
C
WARNING
4//LOW,ESSTHANvCM
WARNING
4//()'(-ORETHANvCM
Latch Mechanism
Gate Panels
Latch
Housings
Hinge
Brackets
WARNING
IMPORTANT:
1.Inspect both gate panels to be certain that the slats are securely attached to the rails. If any slats are loose or damaged, call
Evenflo Parentlink at 1-800-233-5921.
2. You can use this gate at the top or bottom of stairs /.,9 if:
s 4HEGATEISMOUNTEDOVERTHEmOORATTHETOPORBOTTOMOFASTAIRWELL
s The gate is mounted into a solid wood structure, e.g. wooden doorway jamb, solid wood banister post, or wall stud behind
drywall.
s 4HEGATEISINSTALLEDACCORDINGTOTHESEINSTRUCTIONSUSINGTHESCREWSANDHARDWAREPROVIDED
s 4HESTAIRWELLALLOWSTHEGATETOBEMOUNTEDLESSTHANvCMABOVETHEmOOR
4OPREVENTSERIOUSINJURYORDEATHSECURELYINSTALLGATEANDUSEACCORDINGTO
MANUFACTURERSINSTRUCTIONSANDWARNINGSINCLUDINGTHEFOLLOWING
"EFORE9OU3TART
)NSTALLATION
6. Slide the hinge side of the gate B down through both hinges A until it is securely
seated.
7. Squeeze the latch mechanism C and slide the upper latch housing D over the latch
mechanism until it snaps into place.
4OOLS2EQUIRED
Top Rail
Bottom Rail
Slats
+NOW9OUR'ATE
'ATE0ANEL )NSTALLED'ATE
sNEVER use with a child or pet able to climb over, dislodge, or open the gate.
sNEVER leave child unattended.
s)NTENDEDFORUSE/.,9 with children from 6 months through 24 months.
s4OENSUREPROPERlTUSE/.,9 in openings between 30” (76 cm) and 48” (122 cm) wide.
s4OHELPPREVENTENTRAPMENT$/./4 allow space between bottom of gate and floor to exceed 3” (7.62 cm).
s5SE/.,9 with locking/latching mechanism securely engaged to help prevent dislodging.
s5SEINDOORWAYSWITHWOODENFRAMES7HENINSTALLINGAGAINSTDRYWALLMAKESUREMOUNTINGSURFACEISREINFORCEDWITHAWALL
stud to help prevent damage.
s4OHELPPREVENTFALLS$/./4 attempt to step over gate.
s34/0 using gate if any parts are missing or damaged to help ensure proper gate function.
s0ERIODICALLYCHECKALLFASTENERSTOBESURETHEYARETIGHTANDSECURETOHELPPREVENTGATEFROMDISLODGING
s4HISGATEWILLNOT necessarily prevent all accidents.
s0%4342!.'5,!4)/.(!:!2$n0ETSCANFORCETHEMSELVESINTOVERYSMALLOPENINGS5SETHISGATEONLYWITHPETSWHOSE
head or body 7),,./4lTINTOOPENINGSINTHEGATEBETWEENTHEGATEANDTHEmOORORBETWEENTHEGATEANDTHEWALL
sWWWEVENmOCOMsUSA: 1-800-233-5921, 8 AM – 5 PM E.T.
sCanada:sMéxico: 01-800-706-12-00

3 2
D
C
A
E
4OOPENGATE
s 3QUEEZETHELATCHA upward to unlock;
s 3LIDETHEGATEINTHEDIRECTIONOFTHEARROWTODISENGAGEFROM
the upper latch housing B and lower latch housing C;
s 3WINGGATEOPEN
IMPORTANT: The end of the bottom rail E is slightly longer than
the top rail D. Before attempting to swing the gate open, make sure
the bottom rail is disengaged.
8. Swing the gate into the closed position and slide the gate panels until the gate contacts
the latch side of the mounting surface.
9. Making sure that the top of the gate is level with the floor, using a pencil E, carefully
mark the position for the holes for the latch housing D.
10. Swing the gate out of the way, and remove the latch housing.
)NSTALLATION
11. Drill holes as in Step 4. Using the correct screws (see Step 5), secure the upper latch
housing to the mounting surface.
12. Slide the lower latch housing over the lower gate rail.
13. Using a pencil, carefully mark the position for the holes of the lower latch housing.
14. Open and swing the gate out of the way. Remove the lower latch housing from the rail.
15. Drill holes as in Step 4. Using the correct screws (see Step 5), secure the lower latch
housing to the mounting surface.
16. To close gate, place the lower rail into the lower latch housing, while squeezing the
latch C, insert it into the upper latch housing D.
17. Test the gate:
s#HECKTHATEACHSLATISSECURELYATTACHEDTOTHETOPANDBOTTOMRAILS
s3HAKETHEGATEASSEMBLYATTHETOPRAILTOBECERTAINITISSECURELYINSTALLED
s7ASHGATEWITHMILDSOAPANDWARMWATERANDDRYTHOROUGHLYBEFOREUSING
s Metal and plastic parts can be wiped clean with a soft, damp cloth and dried with a soft cloth. $/./4 use abrasive cleaners
or solvents.
s An occasional drop of vegetable oil may reduce wear and tear on moving parts.
#AREAND-AINTENANCE
,IMITED7ARRANTY
For a period of 90 days from the original purchase of this Product, Evenflo warrants to the original end user (“Purchaser”) this
Product (including any accessories) against defects in material or workmanship. Evenflo’s sole obligation under this express
limited warranty shall be, at Evenflo’s option, to repair or replace any Product that is determined to be defective by Evenflo and
determined to be covered by this warranty.
Repair or replacement as provided under this warranty is the exclusive remedy of the Purchaser. Proof of purchase in the form of
a receipted invoice or bill of sale evidencing that the Product is within the warranty period must be presented to obtain warranty
service. This express limited warranty is extended by Evenflo ONLY to the original Purchaser of the Product and is not assignable
ORTRANSFERABLETOSUBSEQUENTPURCHASERSORENDUSERSOFTHE0RODUCT&ORWARRANTYSERVICECONTACT%VENmOS0ARENT,INK#ONSUMER
2ESOURCE#ENTERAT(800) 233- 5921 or www.evenflo.com.
%8#%044/4(%%84%.402/()")4%$"9!00,)#!",%,!7!.9)-0,)%$7!22!.49/&-%2#(!.4!"),)49/2&)4.%33&/2
!0!24)#5,!20520/3%/.4()302/$5#4)3(%2%"9$)3#,!)-%$%6%.&,/3(!,,./4"%,)!",%&/2!.9).#)$%.4!,
#/.3%15%.4)!,30%#)!,/205.)4)6%$!-!'%3/&!.9+).$&/2"2%!#(/&4(%%802%33,)-)4%$7!22!.49/.4()3
02/$5#4/2!.97!22!.49)-0,)%$"9/0%2!4)/./&,!7/4(%24(!.4(%%802%33,)-)4%$7!22!.493%4&/24(
!"/6%4(%2%!2%.//4(%27!22!.4)%34(!4!##/-0!.94()302/$5#4!.$!.9/2!,72)44%./2!.9/4(%2
%802%332%02%3%.4!4)/./&!.9+).$)3(%2%"9$)3#,!)-%$
'ATE/PERATION
#10 x 1/2” Screws
The optional swing control mechanism provides extra security.
7ERECOMMENDTHESWINGCONTROLMECHANISMBEUSEDTOPREVENT
the gate from swinging into a hazard such as over stairs or into a
heavy traffic area.
1. Mount the gate according to instructions.
2. Determine the direction you want to prevent the gate from
swinging.
3. !TTACHTHESWINGSTOPA to the top rail B with the solid
surface of the swing stop toward the direction of the hazard,
i.e. the direction you want to prevent the gate from swinging.
4. The optional swing control mechanism should not be used in
PLACEOFTHELATCHINGMECHANISMS)TISNOTINTENDEDTOLATCHOR
close the gate.
!LWAYSKEEPTHELATCHINGMECHANISMSECURELYENGAGEDWHEN
using the gate. Remove the gate from opening when not in use.
A
B
/PTIONAL3WING#ONTROL
B
C
D
E
sWWWEVENmOCOMsUSA: 1-800-233-5921, 8 AM – 5 PM E.T.
sCanada:sMéxico: 01-800-706-12-00

D
C
E
7 6
Vis #10 x 1/2 po
,EMÏCANISMEOPTIONNELCONTRÙLEDOURVERTUREFOURNITUNESÏCURITÏ
SUPPLÏMENTAIRE.OUSRECOMMANDONSQUELEMÏCANISMESECONTRÙLE
DOUVERTURESOITUTILISÏAlNDEMPÐCHERLABARRIÒREDESOUVRIR
DANGEREUSEMENTSOITVERSUNESCALIEROUVERSUNEZONEÌCIRCULATION
intense.
1.)NSTALLERLABARRIÒRESELONLESINSTRUCTIONS
2.$ÏTERMINERDANSQUELSENSVOUSSOUHAITEZEMPÐCHERLABARRIÒRE
de s’ouvrir.
3.&IXERLECONTRÙLEDARRÐTAAUGUIDESUPÏRIEURB, avec l’aplat du
CONTRÙLEDARRÐTORIENTÏDUCÙTÏOUSESITUELEDANGELESENSDANS
LEQUELVOUSSOUHAITEZEMPÐCHERLABARRIÒRESESOUVRIR
4.,EMÏCANISMEOPTIONNELDECONTRÙLEDOUVERTURENEDEVRAITPAS
ÐTREUTILISÏENREMPLACEMENTDUMÏCANISMEDEVERROUILLAGENon
CONUPOURVERROUILLEROUFERMERLABARRIÒRE
'ARDERTOUJOURSLEMÏCANISMEDEVERROUILLAGESOLIDEMENTENGAGÏ
LORSQUELABARRIÒREESTUTILISÏE2ETIRERLABARRIÒREDELOUVERTURE
LORSQUELLENESTPASUTILISÏE
A
B
8. !MENERLABARRIÒREENPOSITIONFERMÏEETGLISSERLESPANNEAUXDEBARRIÒREJUSQUACE
QUELABARRIÒRETOUCHELECÙTÏVERROUDELASURFACEDEMONTAGE
9. !SSUREZVOUSQUELEHAUTDELABARRIÒREESTDENIVEAUAVECLEPLANCHERUTILISERUNCRAYONE
pour marquer soigneusement l’emplacement des trous pour le bo
î
tier du verrou D.
10. $ÏPLACERLABARRIÒREPOURQUELLENOBSTRUEPASETENLEVERLEBO
î
tier du verrou.
)NSTALLATION
11. 0ERCERLESTROUSTELQUINDIQUÏALÏTAPE!LAIDEDESBONNESVISVOIRÉtape 5), fixer
solidement le boîTIERDUVERROUSUPÏRIEURÌLASURFACEDEMONTAGE
12. 'LISSERLEBOîTIERDUVERROUINFÏRIEURPARDESSUSLEGUIDEINFÏRIEURDELABARRIÒRE
13. !LAIDEDUNCRAYONMARQUESOIGNEUSEMENTLEMPLACEMENTDESTROUSPOURBOîtier du
VERROUINFÏRIEUR
14. /UVRIRETDÏPLACERLABARRIÒREPOURQUELLENOBSTRUEPAS%NLEVERLEBOîtier du verrou
INFÏRIEURDUGUIDE
15. 0ERCERLESTROUSTELQUINDIQUÏALÏTAPE!LAIDEDESBONNESVISVOIRÉtape 5), fixer
solidement le boîTIERDUVERROUINFÏRIEURÌLASURFACEDEMONTAGE
16. 0OURFERMERLABARRIÒREPLACERLEGUIDEINFÏRIEURDANSLEBOîTIERDUVERROUINFÏRIEUR
Tout en pressant le verrou CINSÏREZLEDANSLEBOîTIERDUVERROUSUPÏRIEURD.
17. 4ESTERLABARRIÒRE
s6ÏRIlERQUECHAQUEBARREAUESTBIENlXÏAUXBARRESSUPÏRIEUREETINFÏRIEURE
s3ECOUERLABARRESUPÏRIEUREDELABARRIÒREASSEMBLÏEPOURVÏRIlERQUECELLECIEST
MONTÏEENTOUTESÏCURITÏ
s Laver la barrière à l’eau tiède et au savon neutre. La sécher complètement avant l’usage.
s Les pièces en métal et en plastique peuvent être nettoyées avec un chiffon doux humide et séchées avec un chiffon doux. .%0!3
utiliser de détergents abrasifs ou de solvants.
s À l’occasion, une goutte d’huile végétale peut réduire l’usure des pièces mobiles.
%NTRETIENETNETTOYAGE
'ARANTIE,IMITÏE
%VENmOGARANTITCE0RODUITYCOMPRISLESACCESSOIRESÌLUTILISATEURlNALDORIGINEi!CHETEURwCONTRETOUTDÏFAUTDEMATÏRIAU
OUDEFABRICATIONPOURUNEPÏRIODEDEQUATREVINGTDIXJOURSÌPARTIRDELADATEDELACHATINITIALDECEPRODUIT,ASEULE
RESPONSABILITÏD%VENmOSOUSLESTERMESDECETTEGARANTIEEXPLICITELIMITÏEESTDERÏPAREROUDEREMPLACERÌSADISCRÏTIONTOUT
0RODUITQUILJUGERAÐTREDÏFECTUEUXETQUISERADÏTERMINÏPAR%VENmOÐTRECOUVERTSOUSLESTERMESDECETTEGARANTIE
,ARÏPARATIONOULEREMPLACEMENTSOUSLESTERMESDECETTEGARANTIEESTLESEULRECOURSDEL!CHETEUR,APREUVEDACHATSOUSLA
FORMEDUNEFACTUREOUDUNCONTRATDEVENTEPROUVANTQUELEPRODUITESTTOUJOURSSOUSLAPÏRIODEDEGARANTIEDOITÐTREFOURNIE
POUROBTENIRLESERVICEDEGARANTIE#ETTEGARANTIEEXPLICITELIMITÏEESTACCORDÏE%8#,53)6%-%.4PAR%VENmOÌL!CHETEURINITIALDE
CE0RODUITETNEPEUTÐTREATTRIBUÏENITRANSFÏRÏEAUXACHETEURSOUUTILISATEURSULTÏRIEURSDECE0RODUIT0OURLESERVICEDEGARANTIE
VEUILLEZCONTACTERLECENTREi0ARENT,INK#ONSUMER2ESOURCE#ENTERwD%VENmOAU937-773-3971 ou www.evenflo.com.
°,%8#%04)/.$%#%15)%34).4%2$)40!2,!,/)!00,)#!",%4/54%'!2!.4)%)-0,)#)4%$%6!,%52#/--%2#)!,%/5
$!$!04!4)/.°5.53!'%0!24)#5,)%2$%#%02/$5)4%34%8#,5%%6%.&,/.%3%2!0!34%.50/522%30/.3!",%
0/524/53$/--!'%3!##%33/)2%3).$)2%#4330³#)!58/5$/--!'%3).4³2´43$%15%,15%3/24%15%#%3/)4
0/52-!.15%-%.4°4/54%'!2!.4)%%80,)#)4%,)-)4³%$%#%02/$5)4/54/54%'!2!.4)%)-0,)#)4%3/53%.4%.$5%
0!2,!,/)!5#5.%!542%'!2!.4)%.%#/562%#%02/$5)4°,%8#%04)/.$%,!'!2!.4)%%80,)#)4%,)-)4³%
#)02³3%.4³%!5#5.%!542%'!2!.4)%.%#/562%#%02/$5)4%44/54%2%02³3%.4!4)/./2!,%³#2)4%/5%80,)#)4%
$%15%,15%3/24%15%#%3/)4%34%8#,5%0!2,!02³3%.4%
-ÏCANISMEOPTIONNELDECONTRÙLEDOUVERTURE
A
0OUROUVRIRLABARRIÒRE
s 0RESSERLEVERROUAVERSLEHAUTPOURLEDÏBLOQUER
s &AIRECOULISSERLABARRIÒREENDIRECTIONDELAmÒCHEPOURLA
DÏGAGERDUBOÔTIERDUVERROUSUPÏRIEURB et du boîtier du
VERROUINFÏRIEURC;
s &AIREPIVOTERLABARRIÒREPOURLOUVRIR
)-0/24!.4 L’extrémité de la barre inférieure E est légèrement
plus longue que celle de la barre supérieure D. Avant d’essayer
d’ouvrir la barrière, s’assurer que la barre inférieure a bien été libérée.
&ONCTIONNEMENTDELABARRIÒRE
B
C
D
E
sWWWEVENmOCOMs#ANADAHÌHHEURENORMALEDEL%ST
s53!

sWWWEVENmOCOMsUSA: 1-800-233-5921, 8 AM – 5 PM E.T.
sCanada:sMéxico: 01-800-706-12-00
/