Page is loading ...

USER’S
MANUAL
TDP-225/ TDP-225W/ TDP-324/ TDP-324W Series
DIRECT THERMAL BAR CODE PRINTER

i
Contents
Copyright Declaration ....................................... i
1. Introduction ............................................ iv
1.1 Product Introduction ................................................................................... iv
2. Operations Overview ...................................... 1
2.1 Unpacking and Inspection .......................................................................... 1
2.2 Printer Overview ........................................................................................... 2
2.2.1 Front View ........................................................................................... 2
2.2.2 Interior View ........................................................................................ 3
2.2.3 Rear View ............................................................................................ 4
3. Setup .................................................. 5
3.1 Setting Up the Printer .................................................................................. 5
3.2 Loading the Media ........................................................................................ 5
3.2.1 Loading the Media ............................................................................. 5
3.2.2 Loading External Media (For TDP-225/324 model only) .............. 9
3.2.3 Loading Media in Peel-off Mode (Option) .................................... 11
3.2.4 Loading Media in Cutter Mode (Option) .......................................13
3.3 Diagnostic Tool ...........................................................................................15
3.3.1 Start the Diagnostic Tool ................................................................15
3.3.2 Printer Function (Calibrate sensor, Ethernet setup, RTC
setup………) ...............................................................................................16
3.4 Setting Ethernet by Diagnostic Utility (Option for TDP-225/324 model)
.............................................................................................................................17
3.4.1 Using USB interface to setup Ethernet interface........................17
3.4.2 Using Ethernet interface to setup Ethernet interface ................18
3.5 Install MicroSD Memory Card ...................................................................20
3.6 Mount the Printer on the Wall ...................................................................21
3.7 Using the PC USB Keyboard with Printer USB Host Interface (Factory
option for TDP-225W/324W model) ................................................................22
4. LED and Button Functions ................................. 23
4.1 LED Indicator ...............................................................................................23
4.2 Regular Button Function ...........................................................................23
4.3 Power on Utilities........................................................................................23
4.3.1 Gap/Black Mark Sensor Calibration ..............................................24
4.3.2 Gap/Black Mark Calibration, Self-test and Dump Mode ............25
4.3.3 Printer Initialization .........................................................................28

ii
4.3.4 Set Black Mark Sensor as Media Sensor and Calibrate the Black
Mark Sensor ...............................................................................................29
4.3.5 Set Gap Sensor as Media Sensor and Calibrate the Gap Sensor
29
4.3.6 Skip AUTO.BAS ................................................................................30
5. Troubleshooting ......................................... 31
5.1 LED Status ...................................................................................................31
5.2 Print Problem ..............................................................................................32
5.3 LCD display (Option for TDP-225/324 model) ........................................33
6. Maintenance ............................................ 34
Revise History ............................................ 36

i
Copyright Declaration
Information in this subject to change without notice and does not represent a commitment on
the part of TSC Auto ID Technology Co., Ltd.. No part of this manual may be reproduced or
transmitted in any form by any means, for any purpose other than the purchaser’s personal
use, without the expressed written permission of TSC Auto ID Technology Co., Ltd..

ii
Agency Compliance and Approvals
EN 55032, Class B
EN 55024
EN 60950-1
EN 61000-3-2
EN 61000-3-3
FCC part 15B, Class B
ICES-003, Class B
This equipment has been tested and found to comply with the limits for a Class B
digital device, pursuant to part 15 of the FCC Rules. These limits are designed to
provide reasonable protection against harmful interference in a residential
installation. This equipment generates, uses and can radiate radio frequency energy
and, if not installed and used in accordance with the instructions, may cause harmful
interference to radio communications. However, there is no guarantee that
interference will not occur in a particular installation. If this equipment does cause
harmful interference to radio or television reception, which can be determined by
turning the equipment off and on, the user is encouraged to try to correct the
interference by one or more of the following measures:
-Reorient or relocate the receiving antenna.
-Increase the separation between the equipment and receiver.
-Connect the equipment into an outlet on a circuit different from that to which
the receiver is connected.
-Consult the dealer or an experienced radio/ TV technician for
help.
This device complies with Part 15 of the FCC Rules. Operation is
subject to the following two conditions: (1) This device may cause
harmful interference, and (2) this device must accept any interference
received, including interference that may cause undesired operation.
This Class B digital apparatus complies with Canadian ICES-003.
Cet appareil numérique de la classe B est conform à la norme
NMB-003 du Canada.
AS/NZS CISPR 32, Class B
UL 60950-1(2nd Edition)
CSA C22.2 No. 60950-1-07(2nd Edition)
EN 60950-1

iii
GB 4943.1
GB 9254, Class B
GB 17625.1
Energy Star for Imaging Equipment Version 2.0
TP TC 004/2011
TP TC 020/2011
IS 13252(Part 1)/
IEC 60950-1
KN 22
KN 24
Note: There may have certification differences in the series models, please refer to product label for accuracy.
Important safety instructions:
1. Read all of these instructions and keep them for later use.
2. Follow all warnings and instructions on the product.
3. Disconnect the power plug from the AC outlet before cleaning or if fault happened.
Do not use liquid or aerosol cleaners. Using a damp cloth is suitable for cleaning.
4. The mains socket shall be installed near the equipment and easily accessible.
5. The unit must be protected against moisture.
6. Ensure the stability when installing the device, Tipping or dropping could cause damage.
7. Make sure to follow the correct power rating and power type indicated on marking label
provided by manufacture.
8. Please refer to user manual for maximum operation ambient temperature.
WARNING:
Hazardous moving parts, keep fingers and other body parts away.
CAUTION:
(For equipment with RTC (CR2032) battery or rechargeable battery pack)
Risk of explosion if battery is replaced by an incorrect type.
Dispose of used batteries according to the Instructions as below.
1. DO NOT throw the battery in fire.
2. DO NOT short circuit the contacts.
3. DO NOT disassemble the battery.
4. DO NOT throw the battery in municipal waste.
5. The symbol of the crossed out wheeled bin indicates that the battery should not be placed in
municipal waste.
Caution: The printhead may be hot and could cause severe burns. Allow the printhead to cool.
CAUTION:
Any changes or modifications not expressly approved by the grantee of this device could void
the user's authority to operate the equipment.

iv
1. Introduction
1.1 Product Introduction
Thank you for purchasing TSC bar code printer. Although the printer has a small footprint, it
delivers reliable, superior performance.
This printer provides direct thermal printing at user selectable speed of: 2.0, 3.0, 4.0 or 5.0 ips
for 203 dpi; 2.0, 3.0 or 4.0 ips for 300 dpi. It accepts roll feed, die-cut, and fan-fold media with
gap or black mark. All common bar codes formats are available. Fonts and bar codes can be
printed in 4 directions, 8 different alphanumeric bitmap fonts and built-in scalable font
capability. You will enjoy trouble free, high throughput for printing labels with this printer.

2. Operations Overview
2.1 Unpacking and Inspection
This printer has been specially packaged to withstand damage during shipping. Please
carefully inspect the packaging and printer upon receiving the bar code printer. Please retain
the packaging materials in case you need to reship the printer.
Unpacking the printer, the following items are included in the carton.
One printer unit
One Windows labeling software/Windows driver CD disk
One quick installation guide
One power cord
One auto switching power supply
One USB interface cable
If any parts are missing, please contact the Customer Service Department of your purchased
reseller or distributor.

2
2.2 Printer Overview
2.2.1 Front View
TDP-225/324 model
TDP-225W/324W model
1. Top cover open lever
2. MicroSD card socket
3. Media view window
4. LED indicator
5. Feed button
6. Paper exit chute
7. LCD display (Option for TDP-225/324 model)
* Recommended MicroSD card specification.
SD card spec
SD card capacity
Approved SD card manufacturer
V1.0, V1.1
MicroSD 128 MB
Transcend, Panasonic
V1.0, V1.1
MicroSD 256 MB
Transcend, Panasonic
V1.0, V1.1
MicroSD 512 MB
Transcend, Panasonic
V1.0, V1.1
MicroSD 1 GB
Transcend, Panasonic
V2.0 SDHC CLASS 6
MicroSD 4 GB
Transcend
- The DOS FAT file system is supported for the SD card.
- Folders/files stored in the SD card should be in the 8.3 filename format
1
3
4
5
2
6
1
3
4
5
2
6
7

3
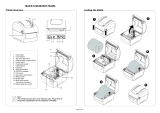
2.2.2 Interior View
1. Top cover
2. Media holder
3. Media guide
4. Printhead
5. Gap sensor (receiver)
6. Gap sensor (transmitter)
7. Platen roller
8. Black mark sensor
9. Media holder lock switch
7
6
5
4
1
8
3
2 (TDP-225/324
model)
2 (TDP-225W
/324W model)
9

4
2.2.3 Rear View
TDP-225/324 model
TDP-225W/324W model
1. Power switch
2. Power jack socket
3. USB interface
4. RS-232C interface
5. Fan-fold paper entrance chute
6. Ethernet interface (Option for TDP-225/324 model)
7. USB host (Factory option for TDP-225W/324W model)
Note:
The interface picture here is for reference only. Please refer to the product specification for the
interfaces availability.
1
4
3
2
5
6
1
3
2
7

5
3. Setup
3.1 Setting Up the Printer
1. Place the printer on a flat, secure surface.
2. Make sure the power switch is set to “off”.
3. Connect the printer to the computer with the provided USB cable.
4. Plug the power cord into the AC power cord socket at the rear of the printer, and then plug
the power cord into a properly grounded power outlet.
Note: Please switch OFF printer power switch prior to plug in the power cord to printer power jack.
3.2 Loading the Media
3.2.1 Loading the Media
1. Open the printer top cover by pulling the tabs located on each side towards the front of the
printer, and then lift the top cover to the maximum open angle.
2. The media holder can be used for 1” and 1.5” media core by rotating the upper part of
label holder 180 degrees clockwise. (For TDP-225/324 model only)
1.5”
1”

6
3. Separate the media holders to the label roll width.
TDP-225/324 model
TDP-225W/324W model
4. Place the roll between the holders and close them onto the core.
TDP-225/324 model
TDP-225W/324W model
5. Place the paper, printing side face up, through the media guides, media sensor and place
the label leading edge onto the platen roller.
TDP-225/324 model
TDP-225W324W model
Media guides
Platen roller
Sensor

7
6. Close the top cover gently and make sure the cover latches securely.
TDP-225/324 model
TDP-225W/324W model
7. Use “Diagnostic Tool” to set the media sensor type and calibrate the selected sensor.
(Start the “Diagnostic tool” Select the “Printer Configuration” tab Click the “Calibrate
Sensor” button)


9
3.2.2 Loading External Media (For TDP-225/324 model only)
1. Open the printer’s top cover and separate the media holders to fit the media width.
2. Press down the media holder lock switch to fix the media holder.
3. Feeds the media through the rear external label entrance chute. And place the paper,
printing side face up, through the media guides, media sensor and place the label leading
edge onto the platen roller.
4. Close the top cover gently.
5. Use “Diagnostic Tool” to set the media sensor type and calibrate the selected sensor.
(Start the “Diagnostic tool” Select the “Printer Configuration” tab Click the “Calibrate
Sensor” button)
Note: Please calibrate the gap/black mark sensor when changing media.
Rear external
label entrance

10

11
3.2.3 Loading Media in Peel-off Mode (Option)
1. Refer to section 3.2.1 to load the media.
2. Open the top cover and peel-off panel after calibrated the sensor.
3. Lead the media through the backing paper opening, beneath the peel-off roller.
4. Push the peel-off panel back to the printer.
Peel-off panel
Peel-off roller
Backing paper opening

12
5. Close the top cover gently.
6. Press the FEED button to test.
Note:
Please calibrate the gap/black mark sensor when changing media.
Backing paper (Liner)

13
3.2.4 Loading Media in Cutter Mode (Option)
1. Refer to section 3.2.1 to load the media.
2. Lead the media through the cutter paper opening.
3. Close the top cover gently.
4. Use “Diagnostic Tool” to set the media sensor type and calibrate the selected sensor.
(Start the “Diagnostic tool” Select the “Printer Configuration” tab Click the “Calibrate
Sensor” button)
Cutter paper opening
/