
PerfectLum
USER’S MANUAL

TABLE OF CONTENTS
I. GETTING STARTED
1.1 Introduction
1.2. Minimum system requirements
1.2.1. PerfectLum client is supported on the following operating systems:
1.2.2. PerfectLum Remote server is supported on the following operating systems:
1.2.3. Your web browser should be one of the following:
1.3. Hardware requirements
1.3.1. Displays and Graphic boards
1.4. Installation Procedure Overview
1.4.1. Pre-installation conditions
1.4.2. Installation
1.4.3. Measurement Device Installation
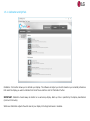
1.5. The Main Window
1.5.1. Calibration and QA Tab
1.5.2. Scheduler Tab
1.5.3. History Tab
1.6. Do my first calibration
1.7. Do my first QA Acceptance test
II. PREFERENCES
2.1. Application Settings:
2.1.1. Language:
2.1.2. Software Update:
2.1.3. Password Protection:
2.1.4. Export/Import Common Settings:
2.1.5. Backup/Recover:
2.2. Workstation Settings:
2.2.1. Workstation name:
2.2.2. Ambient light:

2.2.3. Task Delay:
2.2.4. Sleep Mode:
2.3. Calibration Settings:
2.3.1. Calibration Type:
2.3.2. Color Temperature:
2.3.3. Gamut:
2.3.4. White Level:
2.3.5. Black Level:
2.3.6. ICC/ICM Profile
2.4. QA Settings:
2.4.1. Regulation:
2.4.2. Import Acceptance Values
2.4.3. Workstation Location:
2.4.4. Person Responsible:
2.5. Remote and Network Settings:
2.5.1. Enable Remote:
2.5.2. Remote Database Synchronization:
2.5.3. Proxy Server:
III. LICENSE AND LICENSING
3.1. Remote License:
3.2. PerfectLum Suite License:
IV. DISPLAY SETTINGS
4.1. Ignore Display:
4.2. LUT Upload:
4.3. Used Sensor:
4.4. Sensor Correlation:
4.5. Display Model:
4.6. Display Serial Number:
4.7. Display Manufacturer:
4.8. Inventory number:

4.9. Type of Display:
4.10. Display Technology:
4.11. Screen Size:
4.12. Resolution (h/v):
4.13. Backlight Stabilization:
4.14. Installation Date:
V. REGISTRATION
5.1. Free and Additional Features
5.2. Licenses Functionality
5.3. License Activation
VI. PERFECTLUM SUITE MENU ITEMS
6.1. Software Update
6.2. About us
6.3. Measure Color
6.4. Display Test-Pattern
6.5. 3D Gamut Viewer
6.6. Notification
6.7. Report
VII. OTHER
7.1.Matching Multiple Displays
7.2. Mass Installation of PerfectLum Suite version 3
7.3. PerfectLum Remote: System Administrator Guide
7.4. Acronyms
7.5. Qubyx Software License Agreement

I. GETTING STARTED
1.1. Introduction
When it comes to medical imaging, the ability to see the whole image is important. With a standard workstation configuration using
an uncalibrated display, the user runs the risk of missing fine details. Missing fine details can represent a health risk to the patient, which
may lead to a misdiagnosis or an expensive lawsuit. The problem is not the image or the practitioner’s eye; it is the ability of the display
to represent all information accurately.
PerfectLum Suite is a software solution which enables the user to modify display output to meet DICOM part 14 GSDF and other
key industry standards. After calibration your workstation will allow you to see the finest details of every image displayed. With
PerfectLum Suite medical display calibration software installed on all of your computers, you are assured that no matter which image you
are looking at, it will be the same on every display.
PerfectLum Suite is not only a DICOM calibration tool, but also a medical monitor QA application, that verifies the display’s
conformance to medical standards AAPM TG18, DIN 6868-57, DIN 6868-157, JESRA X-0093, IEC 62563-1, the New York state Primary
Diagnostic Monitor (PDM) Quality Assurance Program and performs acceptance and conformance tests for these standards.
This document provides details on installation and use of the PerfectLum Suite application.
About PerfectLum Suite
PerfectLum Suite is a medical monitor quality assurance suite based on the medical standards NEMA DICOM part 14 GSDF, AAPM
TG18, DIN 6868-57, DIN 6868-157, JESRA X-0093, IEC 62563-1 and NY PDM. The medical monitor QA tool performs calibration,
acceptance test, conformance test and maintains consistency to all medical workstations. The use of this software enables healthcare
professionals to maintain international standards of quality in terms of their displays performance.

PerfectLum Suite Features
● Calibration of all displays to DICOM part 14 GSDF, CIE L*, BT.709 and BT.1886 standard
● Update of video card LUT or display LUT for displays that comply with the DDC/CI standard
● Calibration of multi-head display systems
● White level and black level calibration
● Version 4 ICC profile generation
● Calibration to a certain color temperature and XY coordinates
● Verification of conformance to the major regulations: AAPM TG18, DIN 6868-57, DIN 6868-157, JESRA X-0093, IEC
62563-1 and the New York state Primary Diagnostic Monitor (PDM) Quality Assurance Program
● Automated QA - performing acceptance and conformance tests
● Scheduling conformance test automatically and reminders to perform tests
● Remote quality control
● Convenient and user-friendly calibration and QA reports
● Color measurement capability
● Diversified auto backup
● History log for comparing and checking results of calibrations
● Briggs, SMPTE, AAPM test patterns to visually check calibration results
● Wide OS compatibility, including Windows 10 and Mac OS X 10.9.4
● Many brands of photometer support
● License supports all users on the installed workstation

1.2. Minimum system requirements
1.2.1.PerfectLum client is supported on the following operating systems:
● Windows:
○ Vista (32-bit and 64-bit)
○ Win 7 (32-bit and 64-bit)
○ Win 8 (32-bit and 64-bit)
○ Win 10 (32-bit and 64-bit)
Processor: Pentium or AMD K7
Minimum RAM: 512MB.
Minimum free space on hard disk: 150 MB.
● Mac OS X
○ 10.7+
Processor: Intel only. No PowerPC support.
Minimum RAM: 512MB.
Minimum free space on hard disk: 150 MB.
1.2.2. PerfectLum Remote server is supported on the following operating systems:
● Windows hosts:
○ Windows XP, all service packs (32-bit)

○ Windows Server 2003 (32-bit)
○ Windows Vista (32-bit and 64-bit).
○ Windows Server 2008 (32-bit and 64-bit)
○ Windows Server 2012
○ Windows 7 (32-bit and 64-bit)
○ Windows 8 (32-bit and 64-bit)
○ Windows 8.1 (32-bit and 64-bit)
● Mac OS X hosts:
○ 10.6 Snow Leopard (Intel 32-bit and Intel 64-bit)
○ 10.7 Lion
○ 10.8 Mountain Lion
○ 10.9 Mavericks
○ 10.10 Yosemite
● Linux hosts (32-bit and 64-bit). Among others, this includes:
○ Ubuntu 6.06 ("Dapper Drake"), 6.10 ("Edgy Eft"), 7.04 ("Feisty Fawn"), 7.10 ("Gutsy Gibbon"), 8.04 ("Hardy Heron"), 8.10
("Intrepid Ibex"), 9.04 ("Jaunty Jackalope"), 9.10 ("Karmic Koala"), 10.04 ("Lucid Lynx"), 10.10 ("Maverick Meerkat), 11.04
("Natty Narwhal"), 11.10 ("Oneiric Ocelot"), 12.04 ("Precise Pangolin"), 12.10 ("Quantal Quetzal"), 13.04 ("Raring Ringtail"),
13.10 ("Saucy Salamander"), 14.04 ("Trusty Tahr")
○ Debian GNU/Linux 3.1 ("sarge"), 4.0 ("etch"), 5.0 ("lenny"), 6.0 ("squeeze"), 7.0 (“Wheezy”)
○ Oracle Enterprise Linux 4 and 5, Oracle Linux 6
○ Red Hat Enterprise Linux 4, 5 and 6
○ Fedora Core 4 to 20
○ Gentoo Linux
○ SUSE Linux 9, 10 and 11, openSUSE 10.3, 11.0, 11.1, 11.2, 11.3, 11.4, 12.1, 12.2, 12.3, 13.1
○ Mandriva 2007.1, 2008.0, 2009.1, 2010.0 and 2010.1
1.2.3. Your web browser should be one of the following:
• Mozilla Firefox, version 3.5 or higher
• Safari, version 4 or higher
• Google Chrome, version 3 or higher
• Internet Explorer 8 or higher

1.3. Hardware requirements
1.3.1. Displays and Graphic boards:
- All LCD, CRT Displays and Projectors
- All currently commercially available graphic boards
1.4. Installation Procedure Overview
1.4.1. Pre-installation conditions:
In order to install PerfectLum Suite client you must have Administrator privileges or Administrator’s password if required when
installing to the user profile.
Before installing PerfectLum Suite software in your system:
Power on the workstation with all display(s) attached that you intend to use.
Check if the screen settings are correctly configured:
Vista - Go to Settings -> Control panel and click on “Adjust screen resolution” under the
Appearance and Personalisation Icon.
Windows 7, 8, 10 – Go to Control panel -> Display -> Adjust resolution.
Mac OS X - System Preferences -> Displays and choose resolution radio box “Best for display”.
Ensure that the screen resolution is set to the native resolution of the display with color quality of 32 bit “True color” or higher.
Ensure that the correct graphics card display driver is installed.
Repeat these checks for each display attached to your system.
Your system is now ready to start the installation process.

IMPORTANT: Before starting the installation process, please make sure that the USB measurement device is NOT connected. The
measurement device will be added later, after PerfectLum Suite is successfully installed.
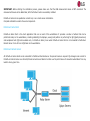
PerfectLum Suite can be operated as a client only or as a client-server combination.
Complete installation consists of several components.
PerfectLum Suite Client
PerfectLum Suite Client is the client application that runs on each of the workstations. It provides a number of actions that can be
performed locally on the workstations, including calibrating the displays, viewing test patterns or performing full QA (Quality Assurance)
and acceptance tests (QA tests available only in PerfectLum Suite). Even when PerfectLum Suite Client is not connected to PerfectLum
Remote Server it can still run all QA tasks on the workstation.
PerfectLum Remote Server
All PerfectLum Suite clients can be connected to PerfectLum Remote Server. No special license is required. QA managers can connect to
PerfectLum Remote Server via internet/intranet connection and take full control over the performance of connected workstations from any
location at any given time.

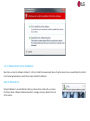
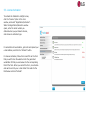
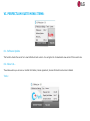
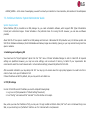
1.4.2. Installation
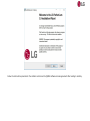
Windows Vista/7/8/10:
Double click on the installer:

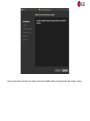
Follow the instructions presented in the installer and click on the QUBYX software license agreement after reading it carefully.

If you don’t want to install PerfectLum Suite into the default directory, browse your computer and choose another one.
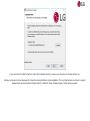
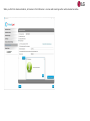
Windows will present a driver message for a few times during PerfectLum Suite installation. This is normal behavior as drivers to support
measurement devices are loaded. Please click the „Install this driver software anyway
‟
button when prompted.

1.4.3. Measurement Device Installation
Now that you have the software installed, it is time to install the measurement device. Plug the device into an unused USB port and refer
to the following depending on which OS you have installed the software:
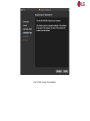
Vista to Windows 10
Vista and Windows 7 will automatically install your device driver. Wait until you receive
the “Device driver software installed successfully‟ message, and jump ahead to the end
of this section.

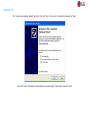
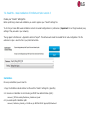
Windows XP:
The “Found new Hardware Wizard” will start. Click the “Yes, this time only” radio button followed by “Next”.
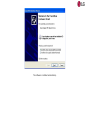
Check the “Install the Software Automatically (Recommended)” radio button and click “Next”.

The software is installed automatically.

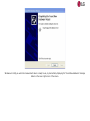
When all drivers have been loaded and configured, the wizard will prompt you to click on the “Finish” button.

Windows will notify you when the measurement device is ready to use, by momentarily displaying the “Found New Hardware” message
balloon in the lower right corner of the screen.

Mac OS:
Double click on the installer
Proceed by double clicking on the “box”.

Page is loading ...
Page is loading ...
Page is loading ...
Page is loading ...
Page is loading ...
Page is loading ...
Page is loading ...
Page is loading ...
Page is loading ...
Page is loading ...
Page is loading ...
Page is loading ...
Page is loading ...
Page is loading ...
Page is loading ...
Page is loading ...
Page is loading ...
Page is loading ...
Page is loading ...
Page is loading ...
Page is loading ...
Page is loading ...
Page is loading ...
Page is loading ...
Page is loading ...
Page is loading ...
Page is loading ...
Page is loading ...
Page is loading ...
Page is loading ...
Page is loading ...
Page is loading ...
Page is loading ...
Page is loading ...
Page is loading ...
Page is loading ...
Page is loading ...
Page is loading ...
Page is loading ...
Page is loading ...
Page is loading ...
Page is loading ...
Page is loading ...
Page is loading ...
Page is loading ...
Page is loading ...
Page is loading ...
Page is loading ...
-
 1
1
-
 2
2
-
 3
3
-
 4
4
-
 5
5
-
 6
6
-
 7
7
-
 8
8
-
 9
9
-
 10
10
-
 11
11
-
 12
12
-
 13
13
-
 14
14
-
 15
15
-
 16
16
-
 17
17
-
 18
18
-
 19
19
-
 20
20
-
 21
21
-
 22
22
-
 23
23
-
 24
24
-
 25
25
-
 26
26
-
 27
27
-
 28
28
-
 29
29
-
 30
30
-
 31
31
-
 32
32
-
 33
33
-
 34
34
-
 35
35
-
 36
36
-
 37
37
-
 38
38
-
 39
39
-
 40
40
-
 41
41
-
 42
42
-
 43
43
-
 44
44
-
 45
45
-
 46
46
-
 47
47
-
 48
48
-
 49
49
-
 50
50
-
 51
51
-
 52
52
-
 53
53
-
 54
54
-
 55
55
-
 56
56
-
 57
57
-
 58
58
-
 59
59
-
 60
60
-
 61
61
-
 62
62
-
 63
63
-
 64
64
-
 65
65
-
 66
66
-
 67
67
-
 68
68


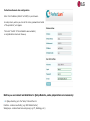
Ask a question and I''ll find the answer in the document
Finding information in a document is now easier with AI
Related papers
Other documents
-
Gossen MetraWatt PerfectLum Operating instructions
-
BenQ PH550 User manual
-
HP DesignJet Z3100 Photo Printer series User guide
-
-
Barco MediCal Administrator User guide
-
NEC GammaCompMD QA User manual
-
KaVo ProXam Constancy Test DIN 6868-5EN Operating instructions
-
Barco QAWeb Enterprise User guide
-
-