Page is loading ...

1
MIXER AMPLIFIER
CVA60U and CVA120U

2
IMPORTANT SAFETY INFORMATION
Please read these instructions carefully before use and retain for future reference.
• When using electrical appliances basic safety precautions should always be
followed.
• Check the condition of the mains lead before use.
• There are no user serviceable parts inside. Do not open the casing.
• Check that the voltage indicated on the rating plate corresponds with that of the
local network before connecting to the mains power supply.
• Do NOT connect this device to the power source, before the system is fully and
correctly wired.
• The device is not completely disconnected from power source when it is switched
to “OFF”.
• For safety, please disconnect the device from the mains power if it is not in use or
any connections to the speaker outputs are required or before any component is
removed from or re-installed to the device or before any electrical connector to the
device is disconnected or reconnected.
• Do not expose the unit to rain or moisture or liquids of any sort, as doing so may
result in damage.
• Do not install near heat sources such as radiators, ovens, or other devices that
produce heat.
• Install in a well ventilated space to allow good heat dissipation.
• Never block the cooling vents.
• Do not operate in locations where excessive vibration or high dust levels are
prevalent.
• If the unit is not in use for a long period of time, switch the power off and
disconnect from the power supply.
• Before cleaning, switch off the power and disconnect from the power supply.

3
FEATURES
WHATs IN THE BOX
• Three working modes: Bluetooth, USB, and AUX.
• Wireless play function.
• Signal level indicator, clipping indicator and protection indicator.
• 100V RMS priority LINE IN, normal signal priority LINE IN, and microphone priority
LINE IN.
• 2 MIC IN, 1 channel with phantom power, and 1 channel with priority.
• 2 LINE IN, 1 channel with RCA, and 1 channel with XLR.
• 2 outputs, 1 channel 100V constant voltage amplier output, and 1 channel 1V
RMS AUX OUT.
• Three level priority, PRIORITY IN on the rear panel with the highest priority,
PRIORITY MIC1 with the second level priority, others with the lowest priority.
• Overload, short circuit, and temperature protection function, and with temperature
controlled fan.
• Master volume control; independent volume control for MIC and LINE
• Treble and bass tone controls.
• Remote control operation.
• Amplier Unit 1 item
• User Manual 1 copy
• 1.8m Power Cord 1 item
• Remote Controller 1 item
• 2P Green Plug 5 items
• 1500MM Audio Cable 1 item

4
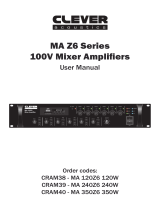
PRODUCT OVERVIEW
MP9312U Mixer Amplifier SIG CLIP PRO
010
MIC1 MIC2/AUX1
010
AUX2
010
BASS
-10 +10
TREBLE
-10 +10
MASTER
010 ON OFF
USB M
1 2 345678
9 10 11 12 13 14 15 16 17
SIG CLIP PRO
010
MIC1 MIC2/AUX1
010
AUX2
010
BASS
-10 +10
TREBLE
-10 +10
MASTER
010
ON OFF
USB M
1 2 345678
9 10 11 12 13 14 15 16 17
PRIORITY MIC1
1. MIC1 IN with the second priority
2. MIC1 Volume - Adjust MIC1 only volume. Turn clockwise to turn up the volume,
and counter clockwise to turn down the volume.
3. MIC2/AUX1 Volume - Adjust MIC2/AUX1 only volume. Turn clockwise to turn up
the volume, and counter clockwise to turn down the volume.
4. AUX2 Volume - Adjust AUX2 only volume. Turn clockwise to turn up the volume,
and counter clockwise to turn down the volume.
5. Bass Control - Take the central position as the reference. Turn clockwise to turn up
the bass, and counter clockwise to turn down the bass.
6. Treble Control - Take the central position as the reference. Turn clockwise to turn
up the treble, and counter clockwise to turn down the treble.
7. Master Volume - Adjust all channel signal levels. Turn clockwise to turn up the
volume, and counter clockwise to turn down the volume.
8. Power Switch.
9. Signal Level Indicator (SIG).
10. Clipping Indicator (CLIP).
11. Protection Indicator (PRO).
12. Digital Display Screen - Display the current mode status.
13. USB Port - Insert the USB ash disk here to provide programs for the built-in MP3.
14. Mode Switching Button - Can switch to BLUE mode, USB mode and AUX mode.
15. Play/Pause Button - In USB mode and Bluetooth mode, it is a Play/Pause button;
while in AUX mode, it is a MUTE button.
16. Previous Button - Press the button to switch to the “previous” track, and long press
the button to turn down the volume.
17. Next Button - Press the button to switch to the “next” track, and long press the
button to turn down the volume.
Front Panel
Mixer Amplier

5
OPERATION
OUTPUT
100V
COM
LINE
LINE2 IN LINE1/MIC2 IN
SELECT
LINE1
GND IN GND 100V
INPUT PRIORITY
MIC2
LINE OUTAC220-50Hz
AC POWER
MIN MAX
PP
INPUT PRIORITY
VOLUME
1 2 3456
7
89
Rear Panel
1. AC220V POWER IN - Connect the working power source. When connecting, rst
connect the plug on the machine, and then connect it to the power source.
2. Fan Cooling Window
3. Speaker OUT
4. LINE1 /MIC2 IN - Can connect MIC and other external audio sources.
5. LINE1/PP/MIC2 - Audio source selection. Slide left or right to select AUX1 or MIC2
or MIC2(PP) with phantom power.
Note: In the PP position, only microphones driven by phantom power can be
connected, and no other signal sources can be connected.
6. Two inputs with the highest priority
7. Volume control for two inputs with the highest priority
8. AUX2 IN
9. 1VRMS AUX OUT
Bluetooth Mode
• Press the “MODE” button on the panel of the machine to enter the Bluetooth
pairing mode, the digital screen will display BL. and the “.” will ash until a
successful pairing is obtained.
• Turn on the Bluetooth pairing of the device to be connected and search for the
mixer amp device name. If required use passcode ”0000” to complete.
• The audio source les in the connected device can be played after the pairing is
successful.
USB Mode
• When the USB ash memory stick is inserted, it will automatically switch to the
USB mode (plug and play), and the amplier will play any tracks in MP3 format.
AUX Mode
• The auxiliary in mode is the default mode of this system. When the USB ash
memory is not inserted, and the Bluetooth is not connected.
• The digital screen displays AUX after power-on.

6
REMOTE CONTROL OPERATION
1
2
4
7
8
10
3
5
6
9
11
12
1. Power on button.
2. Mode button - switch between input sources.
3. Mute button - press this button once, and the content displayed on the LED will
ash while muted and press again to cancel the mute.
4. MP3 play/pause button, tuner memory channel call button: press this button
repeatedly to select the memorized channel progressively in order.
5. MP3 previous song selection button, radio backward channel selection button.
6. MP3 next song selection button, radio forward channel selection button.
7. EQ: Under MP3 output mode, with the Classical mode, Jazz mode, Rock mode,
Bass mode and Pop mode. This button is also used for calling memorized channel
by tuner.
8. VOL- MP3/TUNER volume decrease button.
9. VOL+ MP3/TUNER volume increase button.
10. 0-9 numerical keys: They are used to input the serial number of MP3 chapter and
memorizing number of tuner channel.
11. U/SD: It is used by tuner to search the memorized channel automatically.
12. RPT: Selection of MP3 repeat mode including repeat one and repeat all.

7
SPECIFICATION
Model CVA120U CVA60U
Rated Output Power
120W
(Note: Please use
a constant voltage
speaker within the
power range)
60W
(Note: Please use
a constant voltage
speaker within the
power range)
Rated Output
Voltage 100V
Sensitivity
MIC1 IN 0.005 (±1mV)
MIC2 IN 0.006 (±1mV)
LINE1 IN, LINE2 IN
PRIORITY IN 0.3 (±20mV) VRMS
PRIORITY IN-100V 100 VRMS
SNR
MIC1, MIC2
LINE1 IN ≥74db (MAX.)
LINE2 IN,INPUT
PRIORITY ≥80dB (MAX.)
Frequency Range 80Hz-15kHz (±3dB)
THD ≤0.5%
(1K under normal working condition)
Voltage AC220V/50Hz
Tone Bass ±10dB (100Hz)
Treble ±10dB (10kHz)
Rated Power
Consumption 150W 75W
Dimensions
(L×W×H) 200×190×44mm
Net Weight 1.5kg
Gross Weight 2kg

8
INFORMATION ON WASTE DISPOSAL FOR CONSUMERS OF ELECTRICAL &
ELECTRONIC EQUIPMENT.
When this product has reached the end of its life it must be treated as Waste Electrical & Electronic
Equipment (WEEE). Any WEEE marked products must not be mixed with general household waste,
but kept separate for the treatment, recovery and recycling of the materials used. Contact your local
authority for details of recycling schemes in your area.
Man Rev 1.0
CLEANING AND MAINTENANCE
• When cleaning, use a soft dry cloth to remove any dust that may have
accumulated.
• Use a damp cloth and a small amount of liquid detergent if necessary.
• Do not use any chemicals, abrasives or solvents that could damage the unit.
Made in China
PR2 9PP
PO Box 13362 Dublin 2
/