Page is loading ...

3A2012J
Instructions - Parts
FRP Proportioner
Low emission internal/external mix gel coat and chop proportioners. For use with resin
and catalyst in hazardous and non-hazardous locations.
For professional use only.
See page 4 for model and agency approvals information. See page 83 for maximum working pressure and other
specifications. For patent information, see www.graco.com/patents.
Important Safety Instructions
Read all warnings and instructions in this manual and
all component manuals. Save all instructions.
WARNING
FIRE AND EXPLOSION HAZARD
Oil left in the system at the factory can react with catalyst and create a fire or explosion.
• Flush before first use.
• Do not add catalyst to the catalyst reservoir until the system has been flushed.
Wall Mount SystemCart and Boom System
Cart System
ti18526c
ti18524d
ti18496b
EN
II 2 Gc T5

2 3A2012J
Contents
Related Manuals . . . . . . . . . . . . . . . . . . . . . . . . . . . 3
Agency Approvals . . . . . . . . . . . . . . . . . . . . . . . . . . 3
Models . . . . . . . . . . . . . . . . . . . . . . . . . . . . . . . . . . . 4
Accessories . . . . . . . . . . . . . . . . . . . . . . . . . . . . . . . 5
Warnings . . . . . . . . . . . . . . . . . . . . . . . . . . . . . . . . . 6
Important Methyl Ethyl Ketone Peroxide (MEKP)
Safety Information . . . . . . . . . . . . . . . . . . . . . . 8
Important Two-Component Material Information . 9
Material Self-ignition . . . . . . . . . . . . . . . . . . . . . . 9
Keep Resin and Catalyst Components Separate 9
Changing Materials . . . . . . . . . . . . . . . . . . . . . . . 9
Overview . . . . . . . . . . . . . . . . . . . . . . . . . . . . . . . . . 10
Component Identification . . . . . . . . . . . . . . . . . . 11
Air Control Panel . . . . . . . . . . . . . . . . . . . . . . . . 12
Air Motor and Resin Displacement Pump . . . . . 13
Catalyst Pump . . . . . . . . . . . . . . . . . . . . . . . . . . 14
Solvent Flush Systems . . . . . . . . . . . . . . . . . . . 15
Setup . . . . . . . . . . . . . . . . . . . . . . . . . . . . . . . . . . . . 16
Before Installation . . . . . . . . . . . . . . . . . . . . . . . 16
Location Requirements . . . . . . . . . . . . . . . . . . . 16
System Mounting (Wall Mount Systems Only) . 16
System Assembly . . . . . . . . . . . . . . . . . . . . . . . 18
Grounding . . . . . . . . . . . . . . . . . . . . . . . . . . . . . 20
Connect Fluid and Air Lines . . . . . . . . . . . . . . . 21
Flush Before First Use . . . . . . . . . . . . . . . . . . . 23
Fill Supply Tanks . . . . . . . . . . . . . . . . . . . . . . . . 23
Operation . . . . . . . . . . . . . . . . . . . . . . . . . . . . . . . . 24
Trigger Lock . . . . . . . . . . . . . . . . . . . . . . . . . . . 24
Boom Operation . . . . . . . . . . . . . . . . . . . . . . . . 24
Pressure Relief Procedure and Shutdown . . . . 24
Startup . . . . . . . . . . . . . . . . . . . . . . . . . . . . . . . 26
Prime . . . . . . . . . . . . . . . . . . . . . . . . . . . . . . . . 27
Flush . . . . . . . . . . . . . . . . . . . . . . . . . . . . . . . . . 30
Spray . . . . . . . . . . . . . . . . . . . . . . . . . . . . . . . . . 31
DataTrak Operation . . . . . . . . . . . . . . . . . . . . . 33
Replace DataTrak Battery or Fuse . . . . . . . . . . 38
Maintenance . . . . . . . . . . . . . . . . . . . . . . . . . . . . . . 39
Components . . . . . . . . . . . . . . . . . . . . . . . . . . . 39
Troubleshooting . . . . . . . . . . . . . . . . . . . . . . . . . . 40
Catalyst Pump . . . . . . . . . . . . . . . . . . . . . . . . . . 40
Resin Pump . . . . . . . . . . . . . . . . . . . . . . . . . . . 40
Repair . . . . . . . . . . . . . . . . . . . . . . . . . . . . . . . . . . . 42
General Information . . . . . . . . . . . . . . . . . . . . . . 42
Disconnect the Displacement Pump . . . . . . . . . 42
Reconnect the Displacement Pump . . . . . . . . . 43
Disconnect the Air Motor . . . . . . . . . . . . . . . . . . 44
Reconnect the Air Motor . . . . . . . . . . . . . . . . . . 44
Replace Pumpline . . . . . . . . . . . . . . . . . . . . . . . 46
Repair Catalyst Pump . . . . . . . . . . . . . . . . . . . . 47
System Parts . . . . . . . . . . . . . . . . . . . . . . . . . . . . . 50
Systems . . . . . . . . . . . . . . . . . . . . . . . . . . . . . . . 50
Carts . . . . . . . . . . . . . . . . . . . . . . . . . . . . . . . . . 55
Wall or Pole Mount Kit, 16N918 . . . . . . . . . . . . 57
Boom, 16N761 . . . . . . . . . . . . . . . . . . . . . . . . . . 58
Air Panel . . . . . . . . . . . . . . . . . . . . . . . . . . . . . . 59
Slave Pump Linkage, 16P125 . . . . . . . . . . . . . . 60
Resin Pumplines . . . . . . . . . . . . . . . . . . . . . . . . 61
Air Motor and Pump for
Resin Pumpline . . . . . . . . . . . . . . . . . . . . . . 62
Gun . . . . . . . . . . . . . . . . . . . . . . . . . . . . . . . . . . 62
Resin Filter . . . . . . . . . . . . . . . . . . . . . . . . . . . . 63
Resin Supply Hose . . . . . . . . . . . . . . . . . . . . . . 64
Catalyst Slave Pumps . . . . . . . . . . . . . . . . . . . 66
Catalyst Reservoir . . . . . . . . . . . . . . . . . . . . . . . 68
Hose Bundles . . . . . . . . . . . . . . . . . . . . . . . . . . 70
Hose Bundles . . . . . . . . . . . . . . . . . . . . . . . . . . 71
Accessory Parts . . . . . . . . . . . . . . . . . . . . . . . . . 72
Heater Kits . . . . . . . . . . . . . . . . . . . . . . . . . . . . . 72
Solvent Pressure Pot Kits . . . . . . . . . . . . . . . . . 74
Solvent Diaphragm Pumps . . . . . . . . . . . . . . . . 76
DataTrak Upgrade Kit . . . . . . . . . . . . . . . . . . . . 77
Carts for 55 Gallon Barrel, 16M896 . . . . . . . . . 78
Roving Box Bracket . . . . . . . . . . . . . . . . . . . . . . 79
Extension Hoses . . . . . . . . . . . . . . . . . . . . . . . . 80
Dimensions . . . . . . . . . . . . . . . . . . . . . . . . . . . . . . . 81
Cart and Boom . . . . . . . . . . . . . . . . . . . . . . . . . 81
Cart Only . . . . . . . . . . . . . . . . . . . . . . . . . . . . . . 82
Wall/Pole Mount . . . . . . . . . . . . . . . . . . . . . . . . 82
Pumpline Wall Mounting Bracket Dimensions . . 83
Technical Data . . . . . . . . . . . . . . . . . . . . . . . . . . . . 83
Graco Standard Warranty . . . . . . . . . . . . . . . . . . . 86

Related Manuals
3A2012J 3
Related Manuals
Manuals are available at www.graco.com. Component
manuals in English:
Agency Approvals
* Solvent pots do not affect Atex rating.
Manual Description
3A0232 RS
™
Gun Instructions-Parts
3A2313 U-Cup Displacement Pump
3A2315 NXT
®
Air Motor for FRP
332451 FRP Stainless Steel Fitting Kit
308981 Air Operated Diaphragm Pumps
309524 Viscon HP Heater Instructions
307363 Viscon
®
Heater Instructions
313541 DataTrak
™
Conversion Kit Instructions
308370
ASME and CE-Approved Pressure Pot
Instructions (Solvent Flush Pressure Pot)
307273 Fluid Outlet Filter
407019 Chop Cart Legs Kit
407020 55 Gallon Drum Kit
407021 Roving Box Bracket Kit
407022 Deluxe Inlet Seat Removal Tool
407023 5 Gallon Catalyst Reservoir Kit
407024 Boom Kit
407025 DataTrak
™
Upgrade Kit
407026 Wall or Pole Mount Kit
407027 Linkage Replacement Kit
407028 Resin Pump Connecting Kit
407031 Diaphragm Pump Solvent Flush Kit
407032
Non-CE Approved Solvent Pressure Pot
Kits
407033
ASME and CE-Approved Pressure Pot
Kits
407042 Heater Kits
Manual Description
FRP proportioner systems are approved for use in
hazardous locations when the base model, all acces-
sories, and all kits meet all wiring meet local, state,
and national codes.
Base FRP System with no accessories*
Accessories
See accessory manuals listed in Related Manu-
als section for approvals.
II 2 Gc T5

Models
4 3A2012J
Models
Ratio
Internal or
External
Mix
Gel or
Chop
No Cart Cart Cart, Mast, and Boom
Part No.
Hose
Length
ft (m) Part No.
Hose
Length
ft (m) Part No.
Hose
Length
ft (m)
13:1
Internal Mix
Gel
16R065 25 (7.6) 16R002 25 (7.6) 16R053 25 (7.6)
16R068 35 (10.7) 16R044 35 (10.7) 16R056 35 (10.7)
16R071 50 (15.2) 16R047 50 (15.2) 16R059 50 (15.2)
16R074 --- 16R050 --- 16R062 ---
Chop
16R135 25 (7.6) 16R123 25 (7.6) 16R004 25 (7.6)
16R138 35 (10.7) 16R114 35 (10.7) 16R126 35 (10.7)
16R141 50 (15.2) 16R117 50 (15.2) 16R129 50 (15.2)
16R144 --- 16R120 --- 16R132 ---
External
Mix
Gel
16R030 25 (7.6) 16R001 25 (7.6) 16R018 25 (7.6)
16R033 35 (10.7) 16R009 35 (10.7) 16R021 35 (10.7)
16R036 50 (15.2) 16R012 50 (15.2) 16R024 50 (15.2)
16R039 --- 16R015 --- 16R027 ---
Chop
16R100 25 (7.6) 16R088 25 (7.6) 16R003 25 (7.6)
16R103 35 (10.7) 16R079 35 (10.7) 16R091 35 (10.7)
16R106 50 (15.2) 16R082 50 (15.2) 16R094 50 (15.2)
16R109 --- 16R085 --- 16R097 ---
17:1
Internal Mix
Gel
16R205 25 (7.6) 16R006 25 (7.6) 16R193 25 (7.6)
16R208 35 (10.7) 16R184 35 (10.7) 16R196 35 (10.7)
16R211 50 (15.2) 16R187 50 (15.2) 16R199 50 (15.2)
16R214 --- 16R190 --- 16R202 ---
External
Mix
Gel
16R170 25 (7.6) 16R005 25 (7.6) 16R158 25 (7.6)
16R173 35 (10.7) 16R149 35 (10.7) 16R161 35 (10.7)
16R176 50 (15.2) 16R152 50 (15.2) 16R164 50 (15.2)
16R179 --- 16R155 --- 16R167 ---

Accessories
3A2012J 5
Accessories
The following items can be purchased separately from
the system to gain additional functions. Many of the
items require user installation; refer to the System
Assembly section beginning on page 18 for the
required procedures.
To avoid fire and explosion and electric shock, FRP
proportioners are not approved for use in hazardous
locations unless all accessories, all kits, and all wiring
meet local, state, and national codes. See Agency
Approvals on page 3.
Solvent Flush Diaphragm Pumps
Part Description
16M560 2 Gallon Solvent Flush Diaphragm Pump
16M561 5 Gallon Solvent Flush Diaphragm Pump
Solvent Flush Pressure Pots
Part Description
16M874
2 Gallon, ASME and CE-approved, Solvent
Flush Pressure Pot
16M875
5 Gallon, ASME and CE-approved, Solvent
Flush Pressure Pot
16M893 2 Gallon, ASME Solvent Flush Pressure Pot
16M894 5 Gallon, ASME Solvent Flush Pressure Pot
Heaters
Part Description
16N014★
120V Viscon Heater, for hazardous loca-
tions
16N015★
240V Viscon Heater, for hazardous loca-
tions
16N016
120V Viscon Heater, for hazardous loca-
tions and explosive atmospheres
16N017
240V Viscon Heater, for hazardous loca-
tions and explosive atmospheres
16N018
120V Viscon Heater, for non-hazardous
locations
16N019
240V Viscon Heater, for non-hazardous
locations
★
Heaters can be disassembled to remove
cured material.
Extension Hoses
Part Description
16M712
25 ft Extension Hose Bundle for Chop Sys-
tems
16M718
25 ft Extension Hose Bundle for Internal Gel
Systems
16M719
25 ft Extension Hose Bundle for External
Gel Systems
55 Gallon Barrel Carts
Part Description
16M896 55 Gallon Barrel Cart
Roving Box Bracket
Part Description
16M961 Roving Box Bracket Kit
DataTrak Upgrade
Part Description
16M881 DataTrak Upgrade Kit
5 Gallon Catalyst Reservoir
Part Description
24M501 5 Gallon Catalyst Reservoir Kit
Wall Mounting
Part Description
16N918 FRP Pole or Wall Mount Kit
Pump Connecting Kits
Part Description
16N242 17:1 Pump Connecting Kit
16N243 13:1 Pump Connecting Kit

Warnings
6 3A2012J
Warnings
The following warnings are for the setup, use, grounding, maintenance, and repair of this equipment. The exclama-
tion point symbol alerts you to a general warning and the hazard symbols refer to procedure-specific risks. When
these symbols appear in the body of this manual, refer back to these Warnings. Product-specific hazard symbols and
warnings not covered in this section may appear throughout the body of this manual where applicable.
WARNING
FIRE AND EXPLOSION HAZARD
Flammable fumes, such as solvent and paint fumes, in work area can ignite or explode. To help prevent
fire and explosion:
• Use equipment only in well ventilated area.
• Eliminate all ignition sources; such as pilot lights, cigarettes, portable electric lamps, and plastic drop
cloths (potential static arc).
• Keep work area free of debris, including solvent, rags and gasoline.
• Do not plug or unplug power cords, or turn power or light switches on or off when flammable fumes are
present.
• Ground all equipment in the work area. See Grounding instructions.
• Use only grounded hoses.
• Hold gun firmly to side of grounded pail when triggering into pail.
• If there is static sparking or you feel a shock, stop operation immediately. Do not use equipment until
you identify and correct the problem.
• Keep a working fire extinguisher in the work area.
SKIN INJECTION HAZARD
High-pressure fluid from dispensing device, hose leaks, or ruptured components will pierce skin. This may
look like just a cut, but it is a serious injury that can result in amputation. Get immediate surgical
treatment.
• Engage trigger lock when not dispensing.
• Do not point dispensing device at anyone or at any part of the body.
• Do not put your hand over the fluid outlet.
• Do not stop or deflect leaks with your hand, body, glove, or rag.
• Follow the Pressure Relief Procedure when you stop dispensing and before cleaning, checking, or
servicing equipment.
• Tighten all fluid connections before operating the equipment.
• Check hoses and couplings daily. Replace worn or damaged parts immediately.
ELECTRIC SHOCK HAZARD
This equipment must be grounded. Improper grounding, setup, or usage of the system can cause electric
shock.
• Turn off and disconnect power at main switch before disconnecting any cables and before servicing
equipment.
• Connect only to grounded power source.
• All electrical wiring must be done by a qualified electrician and comply with all local codes and
regulations.

Warnings
3A2012J 7
TOXIC FLUID OR FUMES HAZARD
Toxic fluids or fumes can cause serious injury or death if splashed in the eyes or on skin, inhaled, or
swallowed.
• Read MSDSs to know the specific hazards of the fluids you are using.
• Store hazardous fluid in approved containers, and dispose of it according to applicable guidelines.
PERSONAL PROTECTIVE EQUIPMENT
You must wear appropriate protective equipment when operating, servicing, or when in the operating area
of the equipment to help protect you from serious injury, including eye injury, hearing loss, inhalation of
toxic fumes, and burns. This equipment includes but is not limited to:
• Protective eyewear, and hearing protection.
• Respirators, protective clothing, and gloves as recommended by the fluid and solvent manufacturer.
MOVING PARTS HAZARD
Moving parts can pinch, cut or amputate fingers and other body parts.
• Keep clear of moving parts.
• Do not operate equipment with protective guards or covers removed.
• Pressurized equipment can start without warning. Before checking, moving, or servicing equipment,
follow the Pressure Relief Procedure and disconnect all power sources.
EQUIPMENT MISUSE HAZARD
Misuse can cause death or serious injury.
• Do not operate the unit when fatigued or under the influence of drugs or alcohol.
• Do not exceed the maximum working pressure or temperature rating of the lowest rated system
component. See Technical Data in all equipment manuals.
• Use fluids and solvents that are compatible with equipment wetted parts. See Technical Data in all
equipment manuals. Read fluid and solvent manufacturer’s warnings. For complete information about
your material, request MSDS from distributor or retailer.
• Do not leave the work area while equipment is energized or under pressure. Turn off all equipment and
follow the Pressure Relief Procedure when equipment is not in use.
• Check equipment daily. Repair or replace worn or damaged parts immediately with genuine
manufacturer’s replacement parts only.
• Do not alter or modify equipment. Alterations or modifications may void agency approvals and create
safety hazards.
• Use equipment only for its intended purpose. Call your distributor for information.
• Route hoses and cables away from traffic areas, sharp edges, moving parts, and hot surfaces.
• Do not kink or over bend hoses or use hoses to pull equipment.
• Keep children and animals away from work area.
• Comply with all applicable safety regulations.
BURN HAZARD
Equipment surfaces and fluid that’s heated can become very hot during operation. To avoid severe burns:
• Do not touch hot fluid or equipment.
WARNING

Important Methyl Ethyl Ketone Peroxide (MEKP) Safety Information
8 3A2012J
Important Methyl Ethyl Ketone Peroxide (MEKP)
Safety Information
MEKP is among the more hazardous materials found in commercial channels. Proper handling of the “unstable
(reactive)” chemicals presents a serious challenge to the plastics industry. The highly reactive property which makes
MEKP valuable to the plastics industry in producing the curing reaction of polyester resins and gel-coats also pro-
duces the hazards which require great care and caution in its storage, transportation, handling, processing and dis-
posal.
Workers must be thoroughly informed of the hazards that may result from improper handling of MEKP, especially in
regard to contamination and heat. They must be thoroughly instructed regarding the proper storage, use and dis-
posal of MEKP and other hazardous materials used in the laminating operation.
MEKP is flammable and potentially explosive, as well as potentially damaging to the eyes and skin.
Read material manufacturer’s warnings and material MSDS to know specific hazards and precautions related
to MEKP.
Contaminated MEKP can become explosive. Prevent contamination of MEKP with other materials, including
but not limited to polyester overspray, polymerization accelerators and promoters, and non-stainless metals.
Even small amounts of contaminates can make MEKP explosive. This reaction may start slowly, and gradually
build-up heat, which can accelerate until fire or an explosion result. This process can take from seconds to
days.
Heat applied to MEKP, or heat build-up from contamination reactions can cause it to reach what is called its
Self-Accelerating Decomposition Temperature (SADT), which can cause fire or explosion. Spills should be
promptly removed, so no residues remain. Spillage can heat up to the point of self-ignition. Dispose in accor-
dance with manufacture’s recommendation.
Store MEKP in a cool, dry and well-ventilated area in the original containers away from direct sunlight and
away from other chemicals. It is strongly recommended that the storage temperature remain below 86° F
(30° C). Heat will increase the potential for explosive decomposition. Refer to NFPA 432. Keep MEKP away
from heat, sparks and open flames.
Current catalysts are premixed and do not require any diluents. Graco strongly recommends that diluents not
be used. Diluents add to the possibility of contaminates entering the catalyst system. Never dilute MEKP with
acetone or any solvent since this can produce an extremely shock-sensitive compound which can explode.
Use only original equipment or equivalent parts from Graco in the catalyst system (i.e.: hoses, fittings, etc.)
because a hazardous chemical reaction may result between substituted parts and MEKP.
To prevent contact with MEKP, appropriate personal protective equipment, including chemically impermeable
gloves, boots, aprons and goggles are required for everyone in the work area.

Important Two-Component Material Information
3A2012J 9
Polyester Resins and Gel-Coats Spraying and Lamination Operations
Graco recommends that you consult OSHA Sections
1910.94, 1910.106, 1910.107 and NFPA No. 33, and
NFPA No. 91 for further guidance.
Important Two-Component Material Information
Material Self-ignition
Keep Resin and Catalyst
Components Separate
Changing Materials
• When changing materials, flush the equipment mul-
tiple times to ensure it is thoroughly clean.
• Always clean the fluid inlet strainers after flushing.
• Check with your material manufacturer for chemical
compatibility.
Spraying materials containing polyester resin and
gel-coats creates potentially harmful mist, vapors and
atomized particulates. Prevent inhalation by providing
sufficient ventilation and the use of respirators in the
work area.
Read the material manufacturer’s warnings and mate-
rial MSDSs to know specific hazards and precautions
related to polyester resins and gel-coats.
To prevent contact with polyester resins and gel-coats,
appropriate personal protective equipment, including
chemically impermeable gloves, boots, aprons and
goggles are required for everyone in the work area.
Remove all accumulations of overspray, FRP sand-
ings, etc. from the building as they occur. If this waste
is allowed to build up, spillage of catalyst is more likely
to start a fire.
If cleaning solvents are required, read material manu-
facture’s warnings and material MSDS to know spe-
cific hazards and precautions. (Graco recommends
that clean-up solvents be nonflammable.)
Some materials may become self-igniting if applied
too thickly. Read material manufacturer’s warnings
and material MSDS.
Cross-contamination can result in cured material in
fluid lines which could cause serious injury or
damage equipment. To prevent cross-contamination
of the equipment’s wetted parts, never interchange
catalyst (usually MEKP) and resin (usually polyester
resin or gel-coat) parts.

Overview
10 3A2012J
Overview
The FRP proportioner dispenses pigmented, tooling,
low-VOC, and specialty gel coats, as well as polyester
resin and vinyl ester chemicals. The FRP proportioner
supplies the individual catalyst and resin materials, and
fiberglass roving to the gun. On internal mix systems, it
also supplies solvent to the gun for clearing mixed mate-
rial from the gun.
Typical Applications
• Marine and watercraft
• Pool and spa
•Bath ware
• Transportation
• Corrosion prevention
• Cultured marble
FRP proportioner systems are approved for use in
hazardous locations when the base model, all acces-
sories, and all kits meet all wiring meet local, state,
and national codes.

Component Identification
3A2012J 11
Component Identification
Key:
ACart
BAir Motor
C Resin Displacement Pump
DCatalyst Pump
E Solvent Flush (Diaphragm Pump Option Shown,
Pressure Pot Options also available)*
F Catalyst Reservoir
G Boom (not shown)
H Air Control Panel
J Heater (not shown)
K Grounding Wire (not shown)
L Hook support for resin hose coil
(25 ft and 35 ft hose bundles only)
M Spray gun
N Air/Water Separator (customer supplied)
* Internal mix systems only.
WLF
Cart system shown with solvent
flush diaphragm pump and exter-
nal mix gel gun
A
B
C
D
E
F
H
L
M
N

Component Identification
12 3A2012J
Air Control Panel
Air inlet (AA): from air line.
Air regulator 1 (AB): controls air to resin pump.
Air outlet 1 (AC): air line to resin pump.
Air pressure gauge 1 (AD): indicates air pressure to
resin pump.
Air regulator 2 (AE): for external mix guns only: con-
trols catalyst atomization air. For internal mix guns only:
controls solvent flush pressure.
Air outlet 2 (AF): for external mix guns only: catalyst air
line to spray gun. For internal mix guns only: to solvent
pump.
Air pressure gauge 2 (AG): indicates regulator 2 air
pressure.
Air regulator 3 (AH): controls Air Assist Containment
™
(AAC
™
) air to spray gun.
Air pressure gauge 3 (AK): indicates AAC air pres-
sure.
Air outlet 3 (AM): AAC air line to spray gun.
Air outlet 4 (AN): Chop air supply to spray gun. This
outlet is plugged at the factory. Plug must be removed to
install chop air.
Air Shutoff valve (AP): shuts off air to entire system.
★ Includes a 1/2 to 3/8 reducer to adapt to older chop hose bundles
F
IG
. 1: Air Control Panel Components
AD
AC
AM
AH
AK
AF
AP
AE
ABAG
FRONT REAR
AN
ti21338a ti21339a
AA
Air Outlet Fitting
Details
Internal Chop External Chop Internal Gel External Gel
Air Outlet 2 (AF) 3/8 tube 1/4 tube 3/8 tube 1/4 tube
Air Outlet 3 (AM) 1/4 tube 1/8 npt 3/8 tube 1/8 npt
Air Outlet 4 (AN)★ 1/2 tube 1/2 tube Plugged Plugged

Component Identification
3A2012J 13
Air Motor and Resin Displacement Pump
The air motor powers the resin displacement pump
which supplies resin to the spray gun.
Air inlet (M): connect air hose to the air inlet.
Fluid filter (N): removes particles from the fluid.
Pressure relief/recirculation valve (P): relieves pres-
sure in the hose and gun.
Pressure relief/recirculation fluid outlet (P1): place
container below fluid outlet or connect fluid hose and
route back to the resin container, or install container
below the outlet
Pressurized fluid outlet on filter (R): connect fluid
hose to the 1/4 npt(f) fluid outlet reducer fitting supplied
with Graco hoses.
Fluid inlet (S): connect fluid suction hose to the
3/4 npt(m) fluid inlet.
DataTrak (T) (optional): electronic monitoring for mate-
rial tracking, system diagnostics, and pump runaway
control. The DataTrak is located on the air control panel.
See the NXT Air Motor manual for details of the Data-
Trak controls and indicators.
F
IG
. 2
S
R
N
M
P
P1
ti18499c

Component Identification
14 3A2012J
Catalyst Pump
The catalyst pump supplies catalyst to the spray gun.
Pump arm (U): controls catalyst flow.
Ratio adjustment knob (V1): use to lock/unlock pump
position and adjust the resin to catalyst ratio. It is easiest
to adjust the ratio when the pump is at the bottom of the
stroke.
Pivot point (V2): when pump is moved to adjust ratio,
this point stays stationary.
High pressure relief valve (W): directs catalyst to gun
or back to tank to relieve pressure. It also automatically
relieves pressure if it exceeds normal working pressure.
Fluid pressure gauge (X): indicates catalyst fluid pres-
sure.
Fluid inlet (Y): fluid inlet from the catalyst reservoir.
Fluid Inlet Ball Valve (Y2): controls flow of catalyst to
the catalyst pump.
Weep line (Z): In the event of a throat seal failure, the
fluid will flow into the weep line and back to the catalyst
reservoir.
Fluid outlet (Z1): fluid out to the gun.
Fluid recirculation/high pressure relief (Z2): fluid out-
let to the catalyst reservoir.
Low pressure relief valve (Z3): External mix systems
only. Directs catalyst to gun or back to tank to relieve
pressure.
F
IG
. 3: Catalyst Pump Components
V1
X
U
W
Z2
Z
Z3
Y
V2
U
ti21340a
Z1
Z2
Z
ti21342a
Z3
Y2

Component Identification
3A2012J 15
Solvent Flush Systems
Solvent Flush Diaphragm Pump
The solvent flush diaphragm pump provides solvent to
the gun to clear out mixed fluid and prevent it from cur-
ing in the gun. See the diaphragm pump manual listed
on page 3 for detailed component identification.
Solvent Flush ASME Pressure Pot
The pressure pot works by using the incoming air pres-
sure to expel the solvent in the pot out of the fluid outlet.
Verify supply tube is installed on fluid outlet port.
Solvent Flush ASME and CE-Approved Pressure Pot
The pressure pot works by using the incoming air pres-
sure to expel the solvent in the pot out of the fluid outlet.
See the ASME and CE-approved Pressure Pot manual
listed on page 3 for detailed component identification.
F
IG
. 4: Solvent Pump Components
3/4 npt(f) Fluid
Outlet
3/4 npt(f)
Fluid Outlet
3/4 npt(f) Fluid Outlet
1/4 npt(f)
Air Inlet
ti9078a1
Air Inlet Fill Cap Fluid Outlet
ti18530a
Air Inlet Fill Cap Fluid Outlet
ti18531a

Setup
16 3A2012J
Setup
FRP proportioners are not approved for use in hazard-
ous locations unless all accessories, all kits, and all wir-
ing meet local, state, and national codes. See Agency
Approvals on page 3.
This section provides instructions for basic system setup
of the FRP proportioner. See the separate component
manuals for detailed information.
Before Installation
• Have all system and component documentation
available during installation.
• See component manuals for specific data on compo-
nent requirements. Data presented here applies to
the FRP assemblies only.
• Be sure all accessories are adequately sized and
pressure-rated to meet system requirements. Acces-
sories are available from Graco.
Component identification illustrations are only a guide
for selecting and installing system components and
accessories. Contact your Graco distributor for assis-
tance in designing a system to suit your particular
needs.
Location Requirements
Refer to Dimensions, page 81, for mounting and clear-
ance dimensions.
Cart Mount Systems
• Position the FRP proportioner so the air controls
and catalyst ratio adjustment arm are easily acces-
sible.
• If using a cart and boom system, ensure there is
enough space overhead and surrounding the pro-
portioner for the boom and mast to fully extend.
• Place on a flat and level surface.
System Mounting (Wall Mount
Systems Only)
For ease of operation and service, make sure the pump
air inlet, fluid inlet, and fluid outlet ports are easily
accessible. Mount the catalyst reservoir above the cata-
lyst pump to enable gravity feed. Be sure the bracket is
level.
1. For systems using pole mount:
a. Insert pole clamp bolts through catalyst reser-
voir mounting plate then each of the two upper
pole clamps, then install and tighten nuts to
secure mounting plate and clamps in place.
To avoid fire and explosion and electric shock, FRP
proportioners are not approved for use in hazardous
locations unless all accessories, all kits, and all wiring
meet local, state, and national codes. See Agency
Approvals on page 3.
To reduce the risk of skin injection injury, make sure
the system is depressurized before mounting any
pump assembly. See the Pressure Relief Procedure
and Shutdown on page 24.
NOTICE
To prevent damage to the system caused by the sys-
tem falling off the wall, be sure the wall can support
the weight of the pump, bracket, hoses and accesso-
ries, and stress caused during pump operation.
ti18527d

Setup
3A2012J 17
NOTE: Catalyst reservoir outlet must be above the cata-
lyst pump inlet fitting for true gravity feeding.
b. Insert pole clamp bolts through pumpline
mounting plate then each of the two lower pole
clamps, then install and tighten nuts to secure
mounting plate and clamps in place.
c. Use four bolts and washers to secure catalyst
reservoir to catalyst reservoir mounting plate.
d. Use four bolts and washers to secure pumpline
to pumpline mounting bracket.
2. For systems bolting directly to wall (not using a
pole):
a. Use four bolts, washers, and nuts to install cata-
lyst reservoir mounting bracket to wall.
b. Use four bolts, washers, and nuts to install cata-
lyst reservoir onto the catalyst reservoir mount-
ing bracket.
c. Use four bolts, washers, and nuts to secure
pumpline mounting bracket to wall.
d. Use four bolts, washers, and nuts to secure
pumpline to pumpline mounting bracket.

Setup
18 3A2012J
System Assembly
When the system is shipped from the factory some
items may be shipped loose. Perform the following
instructions to properly install each of the component
items.
1. For cart and boom systems only, install legs:
a. With the system still on the pallet, use the sup-
plied hardware to install the legs onto the base
as shown below. The two longer legs should be
installed on the air control panel side of the
machine. The two non-locking casters should
be installed on the two longer legs.
b. Use a forklift to raise the system off of the pallet,
remove the pallet, then place item directly on
the floor.
2. Connect heater (if ordered):
a. Use supplied hardware to install heater onto
pole as shown below. Position the heater to
ease hose routing between pump and heater.
See Heater Kits manual for bolt hole patterns.
b. Connect heater electrical connections. See
heater manual listed on page 3 for detailed
instructions.
ti18523c
• Improperly installed or connected equipment may
create a hazardous condition that can cause fire,
explosion, or electric shock.
• Refer to heater manual listed on page 3 for
detailed instructions and warnings.
• You must have a qualified electrician connect
heater wiring. Ensure wiring and installation com-
ply with local electrical codes for hazardous areas.
• Wiring, wiring connections, switches, and electrical
distribution panel must all meet flame-proof (explo-
sion-proof) requirements.
Viscon Heater Shown
ti18529b

Setup
3A2012J 19
3. Install solvent flush diaphragm pump or pressure
pot (if ordered).
a. Use the supplied hardware to install the dia-
phragm pump or pressure pot onto the base of
the cart in the mounting holes provided.
b. Use supplied hardware to install solvent supply
tank onto the base of the cart.
4. Install DataTrak Upgrade Kit (if ordered). Follow the
detailed instructions in DataTrak manual listed on
page 3.
5. Assemble the boom as shown below then slide the
boom onto the system pole (if ordered).
6. Use the supplied hardware to install the roving box
bracket onto the pole. Install the top pole clamp
above the lower arm of the boom as shown below (if
ordered). If there is a second roving box, use long
hex screws as shown below to secure mounting
plate of second roving box to the mounting plate of
the first roving box.
Solvent Flush Dia-
phragm Pump shown
ti18455c
ti18532b
Spring
Chain
Deflector Plates
Roving Guides
ti18525b

Setup
20 3A2012J
Grounding
General Grounding Guidelines
Pump: use ground wire and clamp (supplied). Connect
ground clamp to a true earth ground.
Air and fluid hoses: use only electrically conductive
hoses.
Spray gun: ground through connection to a properly
grounded fluid hose and pump.
Fluid supply container: follow local code.
Object being sprayed: follow local code.
Solvent pails used when flushing: follow local code.
Use only conductive metal pails, placed on a grounded
surface. Do not place the pail on a nonconductive sur-
face, such as paper or cardboard, which interrupts
grounding continuity.
FRP Proportioner Grounding
NOTE: All proportioners come with one grounding
clamp to ground the proportioner to a true earth ground.
All accessories for internal mix systems come with a
second grounding clamp to ground the solvent flush
system to the cart.
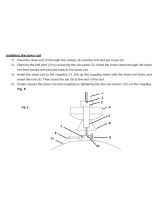
1. Verify that the ground screw is attached and tight-
ened securely to the air motor. Connect the other
end of the ground wire to a true earth ground.
2. For internal mix systems only, ground the solvent
flush system.
a. For solvent flush diaphragm pumps only, con-
nect one end of the second grounding clamp to
the solvent pump grounding strip. See the dia-
phragm pump manual listed on page 3 for
grounding details.
b. Connect the other end of the grounding clamp
to the cart.
3. Use an ohmmeter to verify all components are
grounded to the earth ground.
4. If wall power is used to power the heater, ground
electrical connection according to local codes.
5. For cart proportioners: Connect the other end of the
second supplied grounding clamp to the cart.
For wall proportioners: Connect the other end of the
second supplied grounding clamp to a true earth
ground.
The equipment must be grounded to reduce the risk of
static sparking and electric shock. Electric or static
sparking can cause fumes to ignite or explode.
Improper grounding can cause electric shock.
Grounding provides an escape wire for the electric
current
F
IG
. 5: Ground Wire
ti18454a
Ground
screw
Grounding
wire
/