Page is loading ...

GFX Series
Inverter/Charger
GFX1312 GFX1424 GFX1548
Installation Manual

About OutBack Power Technologies
OutBack Power Technologies is a leader in advanced energy conversion technology. Our products
include true sine wave inverter/chargers, maximum power point tracking charge controllers, system
communication components, as well as breaker panels, breakers, accessories, and assembled systems.
Contact Information
Telephone:
+1.360.435.6030 (North America)
+1.360.618.4363 (Technical Support)
+1.360.435.6019 (Fax)
+34.93.654.9568 (Barcelona, Spain)
Address: North America
19009 62nd Avenue NE
Arlington, WA 98223 USA
E-mail:
Web Site:
www.outbackpower.com
Disclaimer
UNLESS SPECIFICALLY AGREED TO IN WRITING, OUTBACK POWER TECHNOLOGIES:
(a) MAKES NO WARRANTY AS TO THE ACCURACY, SUFFICIENCY OR SUITABILITY OF ANY TECHNICAL
OR OTHER INFORMATION PROVIDED IN ITS MANUALS OR OTHER DOCUMENTATION.
(b) ASSUMES NO RESPONSIBILITY OR LIABILITY FOR LOSS OR DAMAGE, WHETHER DIRECT, INDIRECT,
CONSEQUENTIAL OR INCIDENTAL, WHICH MIGHT ARISE OUT OF THE USE OF SUCH INFORMATION. THE
USE OF ANY SUCH INFORMATION WILL BE ENTIRELY AT THE USER’S RISK.
Warranty Summary
OutBack Power Technologies Inc. warrants that the products it manufactures will be free from defects
in materials and workmanship for a period of two (2) years subject to the conditions set forth in the
warranty detail, found in the GFX Series Operator’s Manual.
OutBack Power Technologies cannot be responsible for system failure, damages, or injury resulting
from improper installation of their products.
Notice of Copyright
GFX Series Installation Manual © October 2010 by OutBack Power Technologies. All Rights Reserved.
Trademarks
OutBack Power is a registered trademark of OutBack Power Technologies.
Date and Revision
October 2010, Revision A
Part Number
900-0113-01-00 Rev A (for firmware revision 002.094.xxx)

Important Safety Instructions
READ AND SAVE THESE INSTRUCTIONS!
This manual contains important safety instructions for the GFX Series inverters. Read all instructions
and cautionary markings on the inverter and on any accessories or additional equipment included in
the installation. Failure to adhere to these instructions could result in severe shock or possible
electrocution. Exercise extreme caution at all times to prevent accidents.
Audience
These instructions are for use by qualified personnel who meet all local and governmental code
requirements for licensing and training for the installation of electrical power systems with AC and DC
voltage up to 600 volts.
Symbols Used
Symbol Description
Ground/PE
AC Current
DC Current
Single-Phase
Sine Wave
WARNING: Hazard to Human Life
This type of notation indicates that the hazard could be harmful to human life.
CAUTION: Hazard to Equipment
This type of notation indicates that the hazard may cause damage to the equipment.
IMPORTANT:
This type of notation indicates that the information provided is important to
the installation, operation and/or maintenance of the equipment. Failure to
follow the recommendations in such a notation could result in voiding the
equipment warranty.
900-0113-01-00 Rev A 1

Important Safety Instructions
Definitions
The following is a list of initials, terms, and definitions used in conjunction with this product.
Table 1 Terms and Definitions
Term Definition
AC Alternating Current; refers to voltage produced by the inverter, utility grid, or generator
AGS Automatic Generator Start
AUX Inverter’s 12-volt auxiliary output
DC Direct Current; refers to voltage produced by the batteries or renewable source
DVM Digital Voltmeter
GFDI Ground Fault Detector Interruptor; a safety device for PV systems
Grid-interactive,
grid-intertie, grid-tie
Utility grid power is available for use and the inverter is a model capable of returning
(selling) electricity back to the utility grid
GND Ground; a permanent conductive connection to earth for safety reasons; also known as
Chassis Ground, Protective Earth, and PE
LED Light-Emitting Diode; refers to indicators used by the inverter and the system display
NEU AC Neutral; also known as Common
Off-grid
Utility grid power
is not
available for use
On-grid Utility grid power is available for use (does not imply grid-interactive capability)
PV Photovoltaic
RE Renewable Energy
RTS Remote Temperature Sensor; accessory that measures battery temperature for charging
System display Remote interface device (such as the MATE), used for monitoring, programming and
communicating with the inverter; also called “remote system display”
Utility grid The electrical service and infrastructure supported by the electrical or utility company;
also called “mains”, “utility service”, or “grid”
General Safety
WARNING: Limitations on Use
This equipment is NOT intended for use with life support equipment or other medical
equipment or devices.
CAUTION: Equipment Damage
Only use components or accessories recommended or sold by OutBack Power
Technologies or its authorized agents.
2 900-0113-01-00 Rev A

Important Safety Instructions
IMPORTANT:
Do not attempt to install this equipment if it appears to be damaged in any way. See
the Troubleshooting Section for instructions on how to return the equipment if it is
damaged or suspected to be damaged.
Personal Safety
WARNING: Personal Injury
This equipment weighs in excess of 49 lbs (22 kg). Use safe lifting techniques when
lifting this equipment as prescribed by local codes.
Use standard safety equipment such as safety glasses, ear protection, steel-toed
safety boots, safety hard hats, etc., as prescribed by local codes when working on
this equipment.
Use standard safety practices when working with electrical equipment (e.g., remove
all jewelry, use insulated tools, wear cotton clothing, etc.).
Never work alone when installing or servicing this equipment. Have someone
nearby that can assist if necessary.
Inverter Safety
WARNING: Lethal Voltage
Review the system configuration to identify all possible sources of energy. Ensure
ALL sources of power are disconnected before performing any installation or
maintenance on this equipment. Confirm that the terminals are de-energized using
a validated voltmeter (rated for a minimum 1000 Vac and 1000 Vdc) to verify the
de-energized condition.
Do not perform any servicing other than that specified in the installation
instructions unless qualified to do so, or have been instructed to do so by OutBack
Power Technologies Technical Support personnel.
WARNING: Burn Hazard
Internal parts can become hot during operation. Do not remove the cover during
operation or touch any internal parts. Be sure to allow sufficient time for internal parts
to cool down before attempting to perform any maintenance.
WARNING: Fire Hazard
Do not place combustible or flammable materials within 12 feet (3.7 m) of
the equipment.
This product contains relays with moving parts and is not ignition-protected.
Ensure AC, DC, and ground cable sizes conform to local codes. See pages 18
through 21 for minimum size requirements. Ensure all conductors are in good
condition. Do not operate the unit wi
th damaged or substandard cabling.
900-0113-01-00 Rev A 3

Important Safety Instructions
CAUTION: Equipment Damage
When connecting cables from the inverter to the battery terminals, ensure the
proper polarity is observed. Connecting the cables incorrectly can damage or
destroy the equipment and void the product warranty.
Thoroughly inspect the equipment prior to energizing. Verify that no tools or
equipment have been inadvertently left behind.
Ensure clearance requirements are strictly enforced. Keep all vents clear of
obstructions that can prevent proper air flow around, or through, the unit.
Sensitive electronics inside the equipment can be destroyed by static electricity. Be
sure to discharge any static electricity before touching the equipment and wear
appropriate protective gear.
Battery Safety
WARNING: Explosion, Electrocution, or Fire Hazard
Use the battery types recommended by OutBack Power Technologies. Follow the
battery manufacturer’s recommendations for installation and maintenance.
Ensure the cables are properly sized. Failure to size the cables properly can result in
a fire hazard.
Ensure clearance requirements are strictly enforced around the batteries.
Ensure the area around the batteries is well ventilated and clean of debris.
Never smoke, or allow a spark or flame near, the batteries.
Always use insulated tools. Avoid dropping tools onto batteries or other
electrical parts.
Keep plenty of fresh water and soap nearby in case battery acid contacts skin,
clothing, or eyes.
Wear complete eye and clothing protection when working with batteries. Avoid
touching bare skin or eyes while working near batteries.
If battery acid contacts skin or clothing, wash immediately with soap and water. If
acid enters the eye, immediately flood it with running cold water for at least
20 minutes and get medical attention as soon as possible.
Never charge a frozen battery.
Insulate batteries as appropriate against freezing temperatures. A discharged
battery will freeze more easily than a charged one.
If a battery must be removed, always remove the grounded terminal from the
battery first. Make sure all devices are de-energized or disconnected to avoid
causing a spark.
If a remote or automatic generator control system is used, disable the starting
circuit and/or disconnect the generator from its starting battery while performing
maintenance to prevent accidental starting.
IMPORTANT:
Baking Soda neutralizes lead-acid battery electrolyte.
Vinegar neutralizes NiCad and NiFe battery electrolyte.
Have a supply of either substance readily available if using these types of batteries.
4 900-0113-01-00 Rev A

Important Safety Instructions
Recycling Information
IMPORTANT: Recycle Electronics and Batteries
Batteries are considered hazardous waste and must be recycled according to
local jurisdiction. Inverters and other electronics contain metals and plastics
that can (and should) be recycled. The following are some websites and phone
numbers that provide information regarding “how” and “where” to recycle
batteries and other electronic equipment.
OutBack Power Technologies strongly encourages you to learn about recycling
and to dispose of recyclable items accordingly. The Earth, and OutBack Power
Technologies, thanks you for that effort.
Earth 911, USA
Web site: www.Earth911.com
Address: 14646 N. Kierland Blvd., Suite 100
Scottsdale, AZ 85254
Phone: +1.480.337.3025 (direct)
Environmental Protection Agency, USA
Web site: www.epa.gov/recyclecity/
Phone: +1.415.947.8000
(Monday –Friday 8:00 AM to 12:00 PM and 1:00 PM to 4:00 PM PST)
Email: [email protected]
Keep America Beautiful, USA
Web site: www.kab.org/
Address: 1010 Washington Boulevard
Stamford, CT 06901
Phone: +1.203.659.3000 (Main number)
Fax: +1.203.659.3001
Email: [email protected]
OurEarth.org, USA
There is a place on the website for contacting OurEarth.org using email. No direct email address
is provided.
Web site: http://www.ourearth.org
Address:
P.O. Box 62133
Durham, NC 27715
Phone: +1.410.878.6485
900-0113-01-00 Rev A 5

Important Safety Instructions
6 900-0113-01-00 Rev A
National Institute of Recyclers, Mexico
Web site: http://www.inare.org.mx/
Email: [email protected], [email protected]
Phone: +1.55.57.85.9160
Fax:
+1.55.57.84.1279
Natural Resources Canada
Address: 580 Booth, Ottawa, ON K1A 0E8
Phone: +1.613.995.0947
TTY: +1.613.996.4397
(Phone and TTY: Monday to Friday, 8:30 a.m. to 4:30 p.m. ET)
Web site: http://www.nrcan-rncan.gc.ca/mms-smm/busi-indu/rec-rec-eng.htm
Office of Waste Management, Canada
Address: Office of Waste Management
Conservation and Protection
Environment Canada
Ottawa, Ontaro K1A 0H3
Phone: +1.819.997.2800
Web site: http://www.portaec.net/library/recycling/recycling_in_canada.html
EuroRecycle.net, Europe
The following website provides general information about recycling in Europe. It also provides a list of
companies and organizations that provide recycling information or assistance.
Web site: http://euro.recycle.net
E-mail: http://euro.recycle.net/cgi-bin/feedback1.cgi?w=27
(This is an online form providing a means to contact
the owners of the website.)
PETCore, Europe
The following website provides information about PET Recycling in Europe.
Web site: www.PETCore.org
Address: Avenue E.Van Nieuwenhuyse 4/3
B-1160
Brussels
Belgium
Fax: +.32.0.2.675.39.35
E-mail: [email protected]

900-0113-01-00 Rev A 7
Table of Contents
Important Safety Instructions ........................................................................1
Audience .................................................................................................................................................................................1
Symbols Used ........................................................................................................................................................................1
Definitions...............................................................................................................................................................................2
General Safety .......................................................................................................................................................................2
Personal Safety......................................................................................................................................................................3
Inverter Safety .......................................................................................................................................................................3
Battery Safety.........................................................................................................................................................................4
Recycling Information ........................................................................................................................................................5
Introduction.................................................................................................9
Welcome to OutBack Power Technologies.................................................................................................................9
Models......................................................................................................................................................................................9
Components and Accessories ...................................................................................................................................... 10
Planning ....................................................................................................11
Applications ........................................................................................................................................................................ 11
Renewable Energy.........................................................................................................................................................................12
Battery Bank.....................................................................................................................................................................................12
Generator..........................................................................................................................................................................................12
Installation.................................................................................................15
Location and Environmental Requirements............................................................................................................ 15
Dimensions.......................................................................................................................................................................... 15
Tools Required.................................................................................................................................................................... 16
Mounting.............................................................................................................................................................................. 16
Terminals and Ports.......................................................................................................................................................... 17
Grounding............................................................................................................................................................................ 18
DC Wiring ............................................................................................................................................................................. 19
AC Wiring.............................................................................................................................................................................. 21
Multiple AC Sources......................................................................................................................................................................21
Accessory Wiring ............................................................................................................................................................... 22
AUX Wiring .......................................................................................................................................................................... 23
Automatic Generator Start (AGS) .............................................................................................................................................24
Single-Inverter Installations........................................................................................................................................... 26
Multiple-Inverter Installations (Stacking) ................................................................................................................. 27
Classic Series Stacking (Dual-Stack).........................................................................................................................................28
Parallel Stacking (Dual-Stack and Larger)..............................................................................................................................30
Three-Phase Stacking ...................................................................................................................................................................32
Functional Test................................................................................................................................................................... 34
Index .........................................................................................................35

Table of Contents
8 900-0113-01-00 Rev A
List of Tables
Table 1 Terms and Definitions......................................................................................................................2
Table 2 Components and Accessories....................................................................................................10
Table 3 Ground Conductor Size and Torque Requirements ..........................................................18
Table 4 DC Conductor Size and Torque Requirements....................................................................19
Table 5 AC Conductor Size and Torque Requirements ....................................................................21
List of Figures
Figure 1 GFX Series Inverter/Charger...........................................................................................................9
Figure 2 GFX Components............................................................................................................................10
Figure 3 Applications (Example) .................................................................................................................11
Figure 4 Dimensions........................................................................................................................................15
Figure 5 Terminals, Ports, and Features ...................................................................................................17
Figure 6 DC Ground Lug ................................................................................................................................18
Figure 7 AC Ground Terminals.....................................................................................................................18
Figure 8 Battery Terminal Covers................................................................................................................19
Figure 9 Required Order of Battery Cable Hardware ..........................................................................20
Figure 10 AC Terminals .....................................................................................................................................21
Figure 11 Multiple AC Sources .......................................................................................................................21
Figure 12 Accessory Connections.................................................................................................................22
Figure 13 ON/OFF Jumper and Connections............................................................................................22
Figure 14 AUX Connections for Vent Fan (Example) .............................................................................23
Figure 15 AUX Connections for Diversion (Example)............................................................................23
Figure 16 Two-Wire Generator Start (Example).......................................................................................24
Figure 17 Three-Wire Generator Start (Example)....................................................................................25
Figure 18 Single-Inverter Wiring ...................................................................................................................26
Figure 19 OutBack HUB4 and MATE.............................................................................................................27
Figure 20 Example of Classic Series Stacking Arrangement...............................................................28
Figure 21 Classic Series Wiring (Two Inverters) .......................................................................................29
Figure 22 Example of Parallel Stacking Arrangement (Three Inverters) ........................................30
Figure 23 Parallel Wiring (Four Inverters)...................................................................................................31
Figure 24 Example of Three-Phase Stacking Arrangement (Three Inverters) ..............................32
Figure 25 Three-Phase Wiring (Three Inverters)......................................................................................33

900-0113-01-00 Rev A 9
Introduction
Welcome to OutBack Power Technologies
Thank you for purchasing the OutBack GFX Series Inverter/Charger. This product offers a complete
power conversion system between batteries and AC power. It can provide backup power or complete
off-grid service.
Battery-to-AC inverting which delivers 120 Vac at 60 Hz
AC-to-battery charging
Rapid transfer between AC source and inverter output
with minimal delay time
Inverter load support for a small AC source
12-, 24-, and 48-volt units
Wattages from 1.3 kVA to 1.5 kVA
Stackable in series, parallel, and three-phase
configurations
Uses energy from PV, wind, and other renewable
sources if appropriate controllers are used
Grid-interactive capable
Figure 1 GFX Series Inverter/Charger
Models
The GFX Series inverters are designed for harsher environments and can survive casual exposure to
the elements. However, enclosed protection is still recommended. These inverters have an internal
fan, but do not use outside air for cooling.
GFX1312 (1.3 kVA output, 12 Vdc)
GFX1424 (1.4 kVA output, 24 Vdc)
GFX1548 (1.5 kVA output, 48 Vdc)
Inverter model numbers use the following naming convention.
Grid-interactive models (all models in this series) begin with the letter G. For example, model GFX1424 is
grid-interactive; model VFX3524 is not.
The model number includes “FX” as the inverter series.
The first two digits show the wattage of that model. For example, “GFX
13
12” is 1300 watts.
The second pair of digits shows the inverter’s nominal DC voltage. For example, “GFX14
24
” is 24 volts.

Introduction
10 900-0113-01-00 Rev A
Each model inverter has a single phase output marked with this symbol:
Each inverter puts out a sine wave waveform marked with this symbol:
Components and Accessories
Table 2 Components and Accessories
Installed Components Included in Box
Battery Terminal Cover, red GFX Series Installation Manual
(this book)
Battery Terminal Cover, black GFX Series Operator’s Manual
AC Conduit Plate “WARNING ELECTRICAL SHOCK” sticker
DC Cover (DCC) Remote Temperature Sensor (RTS)
Silicone Grease Packet
Figure 2 GFX Components
DCC (DC COVER)
Covers the DC terminal area and provides space to
mount other com
p
onents such as a DC current shunt.
AC CONDUIT PLATE
Connects to AC conduit fo
r installations
which do not utilize OutBack’s optional
FLEXware conduit boxes.
BATTERY TERMINAL COVER
Protects terminals from accidental contact. Made of stiff plastic with a snap-on design.
Always keep covers installed during normal operation.
When required, remove covers carefully using a flat-blade screwdriver inserted
into the slots on the sides of each cover.
The DCC does not replace the battery terminal covers; they must be installed in
addition to the DCC.

900-0113-01-00 Rev A 11
Planning
Applications
The GFX Series inverters are intended for on-grid, off-grid, and grid-interactive applications. These
models are designed to use a battery bank to store energy. They can work in conjunction with
photovoltaic (PV) panels to harvest solar energy, as well as wind turbines and other renewable
sources. These sources charge the battery, which in turn is used by the inverter.
In on-grid applications, grid power is used to run the loads. When excess PV (or another renewable
energy source) is available from the batteries, the inverter supports those loads with the PV. When the
PV exceeds the load requirements, the inverter sells that excess power back through its input, to the
utility grid. When the utility grid is not available, the inverter takes over to run the loads with PV and
energy stored in the battery bank.
If the inverter is used as the primary source, the grid power will be used when the batteries have been
drained. In this situation, the AC power, PV harvest, or other renewable energy can be used to
recharge the battery bank.
In off-grid applications, the inverter can use the harvested energy from the battery bank as the
primary power source. An AC generator can also be connected to support the system when required.
Figure 3 Applications (Example)

Planning
12 900-0113-01-00 Rev A
Renewable Energy
The inverter cannot connect directly to PV, wind, or other renewable sources. The batteries are the
inverter’s primary source of power. However, if these sources are used to charge the batteries, the
inverter can use their energy by drawing it from the batteries.
The renewable source is always treated as a battery charger, even if all of its power is used
immediately. The renewable source must have a charge controller or some way to prevent
overcharging. OutBack Power’s FLEXmax charge controllers can be used for this purpose, as can
other products.
Battery Bank
IMPORTANT:
Battery charger settings need to be correct for a given battery type. Always follow
battery manufacturer recommendations. Making incorrect settings, or leaving them at
factory default settings, may cause the batteries to be undercharged or overcharged.
When planning a battery bank, consider the following:
The GFX inverters work best with lead-chemistry batteries intended for deep discharge. These include
batteries for marine, golf-cart, and forklift applications. They also include gel-cell batteries and absorbed
glass-mat (AGM) batteries. OutBack Power recommends the use of batteries designed specifically for RE
applications. Automotive batteries are strongly discouraged and will have a short life if used in inverter
applications. Nickel-based batteries and lithium-ion batteries are discouraged due to limitations in the
inverter’s battery charger.
These inverters are designed to work with 12-, 24-, or 48-volt battery banks, depending on inverter model.
Before constructing a battery bank, check the inverter model and confirm nominal battery voltage.
A vented enclosure for the battery bank may be required by electric code and is recommended in most
cases for safety reasons.
CAUTION: Hazard to Equipment
Batteries can emit hydrogen sulfide gas which is corrosive over long periods of time.
Installing the inverter in the battery compartment may cause corrosion which is not
covered by the product warranty. (Sealed batteries may be an exception.)
Generator
The GFX inverters can work with any generator that delivers clean 120 Vac at 60 Hz. Inverters stacked
for split-phase output (120/240 Vac) can work with both legs of a split-phase generator. Inverters
stacked for three-phase output can work with three-phase generators.
If automatic generator starting is desired, the generator must be an electric-start model with an automatic
choke. The inverter can only perform two-wire starting. (See page 24.) For other starting configurations,
additional equipment is required
.
In all cases, the inverter must be programmed appropriately using a remote system display. (See the
GFX Series Operator’s Manual and the system display manual.)

Planning
900-0113-01-00 Rev A 13
Generator Sizing
A generator should be sized to provide enough power for all the loads and the battery charger.
Available generator power may be limited by ratings for circuit breakers and/or generator connectors.
The generator must be able to provide current to all inverters on a given phase or leg. Minimum generator
wattage* is usually recommended to be twice the wattage of the inverter system. Many portable generators
may not be able to maintain AC voltage or frequency for long periods of time if they are loaded more than
80% of rated capacity.
(*after de-ratings for peak versus continuous power, for load power factor considerations, for altitude, and
for ambient temperature.)
A generator that is to be installed in a building should not have a bond between the neutral and ground
connections.
In addition, if a split-phase 120/240 Vac generator is powering a single-phase 120 Vac inverter system with
no other compensation, it is
required
to be at least twice the wattage of the inverters. (A split-phase
generator that is heavily loaded on one output leg may suffer severely from balancing issues.) The OutBack
FW-X240 or PSX-240 balancing transformers may compensate for this condition.

Planning
14 900-0113-01-00 Rev A
NOTES:

900-0113-01-00 Rev A 15
Installation
Location and Environmental Requirements
The GFX Series inverters can be located outdoors, but OutBack still recommends that they be
protected from the environment.
If protected from the environment, the inverter can mount in any position or orientation. If exposed to the
environment, it cannot be placed upside-down to ensure that water will not accumulate under the DC
cover. (It can be mounted in any other position or orientation.)
For installations where the inverter may be exposed to water spray, the inverter must be mounted either
with the base down (shelf mounting) or with the AC wiring compartment facing down (wall mounting). If
mounted with the base down, water cannot be allowed to accumulate around the inverter’s base. There is a
drainage system on the base of the inverter to dispel condensation. If submerged, water can enter this drain
and cause failure.
The inverter will perform more efficiently in locations offering plenty of air circulation. The recommended
minimum clearance is 2 to 4 inches (5 to 10 cm) on all sides of the inverter.
The inverter will function to all of its specifications if operated in a range of 32 °F to 122 °F (0 °C to 50 °C).
Note that the inverter’s maximum wattage will derate in temperatures above 77 °F (25 °C).
The inverter will function, but will not necessarily meet its specifications, if operated in a temperature range
of –40 °F to 140 °F (–40 °C to 60 °C). This is also the allowable temperature range for storage. (The
specifications are listed in the GFX Series Operator’s Manual.)
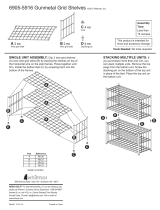
Dimensions
Length 16.25” (41 cm)
Width
8.25” (21 cm)
13” (33 cm)
Height
Figure 4 Dimensions

Installation
16 900-0113-01-00 Rev A
Tools Required
Wire cutters/strippers
Torque wrenches
Assorted insulated screwdrivers
DVM or Voltmeter
Mounting
It is easier for two people to install the GFX inverter due to its weight.
The unit must be secured with appropriate fasteners to a sturdy mounting surface capable of supporting its
weight. OutBack cannot be responsible for damage if inadequate fasteners are used.
The unit has four mounting holes, one in each corner. Use fasteners in all four corners for a secure
installation.
Due to the variance in other mounting methods, OutBack only endorses the use of FLEXware or previous
versions of its mounting plate. Use M6 x 20 mm machine screws, one per corner, to attach the inverter to
the mounting plate. Follow the instructions with each mounting system.
If mounting the inverter on other surfaces such as plywood, wall studs, or masonry, use appropriate
fasteners to support its weight. OutBack cannot be responsible for damage to the product if it is attached
with inadequate fasteners.
Mount and secure each component before attaching any wiring.
When the inverter is used with other metal chassis, make sure that all chassis are grounded appropriately.
(See the grounding instructions on page 18.) Grounding other chassis may involve metal-to-metal contact,
or sepa
rate gr
ound wires.
IMPORTANT:
If using an OutBack FLEXware Mounting Plate, avoid large air gaps behind the plate.
These can result in louder mechanical noise during heavy inverting or charging.

Installation
900-0113-01-00 Rev A 17
Terminals and Ports
Figure 5 Terminals, Ports, and Features
WARNING: Shock Hazard
The inverter’s AC output is defaulted to ON from the factory. It will deliver 120 Vac as soon as DC power is
connected.
INVERTER ON/OFF
: R
eceives wires for a manual
on/off switch to control the inverter. The jumper
alongside (JP1) disables these terminals when
installed (factory default). In this state, the inverter is
always ON and can only be controlled by the system
display. See page 22 for instructions.
DC TERMINALS
:
Connect to battery
cables and DC system. See page 19 for
instructions.
DC and AC GROUND TERMINALS
:
Connect to grounding system for
both batteries and AC. See page 18
for instructions.
CONTROL WIRING TERMINAL BLOCK:
Receives control wires for a variety of
functions, including automatic generator
starting. See pages 23 and 24 for
instructions and the GFX Series Operator’s
Manual for more information.
The Terminal Block can be unplugged from the
AC board for convenience. While installed,
keep screws tight and the block itself secured
tightly to the AC board, to prevent malfunction.
XCT+/XCT- : Non-operational
terminals. Do not connect
anything to them.
MATE and RTS PORTS: Receive
the RJ45 and RJ11 plugs from the
system display and Remote
Temp Sensor. See page 22 for
instructions.
The jacks are mounted sideways.
When viewed from the left side,
they appear as shown below.
AC TERMINAL BLOCK
:
Receives
AC input and output wires. See
page 21 for instructions.
LED INDICATORS
:
Display the unit status and battery voltage. The Operator’s Manual
contains extensive descriptions of the LED functions.
The three BATTERY LEDs (green, yellow, and red) are based on DC voltage, and
provide a very general idea of battery state.
The green INVERTER LED tells if the inverting function is on.
The yellow AC IN LED tells if an AC source is present.
AUX OUTPUT (AUX+/AUX-): Delivers 12 Vdc up
to 0.7 amps (8.4 watts). The output can be
switched on and off for many functions. The
default function is to drive a cooling fan. See page
23 for hookup instructions. See the system display
manual for programming instructions.
AUX LED INDICATOR: Amber LED turns on when
12 Vdc output is present.
The
red ERROR LED indicates either a Warning or an Error. A Warning is an alert for
a problem that is not severe enough for shutdown. An Error usually accompanies
inverter shutdown. See the Operator’s Manual for more information.

Installation
18 900-0113-01-00 Rev A
Grounding
WARNING: Shock Hazard
The unit must be connected to a grounded, permanent wiring system. If a bond is made
between neutral and ground make sure only one bond is present in the AC system at any
time. Some codes require the bond to be made at the main panel only.
WARNING: Shock Hazard
For all installations, the negative battery conductor should be bonded to the grounding
system at only one point. If the OutBack GFDI is present, it can provide the bond.
IMPORTANT:
OutBack products are not designed for use in a positive-grounded system. If it is necessary
to build a positive-ground system with OutBack products, contact OutBack Technical
Support at
360.618.4363
before proceeding. Additionally, consult the online forum at
www.outbackpower.com/forum/
, where this subject has been discussed extensively.
Table 3 Ground Conductor Size and Torque Requirements
Terminal Location Minimum Conductor Size Torque Requirements
Center AC Terminals
#8 AWG or 0.016 in (10 mm) 25 in-lbs (2.8 Nm)
DC Box Lug
#6 AWG or 0.025 in (16 mm) 45 in-lbs (5.1 Nm)
Figure 6 DC Ground Lug
The inverter’s DC ground is a box lug located next to
the negative DC battery terminal. Local codes or
regulations may require the DC ground to be run
separately from the AC ground. Also, if present, it will
be necessary to remove the DC Cover before making
the ground connection.
The two Chassis Ground/PE terminals are electrically
common. Only one terminal can be used if
connecting to an external ground bus. The other
terminal may be used if connecting to a device with
its own ground wire, such as a generator.
Figure 7 AC Ground Terminals
/