Page is loading ...

Radian Series Inverter/Charger
GS4048A
GS8048A
Installation Manual

About OutBack Power Technologies
OutBack Power Technologies is a leader in advanced energy conversion technology. OutBack products
include true sine wave inverter/chargers, maximum power point tracking charge controllers, and system
communication components, as well as circuit breakers, batteries, accessories, and assembled systems.
Applicability
These instructions apply to OutBack inverter/charger models GS8048A and GS4048A only.
Contact Information
Address: Corporate Headquarters
17825 – 59
th
Avenue N.E.
Suite B
Arlington, WA 98223 USA
European Office
Hansastrasse 8
D-91126
Schwabach, Germany
Website: http://www.outbackpower.com
Disclaimer
UNLESS SPECIFICALLY AGREED TO IN WRITING, OUTBACK POWER TECHNOLOGIES:
(a) MAKES NO WARRANTY AS TO THE ACCURACY, SUFFICIENCY OR SUITABILITY OF ANY
TECHNICAL OR OTHER INFORMATION PROVIDED IN ITS MANUALS OR OTHER DOCUMENTATION.
(b) ASSUMES NO RESPONSIBILITY OR LIABILITY FOR LOSS OR DAMAGE, WHETHER DIRECT,
INDIRECT, CONSEQUENTIAL OR INCIDENTAL, WHICH MIGHT ARISE OUT OF THE USE OF SUCH
INFORMATION. THE USE OF ANY SUCH INFORMATION WILL BE ENTIRELY AT THE USER’S RISK.
OutBack Power Technologies cannot be responsible for system failure, damages, or injury resulting from
improper installation of their products.
Information included in this manual is subject to change without notice.
Notice of Copyright
Radian Series Inverter/Charger Installation Manual © 2017 by OutBack Power Technologies.
All Rights Reserved.
Trademarks
OutBack Power, the OutBack Power logo, and Grid/Hybrid are trademarks owned and used by OutBack
Power Technologies, Inc. The ALPHA logo and the phrase “member of the Alpha Group” are trademarks
owned and used by Alpha Technologies Inc. These trademarks may be registered in the United States and
other countries.
Date and Revision
September 2017, Revision B
Part Number
900-0160-01-01 Rev B

900-0160-01-01 Rev B 3
Table of Contents
Introduction ..................................................................................... 5
Audience ......................................................................................................................................... 5
Symbols Used ................................................................................................................................. 5
General Safety ................................................................................................................................ 5
Welcome to OutBack Power Technologies ..................................................................................... 6
Components and Accessories ........................................................................................................ 7
Planning ......................................................................................... 9
Applications ..................................................................................................................................... 9
Input Modes .............................................................................................................................................. 10
Renewable Energy ........................................................................................................................ 11
Battery Bank ................................................................................................................................. 11
Generator ...................................................................................................................................... 14
Generator Sizing ....................................................................................................................................... 14
Maintenance Bypass Switching .................................................................................................... 14
Installation ..................................................................................... 17
Location and Environmental Requirements .................................................................................. 17
Dimensions ................................................................................................................................... 17
Tools Required .............................................................................................................................. 19
Mounting ....................................................................................................................................... 19
Component Mounting ............................................................................................................................... 21
Removing Front Cover .................................................................................................................. 22
Terminals and Ports ...................................................................................................................... 23
Wiring ............................................................................................................................................ 25
Grounding ................................................................................................................................................. 25
DC Wiring ................................................................................................................................................. 26
AC Wiring ................................................................................................................................................. 29
ON and OFF Wiring ...................................................................................................................... 32
Accessory Wiring ...................................................................................................................................... 33
AUX Wiring ............................................................................................................................................... 33
Generator Control ..................................................................................................................................... 35
AC Configurations ......................................................................................................................... 38
Single-Inverter .......................................................................................................................................... 38
Multiple-Inverter AC Installations (Stacking) ............................................................................................ 40
Stacking Configurations ........................................................................................................................... 43
Commissioning ............................................................................... 49
Pre-startup Procedures ............................................................................................................................ 49
Startup ...................................................................................................................................................... 49
Powering Down ........................................................................................................................................ 51
Adding New Devices ................................................................................................................................ 51
Operation ...................................................................................................................................... 52
Firmware Updates .................................................................................................................................... 52
.GIP File Installation for Grid Support ....................................................................................................... 53
Preventative Maintenance ............................................................................................................ 54
Definitions ..................................................................................................................................... 55
Index ............................................................................................ 57

Table of Contents
4 900-0160-01-01 Rev B
List of Tables
Table 1 Components and Accessories ............................................................................................ 7
Table 2 Battery Bank Elements ...................................................................................................... 12
Table 3 Ground Conductor Size and Torque Requirements .......................................................... 25
Table 4 DC Conductor Size and Torque Requirements ................................................................. 27
Table 5 Changing Master Power Save Levels (GS8048A) ............................................................ 48
Table 6 Terms and Definitions ....................................................................................................... 55
List of Figures
Figure 1 Radian Series Inverter/Charger....................................................................................... 6
Figure 2 Radian Inverter and Accessories .................................................................................... 7
Figure 3 Applications (Example) ................................................................................................... 9
Figure 4 Bypass Switching .......................................................................................................... 15
Figure 5 Bypass Switching for Multiple Inverters ......................................................................... 15
Figure 6 Dimensions ................................................................................................................... 17
Figure 7 System Dimensions ...................................................................................................... 18
Figure 8 Installing the Mounting Plate ......................................................................................... 19
Figure 9 Mounting the Inverter .................................................................................................... 20
Figure 10 Mounting for System Components ................................................................................ 21
Figure 11 Removing the Front Cover ............................................................................................ 22
Figure 12 DC Terminals, Ribbon Cables, and Auxiliary Terminals ............................................... 23
Figure 13 AC Terminals, Ports, and Ground Bus .......................................................................... 24
Figure 14 Chassis Ground TBB .................................................................................................... 25
Figure 15 GS8048A and GS4048A Battery Terminals .................................................................. 27
Figure 16 DC Cable Hardware (Radian inverter) .......................................................................... 28
Figure 17 AC Terminals ................................................................................................................ 29
Figure 18 AC Sources ................................................................................................................... 31
Figure 19 ON/OFF Jumper and Connections ................................................................................ 32
Figure 20 Accessory Connections ................................................................................................. 33
Figure 21 AUX Connections for Vent Fan (Example) .................................................................... 34
Figure 22 AUX Connections for Diversion (Example) ................................................................... 34
Figure 23 Two-Wire Generator Start (Relay Aux) ......................................................................... 35
Figure 24 Two-Wire Generator Start (12V AUX) ........................................................................... 36
Figure 25
Three-Wire Generator Start (Example) ......................................................................... 37
Figure 26 Single-Inverter AC System ............................................................................................ 38
Figure 27 Single-Inverter AC Wiring with GS Load Center ........................................................... 39
Figure 28 OutBack Communications Manager and System Display ............................................. 40
Figure 29 Example of Parallel Stacking Arrangement (Three Inverters) ....................................... 43
Figure 30 Parallel Wiring ............................................................................................................... 44
Figure 31 Parallel Wiring with GSLC ............................................................................................. 45
Figure 32 Power Save Levels and Loads ...................................................................................... 46
Figure 33 GS8048A Power Save Priority ...................................................................................... 47
Figure 34 AC Test Points .............................................................................................................. 50
Figure 35 Grid Support Screens .................................................................................................... 53

900-0160-01-01 Rev B
5
Introduction
Audience
This book provides instructions for the physical installation and wiring of this product.
These instructions are for use by qualified personnel who meet all local and governmental code
requirements for licensing and training for the installation of electrical power systems with AC and
DC voltage up to 600 volts. This product is only serviceable by qualified personnel.
Symbols Used
WARNING: Hazard to Human Life
This type of notation indicates that the hazard could be harmful to human life.
CAUTION: Hazard to Equipment
This type of notation indicates that the hazard may cause damage to the equipment.
IMPORTANT:
This type of notation indicates that the information provided is important to the installation,
operation and/or maintenance of the equipment. Failure to follow the recommendations in
such a notation could result in voiding the equipment warranty.
NOTE:
This type of notation indicates useful information. This symbol is not always used.
MORE INFORMATION
When this symbol appears next to text, it means that more information is available in other manuals relating to the
subject. The most common reference is to the Radian Series Inverter/Charger Operator’s Manual. Another
common reference is the system display manual.
General Safety
WARNING: Limitations on Use
This equipment is NOT intended for use with life support equipment or other medical
equipment or devices.
WARNING: Reduced Protection
If this product is used in a manner not specified by GS product literature, the product’s
internal safety protection may be impaired.
CAUTION: Equipment Damage
Only use components or accessories recommended or sold by OutBack Power Technologies
or its authorized agents.

Introduction
6
900-0160-01-01 Rev B
Welcome to OutBack Power Technologies
Thank you for purchasing the OutBack Radian Series Inverter/Charger. This product offers a
complete power conversion system between batteries and AC power. It can provide backup power,
sell power back to the utility grid, or provide complete stand-alone off-grid service.
Figure 1 Radian Series Inverter/Charger
NOTE
:
This product has a settable AC output range. In this book, many references to the output
refer to the entire range. However, some references are made to 120/240 Vac or 60 Hz
output. These are intended as examples only.
1
Outback Power Technologies Intuitive Control System for Renewable Energy
Designed to be integrated as part of an OutBack Grid/Hybrid™ system
Battery-to-AC inverting which delivers split-phase power (100/200 Vac to 120/240 Vac at 60
or 50 Hz)
Model GS8048A can continuously produce 8 kVA (33 Aac)
Model GS4048A can continuously produce 4 kVA (16 Aac)
Mounts easily with supplied mounting plate
All terminals exit at the bottom of the inverter, allowing the
installer to use a single distribution box; the GS Load Center
(GSLC) is specifically designed for this purpose
Uses the MATE3™ class of System Display and
Controller products, or the AXS Port™ SunSpec Modbus
Interface (sold separately) for user interface as part of a
Grid/Hybrid system
~ MATE3s system display is required for grid
support functionality; requires revision 1.001.000
or greater
Supports the OPTICS RE™ online tool
1
for a cloud-based
remote monitoring and control application
~ Requires MATE3-class device or AXS Port
~ Visit www.outbackpower.com to download
Uses the HUB™ Series Communications Manager for
networking as part of a Grid/Hybrid system
Features versatile mounting locations for the MATE3 and
HUB products, FLEXmax charge controller, and GSLC
The venting on the cover allows mounting of multiple Radian inverters side by side with
minimal clearance between them
Up to 10 Radian inverter/chargers can be stacked together
Uses spring-based AC terminals instead of screw-based terminals; this eliminates torque
requirements and periodic re-tightening
Listed by ETL to UL 1741 (2nd Edition with supplement SA) and CSA 22.2

Introduction
900-0160-01-01 Rev B
7
Components and Accessories
IMPORTANT:
The Radian inverter is compatible with the MATE3 class of system display products. It can be
used with any firmware revision of MATE3s. It can only be used with MATE3 revision
002.017.000 or higher.
The MATE3s system display must be used when upgrading the inverter to firmware revision
001.006.063 or higher.
The Radian inverter is not intended for use with the OutBack MATE or MATE2 products. Use
of these products is not supported with the Radian Series.
IMPORTANT:
This product is not stackable with the GS8048 inverter. See page 39.
Table 1 Components and Accessories
Included in Box
Radian Series Inverter/Charger Quick Start Guide
Mounting Bracket
RTS (Remote Temperature Sensor) Hardware Kit
Optional Components for Attachment to Radian Inverter
MATE3-class System Display and Controller FLEXmax Series Charge Controller
GSLC (GS Load Center) series HUB Series Communications Manager
Figure 2 Radian Inverter and Accessories
NOTE: The system display is required if any Radian functions
need adjustment from the factory default settings.
GSLC
Charge Controllers
HUB
Communications
Manager
MATE3s System Display

Introduction
8 900-0160-01-01 Rev B
NOTES:

900-0160-01-01 Rev B
9
Planning
Applications
OutBack inverter/chargers are designed to use a battery bank to store energy. They work together
with power from the utility grid or from renewable energy sources, such as photovoltaic (PV)
modules, wind turbines, and other renewable sources. These sources charge the battery, which is
used by the inverter.
The Radian inverter has two sets of AC input terminals. Two AC sources, such as a gas or diesel
generator and the utility grid, can be connected. Other combinations of AC sources are possible.
NOTE:
The inverter can only accept one source at a time. The input marked
G
RID
has priority,
although this can be changed.
The Radian inverter’s settings can be changed to accommodate many applications. These include
off-grid, backup, and grid-interactive applications.
This product includes grid support functionality according to UL1741 SA. See the
Operator’s
Manual
for more information. Contact the utility company for any specific installation requirements.
Figure 3 Applications (Example)
AC IN*
OR
Utility Grid
AC Generator
AC OUT
AC IN*
Loads
AC OUT
DC OUT
Load
Support
Battery
Charging
AC or PV
PV Harvest
Charge
Controlle
r
DC IN
*Two sources utilizing separate inverter inputs with an
internal selection function

Planning
10 900-0160-01-01 Rev B
Input Modes
The Radian inverter has many modes of operation. See the
Radian Series Inverter/Charger
Operator’s Manual
for additional information on these modes, including reasons and considerations
for using each mode.
The modes determine how the inverter interacts with an AC source. Each mode has functions and
priorities that are intended for a designated application. Each of the Radian’s two AC inputs can be
set to a different operating mode to support different applications.
Generator
: This mode enables the battery charging function to tolerate a wider range of generator
performance and waveform irregularities than other modes. The Radian can use generator power even
when the generator is substandard.
Support
: This mode is intended for systems using utility grid or a generator. In some cases the amount
of current available from the source is limited due to size, wiring, or other reasons. If large loads need to
be run, the Radian inverter augments (supports) the AC source. The inverter uses battery power and
additional sources to ensure that the loads receive the power they demand.
Grid Tied
: This mode is intended for grid-interactive systems that are net metered. Once the battery is
charged and protected loads are serve, the inverter will export power to the utility grid. Grid support
functionality is available in this mode.
UPS
: This mode is intended for systems primarily intended to maintain power to the loads without any
interruption when switching between AC input and batteries. The response speed has been increased so
that if an AC disconnect occurs the response time will be minimized.
Backup
: This mode is intended for systems that have the utility grid or a generator available, but do not
have specialty requirements such as selling or support. The AC source will flow through the Radian
inverter to power the loads unless power is lost. If power is lost, then the Radian inverter will supply
energy to the loads from the battery bank until the AC source returns.
Mini Grid
: This mode is intended for systems that have the utility grid as an input and a sizable amount
of renewable energy. It behaves like an off-grid system using the utility grid as a backup generator. The
system will use the renewable energy until the battery voltage falls to a specified low level. When this
occurs, the Radian inverter will connect to the utility grid to power the loads. The inverter will disconnect
from the utility grid when the batteries are sufficiently recharged.
GridZero:
This mode is intended for systems that have the utility grid as an input and a sizable amount of
renewable energy. The loads will remain connected to the utility grid, but will only draw power from it
when no other power is available. The default power sources are the batteries and renewable energy,
which attempt to “zero” the use of the AC source. This mode does not allow the inverter to charge
batteries or sell. The batteries are discharged and recharged while remaining grid-connected.
Grid support functionality is available in this mode.
See the
Radian Series Inverter/Charger Operator’s Manual
for additional information on these
modes, including the reasons and considerations for using each mode.
Programming
Selection of the input modes and all other inverter programming are performed using a system
display such as the MATE3s. This product can customize a wide range of parameters.

Planning
900-0160-01-01 Rev B
11
Renewable Energy
The Radian inverter cannot connect directly to PV, wind turbines, or other unregulated DC sources.
The batteries are the inverter’s primary source of power.
A renewable energy source is always treated as a battery charger, even if all of its power is used
immediately by the inverter. The renewable source must have a charge controller, or some other
regulation method, to prevent overcharging. OutBack Power’s FLEXmax family of charge
controllers can be used for this purpose, as can other products.
The GSLC will receive the mechanical and electrical connections for up to two FLEXmax charge
controllers. It can receive the electrical connections for two FLEXmax 100 controllers.
Battery Bank
When planning a battery bank, consider the following:
Cables:
Recommendations for battery cable size and length are shown on page 26. The maximum
length will determine the placement of the battery bank. Local codes or regulations may apply and may
take priority over OutBack recommendations.
Battery Type: The Radian inverter/charger uses a three-stage charge cycle.
~ The default inverter/charger settings assume a deep-cycle stationary lead-acid battery, such as
OutBack’s EnergyCell RE or NC series batteries. The charging configuration is highly customizable
so that lithium-ion and other advanced chemistry charging cycles can be accommodated. Consult
the documentation for the specific batteries used in the system to ensure that the settings are
appropriate.
~ The Radian inverter/charger is designed to work with a 48-volt battery bank. Before constructing a
battery bank, confirm the nominal voltage of individual batteries.
Charger Settings and Maintenance:
A vented battery enclosure may be required by electric code
and is usually recommended for safety reasons.
It may be necessary to use a fan to ventilate the
battery enclosure.
Batteries must be regularly maintained according to the instructions of the battery manufacturer.
IMPORTANT:
Battery charger settings need to be correct for a given battery type. Always follow battery
manufacturer recommendations. Making incorrect settings, or leaving them at factory default
settings, may cause the batteries to be undercharged or overcharged.
CAUTION: Hazard to Equipment
Batteries can emit vapors which are flammable and which are corrosive over long periods of
time. Installing the inverter in the battery compartment may cause corrosion which is not
covered by the product warranty. (Sealed batteries may be an exception.)

Planning
12 900-0160-01-01 Rev B
Bank Size:
Battery bank capacity is measured in amp-hours. Determine the required bank
specifications as accurately as possible, beginning with the items below. This avoids underperformance
or wasted capacity.
These ten items are obtainable in different places, summarized in Table 2. Some of the information is
specific to the site or application. Some can be obtained from the battery manufacturer. Information on
OutBack products is available from OutBack Power Technologies or its dealers.
A. Size of load:
B. Daily hours of use:
C. Days of autonomy:
D. Application: This often helps define or prioritize the previous three items. Off-grid systems often
require enough capacity to last for an extended period before recharging. Grid-connected systems
frequently need only enough capacity for short-term backup during outages.
E. Conductor efficiency: Wire size and other factors
will waste power due to resistance and voltage drop.
Typical acceptable efficiency is 96 to 99%.
F. Inverter efficiency: Radian specifications list
“Typical Efficiency” to help estimate operating loss.
G. System DC voltage: The Radian inverter
requires nominal 48 Vdc to operate.
H. Battery voltage: Most individual battery
voltages are less than the system DC voltage.
The batteries need to be placed in series to
deliver the correct voltage.
I. Capacity: Battery capacity, which is measured
in ampere-hours (amp-hours or Ah), is not
usually a fixed number. It is specified based
on the rate of discharge. For example, the
OutBack EnergyCell 200RE is rated at
128.4 Ah when discharged at the 4-hour rate
(to terminal voltage 1.85 volts per cell or Vpc).
This is a high rate of discharge that would
hypothetically drain the battery in 4 hours.
The same battery is rated at 170 Ah when
used at the 20-hour rate.
In general, use the 8-hour capacity or less.
The larger the load, the more severe the
discharge. In these cases conservative values
with faster discharge times from the table (for
example, the 2- or 3-hour capacity) are better.
To choose accurately, the best method is to divide each Ah figure by the discharge in hours. (An
example from Table 2 for the OutBack 200RE would be 119.1 ÷ 3 hours = 39.7 Adc.) If the number is
equal or greater than the load size (in DC amperes), that column can be used as the capacity.
NOTES:
~ The battery’s selected rated capacity may have little to do with the actual hours of use; this figure
simply reflects the rate of discharge.
~ Use battery specifications for terminal voltage 1.85 Vpc whenever possible.
~ Capacity ratings are for batteries at 25°C. Capacity is reduced at cooler temperatures.
J. Maximum depth of discharge (DoD): Most batteries cannot be discharged below a certain level
without damage. The bank requires enough total capacity to keep this from happening. DoD is
usually described as a percentage, although it is shown as a decimal in calculations.
Any losses are essentially amp-hour
capacity that the system cannot use.
The battery bank size can be
increased to account for losses.
These are the most basic
and essential factors used
to determine bank size.
Table 2
Battery Bank Elements
Item Source of information
A
. Load Size
Site-specific
B
. Daily Hours
Site-specific
C
. Days of Autonomy
Site-specific
D
. Application
Site-specific
E
. Conductor Efficiency
Site-specific
F
. Inverter Efficiency
Inverter manufacturer
G
. System Vdc
Inverter manufacturer
H
. Battery Vdc
Battery manufacturer
I.
Capacity Ah
Battery manufacturer
Example:
Model
Discharge in Hours
1 2 3 4 8 20
200RE 82.0 120.0 119.1 128.4 148.8 170.0
220GH 127.3 151.4 162.9 169.6 190.8 206.0
J
. Maximum DoD
Battery manufacturer

Planning
900-0160-01-01 Rev B 13
To Calculate Minimum Battery Bank Size (refer to previous page for letter designations):
1. The load size, item A, is measured in watts. Compensate this figure for efficiency loss. Multiply the
conductor efficiency by the inverter efficiency (E x F). (These items are represented as percentages, but
may be displayed as decimals for calculation.) Divide item A by the result.
2. Convert the compensated load into amperes (Adc). Divide the step 1 result by the system voltage (G).
3. Determine the best battery capacity (I) by dividing each rated capacity by the time in hours (as shown in
Table 2). This is the estimated discharge rate at that battery capacity. The number is usable if the step 2
result (the actual load rate) does not exceed it. Choose the closest (or smaller) rated amp-hour capacity.
4. Determine the daily load consumption in ampere-hours (Ah). Multiply the step 2 result by the daily usage
hours (item B).
5. Adjust the total for required days of autonomy (the days the system must operate without recharging) and
the maximum DoD. Multiply the step 4 result by C and divide by J.
The result is the total amp-hour capacity required for the battery bank.
6. Determine the number of parallel battery strings required. Divide the Ah figure from step 5 by the
individual battery capacity (I) determined in step 3. Round the result to the next highest whole number.
7. Determine the total number of batteries required. Divide the system voltage by the battery voltage
(G ÷ H). Multiply the result by the step 6 result.
The result is the total required quantity of the chosen battery model.
EXAMPLE #1
A
. Backup loads: 1.0 kW (1000 W)
B
. Hours of use: 8
C
. Days of autonomy: 1
D
. Grid-interactive system
(GS4048A inverter)
E
. Conductor efficiency: 98% (0.98)
F
. Inverter efficiency: 93% (0.93)
G
. System voltage: 48 Vdc
H
. Batteries: OutBack EnergyCell
220GH (12 Vdc)
I
. Capacity determined at 8-hour rate: 184.8 Ah
J
. Maximum DoD: 80% (0.8)
EXAMPLE #2
A
. Backup loads: 1.65 kW (1650 W)
B
. Hours of use: 8
C
. Days of autonomy: 2
D
. Off-grid system (GS4048A inverter)
E
. Conductor efficiency: 97% (0.97)
F
. Inverter efficiency: 93% (0.93)
G
. System voltage: 48 Vdc
H
. Batteries: OutBack EnergyCell
200RE (12 Vdc)
I
. Capacity determined at 3-hour rate: 119.1 Ah
J
. Maximum DoD: 50% (0.5)
1. A ÷ [E × F] 1000 ÷ (0.98 × 0.93) = 1097.2 W
2. 1 ÷ G 1097.2 ÷ 48 = 22.9 Adc
3. I = Ah ÷ hours 184.8 ÷ 8 = 23.1 Adc (larger than 22.9;
Compare to 2 this means 184.8 Ah is acceptable)
4. 2 × B 22.9 × 8 = 182.9 Ah
5. [4 × C] ÷ J [182.9 × 1] ÷ 0.8 = 228.6 Ah
6. 5 ÷ I 228.6 ÷ 184.8 = 1.24 (rounded to 2)
7. [G ÷ H] × 6 [48 ÷ 12] × 2 strings = 8 batteries
1. A ÷ [E × F] 1650 ÷ (0.97 × 0.93) = 1829.1 W
2. 1 ÷ G 1829.1 ÷ 48 = 38.1 Adc
3. I = Ah ÷ hours 119.1 ÷ 3 = 39.7 Adc (larger than 38.1;
Compare to 2 this means 119.1 Ah is acceptable)
4. 2 × B 38.1 × 8 = 304.8 Ah
5. [4 × C] ÷ J [304.8 × 2] ÷ 0.5 = 1219.4 Ah
6. 5 ÷ I 1219.4 ÷ 119.1 = 10.2 (rounded to 11)
7. [G ÷ H] ×
6 [48 ÷ 12] × 11 strings = 44 batteries

Planning
14
900-0160-01-01 Rev B
Generator
These Radian models can work with any “split-phase” generator that delivers reliable AC power
at the appropriate system voltage and frequency. They cannot work with a single-phase or
three-phase generator.
The inverter/charger can provide a start signal to control an automatic start generator. If automatic
generator starting is required, the generator must be an electric-start model with automatic choke. It
should have two-wire start capability. For other configurations, additional equipment may be required.
In any configuration, the inverter may need to be specifically programmed with the system display.
Perform all programming according to the specifications of the generator and the required operation of
the inverter. Parameters to be programmed may include generator size, automatic starting requirements,
and potential fluctuations in generator AC voltage.
A generator that is to be installed in a building usually should not have a bond between the neutral and
ground connections. The generator should only be bonded if there is a specific need. Installations in
North America are expected to bond the neutral and ground at the main electrical panel. See page 29 for
more information on neutral-ground bonding.
Generator Sizing
A generator should be sized to provide enough power for all expected use.
A conservative estimate assumes that both the loads and charging will be maximized at the same time.
However, this can result in an oversized generator with inefficient operation.
A smaller generator may be used for average loads with the inverter’s Support mode providing support
from the batteries during peak loads. The loads can be manually disconnected while charging.
In general, the generator should be sufficiently powerful to handle all necessary load surges.
Other considerations:
Available generator power may be limited by ratings for circuit breakers and/or generator connectors.
The maximum allowed AC circuit breaker size is 50 Aac per Radian inverter/charger.
Many generators may not be able to maintain AC voltage or frequency for long periods of time if they are
loaded more than 80% of rated capacity. This statement may not apply to inverter-based generators,
which typically have more stable voltage and frequency regulation.
Maintenance Bypass Switching
Inverter systems are often equipped with AC maintenance bypass switches or interlocks. If the
inverter system ever needs to be shut down or removed, the AC sources and loads must be
disconnected. A bypass device allows the AC source to deliver power directly to the loads,
bypassing the inverter as shown in Figure 4. This can minimize disruption to the system and avoids
the need for extensive rewiring.
The GS Load Center (GSLC) can be equipped with bypass circuit breakers for this purpose.
However, if multiple Radian inverters are stacked in a single system, then the GSLC bypass kits
should not be used. The bypass function must be simultaneous for all inverters. The GSLC bypass
kits operate independently, not simultaneously.
CAUTION: Equipment Damage
Use of a three-phase generator with this equipment may damage either the inverter or the
generator. This damage to the inverter is not covered by the product warranty.

Planning
900-0160-01-01 Rev B
15
Figure 4 Bypass Switching
Both manual and automatic double-throw bypass switches are commonly available in a range of
sizes and options. These are highly recommended for systems with more than a single inverter.
WARNING: Shock Hazard or Equipment Damage
Using independent bypass devices on multiple inverters can result in power being routed to
inappropriate places. This could create an electric shock hazard or damage the equipment.
Figure 5 Bypass Switching for Multiple Inverters
AC Source
AC Loads
GSLC Bypass
Inoperative
Radian
Inverter
Input Wiring Output Wiring
AC Source AC Loads
Output Wiring
Inactive Radian
Inverters
GSLC Bypass Devices
(not to be used)
External Bypass Device
Input Wiring

Planning
16 900-0160-01-01 Rev B
NOTES:

900-0160-01-01 Rev B
17
Installation
Location and Environmental Requirements
Radian series inverter/chargers must be located indoors or in a weather-proof enclosure. They
are not designed for exposure to water, salt air, or excessive wind-blown dust and debris.
The Radian inverter must be wall-mounted in an upright position. The inverter is not approved for
mounting in any other position or orientation.
These inverters will perform more efficiently in locations offering plenty of air circulation. The minimum
recommended clearance is 2 inches (5 cm) on all sides of the inverter.
The sides and bottom may be enclosed or obscured with no restriction when mounting accessory devices
or one other inverter. If more than two Radian inverters are installed side by side with the GSLC, the
inverters should be separated by at least 0.9 inches (2.3 cm) to accommodate the GSLC hinged doors.
These inverters will operate normally in a range of –4°F to 122°F (–20°C to 50°C). Maximum output will
begin to decline at ambient temperatures above 25°F (77°C).
The allowable temperature range for storage is –40°F to 140°F (–40°C to 60°C).
These inverters carry an Ingress Protection (IP) rating of 20 and a Relative Humidity (RH) rating of 93%
(non-condensing).
The specifications are listed in the Radian Series Inverter/Charger Operator’s Manual.
Dimensions
Figure 6 Dimensions
Enclosure Height
28” (71.1 cm)
Mounting Hole Spacing 1.97" (5.0 cm)
Enclosure
Height with
Flange
29.1” (74 cm)
Width 16”
(40.6 cm)
Depth 8.75"
(22 cm)
The dimensions of an assembled system with mounting plate and GSLC are shown on the next page.

Installation
18
900-0160-01-01 Rev B
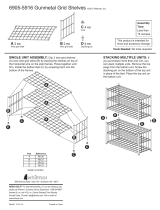
Figure 7 System Dimensions
Width 16.0” (40.6 cm)
0.45” (1.1 cm)
0.45”
(
1.1 cm
)
13.7”
(
34.8 cm
)
28”
(71.1 cm)
29.0”
(73.7 cm)
12.5”
(31.8 cm)
45.0”
(114.3 cm)
8.75”
(22.2 cm)
14.0” (35.6 cm)
This illustration can be used as a basic template
for planning layouts, marking mounting holes, etc.
when installing a system.
The requirements for mounting the Radian
inverter are described beginning on the next page.

Installation
900-0160-01-01 Rev B
19
Tools Required
The following tools may be required for this installation:
Wrench and socket sets; should include
~ torque and ratchet wrenches
~ reversible (stubby) wrenches for narrow access
~ offset box wrench, ½” or 13 mm
Wire cutters/strippers
Mounting
Two or more people may be needed to install the Radian inverter/charger due to its weight.
Mount and secure each component before attaching any wiring. Local or national wiring codes may
require the bottom of the inverter to be enclosed. The GS Load Center was specifically designed for
this purpose.
Avoid large air gaps behind the Radian inverter/charger and its mounting plate. These can result
in louder mechanical noise during heavy inverting or charging. Mount the plate on a flat, solid
mounting surface.
IMPORTANT:
Use correct fasteners to secure the mounting plate and the Radian inverter/charger to the
mounting surface. OutBack cannot be responsible for damage to the product if it is attached with
inadequate fasteners.
The Radian inverter/charger comes equipped with a mounting plate, as shown in Figure 8.
Figure 8 Installing the Mounting Plate
Mount the Radian inverter using
these steps.
1. The mounting plate is to be
screwed or bolted directly to a
solid mounting surface such as
wall studs. Lag screws are
provided for this purpose.
~ The plate is designed to mount
on wall studs with a spacing of
16” (40.6 cm). If the studs have
a different spacing, plywood or
similar material should be installed
over the studs. This material
should be ½” size or thicker. The
mounting plate can be installed on
the plywood surface.
~ If multiple Radian inverter/chargers
are being installed, all mounting
plates should be installed first.
The inverters can be mounted
and secured one at a time when
this is done.
Continued on the next page…
16.0”
(
40.6 cm
)
Mounting
8.0”
(
20.3 cm
)
6.0”
(15.2 cm
)
4.1”
(10.4 cm)
5.0”
(12.7 cm
)
Insulated screwdriver set (flat and
Phillips; should include
~ #2 Phillips screwdriver 15 to16” long
Long-nose pliers
High-resolution voltmeter

Installation
20
900-0160-01-01 Rev B
Figure 9 Mounting the Inverter
Radian
Mountin
g
x x
3. Align the left edge of the inverter with the left edge of
the mounting plate. This will expose the right edge of
the plate, allowing easy installation of another Radian
inverter/charger in the future. All additional inverters
are mounted to the right of the existing unit.
The unit shown to the right is not aligned with the
mounting plate, as the plate is still visible. In this
example, it should slide to the left so that the plate is
entirely covered.
NOTE: If the GS Load Center is used with
the Radian inverter, the following step should
be omitted.
4. Once aligned, secure the Radian inverter
to the stud using a lag screw (provided) in the left
corner of the inverter’s bottom flange.
Securing the inverter this way will prevent it from
dislodging from the mounting plate in the event of an
earthquake or similar event.
NOTE: The left corner is used for securing the
inverter to a stud. If the Radian inverter is mounted
on plywood or a similar wide-area mounting surface
as shown, any of the slots in the mounting flange
may be used.
2. Place the Radian inverter against the wall and slide
it directly over the upper lip of the mounting plate.
The inverter’s mounting flange should come to rest
within the lip so that it hangs securely.
To assist in alignment, dimples have been placed
on the side of the unit to mark the lower edge of the
flange. In the picture to the left, the two x symbols
show the location of the dimples.
WARNING: Shock Hazard
When the inverter is used with other metal chassis, make sure that all chassis are grounded
appropriately. (See the grounding instructions on page 24.) Grounding other chassis may
involve metal-to-metal contact or separate ground wires.
…continued from the previous page…
/